ubuntu打开telnet服务具体步骤
Posted
tags:
篇首语:本文由小常识网(cha138.com)小编为大家整理,主要介绍了ubuntu打开telnet服务具体步骤相关的知识,希望对你有一定的参考价值。
ubuntu打开telnet服务。
在这一步-----输入sudo vi /etc/xinetd.conf并加入内容:
加入内容后该如何返回上一级??
2. 安装成功后,系统也会有相应提示,
sudo vi /etc/inetd.conf并加入以下一行
telnet stream tcp nowait telnetd /usr/sbin/tcpd /usr/sbin/in.telnetd
3. sudo vi /etc/xinetd.conf并加入以下内容:
# Simple configuration file for xinetd
#
# Some defaults, and include /etc/xinetd.d/
defaults
# Please note that you need a log_type line to be able to use
log_on_success
# and log_on_failure. The default is the following :
# log_type = SYSLOG daemon info
instances = 60
log_type = SYSLOG authpriv
log_on_success = HOST PID
log_on_failure = HOST
cps = 25 30
includedir /etc/xinetd.d
4. sudo vi /etc/xinetd.d/telnet并加入以下内容:
# default: on
# description: The telnet server serves telnet sessions; it uses \\
# unencrypted username/password pairs for authentication.
service telnet
disable = no
flags = REUSE
socket_type = stream
wait = no
user = root
server = /usr/sbin/in.telnetd
log_on_failure += USERID
5. 重启机器或重启网络服务sudo /etc/init.d/xinetd restart
6. 使用TELNET客户端远程登录即可进行非root用户访问。
7.使用root登录: mv /etc/securetty /etc/securetty.bak 这样root可以登录
了。也可这样:
修改/etc/pam.d/login这个文件。只需将下面一行注释掉即可。
#auth required lib/security/pam_securetty.so
8. 详细配制/etc/xinetd.d/telnet
service telnet
disable =no
bind =192.168.1.2
only_from=192.168.1.0/24
#上面这两行说明仅提供内部网段!
Instance =UNLIMITED
Nice =0
Flags =REUSE
socket_type=stream
wait =no
user =root
#server =/usr/sbin/telnetd
server =/usr/sbin/in.telnetd
server_args =-a none
log_on_failure +=USERID
service telnet
disable =no
bind =140.116.142.196
only_from=140.116.0.0/16
no_access=140.116.32.10,26
#上面三行设置外部较为严格的限制
instance =10
umask =022
nice =10
flags =REUSE
socket_type=stream
wait =no
user =root
#server =/usr/sbin/telnetd
server =/usr/sbin/in.telnetd
log_on_failure +=USERID
9.加设防火墙iptables:
如果想要针对192.168.0.0/24这个网段及61.xxx.xxx.xxx这个IP进行telnet开放,
可以增加下面几行规则:
/sbin/iptables -A INPUT -p tcp -i eth0 -s 192.168.0.0/24 --dport 23 -j
ACCEPT
/sbin/iptables -A INPUT -p tcp -i eth0 -s 61.xxx.xxx.xxx --dport 23 -j
ACCEPT
/sbin/iptables -A INPUT -p tcp -i eth0 --dport 23 -j DROP
10.加设防火墙/etc/hosts.allow(deny)机制:
上面开放了192.168.0.0/24这个网段,但是如果您只想让其中的
192.168.0.1~192.168.0.5进入,可以设置如下 :
vi /etc/hosts.allow
in.telnetd:192.168.0.1,192.168.0.2,192.168.0.3,192.168.0.4,192.168.0.5:allow
*原文地址*
http://forum.ubuntu.org.cn/viewtopic.php?t=85766&sid=4e2c89918a6a4cc0bc7ab9a2c7c0418b
site : http://blog.chinaunix.net/u1/39518/showart_415036.html
*UBUNTU开启TELNET服务*
1. sudo apt-get install xinetd telnetd
2. 安装成功后,系统也会有相应提示(好象710才有,610就没看到),
sudo vi /etc/inetd.conf并加入以下一行
telnet stream tcp nowait telnetd /usr/sbin/tcpd /usr/sbin/in.telnetd
3. sudo vi /etc/xinetd.conf并加入以下内容:
# Simple configuration file for xinetd
#
# Some defaults, and include /etc/xinetd.d/
defaults
# Please note that you need a log_type line to be able to use
log_on_success
# and log_on_failure. The default is the following :
# log_type = SYSLOG daemon info
instances = 60
log_type = SYSLOG authpriv
log_on_success = HOST PID
log_on_failure = HOST
cps = 25 30
includedir /etc/xinetd.d
4. sudo vi /etc/xinetd.d/telnet并加入以下内容:
# default: on
# description: The telnet server serves telnet sessions; it uses \\
# unencrypted username/password pairs for authentication.
service telnet
disable = no
flags = REUSE
socket_type = stream
wait = no
user = root
server = /usr/sbin/in.telnetd
log_on_failure += USERID
5. 重启机器或重启网络服务sudo /etc/init.d/xinetd restart
6. 使用TELNET客户端远程登录;ifconfig -a显示本机地址;追问
主要是第三步3. sudo vi /etc/xinetd.conf并加入以下内容:
加入内容后不知道如何返回上一级。。。。
不是这个 ,到了下一级输入CD那些无效 ESC也无法退出CTRI+c也不行。
telnet--windows上telnet用法 测试端口号
如何在Windows系统上利用Telnet协议连接Linux服务器
Telnet协议是Internet远程登录服务的标准协议,它为用户提供了在本地计算机上完成远程主机工作的能力。很多终端使用者都习惯在计算机上利用Telnet会话来远程控制服务器。这里小编就分两步为大家演示如何在Windows系统上利用Telnet协议连接Linux服务器。
步骤一:在Windows系统上打开Telnet功能;
步骤二:在Linux系统上启用Telnet服务。

步骤一:Windows终端开启Telnet功能
1/由于在Windows Vista之后的版本默认并没有提供Telnet功能。如果需要使用Telnet就必须打开此项功能。以Windows 7为例,首先打开控制面板。

2/然后在控制面板中打开“程序和功能”。

3/再在左上角点击“打开或关闭Windows功能”。

4/在“打开或关闭Windows功能”对话框中勾选“Telnet客户端”,点击确定,系统会自动安装。到此Windows终端的工作已经完成。

步骤二:Linux服务器开启Telnet服务
1、许多Linux系统在默认情况下是不安装Telnet服务的,如果需要使用就必须安装此项服务。安装的方法有很多,小编在这里只介绍yum安装Telnet服务,它的优点是能够自动检查安装包的依赖文件不用人为干预,当然前提是系统必须联网。在提示符下输入“yum install -y telnet-server”命令安装Telnet服务。最后出现Complete,代表安装完成。

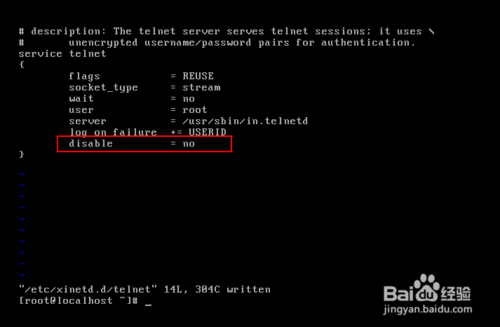
2、使用命令“vi /etc/xinetd.d/telnet”编辑Telnet的配置文件,将disable的值改成no。

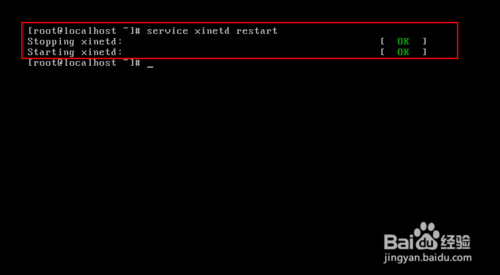
3、重启启动xinetd服务,使得telnet配置生效。

4、在Linux服务器上打开Telnet协议的23端口。使用命令“vi /etc/sysconfig/iptables”添加红框内的代码,保存。

5、重新启动iptables,使得防火墙策略生效。

6、在Windows上,用“telnet IP地址”命令,再输入用户名和密码,就可以完成Linux服务器的远程登录。


CentOS下telnet允许root用户登录
默认情况下,linux不允许root用户以telnet方式登录linux主机,若要允许root用户登录,可采取以下3种方法之一:
1、修改login文件
RedHat中对于远程登录的限制体现在/etc/pam.d/login 文件中,如果把限制的内容注销掉,那么限制将不起作用。
#%PAM-1.0
auth [user_unknown=ignore success=ok ignore=ignore default=bad] pam_securetty.so
auth include system-auth
#account required pam_nologin.so
account include system-auth
password include system-auth
# pam_selinux.so close should be the first session rule
session required pam_selinux.so close
session include system-auth
session required pam_loginuid.so
session optional pam_console.so
# pam_selinux.so open should only be followed by sessions to be executed in the user context
session required pam_selinux.so open
session optional pam_keyinit.so force revoke
~
2、移除securetty文件
验证规则设置在/etc/security文件中,该文件定义root用户只能在tty1-tty6的终端上记录,删除该文件或者将其改名即可避开验证规则实现root用户远程登录。
[root@nodel ~]# mv /etc/securetty /etc/securetty.bak
3、修改securetty文件
[root@nodel ~]# vim /etc/securetty
console
vc/1
....
....
vc/10
tty1
....
tty11
pts/1
pts/2
....
....
....
pts/11
一般不建议直接用root用户远程通过telnet登陆系统,因为telnet在数据传输过程采用明文方式,如果,数据包被人截获,将会很容易获取root用户的登陆口令;还是建议以普通用户通过telnet远程登陆,然后su到root,这样相对比较安全。如果非要用root用户远程连接,建议采用SSH.
以上是关于ubuntu打开telnet服务具体步骤的主要内容,如果未能解决你的问题,请参考以下文章