iOS开源加密相册Agony的实现
Posted 我们都曾拥有最美的时光
tags:
篇首语:本文由小常识网(cha138.com)小编为大家整理,主要介绍了iOS开源加密相册Agony的实现相关的知识,希望对你有一定的参考价值。
简介
虽然目前市面上有一些不错的加密相册App,但不是内置广告,就是对上传的张数有所限制。本文介绍了一个加密相册的制作过程,该加密相册将包括多密码(输入不同的密码即可访问不同的空间,可掩人耳目)、WiFi传图、照片文件加密等功能。目前项目和文章会同时前进,项目的源代码可以在github上下载。
概述
上一篇文章主要介绍了相册管理界面的设计与实现。本文主要介绍图片浏览器设计的技术细节。
图片浏览器设计
说明
之前尝试了使用MWPhotoBrowser来处理多图浏览与查看原图,但有些地方不尽人意,遂自己做了一个图片浏览器,为了以后将其做成框架,没有将其耦合到工程里,而是作为一个框架跟随工程一起开发的,目前已经实现了原图延迟加载、内存优化、批量删除与保存等功能,该框架使用block来回调数据源方法,使用十分方便,目前仍在开发中,源码在GitHub提供的工程目录下Libs/SGPhtoBrowser可以找到。
本文主要介绍其实现细节,限于篇幅只能介绍一部分,其余部分将在接下来的文章中一一介绍。
交互界面设计及说明
以下几幅图片展示了相册的缩略图展示、编辑与原图查看功能。
缩略图查看

编辑模式

查看原图

在原图查看页面单击可以隐藏导航栏和工具栏,双击切换原图与适应屏幕的缩放状态,同时支持捏和手势的缩放。为了优化内存,原图查看时当前图片以及左右两侧的图片都加载了原图,较远处的图片加载的是缩略图,当左右滑动到缩略图时,会去加载当前以及相邻的原图,并且将远处的所有原图替换为缩略图。
图片浏览器的总体设计
数据源模型设计
图片浏览器的缩略图浏览界面为collectionView,collectionView需要的数据为缩略图,而原图浏览时需要的是原图,因此图片浏览器的所需要的数据模型应该包含原图地址与缩略图地址,除此之外,为了标记照片的选中状态,模型中还应该有一个字段用于记录是否选中。综上所述,模型设计如下。
@interface SGPhotoModel : NSObject

@property (nonatomic, copy) NSURL *photoURL;
@property (nonatomic, copy) NSURL *thumbURL;
@property (nonatomic, assign) BOOL isSelected;

@end
数据源回调设计
常规的数据源回调都是通过代理方式,考虑到代理方式写起来比较麻烦,代码也比较分散,这里使用了block回调。数据源主要包含了三个方法,前两个分别是去请求数据模型的数量和获取特定位置的数据模型,第三个请求重新加载数据,之所以存在第三个回调,是因为照片浏览器可能会删除一些图片,但他们没有权限去操作模型数组(只能获取特定位置的模型),因此需要请求数据源去刷新模型数据。具体设计如下。
typedef SGPhotoModel * (^SGPhotoBrowserDataSourcePhotoBlock)(NSInteger index);
typedef NSInteger (^SGPhotoBrowserDataSourceNumberBlock)(void);
typedef void(^SGPhotoBrowserReloadRequestBlock)(void);
@interface SGPhotoBrowser : UIViewController

@property (nonatomic, copy, readonly) SGPhotoBrowserDataSourceNumberBlock numberOfPhotosHandler;
@property (nonatomic, copy, readonly) SGPhotoBrowserDataSourcePhotoBlock photoAtIndexHandler;
@property (nonatomic, copy, readonly) SGPhotoBrowserReloadRequestBlock reloadHandler;

- (void)setNumberOfPhotosHandlerBlock:(SGPhotoBrowserDataSourceNumberBlock)handler;
- (void)setphotoAtIndexHandlerBlock:(SGPhotoBrowserDataSourcePhotoBlock)handler;
- (void)setReloadHandlerBlock:(SGPhotoBrowserReloadRequestBlock)handler;

@end
之所以设置成为readonly并手动提供setter,是因为系统提供的setter无法生成block的智能补全。
对外接口设计
为了方便使用浏览器,只需要继承SGPhotoBrowser并实现数据源的block并提供数据源需要的数据模型即可,因此不需要多少额外的接口,但为了方便用户自定义,提供了一个property来设置每行展示的照片数,并且提供了reloadData方法,当模型数据变化时,要求照片浏览器重新加载模型刷新数据,综上所述,照片浏览器的完整设计如下。
typedef SGPhotoModel * (^SGPhotoBrowserDataSourcePhotoBlock)(NSInteger index);
typedef NSInteger (^SGPhotoBrowserDataSourceNumberBlock)(void);
typedef void(^SGPhotoBrowserReloadRequestBlock)(void);

@interface SGPhotoBrowser : UIViewController

@property (nonatomic, assign) NSInteger numberOfPhotosPerRow;
@property (nonatomic, copy, readonly) SGPhotoBrowserDataSourceNumberBlock numberOfPhotosHandler;
@property (nonatomic, copy, readonly) SGPhotoBrowserDataSourcePhotoBlock photoAtIndexHandler;
@property (nonatomic, copy, readonly) SGPhotoBrowserReloadRequestBlock reloadHandler;

- (void)setNumberOfPhotosHandlerBlock:(SGPhotoBrowserDataSourceNumberBlock)handler;
- (void)setphotoAtIndexHandlerBlock:(SGPhotoBrowserDataSourcePhotoBlock)handler;
- (void)setReloadHandlerBlock:(SGPhotoBrowserReloadRequestBlock)handler;
- (void)reloadData;

@end
缩略图浏览实现
数据源处理
在图片浏览器中有一个collectionView用于展示所有的图片,图片浏览器本身作为其数据源和代理,collectionView对数据源的请求通过浏览器向父类(由用户继承浏览器类实现)去请求相应的block,其中numberOfItemsInSection:方法对应numberOfPhotosHandler,cellForItemAtIndexPath:方法对应photoAtIndexHandler,具体的实现如下。
- (NSInteger)collectionView:(UICollectionView *)collectionView numberOfItemsInSection:(NSInteger)section
    NSAssert(self.numberOfPhotosHandler != nil, @"you must implement 'numberOfPhotosHandler' block to tell the browser how many photos are here");
    return self.numberOfPhotosHandler();


- (__kindof UICollectionViewCell *)collectionView:(UICollectionView *)collectionView cellForItemAtIndexPath:(NSIndexPath *)indexPath
    NSAssert(self.photoAtIndexHandler != nil, @"you must implement 'photoAtIndexHandler' block to provide photos for the browser.");
    SGPhotoModel *model = self.photoAtIndexHandler(indexPath.row);
    SGPhotoCell *cell = [SGPhotoCell cellWithCollectionView:collectionView forIndexPaht:indexPath];
    cell.model = model;
    return cell;
这里通过断言来防止用户没有实现相应的block,但这又引入了一个问题,可能在用户设置block之前对numberOfItemsInSection:进行了回调,这就会报错,为了防止这个问题,collectionView的数据源和代理在block被实现之后才会被启用,具体的实现为在这两个block的setter中检查是否两个block都已经实现,只有都实现了,才对collectionView的代理和数据源赋值,具体实现如下。
- (void)checkImplementation
    if (self.photoAtIndexHandler && self.numberOfPhotosHandler)
        self.collectionView.delegate = self;
        self.collectionView.dataSource = self;
        [self.collectionView reloadData];


- (void)setphotoAtIndexHandlerBlock:(SGPhotoBrowserDataSourcePhotoBlock)handler
    _photoAtIndexHandler = handler;
    [self checkImplementation];


- (void)setNumberOfPhotosHandlerBlock:(SGPhotoBrowserDataSourceNumberBlock)handler
    _numberOfPhotosHandler = handler;
    [self checkImplementation];
排布尺寸处理
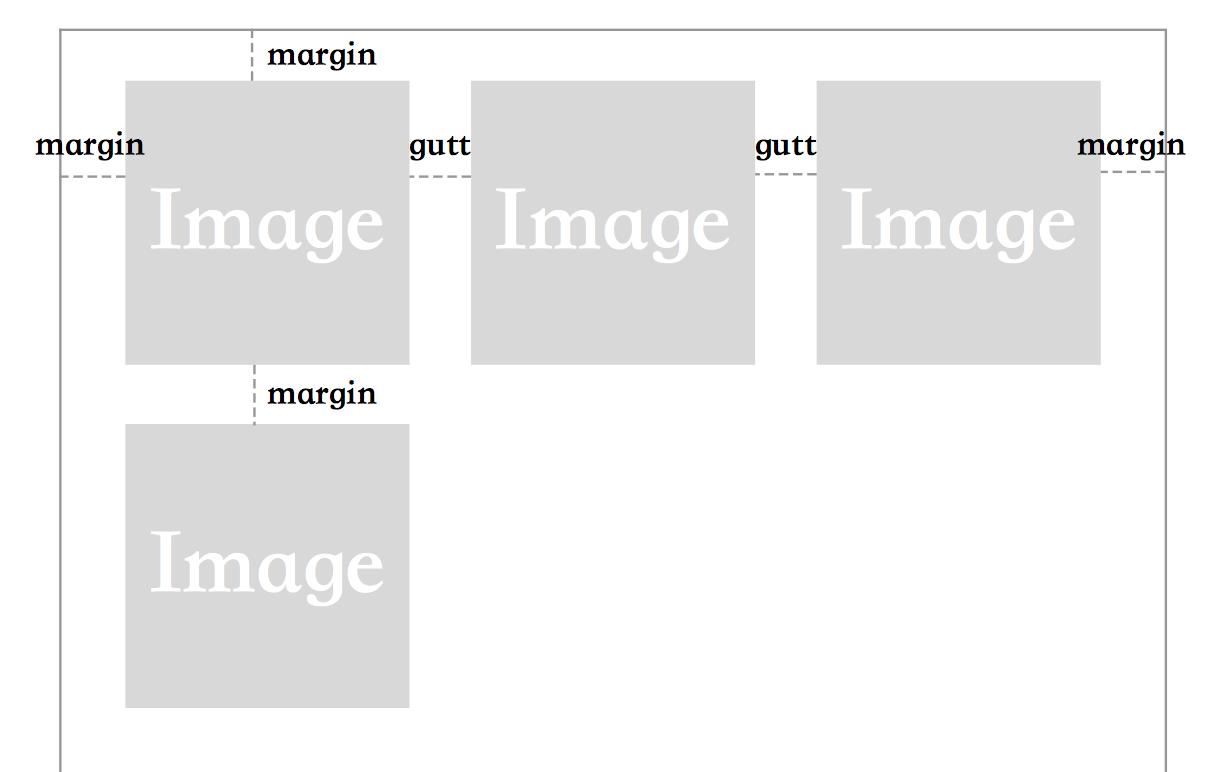
为了保证照片以极小的间隔紧密排布,需要根据屏幕尺寸严格计算每个Cell的尺寸并通过collectionView的代理方法提供,尺寸的计算说明图如下。

根据上图,设屏幕宽度为width,每行的照片数量为n,则每个Cell的宽高=(width - (n - 1) * gutt - 2 * margin) / n。
具体的尺寸计算的实现如下。
// 初始化
- (void)initParams
    _margin = 0;
    _gutter = 1;
    self.numberOfPhotosPerRow = 3;

// 边距
- (UIEdgeInsets)collectionView:(UICollectionView *)collectionView layout:(UICollectionViewLayout*)collectionViewLayout insetForSectionAtIndex:(NSInteger)section
    return UIEdgeInsetsMake(_margin, _margin, _margin, _margin);

// Cell尺寸
- (CGSize)collectionView:(UICollectionView *)collectionView layout:(UICollectionViewLayout*)collectionViewLayout sizeForItemAtIndexPath:(NSIndexPath *)indexPath
    CGFloat value = (self.view.bounds.size.width - (self.numberOfPhotosPerRow - 1) * _gutter - 2 * _margin) / self.numberOfPhotosPerRow;
    return CGSizeMake(value, value);

// Cell上下间距(行间距)
- (CGFloat)collectionView:(UICollectionView *)collectionView layout:(UICollectionViewLayout*)collectionViewLayout minimumInteritemSpacingForSectionAtIndex:(NSInteger)section
    return _gutter;

// Cell左右间距(列间距)
- (CGFloat)collectionView:(UICollectionView *)collectionView layout:(UICollectionViewLayout*)collectionViewLayout minimumLineSpacingForSectionAtIndex:(NSInteger)section
    return _gutter;
Cell设计
每个Cell都通过数据模型SGPhotoModel来显示数据,Cell上铺满了一个ImageView来显示缩略图,除此之外,为了处理选中,在ImageView上加一个遮盖层,默认隐藏,通过设置sg_select(为了和系统的select区分)这一属性来处理隐藏和现实。遮盖层包含了一个半透明背景和一个选中的效果图,它同样被定义在Cell的类文件中,具体实现如下。
objective-c
@interface SGPhotoCell : UICollectionViewCell
@property (nonatomic, strong) SGPhotoModel *model;
// 处理选中
@property (nonatomic, assign) BOOL sg_select;
// 处理重用和快速创建Cell
+ (instancetype)cellWithCollectionView:(UICollectionView )collectionView forIndexPaht:(NSIndexPath )indexPath;
@end
```objective-c
// 遮盖层视图的定义
@interface SGPhotoCellMaskView : UIView
// 遮盖层图片
@property (nonatomic, weak) UIImageView *selectImageView;

@end

@implementation SGPhotoCellMaskView

- (instancetype)initWithFrame:(CGRect)frame
    if (self = [super initWithFrame:frame])
        self.backgroundColor = [[UIColor grayColor] colorWithAlphaComponent:0.6f];
        self.hidden = YES;
        UIImage *selectImage = [UIImage imageNamed:@"SelectButton"];
        UIImageView *selectImageView = [[UIImageView alloc] initWithImage:selectImage];
        self.selectImageView = selectImageView;
        [self addSubview:selectImageView];

    return self;

// 遮盖层图片在右下角显示
- (void)layoutSubviews
    [super layoutSubviews];
    CGFloat padding = 8;
    CGFloat selectWH = 28;
    CGFloat selectX = self.bounds.size.width - padding - selectWH;
    CGFloat selectY = self.bounds.size.height - padding - selectWH;
    self.selectImageView.frame = CGRectMake(selectX, selectY, selectWH, selectWH);


@end
// Cell的实现
@interface SGPhotoCell ()
// 包含缩略图显示的ImageView与选中的遮盖层
@property (nonatomic, weak) UIImageView *imageView;
@property (nonatomic, weak) SGPhotoCellMaskView *selectMaskView;

@end

@implementation SGPhotoCell

+ (instancetype)cellWithCollectionView:(UICollectionView *)collectionView forIndexPaht:(NSIndexPath *)indexPath
    static NSString *ID = @"SGPhotoCell";
    [collectionView registerClass:[SGPhotoCell class] forCellWithReuseIdentifier:ID];
    SGPhotoCell *cell = [collectionView dequeueReusableCellWithReuseIdentifier:ID forIndexPath:indexPath];
    return cell;


- (instancetype)initWithFrame:(CGRect)frame
    if (self = [super initWithFrame:frame])
        UIImageView *imageView = [UIImageView new];
        // 使得缩略图显示适当的部分
        imageView.contentMode = UIViewContentModeScaleAspectFill;
        imageView.clipsToBounds = YES;
        self.imageView = imageView;
        [self.contentView addSubview:imageView];
        // 添加遮盖层
        SGPhotoCellMaskView *selectMaskView = [[SGPhotoCellMaskView alloc] initWithFrame:self.contentView.bounds];
        [self.contentView addSubview:selectMaskView];
        self.selectMaskView = selectMaskView;

    return self;


- (void)setModel:(SGPhotoModel *)model
    _model = model;
    NSURL *thumbURL = model.thumbURL;
    if ([thumbURL isFileURL])
        self.imageView.image = [UIImage imageWithContentsOfFile:thumbURL.path];
     else
        [self.imageView sd_setImageWithURL:thumbURL];

    // 设置模型时根据模型设置选中状态
    self.sg_select = model.isSelected;

// 通过选中属性的setter来处理遮盖层的显示与隐藏
- (void)setSg_select:(BOOL)sg_select
    _sg_select = sg_select;
    self.selectMaskView.hidden = !_sg_select;


- (void)layoutSubviews
    [super layoutSubviews];
    self.imageView.frame = self.contentView.bounds;


@end
关于选中的具体逻辑将在下一篇文章介绍。
照片浏览器的使用
上文主要介绍了照片浏览器的缩略图浏览界面的具体设计,这里将介绍如何使用该浏览器。
1.继承照片浏览器类SGPhotoBrowser。
@interface SGPhotoBrowserViewController : SGPhotoBrowser
// 用于存储当前用户相册文件系统的根目录,在前面的文章中有介绍
@property (nonatomic, copy) NSString *rootPath;

@end
2.使用一个数组来保存所有的数据模型,数据模型通过沙盒中特定用户的文件系统去加载。
@interface SGPhotoBrowserViewController ()

@property (nonatomic, strong) NSArray<SGPhotoModel *> *photoModels;

@end
3.实现数据源的三个block。
- (void)commonInit
    // 设置每行显示的照片数
    self.numberOfPhotosPerRow = 4;
    // 根据根目录去获取文件夹名称(用/分割路径字符串,并取最后一个部分),作为控制器标题
    self.title = [SGFileUtil getFileNameFromPath:self.rootPath];
    // 用于添加图片的按钮,后续的文章会介绍
    self.navigationItem.rightBarButtonItem = [[UIBarButtonItem alloc] initWithBarButtonSystemItem:UIBarButtonSystemItemAdd target:self action:@selector(addClick)];
    WS(); // 创建weakSelf的宏,防止循环引用
    // 实现图片浏览器的数据源block
    [self setNumberOfPhotosHandlerBlock:^NSInteger
        return weakSelf.photoModels.count;
    ];
    [self setphotoAtIndexHandlerBlock:^SGPhotoModel *(NSInteger index)
        return weakSelf.photoModels[index];
    ];
    [self setReloadHandlerBlock:^
        [weakSelf loadFiles];
    ];
4.实现加载数据模型的方法
- (void)loadFiles
    NSFileManager *mgr = [NSFileManager defaultManager];
    // 在每个相册文件夹内,有原图文件夹Photo和缩略图文件夹Thumb,分别获取路径
    NSString *photoPath = [SGFileUtil photoPathForRootPath:self.rootPath];
    NSString *thumbPath = [SGFileUtil thumbPathForRootPath:self.rootPath];
    NSMutableArray *photoModels = @[].mutableCopy;
    // 扫描Photo文件夹,获取所有原图文件的名称
    NSArray *fileNames = [mgr contentsOfDirectoryAtPath:photoPath error:nil];
    for (NSUInteger i = 0; i < fileNames.count; i++)
        NSString *fileName = fileNames[i];
        // 原图与缩略图同名,因此可以同时拼接出原图和缩略图路径
        // 使用URL是为了框架后期能够兼容网络图片
        NSURL *photoURL = [NSURL fileURLWithPath:[photoPath stringByAppendingPathComponent:fileName]];
        NSURL *thumbURL = [NSURL fileURLWithPath:[thumbPath stringByAppendingPathComponent:fileName]];
        // 每个模型都包含了一张图片的原图与缩略图路径
        SGPhotoModel *model = [SGPhotoModel new];
        model.photoURL = photoURL;
        model.thumbURL = thumbURL;
        [photoModels addObject:model];

    self.photoModels = photoModels;
    // 调用父类的reloadData方法要求collectionView重新加载数据
    [self reloadData];
总结
本文主要介绍了图片浏览器的缩略图展示部分的设计,项目的下载地址可以在文首找到。下一篇文章将会介绍图片的选取批处理方法以及查看原图的一些细节,欢迎关注项目后续。
以上是关于iOS开源加密相册Agony的实现的主要内容,如果未能解决你的问题,请参考以下文章