认识Spring核心容器IoC/DI
Posted 你这家伙
tags:
篇首语:本文由小常识网(cha138.com)小编为大家整理,主要介绍了认识Spring核心容器IoC/DI相关的知识,希望对你有一定的参考价值。
对于 Java 编程来说,使用 Spring 能完成的更加快速,更容易并更安全。Spring 专注于速度,便捷与开发效率,也正是如此,让Spring成为了全世界最流行的 Java 框架。从配置到安全,web应用到大数据,不管你的应用架构需要啥玩意,Spring都有合适的开发框架来帮你搭建项目。Spring是基于模块化设计的,所以你可以从最小集开始,只使用你需要的。我们主要学习其中 Spring Framework 和Spring Boot
1. Spring Framework背景介绍
Spring专注于为 Java 企业应用提供一站式的开发框架,目的是让 Java 企业开发更加便捷,安全与高效。 Spring Framework 属于其中最基础,最核心的部分,Spring下的其他大部分框架都依赖 Spring Framework 。

对于整个Spring Framework来说,是学习、使用Spring生态项目(如Spring Boot、Spring Cloud等)的基石。也就是说,我们要引入其他Spring项目作为我们的依赖框架时,也会使用Spring Framework。以上子模块包括的内容我们只学习其中最重要的三个部分:Core Container、AOP、WebMVC
2. Core Container(核心容器)
以前我们操作对象都需要手动的 new 对象,由对象的作用域决定对象的生命周期。使用Spring后,由框架提供了统一的容器来实例化、管理这些对象,并自动组织对象与对象间的关系。这种容器称为IoC容器,有些地方也叫Spring Bean容器、Spring容器。
2.1 IoC / DI
什么是IoC?
-
IoC(inversion of Control),既“控制反转”,是面向对象的一种设计原则,可以用来减低计算机代码的耦合度
-
系统中通过引入实现了IoC模式的IoC容器,即可由IoC容器来管理对象的生命周期、依赖关系等,从而使得应用程序的配置和依赖性规范与实际的应用程序代码分离
-
以前手动new对象,并设置对象中属性的方式,控制权是掌握在应用程序自身。现在则全部转移到了容器,由容器来统一进行管理对象。因为控制权发生了扭转,所以叫“控制反转”。
什么是DI?
DI(Dependency Injection)既“依赖注入”,是实现IoC的方法之一,所谓依赖注入,就是有IOC容器在运行期间,动态的将某种依赖关系注入到对象当中
注意:依赖注入(DI)和控制反转(IoC)是从不同的角度的描述的同一件事情,就是指通过引入 IoC 容
器,利用依赖关系注入的方式,实现对象之间的解耦。
3. Spring容器使用流程
Spring容器的API有 BeanFactory 和 ApplicationContext 两大类,他们都是顶级接口。其中ApplicationContext 是 BeanFactory 的子接口。
- 首选创建衣Maven项目,名称为spring,然后配置pom.xml文件
<?xml version="1.0" encoding="UTF-8"?>
<project xmlns="http://maven.apache.org/POM/4.0.0"
         xmlns:xsi="http://www.w3.org/2001/XMLSchema-instance"
         xsi:schemaLocation="http://maven.apache.org/POM/4.0.0 http://maven.apache.org/xsd/maven-4.0.0.xsd">
    <modelVersion>4.0.0</modelVersion>

    <groupId>org.example</groupId>
    <artifactId>spring-study</artifactId>
    <version>1.0-SNAPSHOT</version>

    <properties>
        <java.version>1.8</java.version>
        <maven.compiler.source>$java.version</maven.compiler.source>
        <maven.compiler.target>$java.version</maven.compiler.target>
        <project.build.sourceEncoding>UTF-8</project.build.sourceEncoding>
        <spring-framework.version>5.2.10.RELEASE</spring-framework.version>
    </properties>

    <dependencies>
        <dependency>
            <groupId>org.springframework</groupId>
            <artifactId>spring-beans</artifactId>
            <version>$spring-framework.version</version>
        </dependency>
        <dependency>
            <groupId>org.springframework</groupId>
            <artifactId>spring-context</artifactId>
            <version>$spring-framework.version</version>
        </dependency>

        <dependency>
            <groupId>org.projectlombok</groupId>
            <artifactId>lombok</artifactId>
            <version>1.18.16</version>
        </dependency>
    </dependencies>

    <build>
        <plugins>
            <!-- 明确指定一些插件的版本,以免受到 maven 版本的影响 -->
            <plugin>
                <artifactId>maven-clean-plugin</artifactId>
                <version>3.1.0</version>
            </plugin>
            <plugin>
                <artifactId>maven-compiler-plugin</artifactId>
                <version>3.8.1</version>
            </plugin>
            <plugin>
                <artifactId>maven-deploy-plugin</artifactId>
                <version>2.8.2</version>
            </plugin>
            <plugin>
                <artifactId>maven-install-plugin</artifactId>
                <version>2.5.2</version>
            </plugin>
            <plugin>
                <artifactId>maven-jar-plugin</artifactId>
                <version>3.2.0</version>
            </plugin>
            <plugin>
                <artifactId>maven-resources-plugin</artifactId>
                <version>3.1.0</version>
            </plugin>
            <plugin>
                <artifactId>maven-site-plugin</artifactId>
                <version>3.3</version>
            </plugin>
            <plugin>
                <artifactId>maven-surefire-plugin</artifactId>
                <version>2.22.2</version>
            </plugin>

        </plugins>
    </build>
</project>
- 准备Spring配置文件
在src/main/resources文件下,创建一个beans.xml文件(如果创建的resources文件,那么就自己创建一个,然后再配置xml文件)
<?xml version="1.0" encoding="UTF-8"?>
<beans xmlns="http://www.springframework.org/schema/beans"
       xmlns:xsi="http://www.w3.org/2001/XMLSchema-instance"
       xmlns:context="http://www.springframework.org/schema/context"
       xsi:schemaLocation="http://www.springframework.org/schema/beans
        https://www.springframework.org/schema/beans/spring-beans.xsd
        http://www.springframework.org/schema/context
        https://www.springframework.org/schema/context/spring-context.xsd">

    <context:component-scan base-package="org.example"/>

</beans>
- 准备启动类入口
Spring提供了通过xml配置文件,来定义Bean,但是定义Bean的方式需要通过包扫描的方式注册到容器中
既在java源代码下创建一个org包,然后创建一个example包,在example下创建一个名为APP的Class类
package org.example;

import org.springframework.context.ApplicationContext;
import org.springframework.context.support.ClassPathXmlApplicationContext;

public class App

    public static void main(String[] args)
        //根据Spring配置文件路径创建容器:应用上下文对象
        ApplicationContext context = new ClassPathXmlApplicationContext("beans.xml");
        //关闭容器
        ((ClassPathXmlApplicationContext) context).close();
4. 初始化/注册bean
4.1 方式一:类注解
在类上使用注解 @Controller , @Service , @Repository , @Component 。需要保证该类会被Spring
扫描到,这种定义方式默认会注册一个名称为类名首字母小写的Bean对象到容器中。
如:我们在org.example包下创建的一个包为dao里面在写一个类名为LoginRepository的类,然后再类名前面加上注解@Repository,此时就会在容器里面注册一个名为 loginRepository 的对象到容器中(也即是首字母小写)
package org.example.dao;
import org.example.model.User;
import org.springframework.stereotype.Repository;
@Repository
public class LoginRepository
定义好了Bean对象,注册到容器中以后,就可以获取Bean对象了,在入口类 org.example.App 中,可以通过 ApplicationContext 对象获取Bean。有两种方式获取:
- 通过类型获取:这种获取参数要求该类型的Bean只能有一个
- 通过名称获取:同样一个类型的Bean可以有多个
如:
import org.example.dao.LoginRepository;
import org.springframework.context.ApplicationContext;
import org.springframework.context.support.ClassPathXmlApplicationContext;

public class App

    public static void main(String[] args)
        //根据Spring配置文件路径创建容器:应用上下文对象
        ApplicationContext context = new ClassPathXmlApplicationContext("beans.xml");
        //通过名称获取
        LoginRepository loginRepository = (LoginRepository) context.getBean("loginRepository");
        //通过类型获取
        LoginRepository loginRepository1 = context.getBean(LoginRepository.class);
        //关闭容器
        ((ClassPathXmlApplicationContext) context).close();
方式二:@Bean
当前类被 Spring 扫描到时,可以在方法上使用 @Bean 注解,通过方法返回类型,也可以定义、注册
Bean对象,默认使用方法名作为Bean的名称。
方式三:@Configuration
在类被Spring扫描到时,使用 @Configuration 注解,可以注册一个配置类到容器中。配置类一般用来自定义配置某些资源
如:
package org.example.config;
import org.springframework.context.annotation.Configuration;
@Configuration
public class AppConfig
5. 依赖注入
5.1 属性注入
当前类被 Spring 扫描到时,可以在属性上使用 @Autowired 注解,会将容器中的Bean对象装配进来。@Service
public class LoginService
@Autowired
private LoginRepository loginRepository;
5.2 构造方法的注入
当前类被 Spring 扫描到时,可以在构造方法上使用 @Autowired 注解,作用也是和setter方法类似,
会将容器中的Bean对象注入方法参数。
@Service
public class LoginServiceByConstructor
    private LoginRepository loginRepository;
    @Autowired
    public LoginServiceByConstructor(LoginRepository loginRepository)
        System.out.printf("LoginServiceByConstructor: %s%n", loginRepository);
        this.loginRepository = loginRepository;
5.3 注入指定的Bean:@Qualifier
同类型的Bean有多个时,注入该类型Bean需要指定Bean的名称:- 属性名或方法参数名设置为Bean的名称
- 属性名或方法参数设置 @Qualifier(“名称”) 注解,注解内的字符串是Bean对象的名称
如:
    @Autowired
    private LoginService loginService;
    @Autowired
    @Qualifier("user1")
    private User u;
    @Autowired
    private User user1;
6. Bean的作用域
Spring 容器在初始化一个 Bean 的实例时,同时会指定该实例的作用域。Spring有6个作用域,最后四种是基于Spring WebMVC生效
1. singleton
描述:该作用域下的Bean在IoC中只存在一个实例:获取Bean(applicationContext.getBean等方法获取),及装配Bean(即通过@Autowired注入)都是同一个对象。
场景:通常无状态的Bean使用该作用域,无状态表示Bean对象的属性状态不需要更新
备注:Spring默认选择该作用域
2. prototype
描述:每次对该作用域下的Bean的请求都会创建一个新的实例:获取Bean(applicationContext.getBean等方法获取),及装配Bean(即通过@Autowired注入)都是新的对象实例。
场景:通常有状态的Bean使用该作用域
3. request
描述:每次http请求会创建新的Bean实例,类似于prototype
描述:每次http请求会创建新的Bean实例,类似于prototype
场景:一次http的请求和响应的共享Bean
4. session
描述:在一个http session中,定义一个Bean实例
场景:用户回话的共享Bean, 比如:记录一个用户的登陆信息
备注:限定SpringMVC中使用
5. application(了解)
描述:在一个http servlet Context中,定义一个Bean实例
场景:Web应用的上下文信息,比如:记录一个应用的共享信息
备注:限定SpringMVC中使用
6. websocket(了解)
描述:在一个HTTP WebSocket的生命周期中,定义一个Bean实例
场景:WebSocket的每次会话中,保存了一个Map结构的头信息,将用来包裹客户端消息头。第一次初始化后,直到WebSocket结束都是同一个Bean。
备注:限定Spring WebSocket中使用
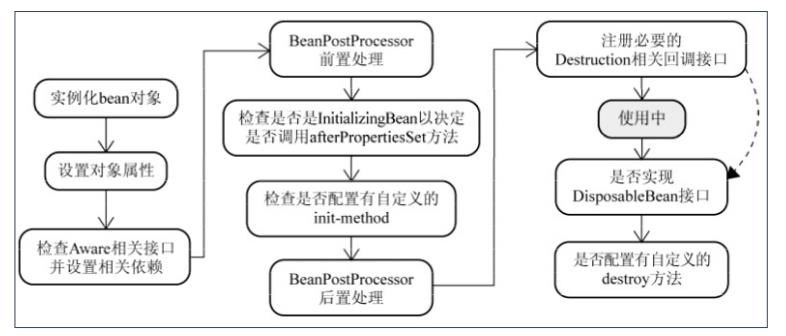
7. Bean的生命周期

Bean的生命周期步骤:
- 实例化Bean:通过反射调用构造方法实例化对象
- 依赖注入:装配Bean的属性
- 实现Aware接口的Bean,执行接口方法:如顺序执行BeanNameAware、BeanFactoryAware、ApplicationContextAware的接口方法。
- Bean对象初始化前:循环调用实现了BeanPostProcessor接口的预初始化方法
- Bean对象初始化:顺序执行@PostConstruct注解方法、InitializingBean接口方法、init-method方法
- Bean对象初始化后:循环调用实现了BeanPostProcessor接口的后初始化方法
- 容器关闭时,执行Bean对象的销毁方法,顺序是:@PreDestroy注解方法、DisposableBean接口
以上是关于认识Spring核心容器IoC/DI的主要内容,如果未能解决你的问题,请参考以下文章