从0到1Flink的成长之路- Flink 原理探析
Posted 熊老二-
tags:
篇首语:本文由小常识网(cha138.com)小编为大家整理,主要介绍了从0到1Flink的成长之路- Flink 原理探析相关的知识,希望对你有一定的参考价值。
Flink 原理探析
Apache Flink 是一个框架和分布式处理引擎,用于在无边界和有边界数据流上进行有状态的
计算。Flink 能在所有常见集群环境中运行,并能以内存速度和任意规模进行计算。
Levels of Abstraction
在Flink中提供不同层次抽象开发批处理Batch和流计算Streaming。
abstraction

Program Model
Program Model
编写Flink 应用程序,主要分为5个步骤,如下所示:
第一步、执行环境(Environment):Obtain an execution environment
第二步、数据源(Source):Load/create the initial data
第三步、数据转换(Transformation):Specify transformations on this data
第四步、数据终端(Sink):Specify where to put the results of your computations
第五步、触发执行(Executtion):Trigger the program execution
其中最为核心时第二步至第五步,从数据源Source加载数据,到依据业务数据转换
Transformation,最后将结果数据输出Sink,如下图所示:

范例:编程Flink流式计算程序,自动数据源生成点击流日志数据,进行窗口Window统计。
package xx.xxxxxx.flink.concepts;
import lombok.AllArgsConstructor;
import lombok.Data;
import lombok.NoArgsConstructor;
import org.apache.commons.lang3.time.FastDateFormat;
import org.apache.flink.api.common.functions.MapFunction;
import org.apache.flink.api.java.functions.KeySelector;
import org.apache.flink.configuration.Configuration;
import org.apache.flink.streaming.api.datastream.DataStreamSource;
import org.apache.flink.streaming.api.datastream.SingleOutputStreamOperator;
import org.apache.flink.streaming.api.environment.StreamExecutionEnvironment;
import org.apache.flink.streaming.api.functions.source.RichParallelSourceFunction;
import org.apache.flink.streaming.api.functions.windowing.WindowFunction;
import org.apache.flink.streaming.api.windowing.assigners.TumblingProcessingTimeWindows;
import org.apache.flink.streaming.api.windowing.time.Time;
import org.apache.flink.streaming.api.windowing.windows.TimeWindow;
import org.apache.flink.util.Collector;
import java.util.Random;
import java.util.concurrent.TimeUnit;
public class StreamWindowDemo
@Data
@NoArgsConstructor
@AllArgsConstructor
static class Event
private String userId ;
private String itemId ;
private Long accessTime ;

public static void main(String[] args) throws Exception
// 1. 执行环境-env:本地执行环境,提供WEB UI界面,端口号8081
StreamExecutionEnvironment env = StreamExecutionEnvironment.createLocalEnvironmentWithWebUI
(
new Configuration()
);
env.setParallelism(2) ;
// 2. 数据源-source:自定义并行数据源
DataStreamSource<String> lines = env.addSource(new RichParallelSourceFunction<String>()
private boolean isRunning = true ;
@Override
public void run(SourceContext<String> ctx) throws Exception
Random random = new Random() ;
while (isRunning)
// 用户访问日志<userId,pageId,accessTime>
String userId = "u_1001" + random.nextInt(5) ;
String pageId = "item_100" + random.nextInt(1000);
Long accessTime = System.currentTimeMillis() - (random.nextInt(4) * 500 ) ;
ctx.collect(userId + "," + pageId + "," + accessTime);
TimeUnit.MILLISECONDS.sleep(500);


@Override
public void cancel()
isRunning = false ;

);
// 3. 数据转换-transformation:每10秒统计最近10秒每个用户访问量(滚动时间窗口)
SingleOutputStreamOperator<Event> events = lines.map(new MapFunction<String, Event>()
@Override
public Event map(String line) throws Exception
String[] split = line.split(",");
return new Event(split[0], split[1], Long.parseLong(split[2]));

);
SingleOutputStreamOperator<String> stats = events
.keyBy(new KeySelector<Event, String>()
@Override
public String getKey(Event event) throws Exception
return event.userId;

)
.window(TumblingProcessingTimeWindows.of(Time.seconds(10)))
.apply(new WindowFunction<Event, String, String, TimeWindow>()
FastDateFormat format = FastDateFormat.getInstance("yyyy-MM-dd HH:mm:ss");
@Override
public void apply(String key, TimeWindow window,
Iterable<Event> input, Collector<String> out) throws Exception
// 窗口时间
String start = format.format(window.getStart()) ;
String end = format.format(window.getEnd()) ;
// 窗口数据聚合
int pv = 0 ;
for(Event event: input) pv += 1 ;
// 输出
out.collect("[" + start + "~" + end + "]: " + key + " -> " + pv);

);
// 4. 数据终端-sink:打印控制台
stats.printToErr();
// 5. 触发执行-execute
env.execute(StreamWindowDemo.class.getSimpleName());
Parallel Dataflows
paraller dataflows
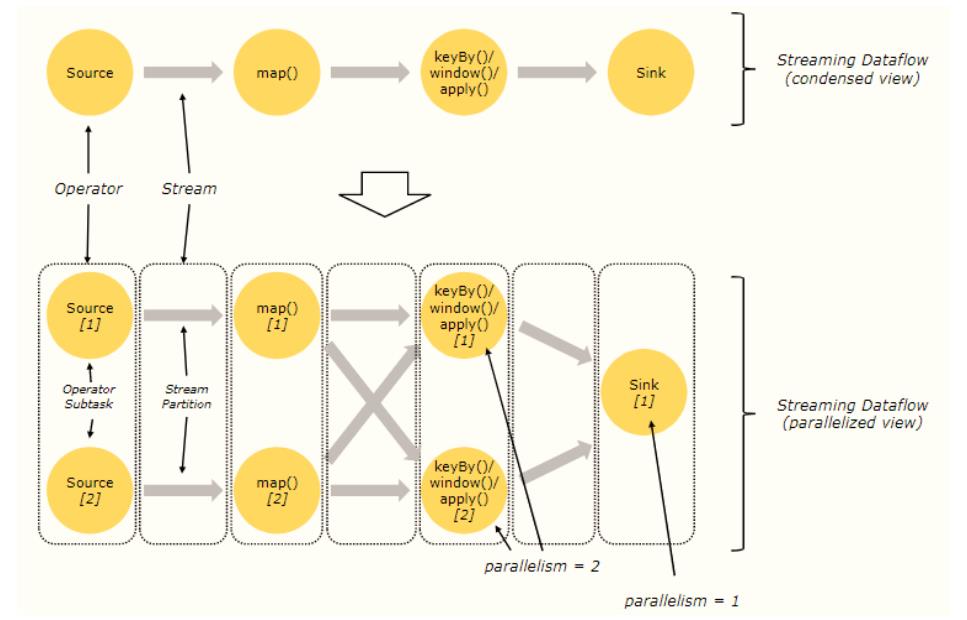
上面代码形成如下数据流图(DataFlow Graph):
Operator:无论是从数据源Source加载数据,还是调用方法转换Transformation处理数据,
到最后数据终端Sink输出,都称为Operator,分为:Source Operator、Transformation
Operator和Sink Operator;
Stream:数据从一个Operator流向另一个Operator;

每个Operator可以设置并行度(Parallelism),假设【Source】、【map()】及
【keyBy()/window()/apply()】三个Operator并行度设置为2,【Sink】Operator并行的设置为1,
形成如下示意图:

由于Operator并行度设置,将Streaming Dataflow图进行详细划分,增加两个概念:
将Stream划分为很多Partition分区,比如上图中【Source Operator】并行度为2,数据流
DataStream经过Source以后,形成2个流分区(Stream Partition);
将每个Operator对应Task(任)分为多个Operator SubTask(子任务);
并行度(Parallelism)设置4中方式:
parallelism
方式一、Operator Level,操作级别

方式二、Execution Environment Level,执行环境级别

方式三、Client Level,客户端级别
提交Flink Job执行时Client客户端设置,要么是flink run,要么是WEB UI界面提交,要么是编
程使用Client提交。

方式四、System Level,系统级别
在Flink框架安装配置文件:flink-conf.yaml文件中,配置属性:parallelism.default。

以上是关于从0到1Flink的成长之路- Flink 原理探析的主要内容,如果未能解决你的问题,请参考以下文章