Android 蓝牙开发 -- 低功耗蓝牙开发
Posted 夏至的稻穗
tags:
篇首语:本文由小常识网(cha138.com)小编为大家整理,主要介绍了Android 蓝牙开发 -- 低功耗蓝牙开发相关的知识,希望对你有一定的参考价值。
Android 蓝牙开发(一) – 传统蓝牙聊天室
Android 蓝牙开发(三) – 低功耗蓝牙开发
项目工程BluetoothDemo
前面已经学习了经典蓝牙开发,学习了蓝牙的配对连接和通信,又通过 配置 A2DP 文件,实现手机和蓝牙音响的连接和播放语音。
这篇,我们来学习蓝牙开发的最后一章,低功耗蓝牙 BLE,也就是我们常说的蓝牙 4.0 。
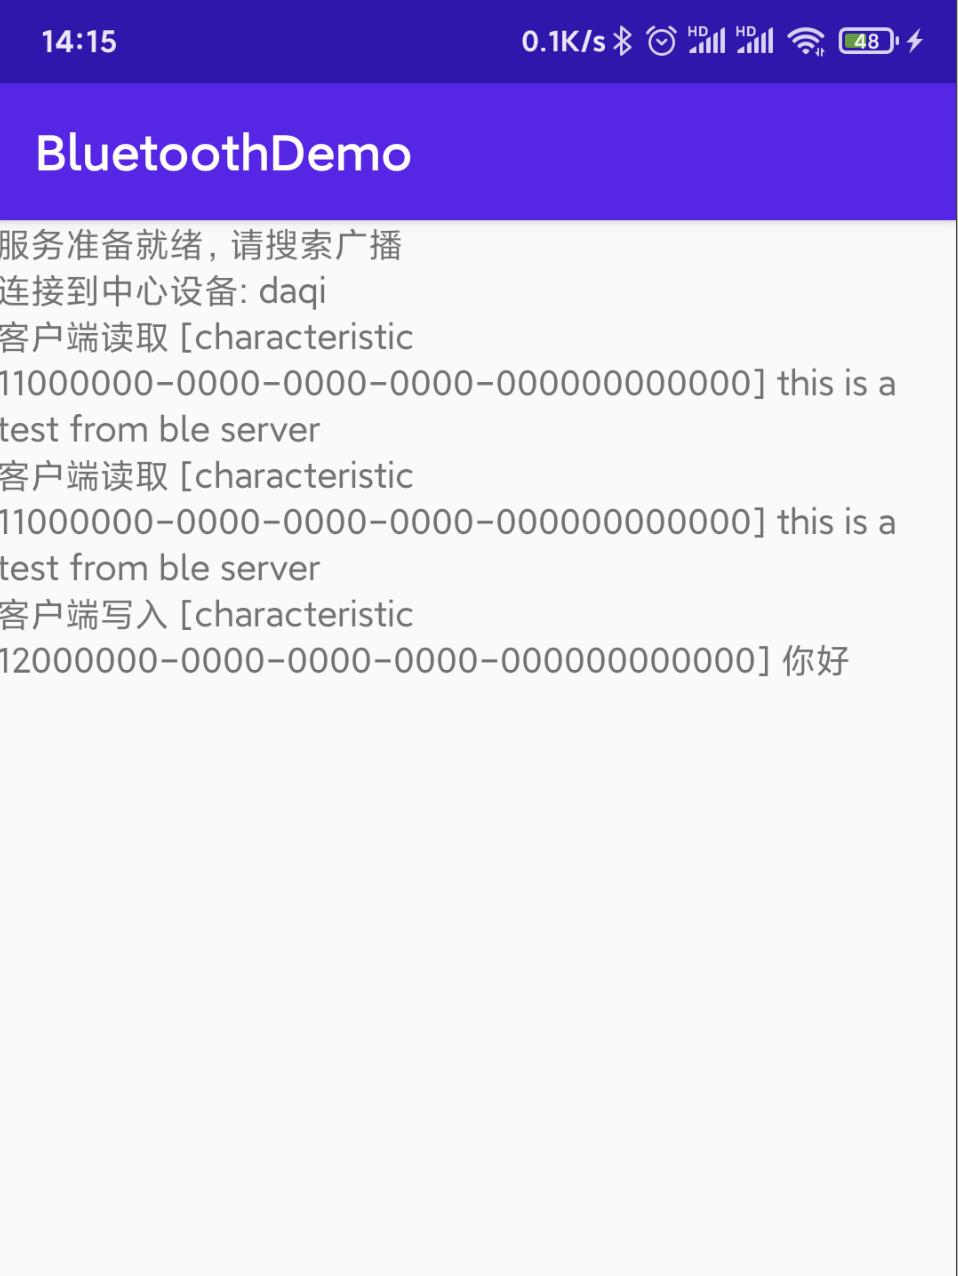
今天要完成的效果如下:
| 中心设备 | 外围设备 |
|---|---|
 |  |
一. 简介
与传统蓝牙不同,低功耗蓝主要为了降低设备功耗,支持更低功耗(如心率检测仪,健身设备)等设备进行通信。
android 在 4.3(API 18) 后将低功耗蓝牙内置,并提供对应的 API,以便于应用发现设备,查询服务和传输信息
1.1 相关概念
低功耗蓝牙有两个角色,分别是中心设备和外围设备
- 外围设备:指功耗更低的设备,会不断的发出广播,直到与中心设备连接
- 中心设备:可以进行扫描,寻找外设广播,并从广播中拿到数据
一般我们的手机会充当中心设备,去搜索周围外设的广播,比如健康设备等,然后健康设备就是外围设备,一直发广播,直到中心设备连接上。在Android 5.0 后,手机也可以充当外围设备。
1.2 关键术语
关于 BLE 的关键术语如下:
- 通用属性配置文件(GATT) : GATT 配置文件是一种通用规范,内容主要针对的是 BLE 通信读写时的简短的数据片段,目前 BLE 的通信均以 GATT 为基础
- 属性协议(ATT) : ATT 是 GATT 的基础,由它来传输属性和特征服务,这些属性都有一个特定的 UUID来作为唯一标识,为通信的基础。
- GATT Service : 通常中心设备与外围设备要进行,首先要知道服务的 UUID,并与之建立通信,然后通过特征和描述符等进行数据通信,这些等后面我们再来理解
二. 权限配置
首先,你需要使用 BLUETOOTH 的权限,考虑到 LE 信标通常与位置相关联,还须声明 ACCESS_FINE_LOCATION 权限。没有此权限,扫描将无法返回任何结果。
注意:如果您的应用适配 Android 9(API 级别 28)或更低版本,则您可以声明 ACCESS_COARSE_LOCATION 权限而非 ACCESS_FINE_LOCATION 权限。
<uses-permission android:name="android.permission.BLUETOOTH"/>
<uses-permission android:name="android.permission.BLUETOOTH_ADMIN"/>

<!-- If your app targets Android 9 or lower, you can declare
     ACCESS_COARSE_LOCATION instead. -->
<uses-permission android:name="android.permission.ACCESS_FINE_LOCATION" />
注意!Android 10 需要你开启gps,否则蓝牙不可用
如果你想要你的设备只支持 BLE ,还可以有以下神明:
<uses-permission android:name="android.permission.BLUETOOTH"/>
<uses-permission android:name="android.permission.BLUETOOTH_ADMIN"/>

<!-- If your app targets Android 9 or lower, you can declare
     ACCESS_COARSE_LOCATION instead. -->
<uses-permission android:name="android.permission.ACCESS_FINE_LOCATION" />
如果设置 required=“false”,你也可以在运行时使用 PackageManager.hasSystemFeature() 确定 BLE 的可用性:
private fun PackageManager.missingSystemFeature(name: String): Boolean = !hasSystemFeature(name)
...

packageManager.takeIf  it.missingSystemFeature(PackageManager.FEATURE_BLUETOOTH_LE) ?.also
    Toast.makeText(this, R.string.ble_not_supported, Toast.LENGTH_SHORT).show()
    finish()
三. 查找 BLE 设备
关于蓝牙的开启,请参考 Android 蓝牙开发(一) – 传统蓝牙聊天室
要查找 BLE 设备,在 5.0 之前,使用 startLeScan() 方法,它会返回当前设备和外设的广播数据。不过在 5.0 之后,使用 startScan() 去扫描,这里为了方便手机充当外围设备,统一使用 5.0 之后的方法。
而扫描是耗时的,我们应该在扫描到想要的设备后就立即停止或者在规定时间内停止,扫描代码如下:
fun scanDev(callback: BleDevListener)
        devCallback = callback
        if (isScanning)
            return


        //扫描设置

        val builder = ScanSettings.Builder()
            /**
             * 三种模式
             * - SCAN_MODE_LOW_POWER : 低功耗模式,默认此模式,如果应用不在前台,则强制此模式
             * - SCAN_MODE_BALANCED : 平衡模式,一定频率下返回结果
             * - SCAN_MODE_LOW_LATENCY 高功耗模式,建议应用在前台才使用此模式
             */
            .setScanMode(ScanSettings.SCAN_MODE_LOW_LATENCY)//高功耗,应用在前台

        if (Build.VERSION.SDK_INT >= Build.VERSION_CODES.M)
            /**
             * 三种回调模式
             * - CALLBACK_TYPE_ALL_MATCHED : 寻找符合过滤条件的广播,如果没有,则返回全部广播
             * - CALLBACK_TYPE_FIRST_MATCH : 仅筛选匹配第一个广播包出发结果回调的
             * - CALLBACK_TYPE_MATCH_LOST : 这个看英文文档吧,不满足第一个条件的时候,不好解释
             */
            builder.setCallbackType(ScanSettings.CALLBACK_TYPE_ALL_MATCHES)


        //判断手机蓝牙芯片是否支持皮批处理扫描
        if (bluetoothAdapter.isOffloadedFilteringSupported)
            builder.setReportDelay(0L)


        isScanning = true
        //扫描是很耗电的,所以,我们不能持续扫描
        handler.postDelayed(

            bluetoothAdapter.bluetoothLeScanner?.stopScan(scanListener)
            isScanning = false;
        , 3000)
        bluetoothAdapter.bluetoothLeScanner?.startScan(null, builder.build(), scanListener)
        //过滤特定的 UUID 设备
        //bluetoothAdapter?.bluetoothLeScanner?.startScan()
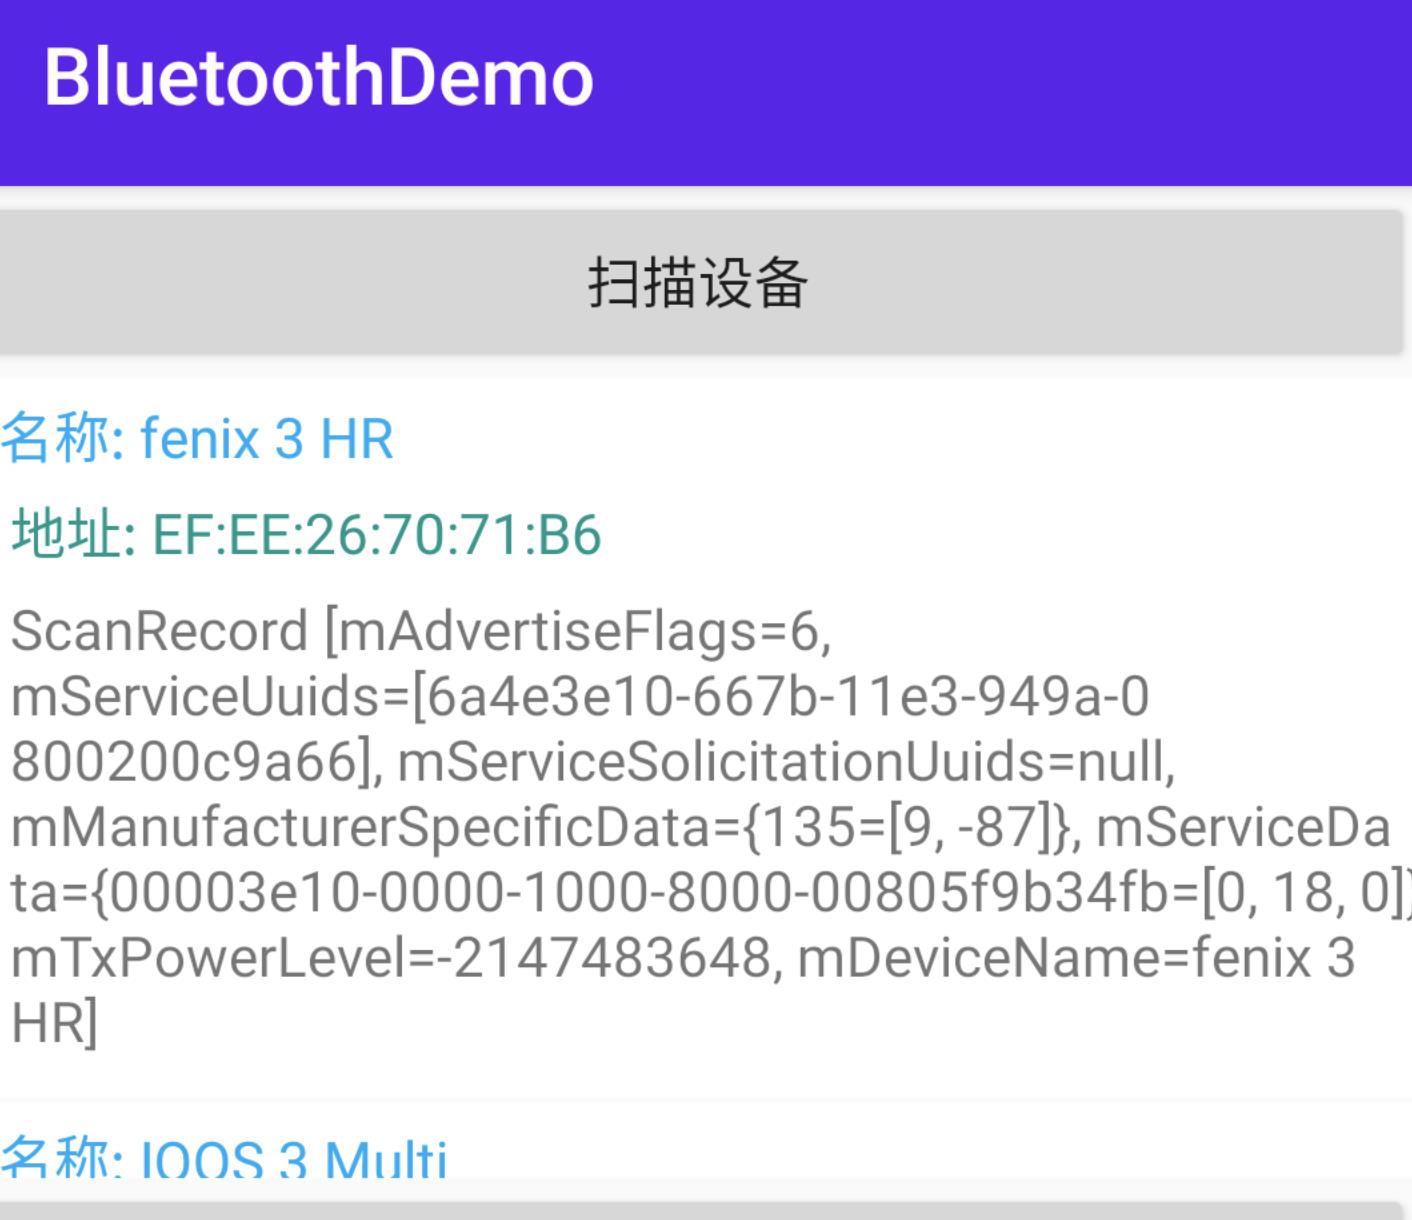
可以看到,在 5.0 之后可以通过 ScanSettings 进行扫描的一些设备,比如设置扫描模式 setScanMode ,在 startScan() 中,也可以过滤自己的 UUID,从而省去一些时间。接着在扫描回调中,把能获取名字的设备通过回调给 recyclerview 去回调。
 private val scanListener = object : ScanCallback()
        override fun onScanResult(callbackType: Int, result: ScanResult?)
            super.onScanResult(callbackType, result)
            //不断回调,所以不建议做复杂的动作
            result ?: return
            result.device.name ?: return

            val bean = BleData(result.device, result.scanRecord.toString())
            devCallback?.let
                it(bean)
效果如下:

四. 手机充当外围设备(服务端)
上面说到,Android 5.0 之后,手机也能充当外围设备,这里我们也来实践一下;
首先,Android要完成一个外围设备,需要完成以下步骤:
- 编写广播设置,比如发送实践,发送功率等
- 编写广播数据,这个是需要的,需要设置 service 的uuid,或者显示名字等
- 编写扫描广播(可选),这个广播当中心设备扫描时,数据能被接受的广播,通常我们会在这里编写一些厂商数据
- 添加 Gatt service ,用来跟中心设备通信
4.1 广播设置
在发送广播之前,我们可以先对广播进行一些配置:
 /**
   * GAP广播数据最长只能31个字节,包含两中: 广播数据和扫描回复
   * - 广播数据是必须的,外设需要不断发送广播,让中心设备知道
   * - 扫描回复是可选的,当中心设备扫描到才会扫描回复
   * 广播间隔越长,越省电
   */

  //广播设置
  val advSetting = AdvertiseSettings.Builder()
      //低延时,高功率,不使用后台
      .setAdvertiseMode(AdvertiseSettings.ADVERTISE_MODE_LOW_LATENCY)
      // 高的发送功率
      .setTxPowerLevel(AdvertiseSettings.ADVERTISE_TX_POWER_HIGH)
      // 可连接
      .setConnectable(true)
      //广播时限。最多180000毫秒。值为0将禁用时间限制。(不设置则为无限广播时长)
      .setTimeout(0)
      .build()
可以看到,这里设置成可连接广播,且广播模式设置为 SCAN_MODE_LOW_LATENCY 高功耗模式 ,它共有三种模式:
- SCAN_MODE_LOW_POWER : 低功耗模式,默认此模式,如果应用不在前台,则强制此模式
- SCAN_MODE_BALANCED : 平衡模式,一定频率下返回结果
- SCAN_MODE_LOW_LATENCY 高功耗模式,建议应用在前台才使用此模式
发送功率也是可选的:
- 使用高TX功率级别进行广播:AdvertiseSettings#ADVERTISE_TX_POWER_HIGH
- 使用低TX功率级别进行广播:AdvertiseSettings#ADVERTISE_TX_POWER_LOW
- 使用中等TX功率级别进行广播:AdvertiseSettings#ADVERTISE_TX_POWER_MEDIUM
- 使用最低传输(TX)功率级别进行广播:AdvertiseSettings#ADVERTISE_TX_POWER_ULTRA_LOW
4.2 配置发送广播数据
接着,是广播数据包:
 //设置广播包,这个是必须要设置的
 val advData = AdvertiseData.Builder()
   .setIncludeDeviceName(true) //显示名字
   .setIncludeTxPowerLevel(true)//设置功率
   .addServiceUuid(ParcelUuid(BleBlueImpl.UUID_SERVICE)) //设置 UUID 服务的 uuid
   .build()
比较好理解,让广播显示手机蓝牙名字,并设置服务的 UUID
4.3 配置扫描广播(可选)
扫描广播是当中心设备在扫描时,能够显示出来的广播,它可以添加一些必要数据,如厂商数据,服务数据等,注意!与上面的广播一样,不能超过31个字节。
//测试 31bit
        val byteData = byteArrayOf(-65, 2, 3, 6, 4, 23, 23, 9, 9,
            9,1, 2, 3, 6, 4, 23, 23, 9, 9, 8,23,23,23)

        //扫描广播数据(可不写,客户端扫描才发送)
        val scanResponse = AdvertiseData.Builder()
            //设置厂商数据
            .addManufacturerData(0x19, byteData)
            .build()
最后,使用 startAdvertising() 就可以开始发送广播了:
val bluetoothLeAdvertiser = bluetoothAdapter?.bluetoothLeAdvertiser
        //开启广播,这个外设就开始发送广播了
        bluetoothLeAdvertiser?.startAdvertising(
            advSetting,
            advData,
            scanResponse,
            advertiseCallback
        )
使用 去监听广播开启成功与否:
    private val advertiseCallback = object : AdvertiseCallback()
        override fun onStartSuccess(settingsInEffect: AdvertiseSettings?)
            super.onStartSuccess(settingsInEffect)
            logInfo("服务准备就绪,请搜索广播")


        override fun onStartFailure(errorCode: Int)
            super.onStartFailure(errorCode)
            if (errorCode == ADVERTISE_FAILED_DATA_TOO_LARGE)
                logInfo("广播数据超过31个字节了 !")
             else
                logInfo("服务启动失败: $errorCode")
此时,你去搜索,就能搜到你手机的蓝牙名称和对应的广播数据了。
4.4 Gatt Service
但如果外围设备想要与中心设备通信,还需要启动 Gatt service 才行,上面说到,启动Service 时,我们需要配置特征 Characteristic 和 描述符 Descriptor,这里我们来解释以下。
4.3 特征 Characteristic
Characteristic 是Gatt通信最小的逻辑单元,一个 characteristic 包含一个单一 value 变量 和 0-n个用来描述 characteristic 变量的 描述符 Descriptor。与 service 相似,每个 characteristic 用 16bit或者32bit的uuid作为标识,实际的通信中,也是通过 Characteristic 进行读写通信的。
所以为了方便通信,这里我们要添加读写的 Characteristic。
//添加读+通知的 GattCharacteristic
  val readCharacteristic = BluetoothGattCharacteristic(
      BleBlueImpl.UUID_READ_NOTIFY,
      BluetoothGattCharacteristic.PROPERTY_READ or BluetoothGattCharacteristic.PROPERTY_NOTIFY,
      BluetoothGattCharacteristic.PERMISSION_READ
  )
  //添加写的 GattCharacteristic
  val writeCharacteristic = BluetoothGattCharacteristic(
      BleBlueImpl.UUID_WRITE,
      BluetoothGattCharacteristic.PROPERTY_WRITE,
      BluetoothGattCharacteristic.PERMISSION_WRITE
  )
描述符 Descriptor
它的定义就是描述 GattCharacteristic 值已定义的属性,比如指定可读的属性,可接受范围等,比如为写的 特征添加描述符:
 //添加 Descriptor 描述符
        val descriptor =
            BluetoothGattDescriptor(
                BleBlueImpl.UUID_DESCRIBE,
                BluetoothGattDescriptor.PERMISSION_WRITE
            )

        //为特征值添加描述
        writeCharacteristic.addDescriptor(descriptor)
接着,把特征添加到服务中,并使用openGattServer() 去打开 Gatt 服务:
/**
 * 添加 Gatt service 用来通信
 */

//开启广播service,这样才能通信,包含一个或多个 characteristic ,每个service 都有一个 uuid
val gattService =
    BluetoothGattService(
        BleBlueImpl.UUID_SERVICE,
        BluetoothGattService.SERVICE_TYPE_PRIMARY
    )
gattService.addCharacteristic(readCharacteristic)
gattService.addCharacteristic(writeCharacteristic)


val bluetoothManager = getSystemService(Context.BLUETOOTH_SERVICE) as BluetoothManager
//打开 GATT 服务,方便客户端连接
mBluetoothGattServer = bluetoothManager.openGattServer(this, gattServiceCallbak)
mBluetoothGattServer?.addService(gattService)
代码比较简单,接着就可以使用 gattServiceCallbak 去监听数据成功与读写的数据了:
    private val gattServiceCallbak = object : BluetoothGattServerCallback()
        override fun onConnectionStateChange(device: BluetoothDevice?, status: Int, newState: Int)
            super.onConnectionStateChange(device, status, newState)
            device ?: return
            Log.d(TAG, "zsr onConnectionStateChange: ")
            if (status == BluetoothGatt.GATT_SUCCESS && newState == 2)
                logInfo("连接到中心设备: $device?.name")
             else
                logInfo("与: $device?.name 断开连接失败!")


        ...
五. 中心设备连接外设(客户端)
上面已经配置了服务端的代码,接着,通过扫描到的广播,使用 BluetoothDevice 的 connectGatt() 方法,来连接 GATT 服务:
 override fun onItemClick(adapter: BaseQuickAdapter<*, *>, view: View, position: Int)
      //连接之前先关闭连接
      closeConnect()
      val bleData = mData[position]
      blueGatt = bleData.dev.connectGatt(this, false, blueGattListener)
      logInfo("开始与 $bleData.dev.name 连接.... $blueGatt")
此时,如果你的配置没有出错的话,就可以通过 BluetoothGattCallback 回调连接到设备了:
private val blueGattListener = object : BluetoothGattCallback()
        override fun onConnectionStateChange(gatt: BluetoothGatt?, status: Int, newState: Int)
            super.onConnectionStateChange(gatt, status, newState)
            val device = gatt?.device
            if (newState == BluetoothProfile.STATE_CONNECTED)
                isConnected = true
                //开始发现服务,有个小延时,最后200ms后尝试发现服务
                handler.postDelayed(
                    gatt?.discoverServices()
                ,300)

                device?.letlogInfo("与 $it.name 连接成功!!!")
            else if (newState == BluetoothProfile.STATE_DISCONNECTED)
                isConnected = false
                logInfo("无法与 $device?.name 连接: $status")
                closeConnect()


        override fun onServicesDiscovered(gatt: BluetoothGatt?, status: Int)
            super.onServicesDiscovered(gatt, status)
           // Log.d(TAG, "zsr onServicesDiscovered: $gatt?.device?.name")
            val service = gatt?.getService(BleBlueImpl.UUID_SERVICE)
            mBluetoothGatt = gatt
            logInfo("已连接上 GATT 服务,可以通信! ")
代码应该好看懂,就是 onConnectionStateChange() 中的 newState 为 BluetoothProfile.STATE_CONNECTED 时,表示已经连接上了,这个时候,尝试去发现这个服务,如果也能回调 onServicesDiscovered() 方法,则证明此时 GATT 服务已经成功建立,可以进行通信了。
5.1 读数据
此时就可以来读取外围设备的数据,这个数据是外围设备给中心设备去读的,所以,外围设备的读回调是这样的:
外围设备的BluetoothGattServerCallback
        override fun onDescriptorReadRequest(
            device: BluetoothDevice?,
            requestId: Int,
            offset: Int,
            descriptor: BluetoothGattDescriptor?
        )
            super.onDescriptorReadRequest(device, requestId, offset, descriptor)
            val data = "this is a test"
            mBluetoothGattServer?.sendResponse(
                device, requestId, BluetoothGatt.GATT_SUCCESS,
                offset, data.toByteArray()
            )
            logInfo("客户端读取 [descriptor $descriptor?.uuid] $data")
很简单,就是发送一个 "this is a test " 的字符传
中心设备读
 /**
     * 读数据
     */
    fun readData(view: View)
        //找到 gatt 服务
        val service = getGattService(BleBlueImpl.UUID_SERVICE)
        if (service != null)
            val characteristic =
                service.getCharacteristic(BleBlueImpl.UUID_READ_NOTIFY) //通过UUID获取可读的Characteristic
            mBluetoothGatt?.readCharacteristic(characteristic)


    // 获取Gatt服务
    private fun getGattService(uuid: UUID): BluetoothGattService?
        if (!isConnected)
            Toast.makeText(this, "没有连接", Toast.LENGTH_SHORT).show()
            return null

        val service = mBluetoothGatt?.getService(uuid)
        if (service == null)
            Toast.makeText(this, "没有找到服务", Toast.LENGTH_SHORT).show()

        return service
如果找得到 GATT 服务,则通过 getCharacteristic() 拿到 GATT 通信的最小单元 Characteristic,通过 mBluetoothGatt?.readCharacteristic(characteristic) 读取数据,这样就会在 BluetoothGattCallback回调的 onCharacteristicRead 拿到数据:
override fun onCharacteristicRead(
      gatt: BluetoothGatt?,
      characteristic: BluetoothGattCharacteristic?,
      status: Int
  )
      super.onCharacteristicRead(gatt, characteristic, status)
      characteristic?.let
          val data = String(it.value)
          logInfo("CharacteristicRead 数据: $data")
同理写也一样,这样我们的 BLE 低功耗蓝牙就学习结束了
参考:
https://www.jianshu.com/p/d273e46f47b1
https://developer.android.google.cn/guide/topics/connectivity/bluetooth-le
以上是关于Android 蓝牙开发 -- 低功耗蓝牙开发的主要内容,如果未能解决你的问题,请参考以下文章