Creating a quantum teleportation circuit
Posted 元之田
tags:
篇首语:本文由小常识网(cha138.com)小编为大家整理,主要介绍了Creating a quantum teleportation circuit相关的知识,希望对你有一定的参考价值。
Entanglement并不能传递信息,但是可以建立两个相距较远的量子之间的相关性。在此基础上,我们通过电话等手段进行通信,便可以达到加密信息传输的效果。
There are two types of interference, namely, constructive and destructive. Constructive interference occurs when the peaks of two waves are summed up where the resulting amplitude is equal to the total positive sum of the two individual waves.

One was from the basis state 1, while the other was from the basis state . Do you remember when we started at either of these two qubit basis states, where on the X-axis of the qubit the Hadamard landed? From , it would land on the positive side of the X axis, but, if we placed the qubit into superposition starting from the state, it would land on the negative X axis.
Scenario
Alice will then send Bob information, classically (such as communicating by phone call or text), who will then perform operations on a qubit, which would enable Bob to generate the state that Alice had. We say Alice had because in order to send the bit information to Bob, she needs to perform a measurement on the arbitrary qubit state, which would therefore collapse the qubit into binary values. Therefore, we would lose all quantum information of the qubit.

Note that we added a barrier after setting up our state. This is just to simplify visualizing the circuit when we draw it to know which component in our flowchart each section pertains to. In this case, it’s the first block specifying .
Executing the quantum teleportation circuit
- In a new Qiskit Notebook, enter the following code into the next empty cell to create the circuit that we need. Then, create the qubit state, which neither Alice nor Bob will know:
import numpy as np
from qiskit import *

q = QuantumRegister(3)

c = ClassicalRegister(3)

qc = QuantumCircuit(q, c)
We now have three qubits. The first qubit q[0] will represent the unknown state, . The second and third qubits, q[1], and q[2], will be the entangled qubits that are shared between Alice and Bob, respectively.
- Let’s prepare the first qubit (q[0]) in an unknown state of which neither Alice nor Bob will know. Of course, we will know as we are creating it. However, the idea here is to see things from the context of both Alice and Bob. To keep this example simple, we will apply two unitary operators, that is, a NOT gate and a Z gate:
qc.x(0)

qc.z(0)

qc.barrier()
Note that we added a barrier after setting up our state. This is just to simplify visualizing the circuit when we draw it to know which component in our flowchart each section pertains to. In this case, it’s the first block specifying .
- Now that we have prepared our state, which is known to us but unknown to both Alice and Bob, we will go to the next step in our flowchart, which is for Alice to entangle the other two qubits (q[1], q[2]) together.
Alice will keep one q[1] and send the other qubit q[2] to Bob. To entangle the two qubits, we will apply a Hadamard gate to Alice’s qubit, q[1], followed by a CNOT between the two qubits, where the Control is connected to Alice’s qubit and the Target is connected to Bob’s qubit. We will include a barrier here, as we did previously, to segment this preparation:
qc.h(1)

qc.cx(1,2)

qc.barrier()
- Now, we’ll move onto the next block, which is where Alice will entangle the qubit in the state with her qubit that was entangled with Bob’s, and then apply a Hadamard gate prior to measuring both the qubit and her entangled qubit:
qc.cx(0,1)

qc.h(0)

qc.measure(0,0)

qc.measure(1,1)

qc.barrier()

qc.cx(1,2)

qc.barrier()
- After measuring the two qubits, and q[1], Alice calls Bob and lets him know her results. He then applies the necessary gates based on her results, as illustrated in the next block in our flowchart, where Bob will apply the corresponding gates based on the information he gathered from Alice. The unitary operation to apply is based on one of the following notions: 00 = Use I (Identity gate), 01 = Use X (NOT gate), 10 = Use Z (Z gate), 11 = Use Z, followed by X gate.
- Since we will be running the circuit with 1,024 shots, we should expect to see all the previous results. So, how can we determine whether the results are correct?
We can verify this by applying the gates that we used to prepare , except we need to do so in reverse. Recall from step 1 that the unitary operators must be reversible. We will apply a Z gate first, then a NOT gate to Bob’s qubit. If all goes well, we should expect the result of Bob’s qubit to always be :
qc.z(2)

qc.x(2)

qc.measure(2,2)
After this measurement, the result in the classic bit (2) should be 0 for all the results.
- Now, let’s draw the circuit to see what we have created so far. Recall that each segment separated by a barrier pertains to the previous flowchart step, where the last segment is simply to verify that we have successfully transported .
Note that we are not stating that we copied the state, , but we transported it because of the no cloning theorem. It is incorrect to state that we successfully copied the state, , from Alice to Bob:
qc.draw(output='mpl')

The previous screenshot shows that barriers (dotted lines) separate the circuit visually so that it is easy to segment and visualize. The first segment is where Alice prepares her qubit, while the second segment entangles two qubits where q1 belongs to Alice and q2 belongs to Bob. The third segment is where Alice entangles her prepared qubit q0 with her shared qubit q1. She, then takes a measurement of the results of her two qubits.
The last segment that Bob reads receives the classical response from Alice, q1, and encodes it into his qubit, which you can see is represented here in reverse order of how Alice prepared her qubit in the first segment. This is because operations on qubits must be reversible, hence why Bob applies a Z gate first, then an X gate. Finally, when Bob measures his qubit, he should get the expected result, 0, which is the initial state that Alice had. If this is different from 0, then Bob can determine that the qubit was tampered with in-between transmission.
- We can now confirm whether the state that Bob has is the same one Alice had previously that she had collapsed and measured . We will run this on qasm simulator and run it with 1024 shots:
backend = Aer.get_backend('qasm_simulator')

job = execute(qc, backend, shots=1024)

job_result = job.result()

results = job_result.get_counts(qc)

plot_histogram(results)
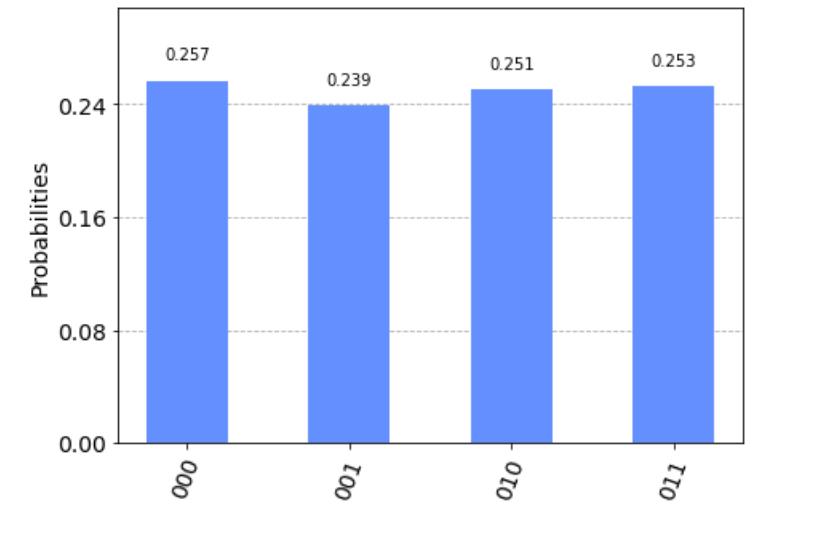
Now, we’ll print out the results in a histogram to confirm we get back all the states 00 through 11, as illustrated earlier in step 4, just to ensure that the leading classic bit (left-most bit) is always 0. The results from the executed circuit, as illustrated in the following screenshot show that the results of the left-most classic bit are always 0 and that the two classic bits correspond to the 00 to 11 states:
In this example, we created a circuit that transports the state of a qubit from one person to the next by using a set of entangled qubits to transmit information from Alice to Bob.
以上是关于Creating a quantum teleportation circuit的主要内容,如果未能解决你的问题,请参考以下文章