去哪儿项目搭建
Posted liyunlonggg
tags:
篇首语:本文由小常识网(cha138.com)小编为大家整理,主要介绍了去哪儿项目搭建相关的知识,希望对你有一定的参考价值。
技术栈
vue2.0 + vue-cli3/4 + vue-router + axios + vuex + vant + rem + sass + webpack
创建项目
vue create 项目名
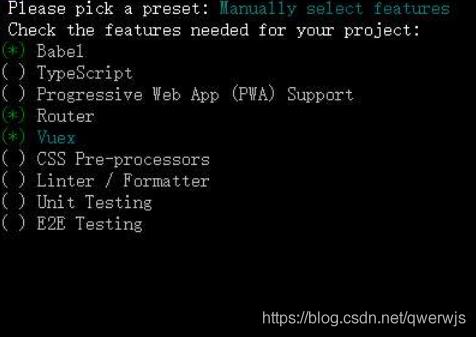
第一步 选择安装方式,我们选择手动安装

第二步 我们安转需要的插件 Babel,Router路由 vuex

第三步 是否选择历史路由模式 , 我们选择 N(是大写的N) no 的意思

第四步 配置文件走默认的

第五步 是否配置保存 N(大写的n)

然后我们等着他下载完成,中途最好不要断网
当我们所有的依赖都安装完成后
cd 项目目录
npm run serve // 启动目录
安装 axios
>在mian.js中配置
>// 配置axios
		import axios form 'axios'   // 导入axios 的依赖包
		Vue.prototype.$axios = axios // 把axios加入Vue的原型中去
安装 vant
npm install vant -save
//配置vantUI的依赖
import Vant from 'vant';
import 'vant/lib/index.css';
Vue.use(Vant);
安装 sass
cnpm install node-sass --save-dev

cnpm install sass-loader --save-dev
配置rem
// aseets/css/border.css
/* 2倍屏 */
@media only screen and (-webkit-min-device-pixel-ratio: 2.0)
    .border-bottom::after
        -webkit-transform: scaleY(0.5);
        transform: scaleY(0.5);


/* 3倍屏 */
@media only screen and (-webkit-min-device-pixel-ratio: 3.0)
    .border-bottom::after
        -webkit-transform: scaleY(0.33);
        transform: scaleY(0.33);


------------------------------------
// main.js
import './aseets/css/border.css'
组件化开发
组件拆分合理 (公共组件,页面级别组件、功能性组件)
组件开发
组件传值 (父传子,子传父,兄弟组件,vuex)
webpack配置打包优化 (vue.config.js)
- 新建vue.config.js
//加载path模块   配置 alias 别名
const path = require('path')
//定义resolve方法,把相对路径转换成绝对路径
const resolve = dir => path.join(__dirname, dir)
// 配置 alias 别名

//使用CDN 加速优化
const isProduction = process.env.NODE_ENV === 'production'
// externals
const externals =
    vue: 'Vue',
    'vue-router': 'VueRouter',
    vuex: 'Vuex',
    vant: 'vant',
    axios: 'axios'

// CDN外链,会插入到index.html中
const cdn =
    // 开发环境
    dev:
        css: [],
        js: []
    ,
    // 生产环境
    build:
        css: ['https://cdn.jsdelivr.net/npm/vant@2.12/lib/index.css'],
        js: [
            'https://cdn.jsdelivr.net/npm/vue@2.6.11/dist/vue.min.js',
            'https://cdn.jsdelivr.net/npm/vue-router@3.1.5/dist/vue-router.min.js',
            'https://cdn.jsdelivr.net/npm/axios@0.19.2/dist/axios.min.js',
            'https://cdn.jsdelivr.net/npm/vuex@3.1.2/dist/vuex.min.js',
            'https://cdn.jsdelivr.net/npm/vant@2.12/lib/vant.min.js'
        ]


//使用CDN 加速优化


module.exports =
	//设置静态资源路径为’./’,否则打包后项目无法运行
    publicPath: './',
    //关闭生产环境下的SourceMap映射文件,包的大小减少80%;
    productionSourceMap: false,
   // 跨域配置
       devServer:
        open: false, // 自动启动浏览器
        host: '0.0.0.0', // localhost
        port: 6060, // 端口号
        hotOnly: false, // 热更新
        overlay:
            //  当出现编译器错误或警告时,在浏览器中显示全屏覆盖层
            warnings: false,
            errors: true
        ,
        proxy:
            //配置跨域
            '/api':
                target: 'https://www.test.com', // 接口的域名
                // ws: true, // 是否启用websockets
                changOrigin: true, // 开启代理,在本地创建一个虚拟服务端
                pathRewrite:
                    '^/api': '/'


    ,
    //配置 alias 别名
    chainWebpack: config =>
        // 添加别名
        config.resolve.alias
            .set('@', resolve('src'))
            .set('assets', resolve('src/assets'))
            .set('api', resolve('src/api'))
            .set('views', resolve('src/views'))
            .set('components', resolve('src/components'))
    ,
    //使用CDN 加速优化
    configureWebpack: config =>
        // 为生产环境修改配置...
        if (isProduction)
            // externals
            config.externals = externals

    ,
    chainWebpack: config =>
        /**
         * 添加CDN参数到htmlWebpackPlugin配置中
         */
        config.plugin('html').tap(args =>
            if (isProduction)
                args[0].cdn = cdn.build
             else
                args[0].cdn = cdn.dev

            return args
        )
    ,
    //使用CDN 加速优化
在 public/index.html 中添加
<!-- 使用CDN的CSS文件 -->
<% for (var i in
  htmlWebpackPlugin.options.cdn&&htmlWebpackPlugin.options.cdn.css)  %>
  <link href="<%= htmlWebpackPlugin.options.cdn.css[i] %>" rel="preload" as="style" />
  <link href="<%= htmlWebpackPlugin.options.cdn.css[i] %>" rel="stylesheet" />
<%  %>
 <!-- 使用CDN加速的JS文件,配置在vue.config.js下 -->
<% for (var i in
  htmlWebpackPlugin.options.cdn&&htmlWebpackPlugin.options.cdn.js)  %>
  <script src="<%= htmlWebpackPlugin.options.cdn.js[i] %>"></script>
<%  %>
以上是关于去哪儿项目搭建的主要内容,如果未能解决你的问题,请参考以下文章