用python tkinter 做界面时,怎么实现键盘按下回车键后,触发某个button按钮?
Posted
tags:
篇首语:本文由小常识网(cha138.com)小编为大家整理,主要介绍了用python tkinter 做界面时,怎么实现键盘按下回车键后,触发某个button按钮?相关的知识,希望对你有一定的参考价值。
准备用python 的 tkinter 库 来做一个界面。
界面中 有多个文本输入框,暂定为text1,text2,....等等。
另外还有多个button按钮,暂定为button1,button2....等等。
现在想实现:
在text1中输入一段字符后,回车,就相当于点击了button1按钮。
也就是说在text1中回车后,就触发了button1的点击操作。 这样就不需要在text1中输入字符后,再手动去鼠标点击button1按钮。
请问怎么实现?
谢谢!
import tkinter as tk
root = tk.Tk()
root.geometry("300x200")
def func(event):
print("You hit return.")
def onclick(event):
print("You clicked the button")
root.bind('<Return>', onclick)
button = tk.Button(root, text="click me")
button.bind('<Button-1>', onclick)
button.pack()
root.mainloop() 参考技术A import tkinter as tk
root = tk.Tk()
root.geometry("300x200")
def func(event):
print("You hit return.")
def onclick(event):
print("You clicked the button")
root.bind('<Return>', onclick)
button = tk.Button(root, text="click me")
button.pack()
button.bind('<Button-1>', onclick)
root.mainloop()
不换行没法儿读, 基本上就是俩event绑定一个事件函数
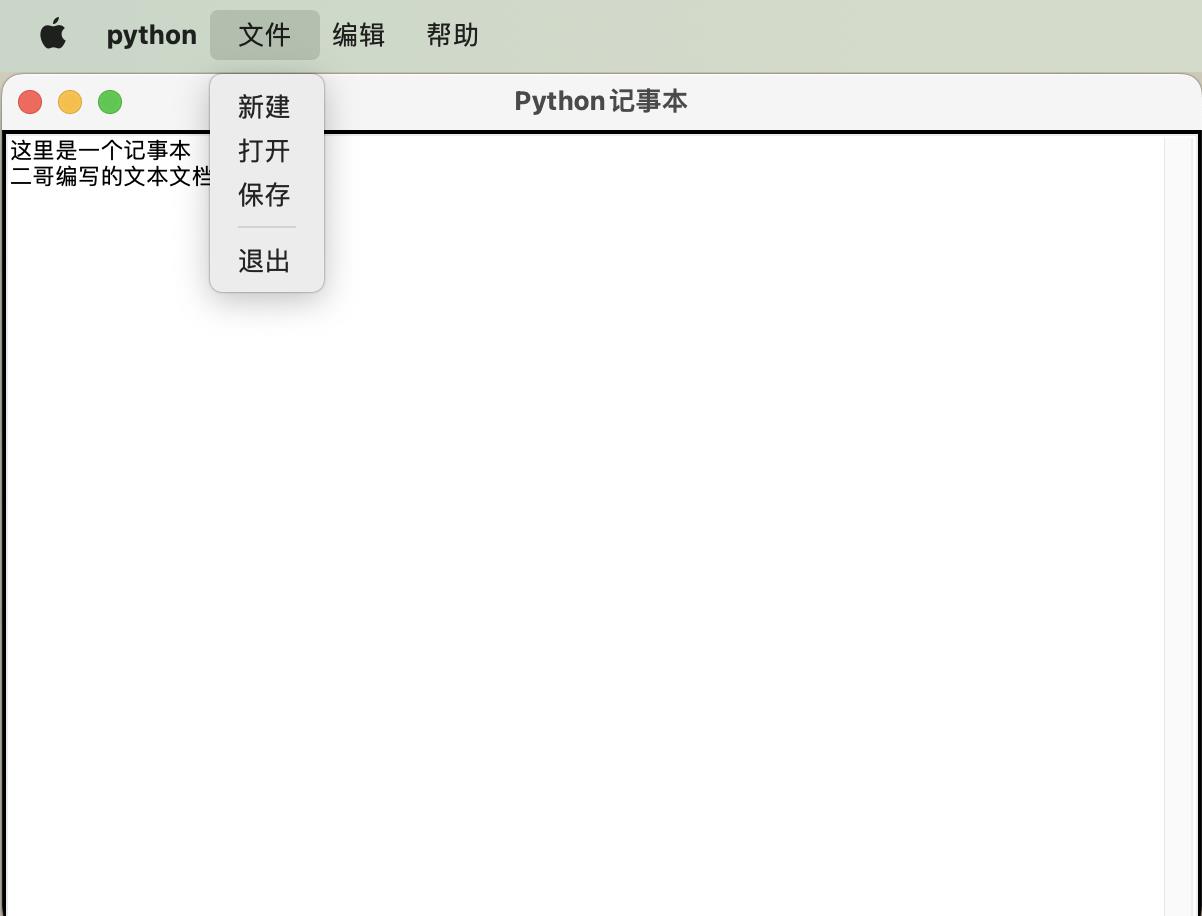
Python|用tkinter实现自定义记事本
Python中我们通常使用tkinter来进行UI界面的编写,本文我们来使用tkinter实现自定义记事本。
一、思考
想要完成记事本,我们首先需要考虑一个正常的记事本都需要具有哪些功能,我们将这些功能按键添加到我们的UI界面上即可。一般功能如下:
- 新建文本文档
- 打开本地文件
- 保存文本文档
- 功能项:剪切、复制、粘贴等
设定好了基本的功能选项之后我们再来思考实现记事本的思路。
- 创建记事本窗口
- 设定记事本菜单项
- 给不同的菜单项配置不同的功能选项
- 运行笔记本
二、代码实现
创建记事本窗口
创建窗口的时候,我们要设定好窗口的高度、宽度、文本区域以及各种菜单,与设定的内容如下:
class Notepad:

    root = Tk()
    '''
    Width:宽度
    Heith:高度
    TextArea:文本区域
    MenuBar:菜单栏
    FileMenu:文件菜单
    EditMenu:编辑菜单
    HelpMenu:帮助菜单
    ScrollBat:滚动条
    '''
    Width = 300
    Height = 300
    TextArea = Text(root)
    MenuBar = Menu(root)
    FileMenu = Menu(MenuBar, tearoff=0)
    EditMenu = Menu(MenuBar, tearoff=0)
    HelpMenu = Menu(MenuBar, tearoff=0)
    ScrollBar = Scrollbar(TextArea)
    file = None
设定记事本菜单项
设定好了基本的框架之后,接下来就是向整个框架中填入各种参数与配置项,包括菜单栏中各种功能选项、窗口标题、窗口位置等。
后续如果向添加新的功能在init函数中进行添加即可
菜单项代码示例:
def __init__(self, **kwargs):
	# 增加新建配置
    self.FileMenu.add_command(label="新建", command=self.__newFile)

    # 增加打开配置
    self.FileMenu.add_command(label="打开", command=self.__openFile)

    # 增加保存配置
    self.FileMenu.add_command(label="保存", command=self.__saveFile)
配置功能选项
接下来就是构建不同的功能函数,实现每一个小功能,这里不需要我们编写独立的功能函数代码,只需要使用tkinter中的函数进行再封装即可。
配置功能示例代码:
def __newFile(self):
    '''
    新文件:默认是一个未命名文件
    '''

    self.root.title("未命名文件")
    self.file = None
    self.TextArea.delete(1.0, END)
完整代码如下
import tkinter
import os
from tkinter import *
from tkinter.messagebox import *
from tkinter.filedialog import *


class Notepad:

    root = Tk()
    '''
    Width:宽度
    Heith:高度
    TextArea:文本区域
    MenuBar:菜单栏
    FileMenu:文件菜单
    EditMenu:编辑菜单
    HelpMenu:帮助菜单
    ScrollBat:滚动条
    '''
    Width = 300
    Height = 300
    TextArea = Text(root)
    MenuBar = Menu(root)
    FileMenu = Menu(MenuBar, tearoff=0)
    EditMenu = Menu(MenuBar, tearoff=0)
    HelpMenu = Menu(MenuBar, tearoff=0)
    ScrollBar = Scrollbar(TextArea)
    file = None

    def __init__(self, **kwargs):

        # 设置文本框的大小

        try:
            self.Width = kwargs['width']
        except KeyError:
            pass

        try:
            self.Height = kwargs['height']
        except KeyError:
            pass

        # 设置窗口标题
        self.root.title("Python记事本")

        # 将窗口居中显示
        screenWidth = self.root.winfo_screenwidth()
        screenHeight = self.root.winfo_screenheight()
        left = (screenWidth / 2) - (self.Width / 2)
        top = (screenHeight / 2) - (self.Height / 2)
        self.root.geometry('%dx%d+%d+%d' %
                           (self.Width, self.Height, left, top))

        # 文本区域大小调整
        self.root.grid_rowconfigure(0, weight=1)
        self.root.grid_columnconfigure(0, weight=1)

        # Add controls (widget)
        self.TextArea.grid(sticky=N + E + S + W)

        # 增加新建配置
        self.FileMenu.add_command(label="新建", command=self.__newFile)

        # 增加打开配置
        self.FileMenu.add_command(label="打开", command=self.__openFile)

        # 增加保存配置
        self.FileMenu.add_command(label="保存", command=self.__saveFile)

        # 增加退出配置
        self.FileMenu.add_separator()
        self.FileMenu.add_command(label="退出", command=self.__quitApplication)
        # 菜单中设置文件按钮
        self.MenuBar.add_cascade(label="文件", menu=self.FileMenu)

        # 增加剪切功能
        self.EditMenu.add_command(label="剪切", command=self.__cut)

        # 增加复制功能
        self.EditMenu.add_command(label="复制", command=self.__copy)

        # 增加粘贴功能
        self.EditMenu.add_command(label="粘贴", command=self.__paste)

        # 菜单中设置编辑按钮
        self.MenuBar.add_cascade(label="编辑", menu=self.EditMenu)

        # 增加关于记事本选项
        self.HelpMenu.add_command(label="关于记事本", command=self.__showAbout)
        # 菜单中射者帮助按钮
        self.MenuBar.add_cascade(label="帮助", menu=self.HelpMenu)

        self.root.config(menu=self.MenuBar)

        self.ScrollBar.pack(side=RIGHT, fill=Y)

        # 滚动条根据内容进行调整
        self.ScrollBar.config(command=self.TextArea.yview)
        self.TextArea.config(yscrollcommand=self.ScrollBar.set)

    def __quitApplication(self):
        '''
        用于退出程序(关了就消失)
        '''

        self.root.destroy()

    def __showAbout(self):
        '''
        添加帮助菜单中的信息
        '''

        showinfo("关于记事本", "来自:二哥不像程序员")

    def __openFile(self):
        '''
        打开文件
        '''

        self.file = askopenfilename(defaultextension=".txt",
                                    filetypes=[("All Files", "*.*"),
                                               ("Text Documents", "*.txt")])

        if self.file == "":
            self.file = None
        else:

            self.root.title(os.path.basename(self.file))
            self.TextArea.delete(1.0, END)
            file = open(self.file, "r")
            self.TextArea.insert(1.0, file.read())
            file.close()

    def __newFile(self):
        '''
        新文件:默认是一个未命名文件
        '''

        self.root.title("未命名文件")
        self.file = None
        self.TextArea.delete(1.0, END)

    def __saveFile(self):
        '''
        用于保存文件,不存在的文件进行新建,存在的文件在原文件基础上覆盖保存
        '''

        if self.file == None:
            self.file = asksaveasfilename(initialfile='Untitled.txt',
                                          defaultextension=".txt",
                                          filetypes=[("All Files", "*.*"),
                                                     ("Text Documents",
                                                      "*.txt")])

            if self.file == "":
                self.file = None
            else:

                file = open(self.file, "w")
                file.write(self.TextArea.get(1.0, END))
                file.close()

                # 更改title名字为文件名
                self.root.title(os.path.basename(self.file))

        else:
            file = open(self.file, "w")
            file.write(self.TextArea.get(1.0, END))
            file.close()

    # 添加功能项
    def __cut(self):
        self.TextArea.event_generate("<<Cut>>")

    def __copy(self):
        self.TextArea.event_generate("<<Copy>>")

    def __paste(self):
        self.TextArea.event_generate("<<Paste>>")

    def run(self):
        # 使用mainloop()使得窗口一直存在
        self.root.mainloop()


notepad = Notepad(width=600, height=400)
notepad.run()
三、展示

菜单栏根据不同的系统会有不同的位置展示,mac嵌入在左上角,win在窗口内部进行嵌入。
以上是关于用python tkinter 做界面时,怎么实现键盘按下回车键后,触发某个button按钮?的主要内容,如果未能解决你的问题,请参考以下文章