[ctf pwn] heap exploitation:ptmalloc的原理
Posted 漫小牛
tags:
篇首语:本文由小常识网(cha138.com)小编为大家整理,主要介绍了[ctf pwn] heap exploitation:ptmalloc的原理相关的知识,希望对你有一定的参考价值。
文章目录
0 堆
0.1 什么是堆
堆是每个程序被分配的一块内存区域,和栈的区别主要在于堆内存是动态分配的。也就是说,程序可以从heap段请求一块内存,或者释放一块内存。
另外,堆内存是全局的,即在程序的任意位置都可以访问到堆,并不一定要在调用malloc的那个函数里访问(比较:栈只能在当前函数中访问局部变量)。这是因为C语言使用指针指向动态分配的内存。但相比访问栈上的静态局部变量,使用指针也带来了一定的开销。
1 从demo引出pwn heap方向
1.1 demo程序
本文主要通过一个简单的heap程序来讲解与heap相关的原理,首先看一下源代码:
#include <stdio.h>
#include <stdlib.h>
#include <unistd.h>

// gcc example -o example

int main()

        char *ptr1 = malloc(0x20);
        char *ptr2 = malloc(0x20);
        char *ptr3 = malloc(0x20);

        memset(ptr1, 'A', 0x20);

        free(ptr1);
        free(ptr2);
        free(ptr3);

        char *ptr4 = malloc(0x20);
        char *ptr5 = malloc(0x200);
        char *ptr6 = malloc(0x200);

        free(ptr6);
        free(ptr5);

        return 0;
采用如下指令编译:
gcc example -o example
1.2 gdb调试分析
1.2.1 vmmap
gdb运行起程序后,vmmap并没有看到heap段,ni单步直到第一个malloc后,再通过vmmap查看:
gdb-peda$ vmmap
Start              End                Perm	Name
0x00400000         0x00401000         r-xp	/home/giantbranch/Desktop/heap/demo/example
0x00600000         0x00601000         r--p	/home/giantbranch/Desktop/heap/demo/example
0x00601000         0x00602000         rw-p	/home/giantbranch/Desktop/heap/demo/example
0x00602000         0x00623000         rw-p	[heap]
0x00007ffff7a0d000 0x00007ffff7bcd000 r-xp	/lib/x86_64-linux-gnu/libc-2.23.so
0x00007ffff7bcd000 0x00007ffff7dcd000 ---p	/lib/x86_64-linux-gnu/libc-2.23.so
0x00007ffff7dcd000 0x00007ffff7dd1000 r--p	/lib/x86_64-linux-gnu/libc-2.23.so
0x00007ffff7dd1000 0x00007ffff7dd3000 rw-p	/lib/x86_64-linux-gnu/libc-2.23.so
0x00007ffff7dd3000 0x00007ffff7dd7000 rw-p	mapped
0x00007ffff7dd7000 0x00007ffff7dfd000 r-xp	/lib/x86_64-linux-gnu/ld-2.23.so
0x00007ffff7fd9000 0x00007ffff7fdc000 rw-p	mapped
0x00007ffff7ff7000 0x00007ffff7ffa000 r--p	[vvar]
0x00007ffff7ffa000 0x00007ffff7ffc000 r-xp	[vdso]
0x00007ffff7ffc000 0x00007ffff7ffd000 r--p	/lib/x86_64-linux-gnu/ld-2.23.so
0x00007ffff7ffd000 0x00007ffff7ffe000 rw-p	/lib/x86_64-linux-gnu/ld-2.23.so
0x00007ffff7ffe000 0x00007ffff7fff000 rw-p	mapped
0x00007ffffffde000 0x00007ffffffff000 rw-p	[stack]
0xffffffffff600000 0xffffffffff601000 r-xp	[vsyscall]
可以看到,heap位于0x00602000开始的address space。
1.2.2 pwngdb的安装
在第一个malloc后可通过parseheap查看,parseheap是pwngdb中的命令,如果没有就需要安装(安装时需要代理,否则连不上)
cd ~/
git clone https://github.com/scwuaptx/Pwngdb.git
cp ~/Pwngdb/.gdbinit ~/
1.2.3 parseheap
在第一个malloc后,输入parseheap的结果如下:
gdb-peda$ parseheap
addr                prev                size                 status              fd                bk
0x602000            0x0                 0x30                 Used                None              None
执行完3个malloc后的parseheap就会有更多的内容:
gdb-peda$ parseheap
addr                prev                size                 status              fd                bk
0x602000            0x0                 0x30                 Used                None              None
0x602030            0x0                 0x30                 Used                None              None
0x602060            0x0                 0x30                 Used                None              None
ni继续执行到free的下一条语句,并查看parseheap:
gdb-peda$ parseheap
addr                prev                size                 status              fd                bk
0x602000            0x0                 0x30                 Freed                0x0              None
0x602030            0x0                 0x30                 Used                None              None
0x602060            0x0                 0x30                 Used                None              None
可发现第一个malloc的地址空间的status已经变为Freed。
1.2.4 heapinfo
输入heapinfo命令,可以看到更多的信息:
gdb-peda$ heapinfo
(0x20)     fastbin[0]: 0x0
(0x30)     fastbin[1]: 0x602000 --> 0x0
(0x40)     fastbin[2]: 0x0
(0x50)     fastbin[3]: 0x0
(0x60)     fastbin[4]: 0x0
(0x70)     fastbin[5]: 0x0
(0x80)     fastbin[6]: 0x0
(0x90)     fastbin[7]: 0x0
(0xa0)     fastbin[8]: 0x0
(0xb0)     fastbin[9]: 0x0
                  top: 0x602090 (size : 0x20f70)
       last_remainder: 0x0 (size : 0x0)
            unsortbin: 0x0
这是一些与链表相关的内容。本篇主要通过demo和pwngdb的基本命令建立一个直观的印象,后面再来讲解具体的一些原理。
2 ptmalloc
2.1 ptmalloc原理概要
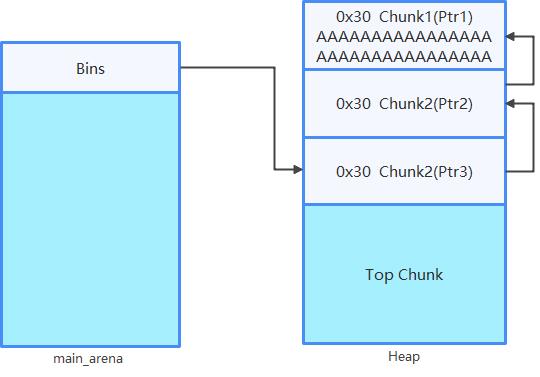
- 第一次调用malloc的时候会先初始化一个叫main_arena的东西,并向kernel申请一大块内存区域,再从这一大块内存区域分割出一个chunk,让malloc回传给程序。
- main_arena存在于libc中,包含了各种与堆相关的数据结构:
- 各种bins链表(可以想象为垃圾桶或回收桶,用于存放一些被free掉的小区块)
- Top chunk
- …
- 之后的malloc/free都是在分配/回收一个叫做chunk的东西,并利用main_arena记录的bins链表管理回收来的chunk。
- 一块内存之后会被切割成大大小小的chunk,没有用到的会归类到Top Chunk。

2.2 实例分析
仍然以example进行讲解:
int main()

        char *ptr1 = malloc(0x20);
        char *ptr2 = malloc(0x20);
        char *ptr3 = malloc(0x20);

        memset(ptr1, 'A', 0x20);

        free(ptr1);
        free(ptr2);
        free(ptr3);

        char *ptr4 = malloc(0x20);
        char *ptr5 = malloc(0x200);
        char *ptr6 = malloc(0x200);

        free(ptr6);
        free(ptr5);

        return 0;
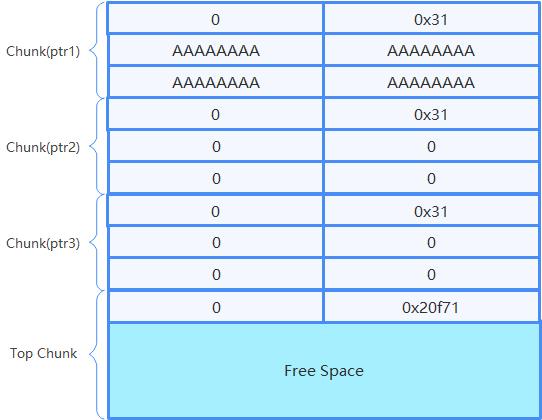
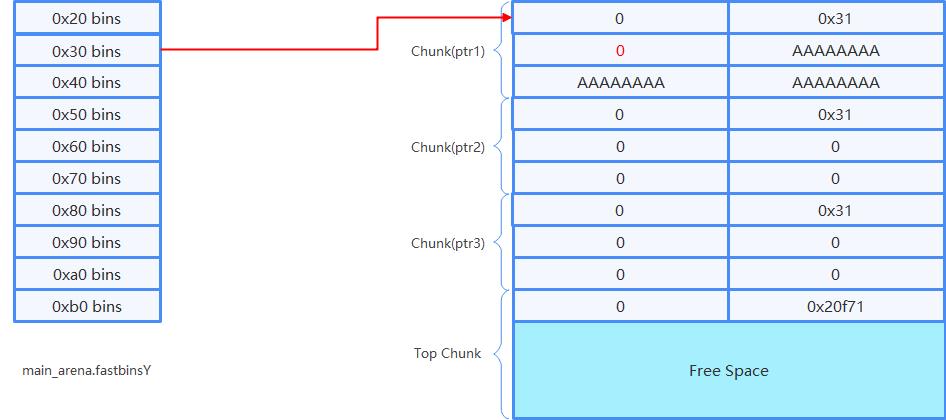
执行完free(ptr3)后的布局如下图所示:
3 Chunk
Chunk可分为Allocated Chunk、Free Chunk和Top Chunk。
Bins分成Fast bin、Small bin、Large bin、Unsorted bin和Tcache。
3.1 通过简单调试引出Chunk的概念
我们在free(ptr2);后的位置通过gdb查看一下调试信息:
gdb-peda$ heapinfo
(0x20)     fastbin[0]: 0x0
(0x30)     fastbin[1]: 0x602030 --> 0x602000 --> 0x0
(0x40)     fastbin[2]: 0x0
(0x50)     fastbin[3]: 0x0
(0x60)     fastbin[4]: 0x0
(0x70)     fastbin[5]: 0x0
(0x80)     fastbin[6]: 0x0
(0x90)     fastbin[7]: 0x0
(0xa0)     fastbin[8]: 0x0
(0xb0)     fastbin[9]: 0x0
                  top: 0x602090 (size : 0x20f70)
       last_remainder: 0x0 (size : 0x0)
            unsortbin: 0x0
fastbin[1]的位置记录了已经回收回来的两个chunk,可通过x/8xg把这些值打出来:
x用于显示内存中的数据,8表示显示8个单元,x表示16进制,g表示8字节。
gdb-peda$ x/8xg 0x602030
0x602030:	0x0000000000000000	0x0000000000000031
0x602040:	0x0000000000602000	0x0000000000000000
0x602050:	0x0000000000000000	0x0000000000000000
0x602060:	0x0000000000000000	0x0000000000000031
gdb-peda$ x/8xg 0x602000
0x602000:	0x0000000000000000	0x0000000000000031
0x602010:	0x0000000000000000	0x4141414141414141
0x602020:	0x4141414141414141	0x4141414141414141
0x602030:	0x0000000000000000	0x0000000000000031
0x602030处chunk的第3个单元是一个指针(0x602000),并指向下一个chunk。
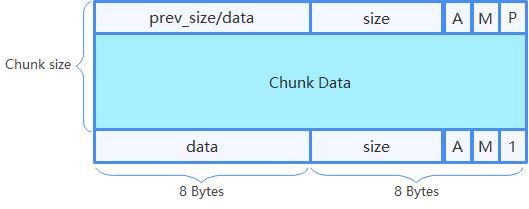
- 每种Chunk有着大同小异的数据结构
- 大致分为Chunk Header和Chunk Data
- 差异在Chunk Header
3.2 Allocated Chunk
- prev_size/data:临近的上一个Chunk的size或data
- size:此Chunk的size
- A(NON_MAIN_ARENA bit):是否由其他的arena管理,而非main_arena(A通常是1,也就是由main arena来管理的);
- M(IS_MMAPPED bit):是否由mmap创建出来的(这个值通常是0,并不是由mmap创建的,而是由ptmalloc内部管理机制切出来的);
- P(PREV_INUSE bit):临近的上一个Chunk是否正在使用,1表示正在使用,0表示未被使用。
问题1:第一个变量有两种身份prev_size和data,什么时候表示prev_size,什么时候表示data?
解答:如果当前的Chunk已经被分配,那么下一个临近的Chunk的第一个变量的身份是data;否则是prev_size。
问题2:malloc 0x20大小的空间时,实际上分配出的Chunk多大?
解答:实际计算Chunk时应当考虑Chunk Header的大小,同时应考虑内存对齐。实际的计算方式在malloc.c中:
#define request2size(req)                                         \\
  (((req) + SIZE_SZ + MALLOC_ALIGN_MASK < MINSIZE)  ?             \\
   MINSIZE :                                                      \\
   ((req) + SIZE_SZ + MALLOC_ALIGN_MASK) & ~MALLOC_ALIGN_MASK)
req是malloc中的参数,就是例子中的0x20;SIZE_SZ为Chunk header第二个单元的大小,8字节;MALLOC_ALIGN_MASK的值是0xf,主要作用是帮助内存对齐;
表达式 ((req) + SIZE_SZ + MALLOC_ALIGN_MASK) & ~MALLOC_ALIGN_MASK为对齐后的大小,假设var=req+SIZE_SZ,若var在0x21-0x2f之间,则对齐后的结果为0x30;若var为0x20,则不对齐,结果为0x20。
套上面代码中的计算公式,对于一些实际分配的情况为:
- malloc(0x20)-----Chunk Size 0x30
- malloc(0x28)-----Chunk Size 0x30
- malloc(0x29)-----Chunk Size 0x40
- malloc(0x2f)-----Chunk Size 0x40
- malloc(0x30)-----Chunk Size 0x40
- malloc(0x38)-----Chunk Size 0x40
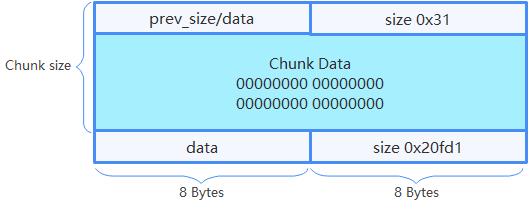
**例子1:**对于第一次malloc(0x20)后,打印出调试信息:
gdb-peda$ x/8xg 0x602000
0x602000:	0x0000000000000000	0x0000000000000031
0x602010:	0x0000000000000000	0x0000000000000000
0x602020:	0x0000000000000000	0x0000000000000000
0x602030:	0x0000000000000000	0x0000000000020fd1
计算过程为,(0x20+0x08+0x0f)&~0xf = 0x30,若A为0,表示在main_arena;M为0,表示非mmap分配;P为1,表示临近的上一块Chunk正在使用中。则Chunk header的第二个单元的值为0x31。由于只分配了一块Chunk,后面紧邻的一块是TOP Chunk,大小为0x20fd1,0xe1对应的二进制为0b11100001,AMP三个bit为001。TOP Chunk的第一个单元的身份为data,但是并没有被用到。
对应调试信息的示意图为:
**例子2:**对于第一次malloc(0x28)后,memset为0x28个A后的情况,即执行如下代码:
        char *ptr1 = malloc(0x28);
        memset(ptr1, 'A', 0x28);
gdb打印出调试信息:
gdb-peda$ x/8xg 0x602000
0x602000:	0x0000000000000000	0x0000000000000031
0x602010:	0x4141414141414141	0x4141414141414141
0x602020:	0x4141414141414141	0x4141414141414141
0x602030:	0x4141414141414141	0x0000000000020fd1
Chunk size的计算过程为: (0x28 + 0x8 + 0xf)&~0xf = 0x30
对应调试信息的示意图为: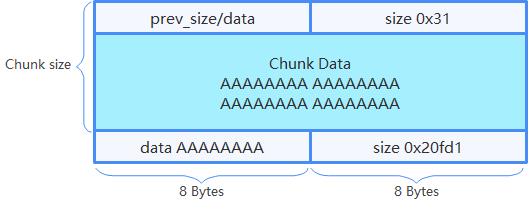
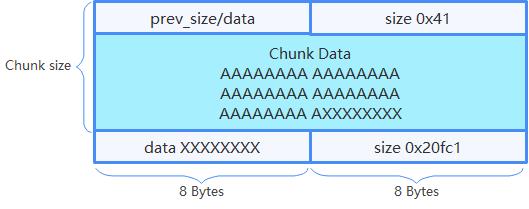
**例子3:**对于第一次malloc(0x29后,memset为0x29个A后的情况,即执行如下代码:
        char *ptr1 = malloc(0x29);
        memset(ptr1, 'A', 0x29);
gdb打印出调试信息:
gdb-peda$ x/10xg 0x602000
0x602000:	0x0000000000000000	0x0000000000000041
0x602010:	0x4141414141414141	0x4141414141414141
0x602020:	0x4141414141414141	0x4141414141414141
0x602030:	0x4141414141414141	0x0000000000000041
0x602040:	0x0000000000000000	0x0000000000020fc1
Chunk size的计算过程为: (0x29 + 0x8 + 0xf)&~0xf = 0x40
对应调试信息的示意图为:
3.3 Free Chunk
- Free掉后的Chunk会根据Size而进到不同的Bins中;
- fd:Forward Pointer,指向下一块Free的Chunk;
- bk:Backward Pointer,指向上一块Free的Chunk;
- 以fd、bk将各个Free Chunk串联起来。
Free掉以后,Free Chunk的示意图为:
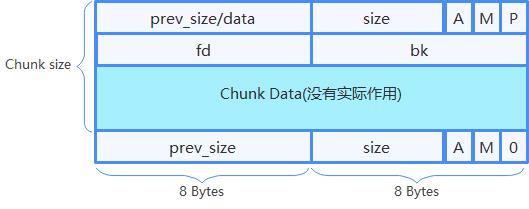
相比Allocated Chunk图中增加了两个指针fd和bk,用于把Free掉的Chunk串起来,填充数据的部分在Free掉以后就没有了任何作用。对于Free Chunk的下一块,Chunk header中的第一个单元的身份应为prev_size,表示上一块物理邻接的Free Chunk的大小,最后一个P标志位为0,表示上一块邻接的Chunk未被使用。
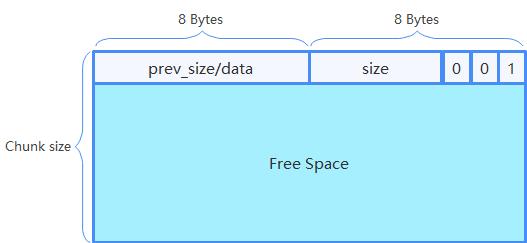
3.4 Top Chunk
在Heap顶端的Chunk,代表着剩余的空间,示意图为:
4 Fastbin
4.1 Fastbin原理
- Free掉Chunk Size小于等于global_max_fast的Chunk,会回收至Fastbin;
- global_max_fast在2.23版本中为0xb0;
- Fastbin共有10个,分别为[0x20, 0x30, 0x40, …, 0xa0, 0xb0];
- 为single linked list(只用了fb,没有用bk);
- e.g. Free掉Chunk Size为0x20的Chunk,会进到0x20 Fastbin的链表;
- Free掉Chunk的时候,并不会清除下一块Chunk的P bit
4.2 Fastbin示例分析
以example中的代码为例,涉及的代码如下:
        char *ptr1 = malloc(0x20);
        char *ptr2 = malloc(0x20);
        char *ptr3 = malloc(0x20);

        memset(ptr1, 'A', 0x20);

        free(ptr1);
        free(ptr2);
        free(ptr3);

		char *ptr4 = malloc(0x20);
执行完memset后的调试信息为:
gdb-peda$ x/20xg 0x602000
0x602000:	0x0000000000000000	0x0000000000000031
0x602010:	0x4141414141414141	0x4141414141414141
0x602020:	0x4141414141414141	0x4141414141414141
0x602030:	0x0000000000000000	0x0000000000000031
0x602040:	0x0000000000000000	0x0000000000000000
0x602050:	0x0000000000000000	0x0000000000000000
0x602060:	0x0000000000000000	0x0000000000000031
0x602070:	0x0000000000000000	0x0000000000000000
0x602080:	0x0000000000000000	0x0000000000000000
0x602090:	0x0000000000000000	0x0000000000020f71
对应的示意图为:
free(ptr1)后的调试信息为:
gdb-peda$ x/20xg 0x602000
0x602000:	0x0000000000000000	0x0000000000000031
0x602010:	0x0000000000000000	0x4141414141414141
0x602020:	0x4141414141414141	0x4141414141414141
0x602030:	0x0000000000000000	0x0000000000000031
0x602040:	0x0000000000000000	0x0000000000000000
0x602050:	0x0000000000000000	0x0000000000000000
0x602060:	0x0000000000000000	0x0000000000000031
0x602070:	0x0000000000000000	0x0000000000000000
0x602080:	0x0000000000000000	0x0000000000000000
0x602090:	0x0000000000000000	0x0000000000020f71
gdb-peda$ heapinfo
(0x20)     fastbin[0]: 0x0
(0x30)     fastbin[1]: 0x602000 --> 0x0
(0x40)     fastbin[2]: 0x0
(0x50)     fastbin[3]: 0x0
(0x60)     fastbin[4]: 0x0
(0x70)     fastbin[5]: 0x0
(0x80)     fastbin[6]: 0x0
(0x90)     fastbin[7]: 0x0
(0xa0)     fastbin[8]: 0x0
(0xb0)     fastbin[9]: 0x0
                  top: 0x602090 (size : 0x20f70)
       last_remainder: 0x0 (size : 0x0)
            unsortbin: 0x0
free掉ptr1后,有两个变化,一是fastbin[1]指向free Chunk的位置,二是free Chunk的fb字段赋值为0,相当于一个Null Pointer,表示该Chunk是fastbin[1]链表中的最后一个Chunk。对应的示意图为:
free(ptr2)后的调试信息为:
gdb-peda$ x/20xg 0x602000
0x602000:	0x0000000000000000	0x0000000000000031
0x602010:	0x0000000000000000	0x4141414141414141
0x602020:	0x4141414141414141	0x4141414141414141
0x602030:	0x0000000000000000	0x0000000000000031
0x602040:	0x0000000000602000	0x0000000000000000
0x602050:	0x0000000000000000	0x0000000000000000
0x602060:	0x0000000000000000	0x0000000000000031
0x602070:	0x0000000000000000	0x0000000000000000
0x602080:	0x0000000000000000	0x0000000000000000
0x602090:	0x0000000000000000	0x0000000000020f71
gdb-peda$ heapinfo
(0x20)     fastbin[0]: 0x0
(0x30)     fastbin[1]: 0x602030 --> 0x602000 --> 0x0
(0x40)     fastbin[2]: 0x0
(0x50)     fastbin[3]: 0x0
(0x60)     fastbin[4]: 0x0
(0x70)     fastbin[5]: 0x0
(0x80)     fastbin[6]: 0x0
(0x90)     fastbin[7]: 0x0
(0xa0)     fastbin[8]: 0x0
(0xb0)     fastbin[9]: 0x0
                  top: 0x602090 (size : 0x20f70)
       last_remainder: 0x0 (size : 0x0)
            unsortbin: 0x0
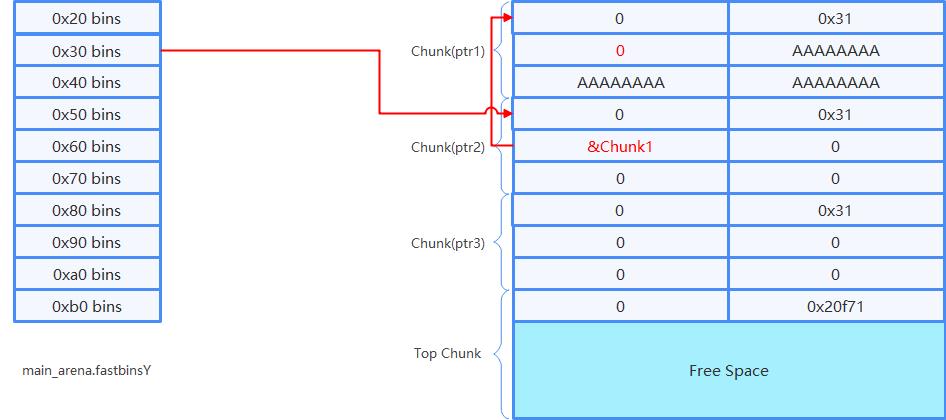
此时fastbin[1]指向第二个Chunk,第二个Chunk的fb指针指向第一个Chunk。对应的示意图为:
free(ptr3)后的调试信息为:
gdb-peda$ x/20xg 0x602000
0x602000:	0x0000000000000000	0x0000000000000031
0x602010:	0x0000000000000000	0x4141414141414141
0x602020:	0x4141414141414141	0x4141414141414141
0x602030:	0x0000000000000000	0x0000000000000031
0x602040:	0x0000000000602000	0x0000000000000000
0x602050:	0x0000000000000000	0x0000000000000000
0x602060:	0x0000000000000000	0x0000000000000031
0x602070:	0x0000000000602030	0x0000000000000000
0x602080:	0x0000000000000000	0x0000000000000000
0x602090:	0x0000000000000000	0x0000000000020f71
gdb-peda$ heapinfo
(0x20)     fastbin[0]: 0x0
(0x30)     fastbin[1]: 0x602060 --> 0x602030 --> 0x602000 --> 0x0
(0x40)     fastbin[2]: 0x0
(0x50)     fastbin[3]: 0x0
(0x60)     fastbin[4]: 0x0
(0x70)     fastbin[5]: 0x0
(0x80)     fastbin[6]: 0x0
(0x90)     fastbin[7]: 0x0
(0xa0)     fastbin[8]: 0x0
(0xb0)     fastbin[9]: 0x0
                  top: 0x602090 (size : 0x20f70)
       last_remainder: 0x0 (size : 0x0)
            unsortbin: 0x0
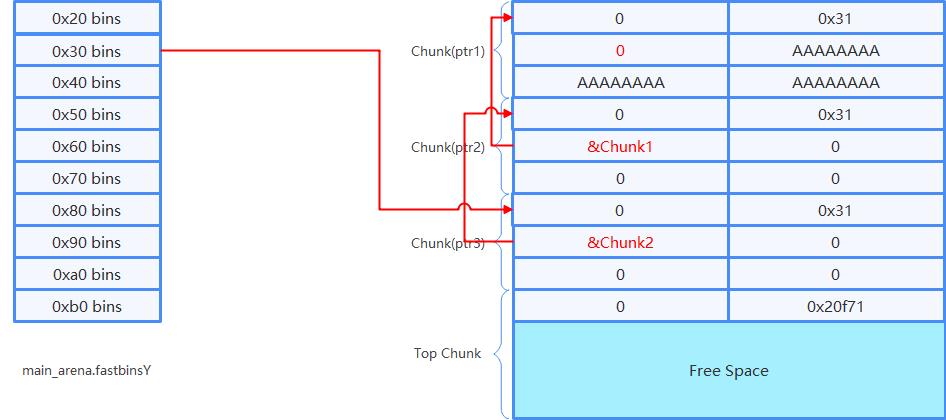
此时fastbin[1]指向第3个Chunk,第3个Chunk的fb指针指向第2个Chunk,第2个Chunk的fb指针指向第1个Chunk。对应的示意图为:
接下来,程序会再次执行malloc指令:
char *ptr4 = malloc(0x20);
这个时候,堆管理器会先从fastbins去找有没有已经释放的大小合适的Chunk,如果有就会把这个Free掉的Chunk重新分配给用户。再次执行malloc后,的调试信息为:
gdb-peda$ x/20xg 0x602000
0x602000:	0x0000000000000000	0x0000000000000031
0x602010:	0x0000000000000000	0x4141414141414141
0x602020:	0x4141414141414141	0x4141414141414141
0x602030:	0x0000000000000000	0x0000000000000031
0x602040:	0x0000000000602000	0x0000000000000000
0x602050:	0x0000000000000000	0x0000000000000000
0x602060:	0x0000000000000000	0x0000000000000031
0x602070:	0x0000000000602030	0x0000000000000000
0x602080:	0x0000000000000000	0x0000000000000000
0x602090:	0x0000000000000000	0x0000000000020f71
gdb-peda$ heapinfo
(0x20)     fastbin[0]: 0x0
(0x30)     fastbin[1]: 0x602030 --> 0x602000 --> 0x0
(0x40)     fastbin[2]: 0x0
(0x50)     fastbin[3]: 0x0
(0x60)     fastbin[4]: 0x0
(0x70)     fastbin[5]: 0x0
(0x80)     fastbin[6]: 0x0
(0x90)     fastbin[7]: 0x0
(0xa0)     fastbin[8]: 0x0
(0xb0)     fastbin[9]: 0x0
                  top: 0x602090 (size : 0x20f70)
       last_remainder: 0x0 (size : 0x0)
            unsortbin: 0x0
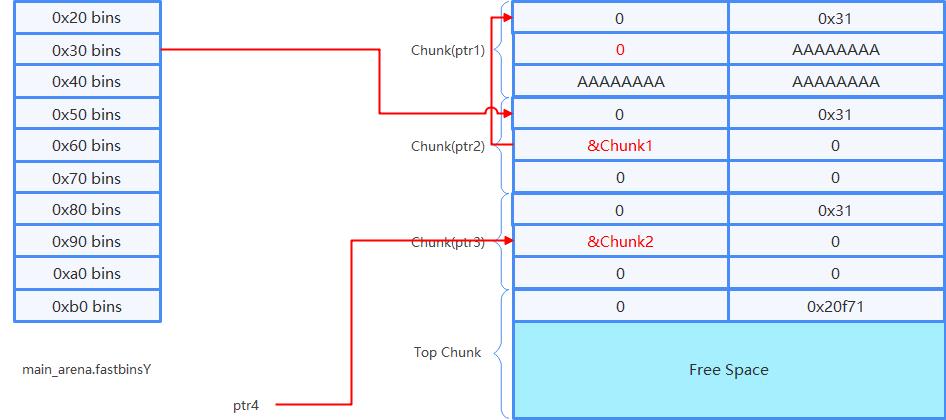
这个时候我们比较一下char *ptr4 = malloc(0x20);前后的调试信息,heap的address space是没有变化的,区别是fastbin[1]链表中少了Chunk3,指向Chunk2。而ptr4指针则指向原来Chunk3的位置。对应的示意图为:
4.3 Fastbin小结
- LIFO
- fd指向下一块Free Chunk的Chunk Header
- 不会改变临近的下一块Chunk的P bit
- 在free时,如果下一块是Top Chunk,并不会被合并进去
5 Tcache
5.1 Tcache原理
- 从libc 2.26开始使用
- Tcache的出现是为了加速程序效率
- Tcache有许多,分别为[0x20, 0x30, 0x40, …, 0x410],有很广的range
- 为singly linked list(和fastbin一样)
- 每个Tcache最多收7个Chunks
- Free这类Chunk时,不会清除下一块Chunk的P bit
- 用结构tcache_perthread_struct管理Tcache,指向此结构的指针存在于TLS中
5.2 Tcache示例分析
代码仍为example.c,但需要libc 2.26以上的环境进行编译。如果不知道当前linux中的libc的版本,可通过如下命令来查看:
xiaot@ubuntu:~/Desktop$ ldd --version
ldd (Ubuntu GLIBC 2.31-0ubuntu9.2) 2.31
Copyright (C) 2020 Free Software Foundation, Inc.
This is free software; see the source for copying conditions.  There is NO
warranty; not even for MERCHANTABILITY or FITNESS FOR A PARTICULAR PURPOSE.
Written by Roland McGrath and Ulrich Drepper.
可以看出,采用的是2.31的glibc。
为避免读者往上翻,再放一遍源代码:
int main()

        char *ptr1 = malloc(0x20);
        char *ptr2 = malloc(0x20);
        char *ptr3 = malloc(0x20);

        memset(ptr1, 'A', 0x20);

        free(ptr1);
        free(ptr2);
        free(ptr3);

        char *ptr4 = malloc(0x20);
        char *ptr5 = malloc(0x200);
        char *ptr6 = malloc(0x200);

        free(ptr6);
        free(ptr5);

        return 0;
5.2.1 第一次malloc的初始化情况
第一次执行malloc前后,相关数据结构的初始化情况为:
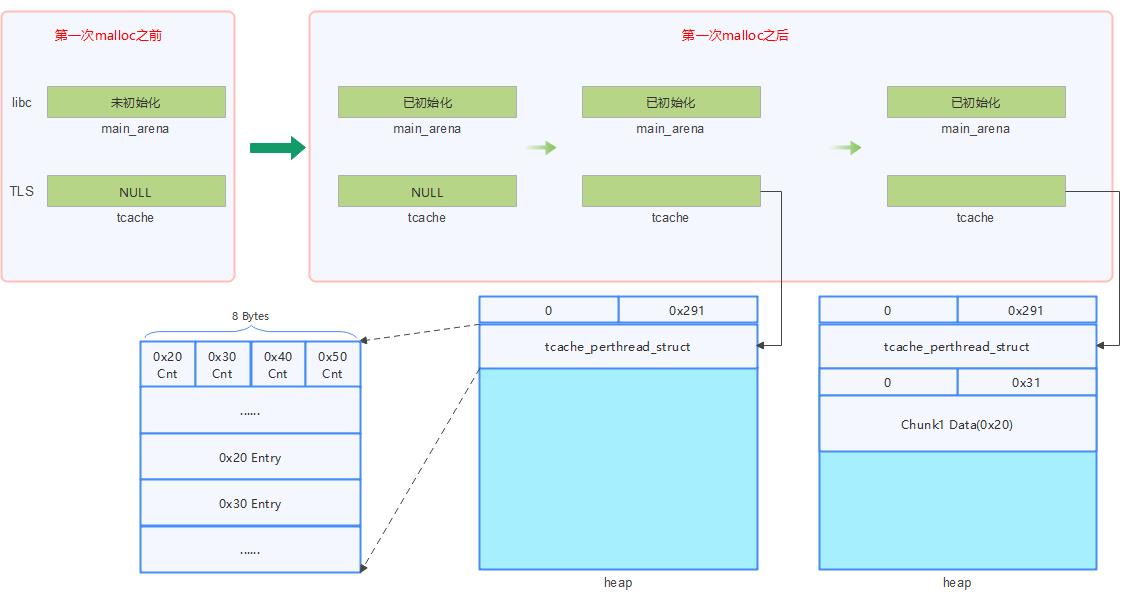
在执行第一次malloc之前,libc中的main_arena处于未初始化的状态,TLS中tcache为NULL,
第一次执行malloc会申请一大块内存作为heap,并初始化main_arena,在分出0x20的空间之前,会接着初始化tcache_perthread_struct。
tcache_perthread_struct会在heap头部的位置,0x291表示含chunk头为0x290,chunk size大小为0x280,把这个结构展开看一下,这个结构主要包括Counts和Entries。图中的每一行为8bytes,里面的0x20 Cnt、0x30 Cnt等等这些位置均为计数器,每个占2bytes,后面是相应的Entry入口。初始情况下,0x20 Entry为NULL,里面没有已分配的Chunk,0x20 Cnt为0,和0x20 Entry中Chunk的个数对应。
gdb调试,在第一次malloc后的情况为:
pwndbg> parseheap
addr                prev                size                 status              fd                bk
0x555555559000      0x0                 0x290                Used                None              None
0x555555559290      0x0                 0x30                 Used                None              None
pwndbg> heapinfo
(0x20)     fastbin[0]: 0x0
(0x30)     fastbin[1]: 0x0
(0x40)     fastbin[2]: 0x0
(0x50)     fastbin[3]: 0x0
(0x60)     fastbin[4]: 0x0
(0x70)     fastbin[5]: 0x0
(0x80)     fastbin[6]: 0x0
(0x90)     fastbin[7]: 0x0
(0xa0)     fastbin[8]: 0x0
(0xb0)     fastbin[9]: 0x0
                  top: 0x5555555592c0 (size : 0x20d40)
       last_remainder: 0x0 (size : 0x0)
            unsortbin: 0x0
可以看出,parseheap有两列,第一列大小0x290,为tcache_perthread_struct,第二列为malloc产生的第一个chunk,
5.2.2 三次malloc和memset后
执行三次malloc,memset后的布局为:
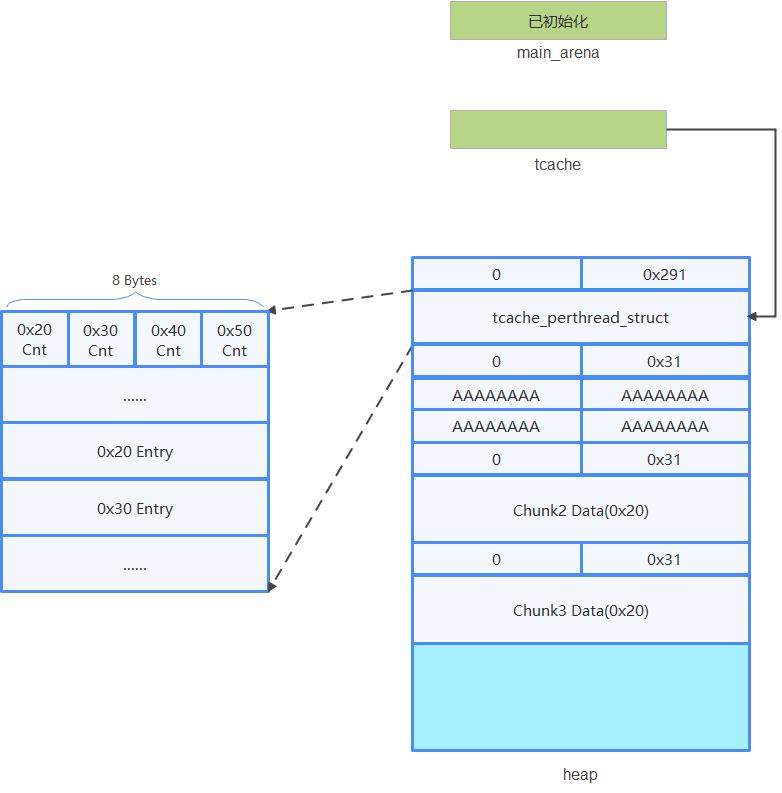
此时,Heap中连续分配了三个0x30的Chunk,由于还没有回收,tcache_perthread_struct结构并没有变化。
gdb调试,在第三次malloc和memset后的情况为:
pwndbg> parseheap
addr                prev                size                 status              fd                bk
0x555555559000      0x0                 0x290                Used                None              None
0x555555559290      0x0                 0x30                 Used                None              None
0x5555555592c0      0x0                 0x30                 Used                None              None
0x5555555592f0      0x0                 0x30                 Used                None              None
pwndbg> heapinfo
(0x20)     fastbin[0]: 0x0
(0x30)     fastbin[1]: 0x0
(0x40)     fastbin[2]: 0x0
(0x50)     fastbin[3]: 0x0
(0x60)     fastbin[4]: 0x0
(0x70)     fastbin[5]: 0x0
(0x80)     fastbin[6]: 0x0
(0x90)     fastbin[7]: 0x0
(0xa0)     fastbin[8]: 0x0
(0xb0)     fastbin[9]: 0x0
                  top: 0x555555559320 (size : 0x20ce0)
       last_remainder: 0x0 (size : 0x0)
            unsortbin: 0x0
pwndbg> x/20xg 0x555555559290
0x555555559290:	0x0000000000000000	0x0000000000000031
0x5555555592a0:	0x4141414141414141	0x4141414141414141
0x5555555592b0:	0x4141414141414141	0x4141414141414141
0x5555555592c0:	0x0000000000000000	0x0000000000000031
0x5555555592d0:	0x0000000000000000	0x0000000000000000
0x5555555592e0:	0x0000000000000000	0x0000000000000000
0x5555555592f0:	0x0000000000000000	0x0000000000000031
0x555555559300:	0x0000000000000000	0x0000000000000000
0x555555559310:	0x0000000000000000	0x0000000000000000
0x555555559320:	0x0000000000000000	0x0000000000020ce1
5.2.3 一次free后
接着执行1次free调用后的内存布局为:
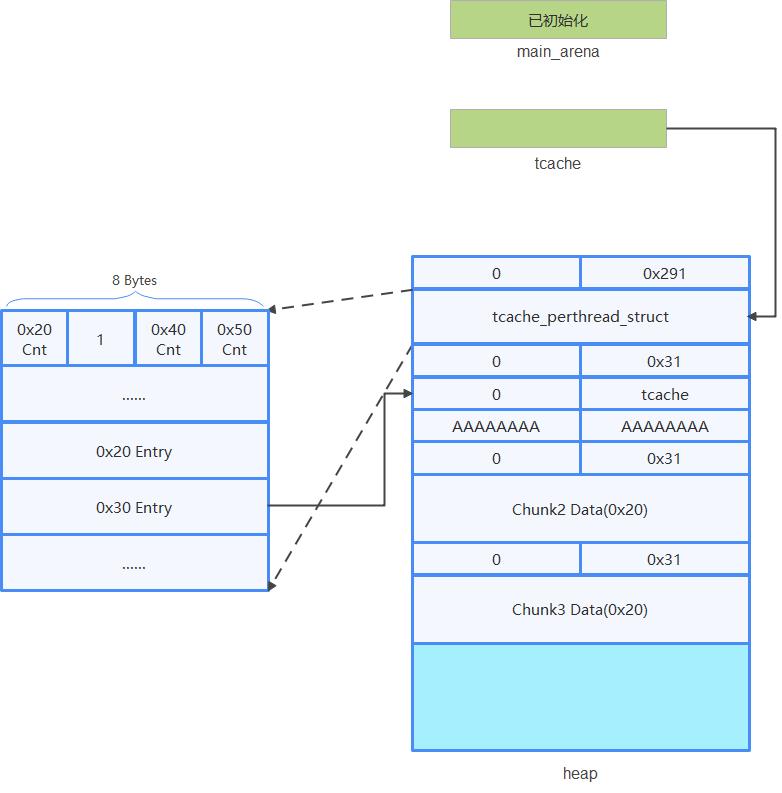
0x30 entry会指向被free的Chunk,注意这里指向的不是Chunk header的地址,而是从偏移0x10开始的地址,填入fd(0),并在dk的位置填入一个key,用于安全检查,这个填入的值为tcache指向的位置。同时,在tcache_perthread_struct中0x30 Cnt的位置中的值由0增加到1。
gdb调试,在第一次free后的情况为:
pwndbg> parseheap
addr                prev                size                 status              fd                bk
0x555555559000      0x0                 0x290                Used                None              None
0x555555559290      0x0                 0x30                 Freed                0x0              None
0x5555555592c0      0x0                 0x30                 Used                None              None
0x5555555592f0      0x0                 0x30                 Used                None              None
pwndbg> heapinfo
(0x20)     fastbin[0]: 0x0
(0x30)     fastbin[1]: 0x0
(0x40)     fastbin[2]: 0x0
(0x50)     fastbin[3]: 0x0
(0x60)     fastbin[4]: 0x0
(0x70)     fastbin[5]: 0x0
(0x80)     fastbin[6]: 0x0
(0x90)     fastbin[7]: 0x0
(0xa0)     fastbin[8]: 0x0
(0xb0)     fastbin[9]: 0x0
                  top: 0x555555559320 (size : 0x20ce0)
       last_remainder: 0x0 (size : 0x0)
            unsortbin: 0x0
(0x30)   tcache_entry[1](1): 0x5555555592a0
可以看到0x555555559290处的Chunk为Free Chunk,tcache_entry[1]的入口(0x30)0x5555555592a0指向这个Chunk的Chunk data部分。
接着把tcache_perthread_struct的一部分打出来:
pwndbg> x/20xg 0x555555559000
0x555555559000:	0x0000000000000000	0x0000000000000291
0x555555559010:	0x0000000000010000	0x0000000000000000
0x555555559020:	0x0000000000000000	0x0000000000000000
0x555555559030:	0x0000000000000000	0x0000000000000000
0x555555559040:	0x0000000000000000	0x0000000000000000
0x555555559050:	0x0000000000000000	0x0000000000000000
0x555555559060:	0x0000000000000000	0x0000000000000000
0x555555559070:	0x0000000000000000	0x0000000000000000
0x555555559080:	0x0000000000000000	0x0000000000000000
0x555555559090:	0x0000000000000000	0x00005555555592a0
可看到0x30 Cnt的位置已经变为1,也表明tcache_entry[1]收入了一个free Chunk。最后一行第二个8字节为第二个表头(Tcache 0x30),它指向第1个Chunk数据部分的位置。
我们再把3个Chunk打出来:
pwndbg> x/20xg 0x555555559290
0x555555559290:	0x0000000000000000	0x0000000000000031
0x5555555592a0:	0x0000000000000000	0x0000555555559010
0x5555555592b0:	0x4141414141414141	0x4141414141414141
0x5555555592c0:	0x0000000000000000	0x0000000000000031
0x5555555592d0:	0x0000000000000000	0x0000000000000000
0x5555555592e0:	0x0000000000000000	0x0000000000000000
0x5555555592f0:	0x0000000000000000	0x0000000000000031
0x555555559300:	0x0000000000000000	0x0000000000000000
0x555555559310:	0x0000000000000000	0x0000000000000000
0x555555559320:	0x0000000000000000	0x0000000000020ce1
可以看到第一个Chunk的fd位置已经写入了0,表明是tcache_entry[1]链表中最后一个Chunk,dk的位置写入了key0x0000555555559010,这个值就是tcache_perthread_struct的数据部分。
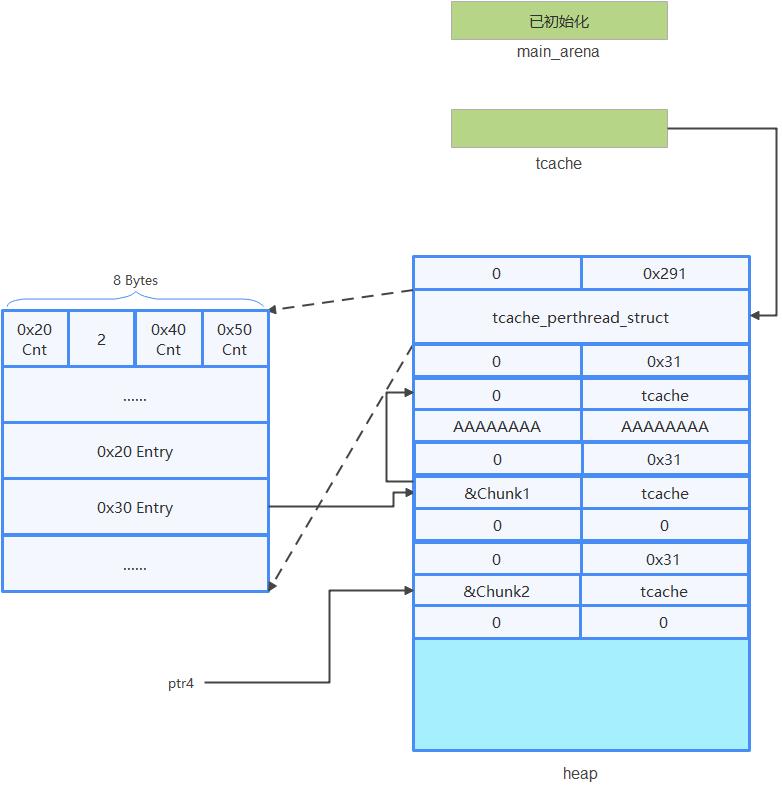
5.2.4 三次free后
执行三次后相关内存的布局为:
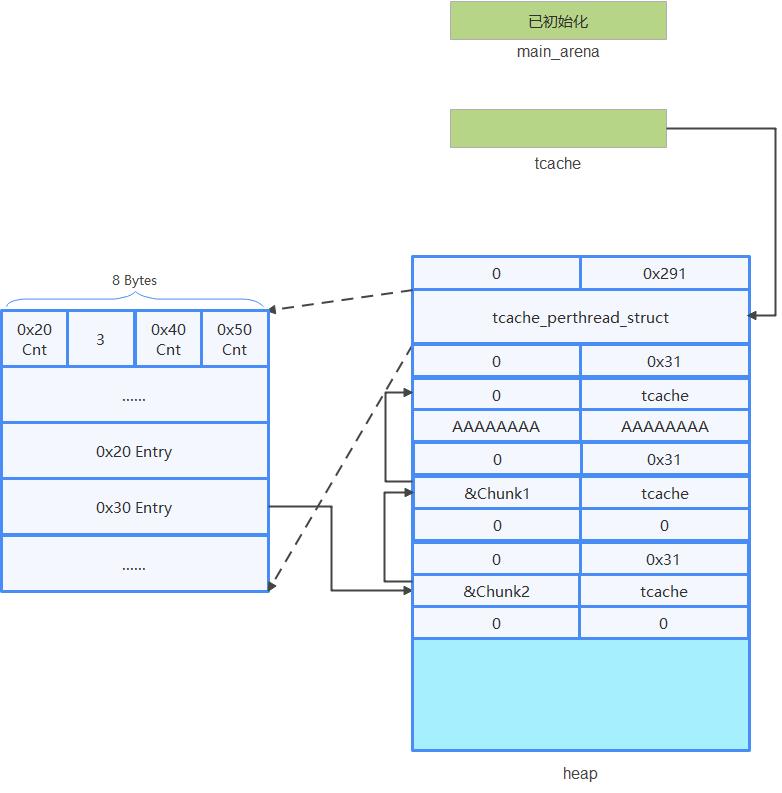
此时,0x30 Entry中收了3个元素,并通过fd串成链表,相应的计数器0x30 Cnt增加到3。
gdb调试,看一下3次free后的情况:
pwndbg> parseheap
addr                prev                size                 status              fd                bk
0x555555559000      0x0                 0x290                Used                None              None
0x555555559290      0x0                 0x30                 Freed                0x0              None
0x5555555592c0      0x0                 0x30                 Freed     0x5555555592a0              None
0x5555555592f0      0x0                 0x30                 Freed     0x5555555592d0              None
pwndbg> heapinfo
(0x20)     fastbin[0]: 0x0
(0x30)     fastbin[1]: 0x0
(0x40)     fastbin[2]: 0x0
(0x50)     fastbin[3]: 0x0
(0x60)     fastbin[4]: 0x0
(0x70)     fastbin[5]: 0x0
(0x80)     fastbin[6]: 0x0
(0x90)     fastbin[7]: 0x0
(0xa0)     fastbin[8]: 0x0
(0xb0)     fastbin[9]: 0x0
                  top: 0x555555559320 (size : 0x20ce0)
       last_remainder: 0x0 (size : 0x0)
            unsortbin: 0x0
(0x30)   tcache_entry[1](3): 0x555555559300 --> 0x5555555592d0 --> 0x5555555592a0
可看到,此时3个Chunk均为Freed状态,tcache_entry[1]中已经收入了3个成员。
将三个Chunk打印出来:
pwndbg> x/20xg 0x555555559290
0x555555559290:	0x0000000000000000	0x0000000000000031
0x5555555592a0:	0x0000000000000000	0x0000555555559010
0x5555555592b0:	0x4141414141414141	0x4141414141414141
0x5555555592c0:	0x0000000000000000	0x0000000000000031
0x5555555592d0:	0x00005555555592a0	0x0000555555559010
0x5555555592e0:	0x0000000000000000	0x0000000000000000
0x5555555592f0:	0x0000000000000000	0x0000000000000031
0x555555559300:	0x00005555555592d0	0x0000555555559010
0x555555559310:	0x0000000000000000	0x0000000000000000
0x555555559320:	0x0000000000000000	0x0000000000020ce1
可看出三者已形成链表,并写入KEY值。
再来看一下tcache_perthread_struct的情况:
pwndbg> x/20xg 0x555555559000
0x555555559000:	0x0000000000000000	0x0000000000000291
0x555555559010:	0x0000000000030000	0x0000000000000000
0x555555559020:	0x0000000000000000	0x0000000000000000
0x555555559030:	0x0000000000000000	0x0000000000000000
0x555555559040:	0x0000000000000000	0x0000000000000000
0x555555559050:	0x0000000000000000	0x0000000000000000
0x555555559060:	0x0000000000000000	0x0000000000000000
0x555555559070:	0x0000000000000000	0x0000000000000000
0x555555559080:	0x0000000000000000	0x0000000000000000
0x555555559090:	0x0000000000000000	0x0000555555559300
可看到相应的计数也为3;最后一行第二个8字节为第二个表头(Tcache 0x30),它指向第3个Chunk数据部分的位置。
5.2.5 再次malloc(0x20)
再次malloc(0x20)时,会把0x30 Entry指向的第一个Chunk拿出来,布局图为:
此时,计数器减1,变为2。
gdb调试,再次malloc后的情况为:
pwndbg> parseheap
addr                prev                size                 status              fd                bk
0x555555559000      0x0                 0x290                Used                None              None
0x555555559290      0x0                 0x30                 Freed                0x0              None
0x5555555592c0      0x0                 0x30                 Freed     0x5555555592a0              None
0x5555555592f0      0x0                 0x30                 Freed     0x5555555592d0              None
pwndbg> heapinfo
(0x20)     fastbin[0]: 0x0
(0x30)     fastbin[1]: 0x0
(0x40)     fastbin[2]: 0x0
(0x50)     fastbin[3]: 0x0
(0x60)     fastbin[4]: 0x0
(0x70)     fastbin[5]: 0x0
(0x80)     fastbin[6]: 0x0
(0x90)     fastbin[7]: 0x0
(0xa0)     fastbin[8]: 0x0
(0xb0)     fastbin[9]: 0x0
                  top: 0x555555559320 (size : 0x20ce0)
       last_remainder: 0x0 (size : 0x0)
            unsortbin: 0x0
(0x30)   tcache_entry[1](2): 0x5555555592d0 --> 0x5555555592a0
虽然parseheap显示3块Chunk的状态均为Freed的状态,但tcache_entry[1]只收了两个Chunk,第3个Chunk的地址返回给了RAX寄存器,即ptr4。这也说明Free时,不会改临近的下一块Chunk的P bit。
将3个Chunk打印出来:
pwndbg> x/20xg 0x555555559290
0x555555559290:	0x0000000000000000	0x0000000000000031
0x5555555592a0:	0x0000000000000000	0x0000555555559010
0x5555555592b0:	0x4141414141414141	0x4141414141414141
0x5555555592c0:	0x0000000000000000	0x0000000000000031
0x5555555592d0:	0x00005555555592a0	0x0000555555559010
0x5555555592e0:	0x0000000000000000	0x0000000000000000
0x5555555592f0:	0x0000000000000000	0x0000000000000031
0x555555559300:	0x00005555555592d0	0x0000000000000000
0x555555559310:	0x0000000000000000	0x0000000000000000
0x555555559320:	0x0000000000000000	0x0000000000020ce1
可看到与三次Free后的唯一区别是第三个Chunk的KEY部分被清0了。
将tcache_perthread_struct打印出来:
pwndbg> x/20xg 0x555555559000
0x555555559000:	0x0000000000000000	0x0000000000000291
0x555555559010:	0x0000000000020000	0x0000000000000000
0x555555559020:	0x0000000000000000	0x0000000000000000
0x555555559030:	0x0000000000000000	0x0000000000000000
0x555555559040:	0x0000000000000000	0x0000000000000000
0x555555559050:	0x0000000000000000	0x0000000000000000
0x555555559060:	0x0000000000000000	0x0000000000000000
0x555555559070:	0x0000000000000000	0x0000000000000000
0x555555559080:	0x0000000000000000	0x0000000000000000
0x555555559090:	0x0000000000000000	0x00005555555592d0
可看到Tcache 0x30中的计数已经变为2,tcache_entry[1]的入口为0x00005555555592d0。
5.3 Tcache小结
-
跟Fastbin很像
- LIFO
- fd指向下一块Free Chunk的Chunk Data
- 不会改临近的下一块Chunk的P bit
- 在free时,如果下一块是Top Chunk,并不会被合并进去
-
Size range比Fastbin大很多
-
每个Tcache最多只能装7个Chunk
-
Fastbin的fd是指到Chunk Header;Tcache的fd是指到Chunk Data
6 Unsorted bin
当程序申请大于global_max_fast内存时,分配器遍历unsorted bin,每次取最后的一个unsorted chunk。
- 如果unsorted chunk满足以下四个条件,它就会被切割为一块满足申请大小的chunk和另一块剩下的chunk,前者返回给程序,后者重新回到unsorted bin。
(1)申请大小属于small bin范围
(2)unsorted bin中只有该chunk
(3)这个chunk同样也是last remainder chunk
(4)切割之后的大小依然可以作为一个chunk - 否则,从unsorted bin中删除unsorted chunk。
(1)若unsorted chunk恰好和申请大小相同,则直接返回这个chunk
(2)若unsorted chunk属于small bin范围,插入到相应small bin
(3)若unsorted chunk属于large bin范围,则跳转到3 - 此时unsorted chunk属于large bin范围
(1)若对应large bin为空,直接插入unsorted chunk,其fd_nextsize与bk_nextsize指向自身。
(2)否则,跳转到4。 - 到这一步,我们需按大小降序插入对应large bin。
(1)若对应large bin最后一个chunk大于unsorted chunk,则插入到最后。
(2)否则,从对应large bin第一个chunk开始,沿fd_nextsize(即变小)方向遍历,直到找到一个chunk fwd,其大小小于等于unsorted chunk的大小。
- a. 若fwd大小等于unsorted chunk大小,则插入到fwd后面
- b. 否则,插入到fwd前面
直到找到满足要求的unsorted chunk,或无法找到,去top chunk切割为止。
以上是关于[ctf pwn] heap exploitation:ptmalloc的原理的主要内容,如果未能解决你的问题,请参考以下文章