android 之 Dialog
Posted 叶常绿
tags:
篇首语:本文由小常识网(cha138.com)小编为大家整理,主要介绍了android 之 Dialog相关的知识,希望对你有一定的参考价值。
android平台下对话框主要有普通对话框、选项对话框、单选多选对话框、进度对话框、日期对话框、时间对话框等。
在程序中通过开发回调方法onCreateDialog来完成对话框的创建,该方法需要传入代表对话框id参数。如果要显示对话框,则调用showDialog方法传入对话框的id来显示指定对话框。
当对话框第一次被显示时,会调用onCreateDialog方法来创建对话框实例,之后将不再重复创建该实例。每次对话框在被显示之前都会调用onPrepareDialog方法,如不重写该方法,每次显示的对话框都将是最初创建的那个。
关闭对话框可用dismiss方法实现。但如果需要让对话框在关闭之后彻底被清除,要调用removeDialog方法并传入dialog的id来彻底释放对话框。
onDismissListener方法可在关闭对话框时执行一些特定工作。
例子如下:
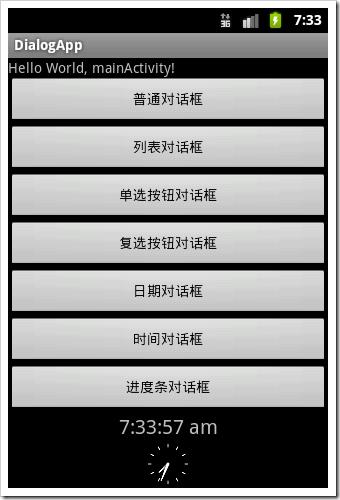
界面上放置四个按钮:
<?xml version="1.0" encoding="utf-8"?>
<LinearLayout xmlns:android="http://schemas.android.com/apk/res/android"
android:orientation="vertical" android:layout_width="fill_parent"
android:layout_height="fill_parent">
<TextView android:id="@+id/tv01" android:layout_width="fill_parent"
android:layout_height="wrap_content" android:text="@string/hello" />
<Button android:id="@+id/bt01" android:layout_width="fill_parent"
android:layout_height="wrap_content" android:text="普通对话框" />
<Button android:id="@+id/bt02" android:layout_width="fill_parent"
android:layout_height="wrap_content" android:text="列表对话框" />
<Button android:id="@+id/bt03" android:layout_width="fill_parent"
android:layout_height="wrap_content" android:text="单选按钮对话框" />
<Button android:id="@+id/bt04" android:layout_width="fill_parent"
android:layout_height="wrap_content" android:text="复选按钮对话框" />
<Button android:id="@+id/bt05" android:layout_width="fill_parent"
android:layout_height="wrap_content" android:text="日期对话框" />
<Button android:id="@+id/bt06" android:layout_width="fill_parent"
android:layout_height="wrap_content" android:text="时间对话框" />
<Button android:id="@+id/bt07" android:layout_width="fill_parent"
android:layout_height="wrap_content" android:text="进度条对话框" />
<DigitalClock android:text="DigitalClock"
android:textSize="20dip" android:gravity="center" android:id="@+id/dclock01"
android:layout_width="fill_parent" android:layout_height="wrap_content" />
<AnalogClock android:text="AnalogClock" android:textSize="20dip"
android:gravity="center" android:id="@+id/aclock01"
android:layout_width="fill_parent" android:layout_height="wrap_content" />
</LinearLayout>
为每个按钮绑定OnClikListener,其中用showDialog(id)方法显示对话框:
bt01.setOnClickListener(new Button.OnClickListener(){
@Override
public void onClick(View v) {
// TODO Auto-generated method stub
showDialog(COMMON_DIALOG);
}});
覆写onCreateDialog方法:
@Override
protected Dialog onCreateDialog(int id) {
// TODO Auto-generated method stub
Dialog dialog = null;
switch (id) {
case COMMON_DIALOG:
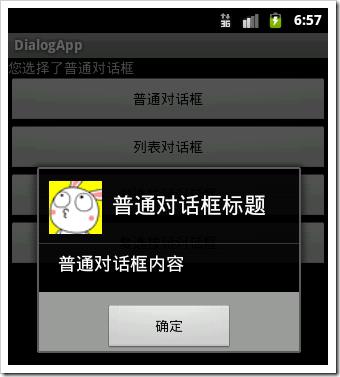
Builder b1 = new AlertDialog.Builder(this);
b1.setIcon(R.drawable.img01);
b1.setTitle("普通对话框标题");
b1.setMessage("普通对话框内容");
b1.setPositiveButton("确定", new OnClickListener() {@Override
public void onClick(DialogInterface dialog, int which) {
// TODO Auto-generated method stub
tv.setText("您选择了普通对话框");
}
});
dialog = b1.create();
break;
case LIST_DIALOG:
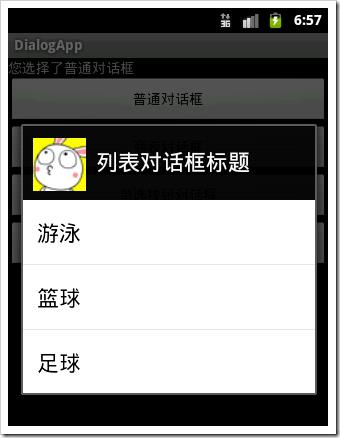
Builder b2 = new AlertDialog.Builder(this);
b2.setIcon(R.drawable.img01);
b2.setTitle("列表对话框标题");
b2.setItems(R.array.msa, new DialogInterface.OnClickListener() {
@Override
public void onClick(DialogInterface dialog, int which) {
// TODO Auto-generated method stub
tv.setText("您选择了:"+getResources().getStringArray(R.array.msa)[which]);
}
});
dialog = b2.create();
break;/*其中R.array.msa在res/values下array.xml中:
<?xml version="1.0" encoding="utf-8"?>
<resources>
<string-array name="msa">
<item>游泳</item>
<item>篮球</item>
<item>足球</item>
</string-array>
</resources>*/
case LIST_DIALOG_SINGLE:
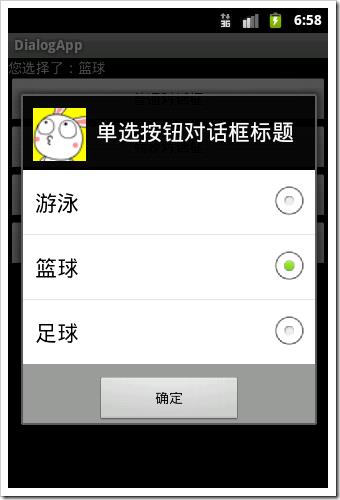
Builder b3 = new AlertDialog.Builder(this);
b3.setIcon(R.drawable.img01);
b3.setTitle("单选按钮对话框标题");
b3.setSingleChoiceItems(R.array.msa, 0,new DialogInterface.OnClickListener() {
@Override
public void onClick(DialogInterface dialog, int which) {
// TODO Auto-generated method stub
tv.setText("您选择了:"+getResources().getStringArray(R.array.msa)[which]);
}
});
b3.setPositiveButton("确定", new DialogInterface.OnClickListener() {
@Override
public void onClick(DialogInterface dialog, int which) {
// TODO Auto-generated method stub
}
});
dialog = b3.create();
break;
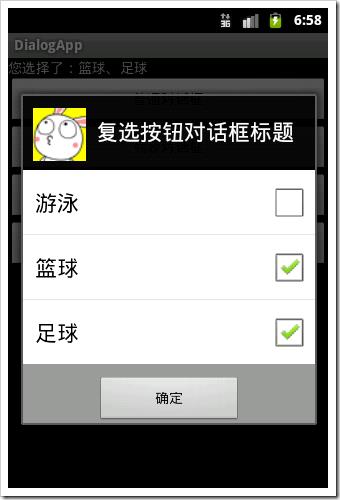
Builder b4 = new AlertDialog.Builder(this);
b4.setIcon(R.drawable.img01);
b4.setTitle("复选按钮对话框标题");
b4.setMultiChoiceItems(R.array.msa, mulFlags,new DialogInterface.OnMultiChoiceClickListener() {
@Override
public void onClick(DialogInterface dialog, int which, boolean isChecked) {
// TODO Auto-generated method stub
mulFlags[which]=isChecked;
String result="您选择了:";
for(int i=0;i<mulFlags.length;i++){
if(mulFlags[i]){
result+=items[i]+"、";
}
}
tv.setText(result.substring(0, result.length()-1));
}
});
b4.setPositiveButton("确定", new DialogInterface.OnClickListener() {
@Override
public void onClick(DialogInterface dialog, int which) {
// TODO Auto-generated method stub
}
});
dialog = b4.create();
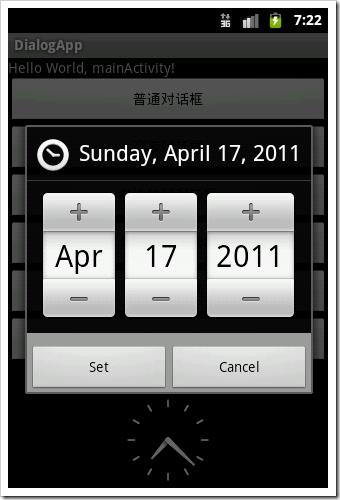
break;case DATE_DIALOG:
c=Calendar.getInstance();
dialog=new DatePickerDialog(this, new DatePickerDialog.OnDateSetListener() {
@Override
public void onDateSet(DatePicker view, int year, int monthOfYear,
int dayOfMonth) {
// TODO Auto-generated method stub
tv.setText("您选择了"+year+"年"+monthOfYear+"月"+dayOfMonth+"日");
}
}, c.get(Calendar.YEAR), c.get(Calendar.MONTH), c.get(Calendar.DAY_OF_MONTH));
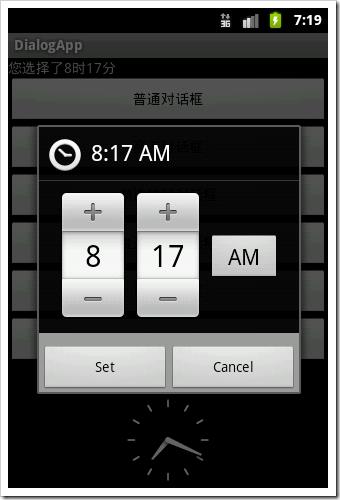
case TIME_DIALOG:
c=Calendar.getInstance();
dialog=new TimePickerDialog(this, new TimePickerDialog.OnTimeSetListener() {@Override
public void onTimeSet(TimePicker view, int hourOfDay, int minute) {
// TODO Auto-generated method stub
tv.setText("您选择了"+hourOfDay+"时"+minute+"分");
}
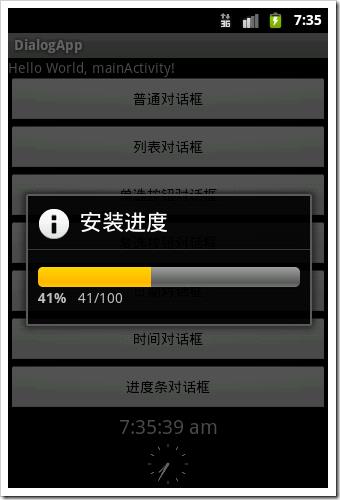
}, c.get(Calendar.HOUR_OF_DAY), c.get(Calendar.MINUTE),false);case PROGRESS_DIALOG:
pd = new ProgressDialog(this);
pd.setMax(100);
pd.setProgressStyle(ProgressDialog.STYLE_HORIZONTAL);
pd.setTitle("安装进度");
pd.setCancelable(false);
dialog=pd;
break;
显示进度进度条需要时刻更新进度条进度,因此需要覆写onPrepareDialpg方法:
@Override
protected void onPrepareDialog(int id, Dialog dialog) {
// TODO Auto-generated method stub
super.onPrepareDialog(id, dialog);
switch (id) {
case PROGRESS_DIALOG:
pd.incrementProgressBy(-pd.getProgress());
new Thread() {//该线程负责进度对话框的进度,并发送消息至主Activity的handler对象进行更新。
public void run() {
while (true) {
myHandler.sendEmptyMessage(INCREASE);
if (pd.getProgress() >= 100) {
break;
}
try {
Thread.sleep(40);
} catch (Exception e) {
e.printStackTrace();
}
}
}
}.start();
}
}
主函数中myhandler:
myHandler = new Handler() {
@Override
public void handleMessage(Message msg) {
// TODO Auto-generated method stubswitch (msg.what) {
case INCREASE:
pd.incrementProgressBy(1);
if (pd.getProgress() >= 100) {
pd.dismiss();
}
break;
}
super.handleMessage(msg);
}};
以上是关于android 之 Dialog的主要内容,如果未能解决你的问题,请参考以下文章
