GPUImage 源码分析
Posted 月盡天明
tags:
篇首语:本文由小常识网(cha138.com)小编为大家整理,主要介绍了GPUImage 源码分析相关的知识,希望对你有一定的参考价值。
GPUImage源码解读
介绍
GitHub - cats-oss/android-gpuimage: Android filters based on OpenGL (idea from GPUImage for iOS)
做图片或者视频滤镜渲染,离不开 OpenGL,而在移动平台上最令人熟知的就是 GitHub - BradLarson/GPUImage2: GPUImage 2 is a BSD-licensed Swift framework for GPU-accelerated video and image processing. 这个库。而今天要说的是它的 ”android 版本“。
基本使用
关于 GPUImage 的基本使用比较简单,参考 github 上的 readme 即可:android-gpuimage/README.md at master · cats-oss/android-gpuimage · GitHub
源码分析
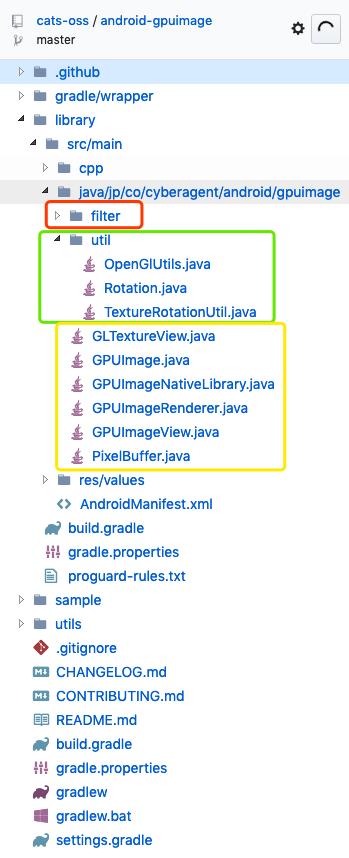
比较重要的几个类:
- GPUImageFilter
- GPUImageFilterGroup
- GPUImage
- GPUImageView
- GPUImageRender
- GLTextureView
- PixelBuffer
GPUImageView
<jp.co.cyberagent.android.gpuimage.GPUImageView
    android:id="@+id/gpuimageview"
    android:layout_width="match_parent"
    android:layout_height="match_parent"
    app:gpuimage_show_loading="false"
    app:gpuimage_surface_type="texture_view" /> <!-- surface_view or texture_view -->
先从控件开始看。
从 xml 中可以看出该控件支持两种自定义属性:
- gpuimage_show_loading — 是否显示 loading 框
- gpuimage_surface_type — 设置 egl 绘图的承载 view
- SurfaceView
- TextureView
将 GpuImageView 进行拆解
public class GPUImageView extends FrameLayout

    private int surfaceType = SURFACE_TYPE_SURFACE_VIEW;
    private View surfaceView; // 承载 view
    private GPUImage gpuImage; //
    private GPUImageFilter filter;

    public final static int RENDERMODE_WHEN_DIRTY = 0;
    public final static int RENDERMODE_CONTINUOUSLY = 1;

    public GPUImageView(Context context)
        super(context);
        init(context, null);


    public GPUImageView(Context context, AttributeSet attrs)
        super(context, attrs);
        init(context, attrs);


    private void init(Context context, AttributeSet attrs)
        if (attrs != null)
            TypedArray a = context.getTheme().obtainStyledAttributes(attrs, R.styleable.GPUImageView, 0, 0);
            try
                surfaceType = a.getInt(R.styleable.GPUImageView_gpuimage_surface_type, surfaceType);
                isShowLoading = a.getBoolean(R.styleable.GPUImageView_gpuimage_show_loading, isShowLoading);
             finally
                a.recycle();


        gpuImage = new GPUImage(context);
		  // 判断surface类型来添加不同 view
        if (surfaceType == SURFACE_TYPE_TEXTURE_VIEW)
            surfaceView = new GPUImageGLTextureView(context, attrs);
            gpuImage.setGLTextureView((GLTextureView) surfaceView);
         else
            surfaceView = new GPUImageGLSurfaceView(context, attrs);
            gpuImage.setGLSurfaceView((GLSurfaceView) surfaceView);

        addView(surfaceView);


    /**
     * 设置渲染模式
     *
     * @see #RENDERMODE_CONTINUOUSLY
     * @see #RENDERMODE_WHEN_DIRTY
     * @see GLSurfaceView#setRenderMode(int)
     * @see GLTextureView#setRenderMode(int)
     */
    public void setRenderMode(int renderMode)
        if (surfaceView instanceof GLSurfaceView)
            ((GLSurfaceView) surfaceView).setRenderMode(renderMode);
         else if (surfaceView instanceof GLTextureView)
            ((GLTextureView) surfaceView).setRenderMode(renderMode);


	  /**
     * 设置滤镜
     *
     * @param filter Filter that should be applied on the image.
     */
    public void setFilter(GPUImageFilter filter)
        this.filter = filter;
        gpuImage.setFilter(filter);
        requestRender();


    /**
     * 渲染一个 bitmap
     *
     * @param bitmap the new image
     */
    public void setImage(final Bitmap bitmap)
        gpuImage.setImage(bitmap);


    /**
     * 渲染一个 image
     *
     * @param uri the uri of the new image
     */
    public void setImage(final Uri uri)
        gpuImage.setImage(uri);


    /**
     * 渲染一个 image
     *
     * @param file the file of the new image
     */
    public void setImage(final File file)
        gpuImage.setImage(file);


    /**
     * 请求渲染
     */
    public void requestRender()
        if (surfaceView instanceof GLSurfaceView)
            ((GLSurfaceView) surfaceView).requestRender();
         else if (surfaceView instanceof GLTextureView)
            ((GLTextureView) surfaceView).requestRender();


	  /**
     * onPause() 生命周期管理
     */
    public void onPause()
        if (surfaceView instanceof GLSurfaceView)
            ((GLSurfaceView) surfaceView).onPause();
         else if (surfaceView instanceof GLTextureView)
            ((GLTextureView) surfaceView).onPause();


    /**
     * onResume() 生命周期管理
     */
    public void onResume()
        if (surfaceView instanceof GLSurfaceView)
            ((GLSurfaceView) surfaceView).onResume();
         else if (surfaceView instanceof GLTextureView)
            ((GLTextureView) surfaceView).onResume();
GPUImageView本身是一个 FrameLayout,在 init () 函数中通过读取自定义的属性创建不同的 view (GPUImageGLSurfaceView / GPUImageGLTextureView),然后设置到 GPUImage 对象中去。最后将此 view 添加到 FrameLayout 上去。
private class GPUImageGLSurfaceView extends GLSurfaceView
        public GPUImageGLSurfaceView(Context context)
            super(context);


        public GPUImageGLSurfaceView(Context context, AttributeSet attrs)
            super(context, attrs);


        @Override
        protected void onMeasure(int widthMeasureSpec, int heightMeasureSpec)
            if (forceSize != null)
                super.onMeasure(MeasureSpec.makeMeasureSpec(forceSize.width, MeasureSpec.EXACTLY),
                        MeasureSpec.makeMeasureSpec(forceSize.height, MeasureSpec.EXACTLY));
             else
                super.onMeasure(widthMeasureSpec, heightMeasureSpec);


    private class GPUImageGLTextureView extends GLTextureView
        public GPUImageGLTextureView(Context context)
            super(context);


        public GPUImageGLTextureView(Context context, AttributeSet attrs)
            super(context, attrs);


        @Override
        protected void onMeasure(int widthMeasureSpec, int heightMeasureSpec)
            if (forceSize != null)
                super.onMeasure(MeasureSpec.makeMeasureSpec(forceSize.width, MeasureSpec.EXACTLY),
                        MeasureSpec.makeMeasureSpec(forceSize.height, MeasureSpec.EXACTLY));
             else
                super.onMeasure(widthMeasureSpec, heightMeasureSpec);
从上面代码可看出,GPUImageGLSurfaceView 直接继承自 GLSurfaceView, GPUImageGLTextureView 继承于 GLTextureView。
GLSurfaceView
关于 GLSurfaceView 的分析可以参考 GLSurfaceView 源码分析 & EGL 创建过程 - crazy_jack - CSDN博客 这篇文章
GLTextureView
GLTextureView的封装基本是按照 GLSurfaceView的模式来的。只不过 GLTextureView 实现 TextureView.SurfaceTextureListener 接口。
    public static interface SurfaceTextureListener

        public void onSurfaceTextureAvailable(SurfaceTexture surface, int width, int height);

        public void onSurfaceTextureSizeChanged(SurfaceTexture surface, int width, int height);

        public boolean onSurfaceTextureDestroyed(SurfaceTexture surface);

        public void onSurfaceTextureUpdated(SurfaceTexture surface);
只不过在这四个回调中,调用类似于 GLSurfaceView 的三个回调函数。
		public void onSurfaceTextureAvailable(SurfaceTexture surface, int width, int height)
        surfaceCreated(surface);
        surfaceChanged(surface, 0, width, height);
        for (SurfaceTextureListener l : surfaceTextureListeners)
            l.onSurfaceTextureAvailable(surface, width, height);


    public void onSurfaceTextureSizeChanged(SurfaceTexture surface, int width, int height)
        surfaceChanged(surface, 0, width, height);
        for (SurfaceTextureListener l : surfaceTextureListeners)
            l.onSurfaceTextureSizeChanged(surface, width, height);


    public boolean onSurfaceTextureDestroyed(SurfaceTexture surface)
        surfaceDestroyed(surface);
        for (SurfaceTextureListener l : surfaceTextureListeners)
            l.onSurfaceTextureDestroyed(surface);


        return true;


    public void onSurfaceTextureUpdated(SurfaceTexture surface)
        requestRender();
        for (SurfaceTextureListener l : surfaceTextureListeners)
            l.onSurfaceTextureUpdated(surface);
其他的过程基本与 GLSurfaceView 无二。
Camera 预览
// camera 预览回调
cameraLoader.setOnPreviewFrameListener  data, width, height ->
            gpuImageView.updatePreviewFrame(data, width, height)

// 设置方向
gpuImageView.setRotation(getRotation(cameraLoader.getCameraOrientation()))
// 设置渲染模式        gpuImageView.setRenderMode(GPUImageView.RENDERMODE_CONTINUOUSLY)
从上面代码可看出,最重要的是设置 camera 的预览回调,回调中去调用 GPUImageView 的 updatePreviewFrame() 函数,注意 data 是 YUV 格式数据。
GPUImageView
public void updatePreviewFrame(byte[] data, int width, int height)
        gpuImage.updatePreviewFrame(data, width, height);
GPUImage
public void updatePreviewFrame(final byte[] data, final int width, final int height)
        renderer.onPreviewFrame(data, width, height);
经过上面的调用,最有调用 GPUImageRenderer 类的 onPreviewFrame() 函数。
renderer 对象是在 GPUImage 对象构造的时候创建的。
	public GPUImage(final Context context)
        if (!supportsOpenGLES2(context))
            throw new IllegalStateException("OpenGL ES 2.0 is not supported on this phone.");


        this.context = context;
        filter = new GPUImageFilter(); // 负责滤镜效果处理
        renderer = new GPUImageRenderer(filter); // 负责处理渲染流程
		  public void onPreviewFrame(final byte[] data, final int width, final int height)
		  // allocate rgb 数据需要的buffer
        if (glRgbBuffer == null)
            glRgbBuffer = IntBuffer.allocate(width * height);

		  // 切换到 gl 线程来进行渲染
        if (runOnDraw.isEmpty())
            runOnDraw(new Runnable()
                @Override
                public void run()
					  // YUV数据转成 RGB 数据
                    GPUImageNativeLibrary.YUVtoRBGA(data, width, height, glRgbBuffer.array());
					  // 根据 rgb buffer 加载出一个 texture 出来
                    glTextureId = OpenGlUtils.loadTexture(glRgbBuffer, width, height, glTextureId);
					  // 从相机出来的数据一般宽高都与上次的一直。除非是首帧数据或者切换摄像头会调用 adjustImageScaling()。
                    if (imageWidth != width)
                        imageWidth = width;
                        imageHeight = height;
                        adjustImageScaling();


            );
由于相机返回的是YUV数据,不是我们常用的RGB数据,但是 OpenGL 使用的纹理必须得是RGB数据,所以需要将YUV数据转成RGB数据。::
YUV数据转成RGB的过程都是按照固定的运算规则,可以参考 https://github.com/cats-oss/android-gpuimage/raw/master/library/src/main/cpp/yuv-decoder.c 。
由于相机预览设置的 renderMode 是连续模式 — RENDERMODE_CONTINUOUSLY,所以 onDrawFrame() 函数会一直回调。
GPUImageRenderer定义了两个 Runnable 类型的队列:
private final Queue<Runnable> runOnDraw;
private final Queue<Runnable> runOnDrawEnd;
	  protected void runOnDraw(final Runnable runnable)
        synchronized (runOnDraw)
            runOnDraw.add(runnable);


    protected void runOnDrawEnd(final Runnable runnable)
        synchronized (runOnDrawEnd)
            runOnDrawEnd.add(runnable);
分别用来标识执行在 onDrawFrame()之前和之后。
@Override
    public void onDrawFrame(final GL10 gl)
        GLES20.glClear(GLES20.GL_COLOR_BUFFER_BIT | GLES20.GL_DEPTH_BUFFER_BIT);
        runAll(runOnDraw); // 运行 onDraw 之前的队列 runnable
		  // 真正的绘制画面
        filter.onDraw(glTextureId, glCubeBuffer, glTextureBuffer);
        runAll(runOnDrawEnd); // onDraw 之后的 Runnable 队列
        if (surfaceTexture != null)
            surfaceTexture.updateTexImage();
通过 GLSurfaceView 的源码得知,onDrawFrame 执行完毕之后,会调用 egl.eglSwapBuffers() , 然后将数据进行交换进而显示画面。
渲染一张图片
参考 GPUImage 的 demo 里面的用法:
// 默认是 RENDERMODE_WHEN_DIRTY 渲染模式
gpuImageView.setImage(data!!.data)
gpuImage.setImage(uri);
new LoadImageUriTask(this, uri).execute();
通过一个AsyncTask 来加载一个图片
private class LoadImageUriTask extends LoadImageTask

        private final Uri uri;

        public LoadImageUriTask(GPUImage gpuImage, Uri uri)
            // ...


        @Override
        protected Bitmap decode(BitmapFactory.Options options)
            // ...
            return BitmapFactory.decodeStream(inputStream, null, options);


        @Override
        protected int getImageOrientation() throws IOException
            // ...
private abstract class LoadImageTask extends AsyncTask<Void, Void, Bitmap>

        private final GPUImage gpuImage;
        private int outputWidth;
        private int outputHeight;

        public LoadImageTask(final GPUImage gpuImage)
            this.gpuImage = gpuImage;


        @Override
        protected Bitmap doInBackground(Void... params)
            // ...
            outputWidth = getOutputWidth();
            outputHeight = getOutputHeight();
            return loadResizedImage();


        @Override
        protected void onPostExecute(Bitmap bitmap)
            super.onPostExecute(bitmap);
            gpuImage.deleteImage();

            // !!!
            gpuImage.setImage(bitmap);


        protected abstract Bitmap decode(BitmapFactory.Options options);

        private Bitmap loadResizedImage()
            // ... 省略代码,resize bitmap
            return bitmap;


        protected abstract int getImageOrientation() throws IOException;
其实关键代码就一行,gpuImage.setImage(bitmap);
    public void setImage(final Bitmap bitmap)
        currentBitmap = bitmap;
        renderer.setImageBitmap(bitmap, false);
        requestRender(); // 请求渲染
    public void setImageBitmap(final Bitmap bitmap, final boolean recycle)
        if (bitmap == null)
            return;


        // 放入到队列中
        runOnDraw(new Runnable()

            @Override
            public void run()
                // 判断宽宽度是否是偶数,这里我猜想是想避免添加滤镜渲染黑边的问题。
                Bitmap resizedBitmap = null;
                if (bitmap.getWidth() % 2 == 1)
                    resizedBitmap = Bitmap.createBitmap(bitmap.getWidth() + 1, bitmap.getHeight(),
                            Bitmap.Config.ARGB_8888);
                    Canvas can = new Canvas(resizedBitmap);
                    can.drawARGB(0x00, 0x00, 0x00, 0x00);
                    can.drawBitmap(bitmap, 0, 0, null);
                    addedPadding = 1;
                 else
                    addedPadding = 0;

                // 根据 bitmap 生成一个 texture
                glTextureId = OpenGlUtils.loadTexture(
                        resizedBitmap != null ? resizedBitmap : bitmap, glTextureId, recycle);
                if (resizedBitmap != null)
                    resizedBitmap.recycle();

                imageWidth = bitmap.getWidth();
                imageHeight = bitmap.getHeight();
                adjustImageScaling();

        );
requestRender()之后,根据 bitmap 生成了 textureId ,在 onDrawFrame() 中就可以拿到这个 textureId,来渲染出来这个图片。
渲染图片时使用默认的 RENDERMODE_WHEN_DIRTY 模式,所以每次显示图片或者设置滤镜,都需要调用 requestRender()。
GPUImageRenderer
接下来分析一下 GPUImageRenderer 类。
public class GPUImageRenderer implements GLSurfaceView.Renderer, GLTextureView.Renderer, PreviewCallback
在 GPUImage 中将 renderer 设置为 GLSurfaceView 或者 GLTextureView 的监听
glSurfaceView.setRenderer(renderer);
glTextureView.setRenderer(renderer);
GPUImageRenderer的构造函数:
	public GPUImageRenderer(final GPUImageFilter filter)
        this.filter = filter;
        runOnDraw = new LinkedList<>();
        runOnDrawEnd = new LinkedList<>();
		  // 定点 buffer
        glCubeBuffer = ByteBuffer.allocateDirect(CUBE.length * 4)
                .order(ByteOrder.nativeOrder())
                .asFloatBuffer();
        glCubeBuffer.put(CUBE).position(0);
	      // 片段 bufer
        glTextureBuffer = ByteBuffer.allocateDirect(TEXTURE_NO_ROTATION.length * 4)
                .order(ByteOrder.nativeOrder())
                .asFloatBuffer();
        setRotation(Rotation.NORMAL, false, false);
OpenGL 的坐标系:
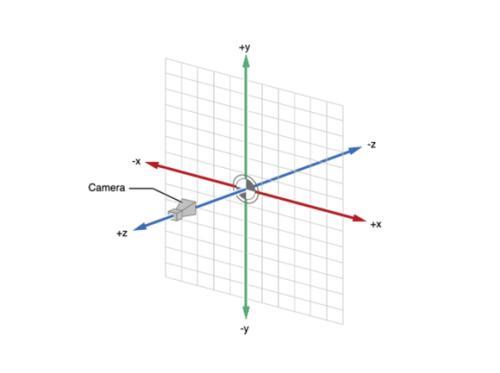
OpenGL 的坐标是三维的。
    public static final float CUBE[] =
            -1.0f, -1.0f, // 左下
            1.0f, -1.0f, // 右下
            -1.0f, 1.0f, // 坐上
            1.0f, 1.0f, // 右上
    ;
在 OpenGL 里,只能绘制点、直线以及三角形。
其他形状,比如方形都是由这三个基本图形拼凑出来的。
OpenGLUtils
这是一个关于 shader、program、texture的工具类。如果自己需要在开发中使用 OpenGL,可以直接拿来使用。
    // 根据图像数据加载纹理
    public static int loadTexture(final IntBuffer data, final int width, final int height, final int usedTexId)
        int textures[] = new int[1];
        if (usedTexId == NO_TEXTURE)
			  // 创建纹理
            GLES20.glGenTextures(1, textures, 0);
            GLES20.glBindTexture(GLES20.GL_TEXTURE_2D, textures[0]);
            GLES20.glTexParameterf(GLES20.GL_TEXTURE_2D,
                    GLES20.GL_TEXTURE_MAG_FILTER, GLES20.GL_LINEAR);
            GLES20.glTexParameterf(GLES20.GL_TEXTURE_2D,
                    GLES20.GL_TEXTURE_MIN_FILTER, GLES20.GL_LINEAR);
            GLES20.glTexParameterf(GLES20.GL_TEXTURE_2D,
                    GLES20.GL_TEXTURE_WRAP_S, GLES20.GL_CLAMP_TO_EDGE);
            GLES20.glTexParameterf(GLES20.GL_TEXTURE_2D,
                    GLES20.GL_TEXTURE_WRAP_T, GLES20.GL_CLAMP_TO_EDGE);
            GLES20.glTexImage2D(GLES20.GL_TEXTURE_2D, 0, GLES20.GL_RGBA, width, height,
                    0, GLES20.GL_RGBA, GLES20.GL_UNSIGNED_BYTE, data);
         else
			  // 如果已经有了纹理,则直接更新纹理上的数据即可,复用同一个纹理id。
            GLES20.glBindTexture(GLES20.GL_TEXTURE_2D, usedTexId);
			  // 更新纹理数据
            GLES20.glTexSubImage2D(GLES20.GL_TEXTURE_2D, 0, 0, 0, width,
                    height, GLES20.GL_RGBA, GLES20.GL_UNSIGNED_BYTE, data);
            textures[0] = usedTexId;

        return textures[0];
glTexImage2D & glTexSubImage2D
GPUImageFilter
GPUImageFilter是所有滤镜的基类,不带任何滤镜效果。不添加任何滤镜时,2D 的 texture 就是通过该类来渲染出来的。
    public GPUImageFilter()
        this(NO_FILTER_VERTEX_SHADER, NO_FILTER_FRAGMENT_SHADER);


    public GPUImageFilter(final String vertexShader, final String fragmentShader)
        runOnDraw = new LinkedList<>();
        this.vertexShader = vertexShader;
        this.fragmentShader = fragmentShader;
有两个构造函数,第一个是不带滤镜的构造,第二个接受顶点 shader 和 片源 shader。
GPUImageFilter 就使用第一个构造。而它的子类使用第二个,传入不同滤镜对应的 shader 来构造 program。
在 GPUImageRenderer 里面的 onSurfaceCreated() 回调中,调用了 filter.ifNeedInit() 来初始化 shader与 program 。
    public void onInit()
        glProgId = OpenGlUtils.loadProgram(vertexShader, fragmentShader);
        glAttribPosition = GLES20.glGetAttribLocation(glProgId, "position");
        glUniformTexture = GLES20.glGetUniformLocation(glProgId, "inputImageTexture");
        glAttribTextureCoordinate = GLES20.glGetAttribLocation(glProgId, "inputTextureCoordinate");
        isInitialized = true;
这里牵涉到 OpenGL 的shader 创建绑定以及程序创建绑定过程。

一个OpenGL 程序简单来说就是把一个顶点着色器和一个片段着色器链接在一起变成单个对象。
顶点着色器和片段着色器总是一起工作的,缺一不可。没有片段着色器,OpenGL 就不知道怎么绘制那些组成点、直线和三角形的片段;没有顶点着色器,OpenGL 就不知道在哪里绘制这些片段。
-
glCreateShader() 创建着色器对象
-
glShaderSource() 把着色器代码上传到着色器对象里
-
glCompileShader() 编译着色器
-
glGetShaderiv() 获取编译状态
-
glGetShaderInfoLog() 获取着色器信息日志
-
glDeleteShader() 删除着色器对象
-
glCreateProgram() 创建程序对象
-
glAttachShader() 将着色器附加到程序对象上
-
glLinkProgram() 链接程序
-
glGetProgramiv() 检查链接的结果
-
glGetProgramInfoLog() 获取链接的信息日志
-
glDeleteProgram() 删除链接程序
-
glGetUniformLocation() 获取uniform的位置
-
glGetAttribLocation() 获取属性的位置
-
glVertexAttribPointer() 关联属性与数据
-
glEnableVertexAttribArray() 使能属性
-
glDrawArrays() 绘制图形,这个函数的 API 比较重要。
   	 public void onDraw(final int textureId, final FloatBuffer cubeBuffer,
                       final FloatBuffer textureBuffer)
        // 应用 program
        GLES20.glUseProgram(glProgId);
        // 在绘制之前做一些准备工作,基本上就是各种滤镜的赋值操作。
        runPendingOnDrawTasks();
        if (!isInitialized)
            return;


        cubeBuffer.position(0);
        GLES20.glVertexAttribPointer(glAttribPosition, 2, GLES20.GL_FLOAT, false, 0, cubeBuffer);
        GLES20.glEnableVertexAttribArray(glAttribPosition);
        textureBuffer.position(0);
        GLES20.glVertexAttribPointer(glAttribTextureCoordinate, 2, GLES20.GL_FLOAT, false, 0,
                textureBuffer);
        GLES20.glEnableVertexAttribArray(glAttribTextureCoordinate);
        if (textureId != OpenGlUtils.NO_TEXTURE)
            GLES20.glActiveTexture(GLES20.GL_TEXTURE0);
            GLES20.glBindTexture(GLES20.GL_TEXTURE_2D, textureId);
            GLES20.glUniform1i(glUniformTexture, 0);

        onDrawArraysPre();
        // 绘制数据
        GLES20.glDrawArrays(GLES20.GL_TRIANGLE_STRIP, 0, 4);
        GLES20.glDisableVertexAttribArray(glAttribPosition);
        GLES20.glDisableVertexAttribArray(glAttribTextureCoordinate);
        GLES20.glBindTexture(GLES20.GL_TEXTURE_2D, 0);
runPendingOnDrawTasks() 的目的其实就是给各个滤镜设置参数的。
	  // 类似于GPUImageRenderer 中的 runOnDraw,也是一个 Runnable 类型的队列。
    private final LinkedList<Runnable> runOnDraw;
	  protected void runPendingOnDrawTasks()
        while (!runOnDraw.isEmpty())
            runOnDraw.removeFirst().run();
GPUImageFilterGroup
如果需要多种组合滤镜效果,则需要用到 GPUImageFilterGroup,直接继承 GPUImageFilter。 GPUImage 这个库对图片或者相机预览的数据机型多种滤镜组合效果实现时,利用了一个 FBO 的概念。
public class GPUImageFilterGroup extends GPUImageFilter
GPUImageFIlterGroup 在处理滤镜的时候,会把所有的滤镜都进行一遍绘制。
GPUImageFilterGroup 与 GPUImageFilter 的关系类似于 ViewGroup与 View 的关系。ViewGroup 继承于 View,同时可以包括若干个 View 或者 ViewGroup。同样,GPUImageFilterGroup也可以包括若干个 GPUImageFilterGroup 或者 GPUImageFilter。
当设置一个 GPUImageFilter 时,首先会调用GPUImageView 中的 setFilter() 函数。
setFilter()
	  // #GPUImageView
    public void setFilter(GPUImageFilter filter)
        this.filter = filter;
        gpuImage.setFilter(filter);
		  // ps. 感觉这里的 requestRender 的调用多余了。
        requestRender();


    // #GPUImage
    public void setFilter(final GPUImageFilter filter)
        this.filter = filter;
        renderer.setFilter(this.filter);
        requestRender();


    // #GPUImageRenderer
    public void setFilter(final GPUImageFilter filter)
        runOnDraw(new Runnable()
            @Override
            public void run()
                final GPUImageFilter oldFilter = GPUImageRenderer.this.filter;
                GPUImageRenderer.this.filter = filter;
                if (oldFilter != null)
                    oldFilter.destroy();

                GPUImageRenderer.this.filter.ifNeedInit();
                GLES20.glUseProgram(GPUImageRenderer.this.filter.getProgram());
                GPUImageRenderer.this.filter.onOutputSizeChanged(outputWidth, outputHeight);

        );
addFilter()
	private List<GPUImageFilter> filters; // 存储滤镜或者滤镜 group
  private List<GPUImageFilter> mergedFilters; // 存储单个滤镜
	public void addFilter(GPUImageFilter aFilter)
        if (aFilter == null)
            return;

        filters.add(aFilter);
        updateMergedFilters();

	  // 遍历所有的滤镜(或者滤镜group)
    public void updateMergedFilters()
        if (filters == null)
            return;

        if (mergedFilters == null)
            mergedFilters = new ArrayList<>();
         else
            mergedFilters.clear();


        List<GPUImageFilter> filters;
		  // 遍历 filters,如果item 是 group 类型,则递归调用继续拆分。
        for (GPUImageFilter filter : this.filters)
            if (filter instanceof GPUImageFilterGroup)
                ((GPUImageFilterGroup) filter).updateMergedFilters();
                filters = ((GPUImageFilterGroup) filter).getMergedFilters();
                if (filters == null || filters.isEmpty())
                    continue;
                mergedFilters.addAll(filters);
                continue;

			  // 非 group 类型滤镜直接添加到 mergedFilters 列表中。
            mergedFilters.add(filter);
- 其实这个方法还有一个优化点,mergedFilters添加滤镜的时候应该去重,因为不同的 group 中可能有相同的单个 filter 滤镜。
onOutputSizeChanged()
在绘制之前,调用了 onOutputSizeChanged() 函数,创建与滤镜个数相同的 FrameBuffer 和 TextureBuffer。
	  @Override
    public void onOutputSizeChanged(final int width, final int height)
        super.onOutputSizeChanged(width, height);
        if (frameBuffers != null)
            destroyFramebuffers();

        // 递归调用
        int size = filters.size();
        for (int i = 0; i < size; i++)
            filters.get(i).onOutputSizeChanged(width, height);


        if (mergedFilters != null && mergedFilters.size() > 0)
            size = mergedFilters.size();
            frameBuffers = new int[size - 1];
            frameBufferTextures = new int[size - 1];

            for (int i = 0; i < size - 1; i++)
                // 生成 FrameBuffer 对象
                GLES20.glGenFramebuffers(1, frameBuffers, i);
                // 生成纹理
                GLES20.glGenTextures(1, frameBufferTextures, i);
                GLES20.glBindTexture(GLES20.GL_TEXTURE_2D, frameBufferTextures[i]);
                GLES20.glTexImage2D(GLES20.GL_TEXTURE_2D, 0, GLES20.GL_RGBA, width, height, 0,
                        GLES20.GL_RGBA, GLES20.GL_UNSIGNED_BYTE, null);

                GLES20.glTexParameterf(GLES20.GL_TEXTURE_2D,
                        GLES20.GL_TEXTURE_MAG_FILTER, GLES20.GL_LINEAR);
                GLES20.glTexParameterf(GLES20.GL_TEXTURE_2D,
                        GLES20.GL_TEXTURE_MIN_FILTER, GLES20.GL_LINEAR);
                GLES20.glTexParameterf(GLES20.GL_TEXTURE_2D,
                        GLES20.GL_TEXTURE_WRAP_S, GLES20.GL_CLAMP_TO_EDGE);
                GLES20.glTexParameterf(GLES20.GL_TEXTURE_2D,
                        GLES20.GL_TEXTURE_WRAP_T, GLES20.GL_CLAMP_TO_EDGE);
                // 绑定 FBO
               GLES20.glBindFramebuffer(GLES20.GL_FRAMEBUFFER, frameBuffers[i]);
                // 将纹理绑定到 FBO 上
          GLES20.glFramebufferTexture2D(GLES20.GL_FRAMEBUFFER, GLES20.GL_COLOR_ATTACHMENT0,
                        GLES20.GL_TEXTURE_2D, frameBufferTextures[i], 0);

                GLES20.glBindTexture(GLES20.GL_TEXTURE_2D, 0);
                GLES20.glBindFramebuffer(GLES20.GL_FRAMEBUFFER, 0);
onDraw()
在GPUImageRenderer.onDrawFrame()过程中,调用了filter.onDraw() 函数:
public void onDraw(final int textureId, final FloatBuffer cubeBuffer,
                       final FloatBuffer textureBuffer)
        runPendingOnDrawTasks();
        if (!isInitialized() || frameBuffers == null || frameBufferTextures == null)
            return;

        if (mergedFilters != null)
            int size = mergedFilters.size();
            int previousTexture = textureId;
			  // 遍历所有的 filter
            for (int i = 0; i < size; i++)
                GPUImageFilter filter = mergedFilters.get(i);
                boolean isNotLast = i < size - 1;
                if (isNotLast)
                	  // 每次绘制之前使用glBindFramebuffer绑定FBO
GLES20.glBindFramebuffer(GLES20.GL_FRAMEBUFFER, frameBuffers[i]);
                    GLES20.glClearColor(0, 0, 0, 0);


                if (i == 0)
                    filter.onDraw(previousTexture, cubeBuffer, textureBuffer);
                 else if (i == size - 1)
                    filter.onDraw(previousTexture, glCubeBuffer, (size % 2 == 0) ? glTextureFlipBuffer : glTextureBuffer);
                 else
                    filter.onDraw(previousTexture, glCubeBuffer, glTextureBuffer);


                if (isNotLast)
                    // 纹理给下一个滤镜作为输入GLES20.glBindFramebuffer(GLES20.GL_FRAMEBUFFER, 0);
                    previousTexture = frameBufferTextures[i];
FBO — frame buffer object — 帧缓冲对象。
PixelBuffer
离屏渲染。
顾名思义,就是渲染数据脱离屏幕。
构造函数:
	  public PixelBuffer(final int width, final int height)
        this.width = width;
        this.height = height;

        int[] version = new int[2];
        int[] attribList = new int[]
                EGL_WIDTH, this.width,
                EGL_HEIGHT, this.height,
                EGL_NONE
        ;

        egl10 = (EGL10) EGLContext.getEGL();
        // 创建与本地窗口系统的连接
        eglDisplay = egl10.eglGetDisplay(EGL_DEFAULT_DISPLAY);
        egl10.eglInitialize(eglDisplay, version);
        eglConfig = chooseConfig();

        int EGL_CONTEXT_CLIENT_VERSION = 0x3098;
        int[] attrib_list =
                EGL_CONTEXT_CLIENT_VERSION, 2,
                EGL10.EGL_NONE
        ;
        // 创建 egl 上线文
        eglContext = egl10.eglCreateContext(eglDisplay, eglConfig, EGL_NO_CONTEXT, attrib_list);

        // 创建 Pbuffer surface
        eglSurface = egl10.eglCreatePbufferSurface(eglDisplay, eglConfig, attribList);
        egl10.eglMakeCurrent(eglDisplay, eglSurface, eglSurface, eglContext);

        gl10 = (GL10) eglContext.getGL();

        // Record thread owner of OpenGL context
        mThreadOwner = Thread.currentThread().getName();
	  // 设置renderer
    public void setRenderer(final GLSurfaceView.Renderer renderer)
        this.renderer = renderer;

        // Call the renderer initialization routines
        this.renderer.onSurfaceCreated(gl10, eglConfig);
        this.renderer.onSurfaceChanged(gl10, width, height);
创建相关环境之后,就可以通过当亲 egl 环境渲染数据获取一个渲染bitmap 数据。
public Bitmap getBitmap()
        // 省略代码。。。

        // Call the renderer draw routine (it seems that some filters do not
        // work if this is only called once)
        renderer.onDrawFrame(gl10);
        renderer.onDrawFrame(gl10);
        // !!! 获取渲染 bitmap 结果
        convertToBitmap();
        return bitmap;
当然最最重要的还是 readPixel()
	private void convertToBitmap()
        bitmap = Bitmap.createBitmap(width, height, Bitmap.Config.ARGB_8888);
		  // 通过 jni 调用
        GPUImageNativeLibrary.adjustBitmap(bitmap);
Jni 中的调用函数:【具体函数可以参考 https://github.com/cats-oss/android-gpuimage/raw/master/library/src/main/cpp/yuv-decoder.c 】:
glReadPixels(0, 0, srcInfo.width, srcInfo.height, GL_RGBA, GL_UNSIGNED_BYTE, srcByteBuffer);
一般通过 Java 层来调用 GLES20.readPixels() 来实现。
	  /**
     * 保存 bitmap
     *
     * @param frameWidth
     * @param frameHeight
     * @return
     */
    public @Nullable
    Bitmap saveFrameBitmap(int textureId, int frameWidth, int frameHeight)
        int[] frameBuffers = new int[1];
        GLES20.glGenFramebuffers(1, frameBuffers, 0);
        GLES20.glBindFramebuffer(GLES20.GL_FRAMEBUFFER, frameBuffers[0]);
        GLES20.glFramebufferTexture2D(GLES20.GL_FRAMEBUFFER, GLES20.GL_COLOR_ATTACHMENT0,
                GLES20.GL_TEXTURE_2D, textureId, 0);

        ByteBuffer buf = ByteBuffer.allocateDirect(frameWidth * frameHeight * 4);
        buf.order(ByteOrder.LITTLE_ENDIAN);
		  // 读取 pixel 数据到 ByteBuffer 中
        GLES20.glReadPixels(0, 0, frameWidth, frameHeight,
                GLES20.GL_RGBA, GLES20.GL_UNSIGNED_BYTE, buf);
        try
            OpenGLUtils.checkGlError("glReadPixels error");
         catch (RuntimeException ex)
            RLog.e("ImageInputRender", "GLES20 Error");

        buf.rewind();
        try
            Bitmap bmp = Bitmap.createBitmap(frameWidth, frameHeight, Bitmap.Config.ARGB_8888);
			  // 转成 bitmap 数据
            bmp.copyPixelsFromBuffer(buf);
            return bmp;
         catch (IllegalArgumentException ex)
            return null;
         catch (IllegalStateException ex)
            return null;
         finally
            GLES20.glBindFramebuffer(GLES20.GL_FRAMEBUFFER, 0);
通过 filter 等一系列效果处理之后,拿到处理的 texture 之后,传入到上面函数中即可得到一个 bitmap。
以上过程就是不用过一个显示的 surface 就能够渲染得到一个图片的结果,视频数据同理。
reference
- GPUImage源码解析 — OpenGL ES基础 - 简书
- 【腾讯优测干货分享】Android 相机预览方向及其适配探索 - 腾讯Bugly的专栏 - CSDN博客
- Android 相机开发中的尺寸和方向问题
- OpenGL 之 帧缓冲 使用实践
- OpenGL 之 GPUImage 源码分析 - zhying719的博客 - CSDN博客
以上是关于GPUImage 源码分析的主要内容,如果未能解决你的问题,请参考以下文章