web前端练习29----Bom中,Navigator,loaction,history ,Screen,window及案例(滚动,刷新加载,传参)
Posted zhaihaohao1
tags:
篇首语:本文由小常识网(cha138.com)小编为大家整理,主要介绍了web前端练习29----Bom中,Navigator,loaction,history ,Screen,window及案例(滚动,刷新加载,传参)相关的知识,希望对你有一定的参考价值。
BOM- 浏览器对象模型
- BOM可以使我们通过JS来操作浏览器
- 在BOM中为我们提供了一组对象,用来完成对浏览器的操作
- BOM对象:
1.Navigator- 代表的当前浏览器的信息,通过该对象可以来识别不同的浏览器
2.Location- 代表当前浏览器的地址栏信息,通过Location可以获取地址栏信息,或者操作浏览器跳转页面
3.History- 代表浏览器的历史记录,可以通过该对象来操作浏览器的历史记录
由于隐私原因,该对象不能获取到具体的历史记录,只能操作浏览器向前或向后翻页
而且该操作只在当次访问时有效
4.Screen- 代表用户的屏幕的信息,通过该对象可以获取到用户的显示器的相关的信息
5.Window- 代表的是整个浏览器的窗口,同时window也是网页中的全局对象
这些BOM对象在浏览器中都是作为window对象的属性保存的,
可以通过window对象来使用,也可以直接使用
1.Navigator 识别不同浏览器
通过 navigator.userAgent 判断浏览器类型
		<script type="text/javascript">
			/*
			 * Navigator
			 * 	- 代表的当前浏览器的信息,通过该对象可以来识别不同的浏览器
			 * 	- 由于历史原因,Navigator对象中的大部分属性都已经不能帮助我们识别浏览器了
			 * 	- 一般我们只会使用userAgent来判断浏览器的信息,
			 * 		userAgent是一个字符串,这个字符串中包含有用来描述浏览器信息的内容,
			 * 		不同的浏览器会有不同的userAgent
			 *
			 * 火狐的userAgent
			 * 	Mozilla/5.0 (Windows NT 6.1; WOW64; rv:50.0) Gecko/20100101 Firefox/50.0
			 *
			 * Chrome的userAgent
			 *  Mozilla/5.0 (Windows NT 6.1; Win64; x64) AppleWebKit/537.36 (Khtml, like Gecko) Chrome/52.0.2743.82 Safari/537.36
			 *
			 * IE8
			 * 	Mozilla/4.0 (compatible; MSIE 8.0; Windows NT 6.1; WOW64; Trident/7.0; SLCC2; .NET CLR 2.0.50727; .NET CLR 3.5.30729; .NET CLR 3.0.30729; Media Center PC 6.0; .NET4.0C; .NET4.0E)
			 *
			 * IE9
			 * 	Mozilla/5.0 (compatible; MSIE 9.0; Windows NT 6.1; WOW64; Trident/7.0; SLCC2; .NET CLR 2.0.50727; .NET CLR 3.5.30729; .NET CLR 3.0.30729; Media Center PC 6.0; .NET4.0C; .NET4.0E)
			 *
			 * IE10
			 * 	Mozilla/5.0 (compatible; MSIE 10.0; Windows NT 6.1; WOW64; Trident/7.0; SLCC2; .NET CLR 2.0.50727; .NET CLR 3.5.30729; .NET CLR 3.0.30729; Media Center PC 6.0; .NET4.0C; .NET4.0E)
			 *
			 * IE11
			 * 	Mozilla/5.0 (Windows NT 6.1; WOW64; Trident/7.0; SLCC2; .NET CLR 2.0.50727; .NET CLR 3.5.30729; .NET CLR 3.0.30729; Media Center PC 6.0; .NET4.0C; .NET4.0E; rv:11.0) like Gecko
			 * 	- 在IE11中已经将微软和IE相关的标识都已经去除了,所以我们基本已经不能通过UserAgent来识别一个浏览器是否是IE了
			 */

			//alert(navigator.appName);

			var ua = navigator.userAgent;

			console.log(ua);
			// 通过正则表达式判断浏览器类型
			if(/firefox/i.test(ua))
				alert("你是火狐!!!");
			else if(/chrome/i.test(ua))
				alert("你是Chrome");
			else if(/msie/i.test(ua))
				alert("你是IE浏览器~~~");
			else if("ActiveXObject" in window)
				alert("你是IE11,枪毙了你~~~");


		</script>
2.Location - 该对象中封装了浏览器的地址栏的信息
2.1 location.href 可以实现页面的跳转并传参
//跳转,在路径中拼接参数
window.location.href = 'demo02.1.html?name=zhh';
//在新页面拿到url,并截取参数
window.location.href
location.href 等同于 location,例如:
//跳转,在路径中拼接参数
window.location = 'demo02.1.html?name=zhh';
//在新页面拿到url,并截取参数
window.location
2.2 location.assign("http://www.baidu.com");
- 用来跳转到其他的页面,作用和直接修改location一样
2.3 location.reload(true);
- 用于重新加载当前页面,作用和刷新按钮一样
- 如果在方法中传递一个true,作为参数,则会强制清空缓存刷新页面
2.4 location.replace("01.BOM.html");
- 可以使用一个新的页面替换当前页面,调用完毕也会跳转页面
不会生成历史记录,不能使用回退按钮回退
2.5 location的其它常用属性
        // 拿到整个网址,可以截取后面的参数
        let url = window.location.href;
        console.log(url);

        // 获取主机加端口号
        let host = window.location.host;
        console.log(host);

        // 获取主机
        let hostName = window.location.hostname;
        console.log(hostName);

        // 获取端口号
        let port = window.location.port;
        console.log(port);

        // 获取协议
        let xieyi = window.location.protocol;
        console.log(xieyi);

        // 获取路径
        let pathName = window.location.pathname;
        console.log(pathName);

        // 片段标识符,可以判断网页状态
        let hash = window.location.hash;
        console.log(hash);

        // 返回网址问号后面的字段
        let ziduan = window.location.search;
        console.log(ziduan);
3.History- 对象可以用来操作浏览器向前或向后翻页
history.forward(); - 可以跳转下一个页面,作用和浏览器的前进按钮一样
history.back(); - 可以用来回退到上一个页面,作用和浏览器的回退按钮一样
history.go(整数);
- 可以用来跳转到指定的页面
- 它需要一个整数作为参数
history.go(1):表示向前跳转一个页面 相当于forward()
history.go(2):表示向前跳转两个页面
history.go(-1):表示向后跳转一个页面
history.go(-2):表示向后跳转两个页面
4.Screen 不常用这里不讲了,用的时候自己去查文档
5.Window 对象
5.1 window 对象的延时执行函数
setInterval();
clearInterval();
setTimeout();
clearTimeout()
具体参考另外一篇文章:
https://blog.csdn.net/zhaihaohao1/article/details/102593574
5.2 window 对象的提示框
5.2.1 警告框对话框
window.alert('出问题了');
5.2.2 选择对话框
            let istrue = window.confirm('是否正确');
            if (istrue)
                console.log('正确');
             else
                console.log('错误');
5.2.3输入对话框
            // 拿到输入的内容
            let content = window.prompt('请输入内容', 'zhhhh');
            console.log(content);
5.3 三个监听事件
5.3.1 window.onload 等整个Dom执行完在触发
window.onload = function ()
5.3.2 window.onscroll 滚动事件,监听浏览器的滚动
这个事件很重要,可以实现 上拉加载,下拉刷新 等重要功能
和浏览器相关的几个高度 https://blog.csdn.net/qq_35430000/article/details/80277587
window.onscroll = function()
5.3.3 window.onresize 监听浏览器可视化窗口的变化
window.onresize = function ()
6三个练习案例
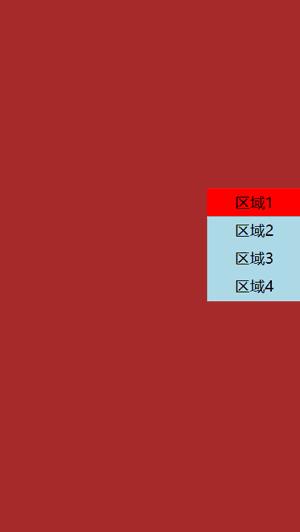
6.1案例:左右联动
左边滑动,右边的按钮变色,点击右边的按钮,左边对应滑动
效果图:
实现思路:
监听滚动事件,window.onscroll = function ()
设置顶部被隐藏的高度 window.document.body.scrollTop
代码如下:
<html lang="en">

<head>
    <meta charset="UTF-8">
    <meta name="viewport" content="width=device-width, initial-scale=1.0">
    <meta http-equiv="X-UA-Compatible" content="ie=edge">
    <title>Document</title>
    <style>
        *
            margin: 0px;
            padding: 0px;

    </style>
</head>

<body>

    <div style="height: 2800; width: 100%;">
        <div style="height: 700; width: 100%;background-color: brown;"></div>
        <div style="height: 700; width: 100%;background-color: darkblue;;"></div>
        <div style="height: 700; width: 100%;background-color: darkgreen;"></div>
        <div style="height: 700; width: 100%;background-color: gold;"></div>
    </div>
    <div
        style="height: 120px;width: 100px; background-color: lightblue; position: fixed;right: 0;top: 200px;z-index: 1;">
        <div id="button1" style="line-height: 30px;width: 100%;text-align: center;background-color: red;">区域1</div>
        <div id="button2" style="line-height: 30px;width: 100%;text-align: center;">区域2</div>
        <div id="button3" style="line-height: 30px;width: 100%;text-align: center;">区域3</div>
        <div id="button4" style="line-height: 30px;width: 100%;text-align: center;">区域4</div>

    </div>

    <script>
        let button1 = document.getElementById('button1');
        let button2 = document.getElementById('button2');
        let button3 = document.getElementById('button3');
        let button4 = document.getElementById('button4');
        // 监听滚动事件,window.onscroll = function ()
        // 设置顶部被隐藏的高度 window.document.body.scrollTop
        window.onscroll = function ()
            // 顶部被隐藏的高度
            let tophideheight = window.document.body.scrollTop;
            console.log(tophideheight);
            setColor();

            button1.onclick = function ()
                window.document.body.scrollTop = 0;
                setColor();

            button2.onclick = function ()
                window.document.body.scrollTop = 700;
                setColor();

            button3.onclick = function ()
                window.document.body.scrollTop = 1400;
                setColor();

            button4.onclick = function ()
                window.document.body.scrollTop = 2100;
                setColor();


            function setColor()
                if (tophideheight < 700)
                    button1.style.backgroundColor = 'red';
                 else
                    button1.style.backgroundColor = 'lightblue';


                if (tophideheight >= 700 && tophideheight < 1400)
                    button2.style.backgroundColor = 'red';
                 else
                    button2.style.backgroundColor = 'lightblue';


                if (tophideheight >= 1400 && tophideheight < 2100)
                    button3.style.backgroundColor = 'red';
                 else
                    button3.style.backgroundColor = 'lightblue';


                if (tophideheight >= 2100 && tophideheight < 2800)
                    button4.style.backgroundColor = 'red';
                 else
                    button4.style.backgroundColor = 'lightblue';


    </script>


</body>

</html>
6.2案例:列表的下拉刷新和上拉加载
这个例子的兼容性不好,有些浏览器没效果, 兼容性好的参考
https://blog.csdn.net/zhaihaohao1/article/details/102983531
效果图:
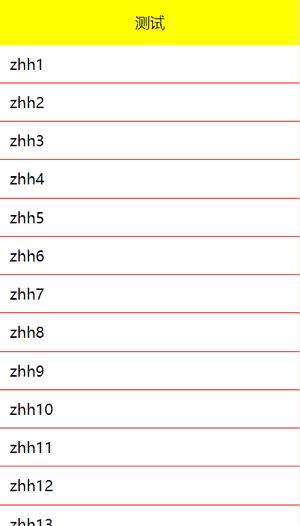
开发思路:
1监听滚动事件 window.onscroll = function ()
2判断滑动到顶部时刷新数据 document.body.scrollTop = 0
3判断滑动到底部时加载数据
可见高度
let clientHeight = document.body.clientHeight;
全文高度(包括不可见部分的高度)
let scrollHeight = document.body.scrollHeight;
顶部被遮住部分的距离
let scrollTop = document.body.scrollTop;
判断滑动到底部(有时候有一点误差,根据实际需要判断)
scrollHeight = scrollHeight+scrollTop;
代码:
<html lang="en">

<head>
    <meta charset="UTF-8">
    <meta name="viewport" content="width=device-width, initial-scale=1.0">
    <meta http-equiv="X-UA-Compatible" content="ie=edge">
    <title>Document</title>
    <style>
        *
            margin: 0px;
            padding: 0px;


        #title
            position: fixed;
            left: 0;
            top: 0;
            width: 100%;
            line-height: 50px;
            text-align: center;
            background-color: yellow;


        #list
            margin-top: 50px;


        .item
            border-bottom: 1px solid red;
            line-height: 40px;
            text-align: left;
            padding-left: 10px;

    </style>
</head>

<body>
    <div id="title">测试</div>
    <div id="list">
        <p id="head" class="item">刷新。。。</p>
        <div id="listContent">


        </div>
        <p id="foot" class="item">加载中。。。</p>
    </div>
    <script>
        // bom相关
        // 刷新时的数据
        let arrayRefresh = ['zhh1', 'zhh2', 'zhh3', 'zhh4',
            'zhh5', 'zhh6', 'zhh7', 'zhh8', 'zhh9', 'zhh10',
            'zhh11', 'zhh12', 'zhh13', 'zhh14', 'zhh15', 'zhh16',
            'zhh17', 'zhh18', 'zhh19', 'zhh20', 'zhh21', 'zhh22',
            'zhh23', 'zhh24', 'zhh25', 'zhh26', 'zhh27', 'zhh28',
            'zhh29', 'zhh30'
        ];
        // 加载时的数据
        let arrayLoad = [...arrayRefresh];
        let head = document.getElementById('head');
        let foot = document.getElementById('foot');
        // 隐藏刷新和加载数据的 p 元素
        head.style.display = "none";
        foot.style.display = "none";
        // 渲染数据
        drawData(arrayRefresh);
        // 顶部隐藏高度要设置,否则无法下拉刷新
        document.body.scrollTop = 1;
        window.onscroll = function()
                //文档高度
                let scrollHeight = document.body.scrollHeight;
                // 可见高度
                let clientHeight = document.body.clientHeight;
                // 滚动高度(就是顶部隐藏的高度)
                let scrollTop = document.body.scrollTop;
                // 到顶部了
                if (scrollTop == 0)
                    head.style.display = "block";
                    console.log('到顶部了');

                    listContent.innerHTML = '';
                    // 渲染数据
                    drawData(arrayRefresh);
                    // 重新设置加载的数据
                    arrayLoad = [];
                    arrayLoad = [...arrayRefresh];
                    setTimeout(function()
                        // 隐藏头
                        head.style.display = "none";
                        // 设置向上隐藏的高度是1,可以继续刷新
                        document.body.scrollTop = 1;
                    , 500);


                let chaAbs = Math.abs(scrollHeight-(clientHeight + scrollTop));


                // 到底部了
                if (chaAbs<0.5)
                    console.log('到底了...');
                    console.log(chaAbs);

                    foot.style.display = "block";
                    setTimeout(function()
                        listContent.innerHTML = '';
                        arrayLoad.push('新加的数据');
                        drawData(arrayLoad);
                        console.log(arrayLoad.length);

                    , 500);


            //渲染数据,写个函数
        function drawData(array)
            for (let index = 0; index < array.length; index++)
                let p = document.createElement('p');
                p.className = 'item';
                p.innerText = array[index];
                listContent.appendChild(p);


    </script>

</body>

</html>
参考文章:
https://blog.csdn.net/money_oriented/article/details/80323965
https://blog.csdn.net/qq_35430000/article/details/80277587
6.3案例:页面的跳转并传递参数:
效果图:
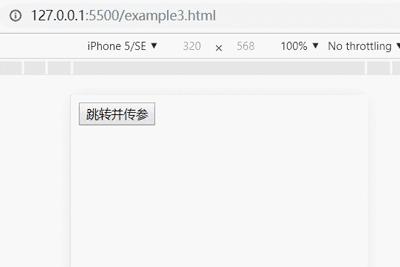
开发思路
在 example3.html 中要转网页,并传参
window.location.href = 'example3.1.html?name=zhh';
在 example3.1.html 中拿到路径,并截取参数
let url = window.location.href;
代码:
example3.1.html中传数据:
<html lang="zh-CN">

<head>
    <meta charset="UTF-8">
    <meta name="viewport" content="width=device-width, initial-scale=1.0">
    <meta http-equiv="X-UA-Compatible" content="ie=edge">
    <title>Document</title>
</head>

<body>
    <button id="button">跳转并传参</button>
    <!-- 网页跳转并传参 -->
    <script>
        /*
        在 example3.html 中要转网页,并传参
        window.location.href = 'example3.1.html?name=zhh';
        在 example3.1.html 中拿到路径,并截取参数
        let url = window.location.href;


         */
        let button = document.getElementById('button');
        button.onclick = function()
        //在第一个 跳转到第二页并在后面拼接参数
        window.location.href = 'example3.1.html?name=zhh';


    </script>

</body>

</html>
example3.1.html 中接收数据
<html lang="zh-CN">

<head>
    <meta charset="UTF-8">
    <meta name="viewport" content="width=device-width, initial-scale=1.0">
    <meta http-equiv="X-UA-Compatible" content="ie=edge">
    <title>Document</title>
</head>

<body>
    <div></div>
    <script>
        //拿到全路径,并截取里面的参数
        let url = window.location.href;
        console.log(url);// http://127.0.0.1:5500/example3.1.html?name=zhh

        // 截取参数
        let name = url.split('?')[1];
        console.log(name);// name=zhh

        // 再根据等号截取
        let nameValue = url.split('=')[1];
        console.log(nameValue); // zhh

        document.getElementsByTagName('div')[0].innerText=name;


    </script>
</body>

</html>
以上是关于web前端练习29----Bom中,Navigator,loaction,history ,Screen,window及案例(滚动,刷新加载,传参)的主要内容,如果未能解决你的问题,请参考以下文章