手把手教学MFC吃豆子教程
Posted 大师兄啦啦啦
tags:
篇首语:本文由小常识网(cha138.com)小编为大家整理,主要介绍了手把手教学MFC吃豆子教程相关的知识,希望对你有一定的参考价值。
手把手教学MFC吃豆子教程
本教程适用于零基础学员制作C++课程设计编程工具:VC++6.0. 本次教学主要知识点: 1.控件消息响应。 2.CDC类函数的使用。
下面开始教学: 吃豆子的基本思想: 1.定义脸和食物类. 2.不断将脸的上一个坐标重绘为白色,将新的脸绘制出来,从而在宏观上实现脸的移动. 3.运用OnTimer()函数制作时钟更新画面, 运用OnKeyDown()接收键盘消息.
首先创建工程:我们选择的是MFC AppW的单文档工程.


xxxxxxxxxxxxxxxxxxxxxxxxxxxxxxxxxxxxxxxxxxxxxxxxxxxxxxxxxxxxxx 下面我们添加三个windows 消息如图
添加方式:右键CView类选择 Add Window Message Hander
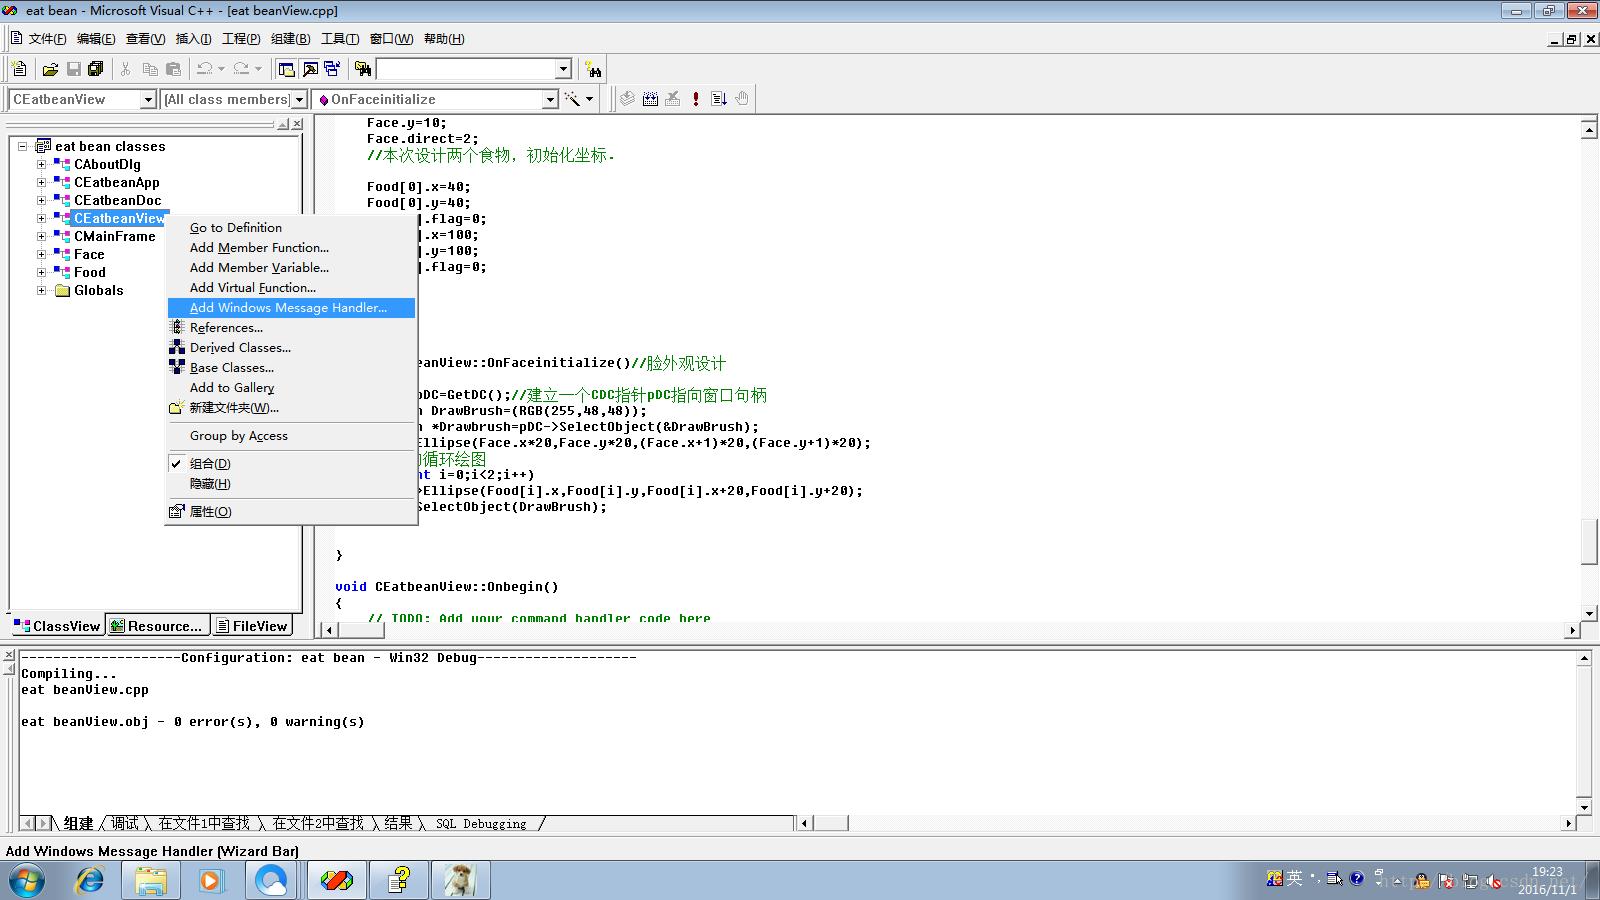
添加结果: 共需要这三个消息
1.WM_KEYDOWN (键盘消息,用来接收键盘反馈) 2.WM_RBUTTONDOWN(鼠标消息,用于后续一个函数方便读者理解程序使用) 3.WM_TIMER
 下面我们开始添加函
添加方式:右键CView类选择 Add Virtual Function
下面我们开始添加函
添加方式:右键CView类选择 Add Virtual Function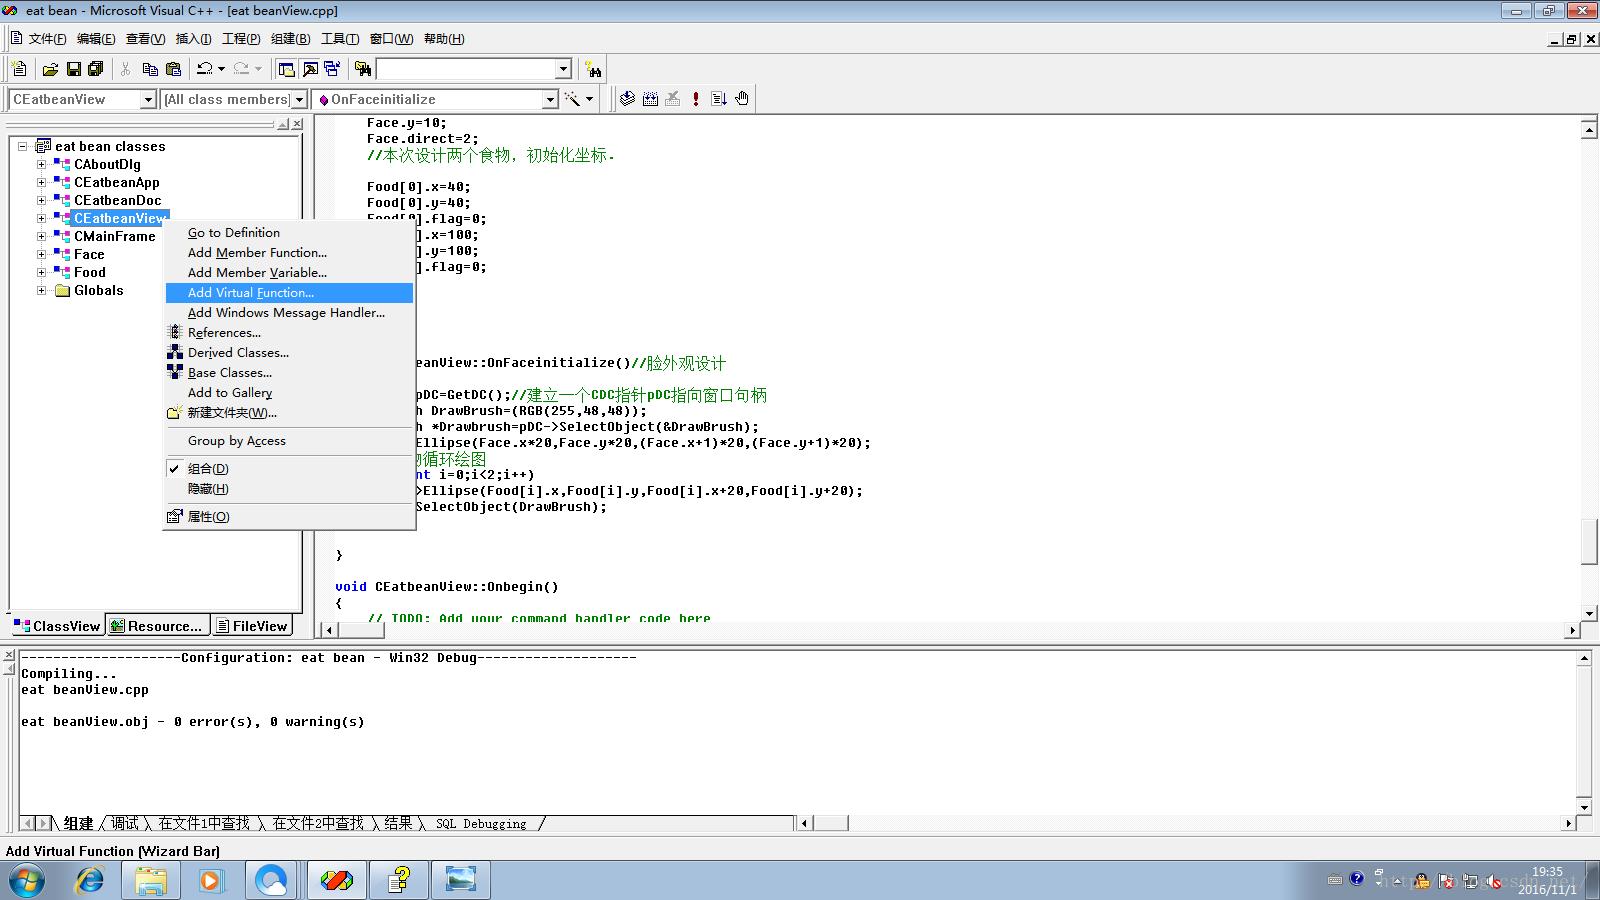 从左边找到OnlitialUpdate函数按Add Handler添加到右边
添加成功图如下:添加完后记得按确定
从左边找到OnlitialUpdate函数按Add Handler添加到右边
添加成功图如下:添加完后记得按确定

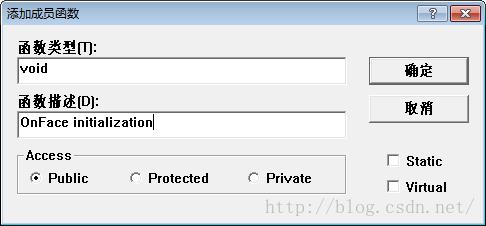
OnInitialUpdate()函数主要是用于脸和食物的初始化,因为这个函数在OnDraw()函数之前调用. 具体说明读者可以自行Bai度; 最后我们再自己添加一个OnFace initialization()(脸的初始化)函数用来对脸进行初始化. 依然是右键CView类选择Add Member Function
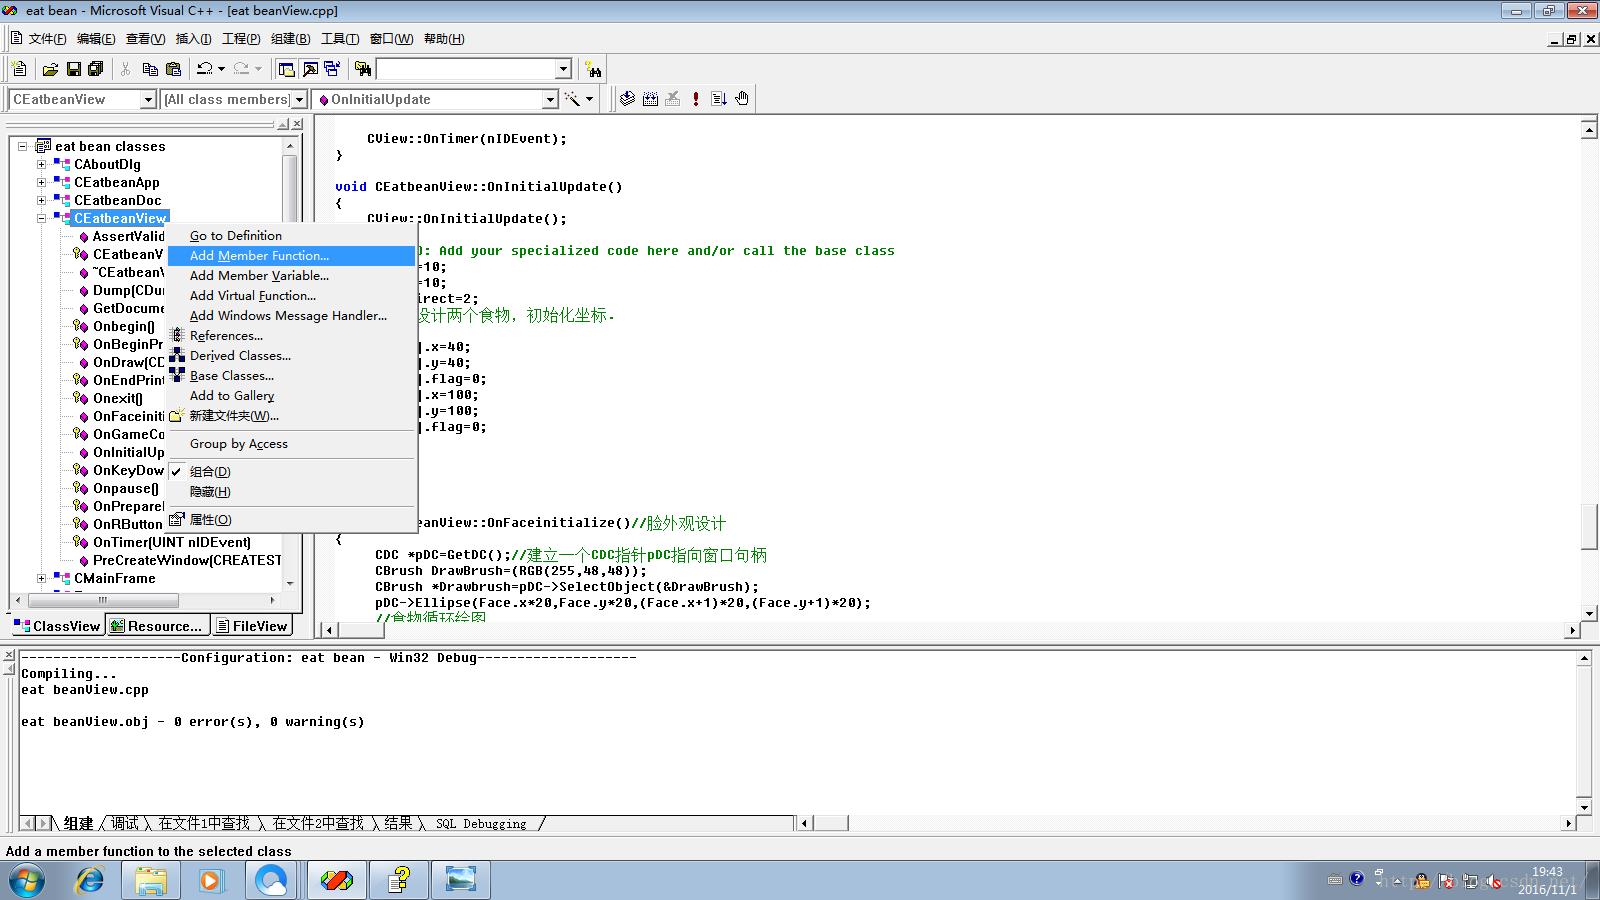
在弹出菜单里输入如图信息.中间最好不要加空格不然到时候不好找函数在哪里,此图就不做修改了.
好了基本游戏框架就算是做好了。 那么我们现在先做一个游戏界面的控件设计吧。 首先我们先选择右边菜单底部的RESOURCE VIEW 双击IDR_MAINFRAME如图

右键空白的格子选择属性
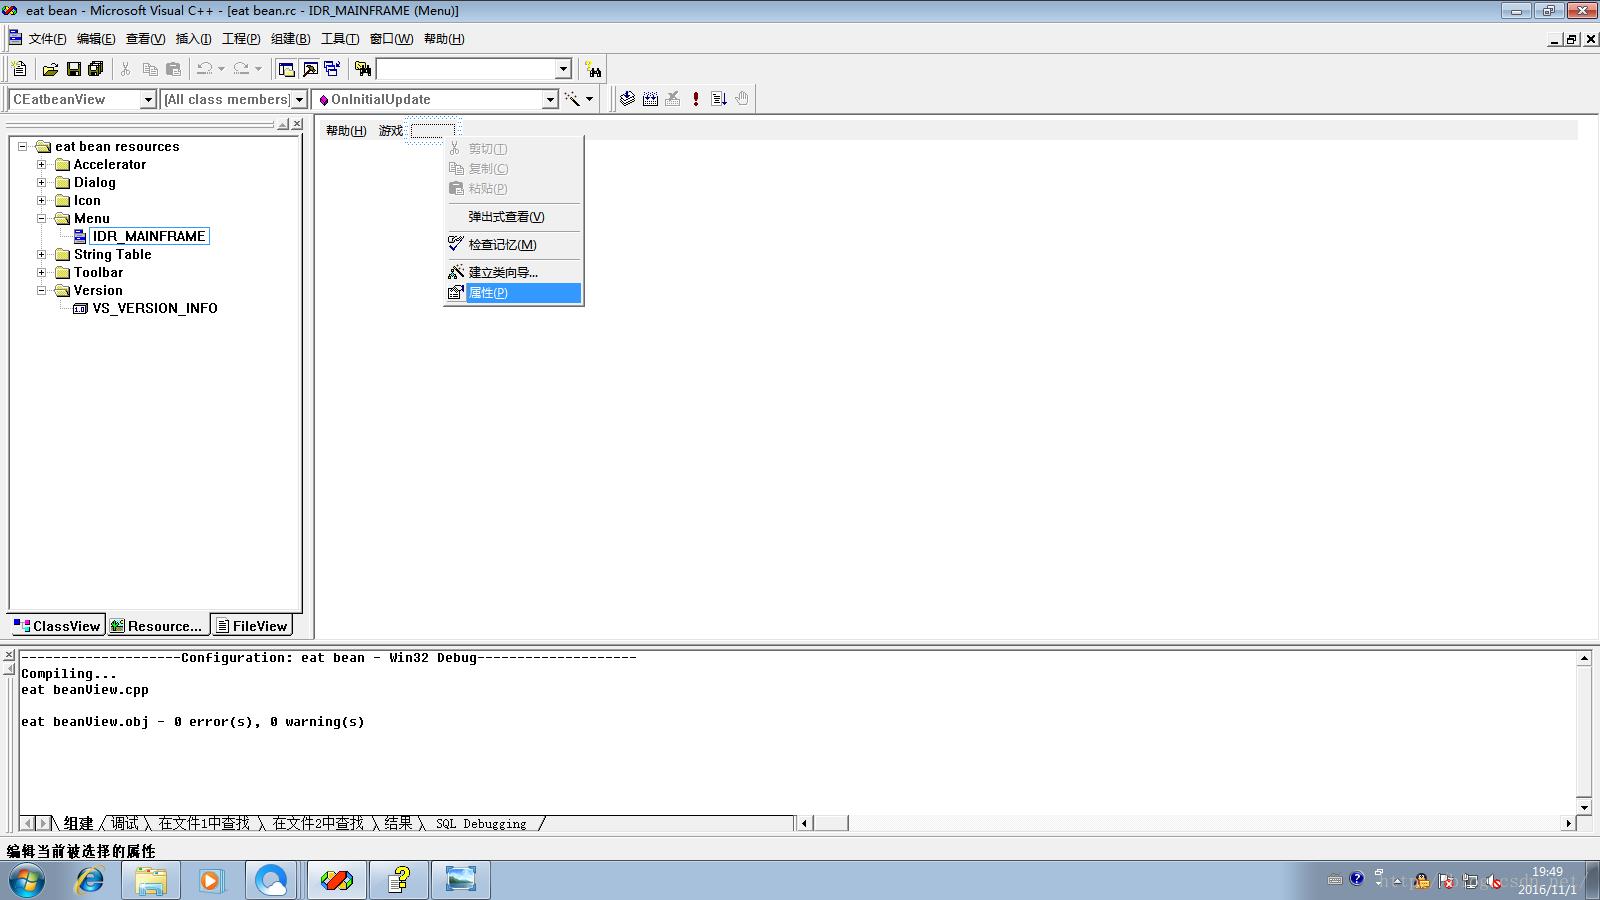
输入标注
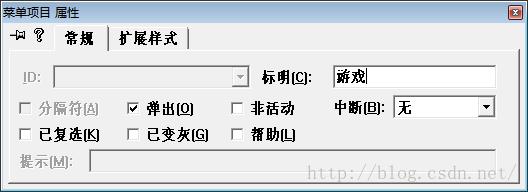
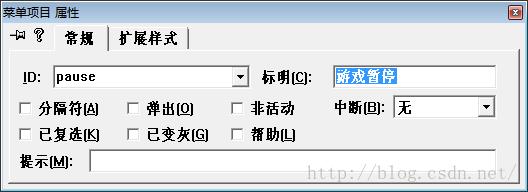
然后在游戏菜单栏的扩展栏分别创建下面的扩展选项

扩展选项的属性分别为


ID成功设置之后我们就开始对这些控件进行消息的响应处理 具体方法如下图

注意一定要在Class name:选项中选择CVIEW类 赋予Begin COMMAND的Message:

其他控件也如上例子添加函数
添加完毕后我们就可以检查一下所添加的函数是否有遗漏 读者可以参照此图,如果有遗漏可以自行返回上面再次学习添加.

下面我们要向所添加的函数体里面添加代码了,教程也快到尾声了大家坚持.

1.我们在如图位置添加脸和食物的全局变量 class Face
public:
int x,y;//坐标
int direct;//方向
Face;
class Food
public:
int x;
int y;
int flag;//flag(标志)后用于防止食物坐标重复访问造成游戏结束的问题
Food[2];
int flag =2;//这个flag用于计算食物的个数,当flag等于0那么游戏将结束
插入在如图的地方,代码是源程序里面复制的读者可以选择复制粘贴到自己的程序中.

对食物和脸进行初始化 void CEatbeanView::OnInitialUpdate()
CView::OnInitialUpdate();
// TODO: Add your specialized code here and/or call the base class
Face.x=10;
Face.y=10;
Face.direct=2;
//本次设计两个食物,初始化坐标.
Food[0].x=40;
Food[0].y=40;
Food[0].flag=0;
Food[1].x=100;
Food[1].y=100;
Food[1].flag=0;

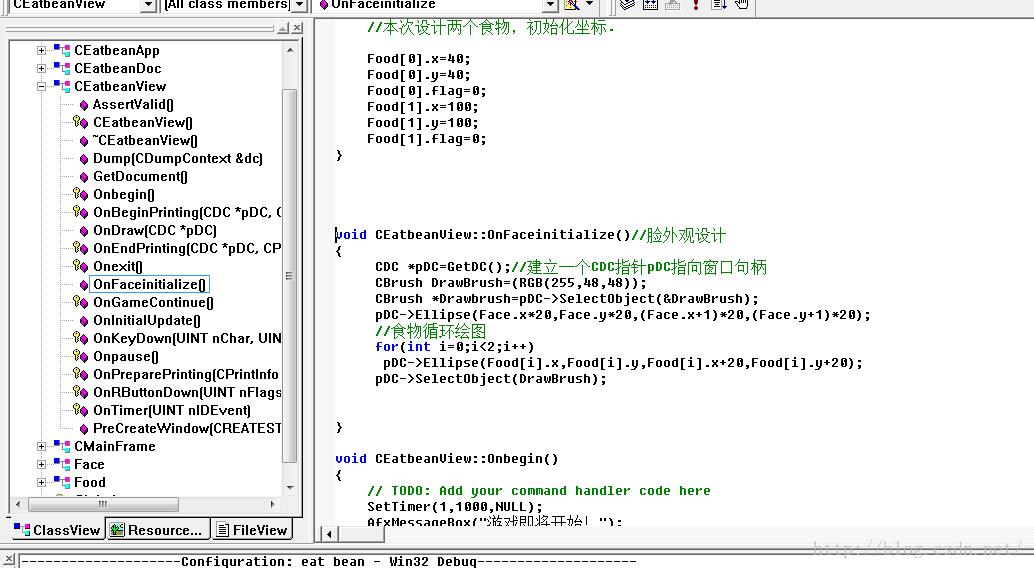
2.找到刚才我们定义的Faceinitialization函数做脸的初始化和食物的初始化
void CEatbeanView::OnFaceinitialize()//脸外观设计
CDC *pDC=GetDC();//建立一个CDC指针pDC指向窗口句柄
CBrush DrawBrush=(RGB(255,48,48)); //创建一个画刷需要用RBG进行初始化,RBG的色彩可以百度
CBrush *Drawbrush=pDC->SelectObject(&DrawBrush);
pDC->Ellipse(Face.x*20,Face.y*20,(Face.x+1)*20,(Face.y+1)*20);
//食物循环绘图
for(int i=0;i<2;i++)
pDC->Ellipse(Food[i].x,Food[i].y,Food[i].x+20,Food[i].y+20);
pDC->SelectObject(DrawBrush);
结果图
3.对OnKeyDown()函数中添加代码
void CEatbeanView::OnKeyDown(UINT nChar, UINT nRepCnt, UINT nFlags) //nChar用来从键盘接收消息
// TODO: Add your message handler code here and/or call default
switch(nChar)//用一个stitch接收按键并转化为数字方便运算
case VK_UP:Face.direct=1;break;// 上1
case VK_DOWN:Face.direct=2;break;// 下2
case VK_LEFT:Face.direct=3;break;// 左3
case VK_RIGHT:Face.direct=4;break;// 右4
CView::OnKeyDown(nChar, nRepCnt, nFlags);//自己生成
添加结果图
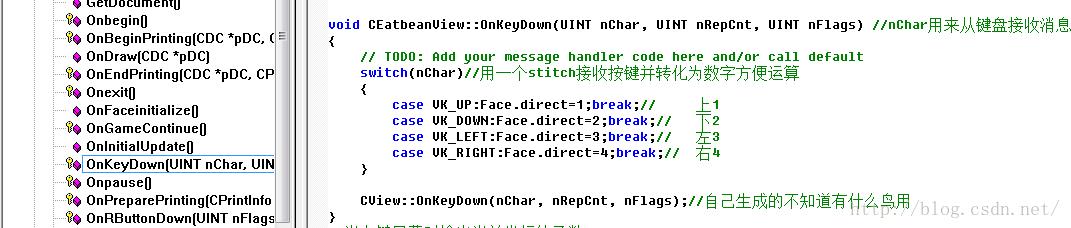
OnKeyDown函数的第一个参数UINT nChar是键盘输入的信息,这里我们用switch进行判断 对不同按键我们将脸的朝向Face.direct变量进行不同的初始化.不同的方向用不同的数字代表 之后我们方面判断.
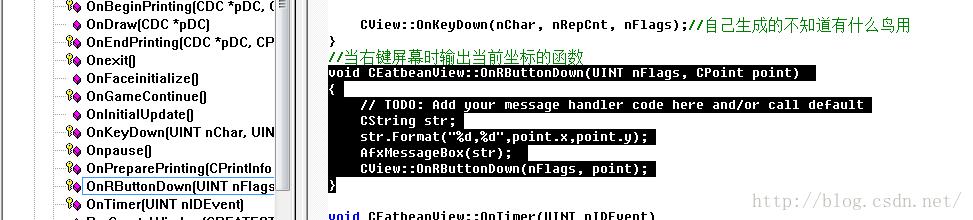
4.因为读者可能不了解坐标所以我这里添加了一个函数,这个函数的作用是: 当你右键游戏窗口会弹窗此处坐标,方便于读者理解程序所用,没有这个函数游戏也能愉快运行. 添加方式和上面几个函数一样在右边找到然后输入代码 void CEatbeanView::OnRButtonDown(UINT nFlags, CPoint point)
// TODO: Add your message handler code here and/or call default
CString str;
str.Format("%d,%d",point.x,point.y);
AfxMessageBox(str);
CView::OnRButtonDown(nFlags, point);
结果图
5.对游戏开始游戏暂停等控件添加代码 void CEatbeanView::Onbegin()
// TODO: Add your command handler code here
SetTimer(1,1000,NULL);
AfxMessageBox("游戏即将开始!");
void CEatbeanView::Onexit()
// TODO: Add your command handler code here
AfxMessageBox("退出游戏");
AfxGetMainWnd()->SendMessage(WM_CLOSE);//关闭窗口
void CEatbeanView::Onpause()
// TODO: Add your command handler code here
KillTimer(1);
AfxMessageBox("游戏暂停中!");
void CEatbeanView::OnGameContinue()
// TODO: Add your command handler code here
SetTimer(1,1000,NULL);
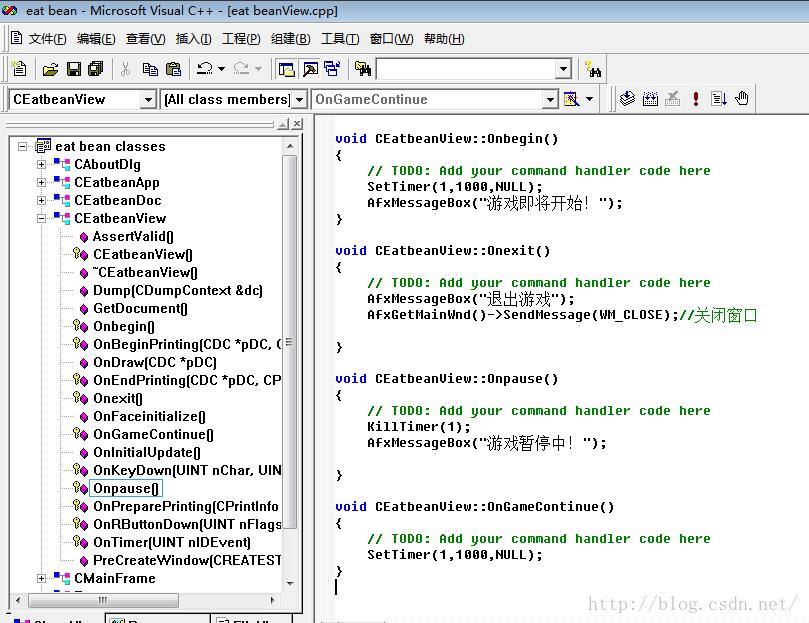
AfxMessageBox是弹窗消息的函数. SetTimer函数的说明:创建或设置一个定时器,该函数创建的定时器与Timer控件(定时器控件)效果相同。 里面一共有三个参数SetTimer(计时器名字,时间间隔单位毫秒,指定窗口句柄)
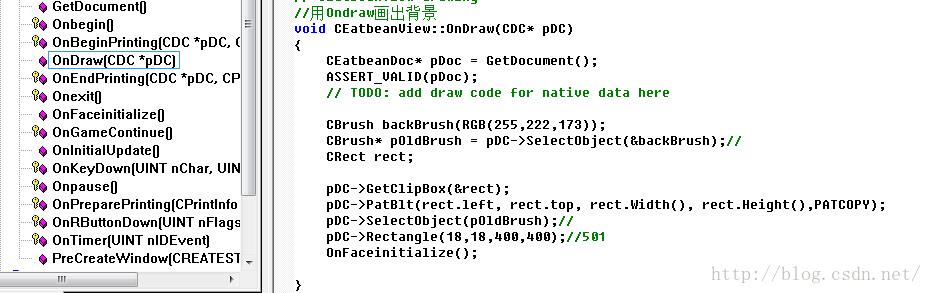
6.对OnDraw函数进行代码添加
我们用这个函数进行界面的初始绘制 void CEatbeanView::OnDraw(CDC* pDC)
CEatbeanDoc* pDoc = GetDocument();
ASSERT_VALID(pDoc);
// TODO: add draw code for native data here
CBrush backBrush(RGB(255,222,173));
CBrush* pOldBrush = pDC->SelectObject(&backBrush);//
CRect rect;
pDC->GetClipBox(&rect);
pDC->PatBlt(rect.left, rect.top, rect.Width(), rect.Height(),PATCOPY);
pDC->SelectObject(pOldBrush);//
pDC->Rectangle(18,18,400,400);//501
OnFaceinitialize();
7.对OnTimer函数的代码添加 void CEatbeanView::OnTimer(UINT nIDEvent)
// TODO: Add your message handler code here and/or call default
//撞界判断,食物吃完
CDC *pDC=GetDC();
if(Face.x*20<=20||Face.y*20<=20||Face.x*20>=380||Face.y*20>=380||flag==0)
KillTimer(1);
AfxMessageBox("游戏结束");
//判断食物的剩余
//先擦除前一个位置
pDC->SelectStockObject(WHITE_PEN);
pDC->Rectangle(Face.x*20,Face.y*20,(Face.x+1)*20,(Face.y+1)*20);
//后画出新的脸
//行走方向判断
if(Face.direct==1)Face.y--;
if(Face.direct==2)Face.y++;
if(Face.direct==3)Face.x--;
if(Face.direct==4)Face.x++;
pDC->SelectStockObject(BLACK_PEN);
CBrush DrawBrush=(RGB(255,48,48));
CBrush *Drawbrush=pDC->SelectObject(&DrawBrush);
/
if(Face.x*20==Food[0].x&&Face.y*20==Food[0].y&&Food[0].flag==0)
flag--;
Food[0].flag=1;
else if(Face.x*20==Food[1].x&&Face.y*20==Food[1].y&&Food[1].flag==0)
flag--;
Food[1].flag=1;
if(Face.direct==1)//上
if((Face.x+Face.y)%2==0)
pDC->Ellipse(Face.x*20,Face.y*20,(Face.x+1)*20,(Face.y+1)*20);//闭嘴重绘
else
pDC->Pie(Face.x*20,Face.y*20,(Face.x+1)*20,(Face.y+1)*20,Face.x*20+5,Face.y*20,Face.x*20+15,Face.y*20);
if(Face.direct==2)//下//
if((Face.x+Face.y)%2==0)
pDC->Ellipse(Face.x*20,Face.y*20,(Face.x+1)*20,(Face.y+1)*20);//闭嘴重绘
else
pDC->Pie(Face.x*20,Face.y*20,(Face.x+1)*20,(Face.y+1)*20,/**/Face.x*20+15,Face.y*20+20,Face.x*20+5,Face.y*20+20);
if(Face.direct==3)//左/
if((Face.x+Face.y)%2==0) //我们用脸的横纵坐标之和对2取余进行不同的绘制从而实现嘴巴的开合.
pDC->Ellipse(Face.x*20,Face.y*20,(Face.x+1)*20,(Face.y+1)*20);//闭嘴重绘
else
//pDC->SelectStockObject(BLACK_BRUSH);
pDC->Pie(Face.x*20,Face.y*20,(Face.x+1)*20,(Face.y+1)*20,Face.x*20,Face.y*20+15,Face.x*20,Face.y*20+5);
if(Face.direct==4)//右
if((Face.x+Face.y)%2==0)
pDC->Ellipse(Face.x*20,Face.y*20,(Face.x+1)*20,(Face.y+1)*20);//闭嘴重绘
else
pDC->Pie(Face.x*20,Face.y*20,(Face.x+1)*20,(Face.y+1)*20,Face.x*20+20,Face.y*20+5,Face.x*20+20,Face.y*20+15);
pDC->SelectObject(DrawBrush);
CView::OnTimer(nIDEvent);
这里我对代码进行说明一下 if((Face.x+Face.y)%2==0) //我们用脸的横纵坐标之和对2取余进行不同的绘制从而实现嘴巴的开合. //先擦除前一个位置
pDC->SelectStockObject(WHITE_PEN);
pDC->Rectangle(Face.x*20,Face.y*20,(Face.x+1)*20,(Face.y+1)*20);
这段函数的作用就是画矩形我们用,画白色矩形的方法来擦除上一个位置,当然当脸吃到食物之后食物就成了上一个位置 我们就用这个矩形覆盖食物同时覆盖原来的脸,这样就实现的食物的删除.
本次教程就到这里了,已经详细之至了,实在不懂的地方就请 读
者自行度娘了.
以上是关于手把手教学MFC吃豆子教程的主要内容,如果未能解决你的问题,请参考以下文章