你真的会用java注解吗?
Posted 一代小强
tags:
篇首语:本文由小常识网(cha138.com)小编为大家整理,主要介绍了你真的会用java注解吗?相关的知识,希望对你有一定的参考价值。
“揭开java注解的神秘面纱“
介绍
想必大家在接触java,甚至部分工作几年的,对于类、方法、字段上的 @xxx 都有一种迷茫:这是啥玩意,它是怎么运行起来的?
别慌,这就是java的注解,一个很常见但又神秘的特性。
我们从最熟悉的Override注解开始,Override对应的声明如下,可以看到,注解与接口的声明很相似,只不过多了一个@。
@Target(ElementType.METHOD)
@Retention(RetentionPolicy.SOURCE)
public @interface Override
同时他也依赖了其他两个注解Target和Retention。target的声明如下,用于声明注解的作用域,比如 Override是作用于方法的,如果在其他域使用该注解,编译器将会报错。
@Documented
@Retention(RetentionPolicy.RUNTIME)
@Target(ElementType.ANNOTATION_TYPE)
public @interface Target
    // 注解值
    ElementType[] value();

// 注解类型
public enum ElementType
   // 用于接口、类、枚举
    TYPE,
    // 字段和枚举常量
    FIELD,
    // 方法
    METHOD,
    // 参数
    PARAMETER,
    // 构造函数
    CONSTRUCTOR,
    // 局部变量
    LOCAL_VARIABLE,
    // 注解
    ANNOTATION_TYPE,
    // 包
    PACKAGE
而Retention的声明如下,其中CLASS、RUNTIME就是大名鼎鼎的编译时注解、运行时注解。
@Documented
@Retention(RetentionPolicy.RUNTIME)
@Target(ElementType.ANNOTATION_TYPE)
public @interface Retention
    // 返回注解策略
    RetentionPolicy value();

// 注解策略
public enum RetentionPolicy
    // 注释将由编译器丢弃
    SOURCE,
    // 注释将由编译器记录在类文件中,但无需在运行时由 VM 保留,这是默认值行为。
    CLASS,
    // 注释将由编译器和运行时由 VM 保留,因此可以反射地读取它们
    RUNTIME
简单的来说,注解的声明有两个重要的注解:作用域(target)和保留策略(Retention)。其中保留策略很重要,它决定了注解的生命长度。
道理都懂,问题是注解怎么用,只是好(装)看(B)么?来,教你真功夫!
1、SOURCE注解
作用:source注解又称源码注解,给编译器读的,在编译成class文件的时候会被去掉,用于协助开发者编写正确的代码。
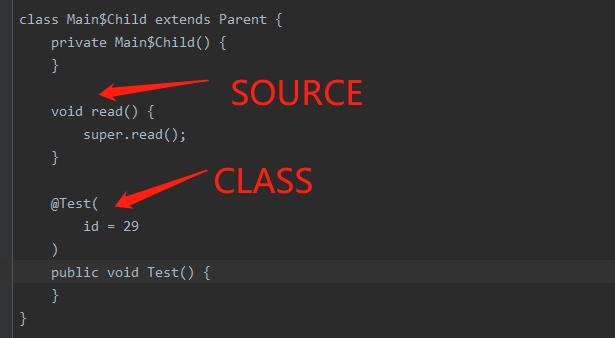
有如下代码,其中Override是源码注解,Test注解是编译时注解。
public class Main
    private static class Parent
        void read()
            System.out.println("read");


    private static class Child extends Parent
        @Override
        void read()
            super.read();

        @Test(id = 29)
        public void Test()
对应的编译class文件如下,可以看到Override注解已经被移除,但是Test注解还在。

那SOUIRCE注解是怎么帮助编写正确的代码呢?
且看这个例子:
下面的setLeve 方法需要限制传入的参数,只能传LEVE_1或者LEVE_2。我们可以通过定义Level 注解来实现。
import androidx.annotation.IntDef;
import java.lang.annotation.ElementType;
import java.lang.annotation.Retention;
import java.lang.annotation.RetentionPolicy;
import java.lang.annotation.Target;

public class Main

    public static final int LEVE_1 = 1;
    public static final int LEVE_2 = 2;

    @Retention(RetentionPolicy.SOURCE) // 源码注解
    @Target(ElementType.PARAMETER) // 作用于参数
    @IntDef(LEVE_1, LEVE_2) // 限制值的范围
    public @interface Level


    public static void main(String[] args)
        Main main = new Main();
        main.setLeve(0); // 报错
        main.setLeve(1); // 报错
        main.setLeve(LEVE_1); // 正确

    // 限制合法参数为LEVEL_1 和 LEVEL_2
    public void setLeve(@Level int level)
        System.out.println("level " + level);
一般如果要实现上述需求,需要定义对应的枚举来实现,这里通过Android 提供的IntDef 注解,定义对应参数的值范围,达到枚举的效果,并且性能比枚举好。
2、运行时注解
作用:保留到运行阶段。主要在代码执行的时候会获取该注解 ,做一些反射的操作。
我们用运行时注解实现butterKnife的功能,核心思路:通过遍历指定的注解,拿到值后,用activity的方法获取view,再反射绑定到对应的属性上。
接口
首先定义两个注解接口
// 用于绑定view
@Target(ElementType.FIELD)
@Retention(RetentionPolicy.RUNTIME)
public @interface FindView
    int value();


// 用于绑定方法
@Target(ElementType.METHOD)
@Retention(RetentionPolicy.RUNTIME)
public @interface OnClick
    int value();
处理器
定义ViewProcessor,用于在运行时解析注解。
public class ViewProcessor
    private static final String TAG = "ViewProcessor";

    public void inject(Activity activity)
        try
            injectId(activity);
            injectOnClick(activity);
         catch (Exception e)
            e.printStackTrace();


    private void injectOnClick(Activity activity)
        Class<?> cls = activity.getClass();
        // 获取全部声明的方法
        for (Method method : cls.getDeclaredMethods())
            Log.d(TAG, "injectOnClick method is : " + method.getName());
            // 获取该方法上的注解
            Annotation[] annotations = method.getAnnotations();
            for (Annotation annotation : annotations)
                if (!(annotation instanceof OnClick))
                    continue;

                // 找到OnClick注解
                OnClick findView = (OnClick) annotation;
                // 获取OnClick的值
                int id = findView.value();
                // 找到对应的view
                View view = activity.findViewById(id);
                if (view == null)
                    continue;

                view.setOnClickListener((view1) ->
                    Log.d(TAG, "injectOnClick: callback");
                    try
                        // 反射调用该方法
                        method.setAccessible(true);
                        method.invoke(activity);
                     catch (Exception e)
                        e.printStackTrace();

                );


    private void injectId(Activity activity) throws IllegalAccessException
        Class<?> cls = activity.getClass();
        for (Field field : cls.getDeclaredFields())
            Log.d(TAG, "injectOnClick filed is : " + field);
            Annotation[] annotations = field.getAnnotations();
            for (Annotation annotation : annotations)
                if (!(annotation instanceof FindView))
                    continue;

                // 找到FindView注解
                FindView findView = (FindView) annotation;
                int id = findView.value();
                View view = activity.findViewById(id);
                if (view == null)
                    continue;

                field.setAccessible(true);
                // 给该域赋值
                field.set(activity, view);
使用
在onCreate的时候,初始化注解处理器,实现注解的解析。
public class RuntimeActivity extends AppCompatActivity

    @FindView(R.id.runtime_button1)
    private Button mButton;

    @Override
    protected void onCreate(Bundle savedInstanceState)
        super.onCreate(savedInstanceState);
        setContentView(R.layout.activity_runtime);
        // 初始化注解处理器
        ViewProcessor bindViewHelper = new ViewProcessor();
        bindViewHelper.inject(this);
        mButton.setOnClickListener((view) ->
            Toast.makeText(this, "运行时注解 FindView", Toast.LENGTH_SHORT).show();
        );


    @OnClick(R.id.runtime_button2)
    private void onClick2()
        Toast.makeText(this, "运行时注解 OnClick", Toast.LENGTH_SHORT).show();
小结
- 优点:通过反射方式,实现赋值和方法调用,对于域或方法的访问范围不做要求,框架实现较为简单。
- 缺点:使用大量反射,运行时性能较差。
3、编译时注解——概念
作用:在编译期间生效的,常用于在编译期间插入模板代码。
什么是APT
这里不得不提一下APT,APT(Annotation Processing Tool)是 javac 提供的一种可以处理注解的工具,用来在编译时扫描和处理注解的,简单来说就是可以通过 APT 获取到注解及其注解所在位置的信息,可以使用这些信息在编译器生成代码。编译时注解就是通过 APT 来通过注解信息生成代码来完成某些功能,典型代表有 ButterKnife、Dagger等。
AbstractProcessor
AbstractProcessor 是实现编译注解的关键入口,自定义的注解处理器都是需要继承于它,其中以下方法比较重要:
- init:主要做一些初始化的动作,比如Elements、Filer 和 Message等。
- getSupportedAnnotationTypes:用来设置支持的注解类型
- getSupportedSourceVersion:获取java版本。
- process:解析注解,生成代码模板的实现回调。
Element
Element 用于表示程序元素,例如模块、包、类或方法。每个元素代表一个静态的、语言级别的构造。而Elements 是处理 Element 的工具类,只提供接口。
4、编译时注解——实现
我们用编译时注解重写一下上面的butterKnife。
项目中,有如下module
- app:用于demo演示
- api:用于定义注解,比如BindView
- butterKnife:用于处理注解,生成代码的逻辑
接口
api模块定义了两个注解BindView和Onclick
@Target(ElementType.FIELD)
@Retention(RetentionPolicy.CLASS)
public @interface BindView
    int value();


@Target(ElementType.METHOD)
@Retention(RetentionPolicy.CLASS)
public @interface Onclick
    int[] value();
处理器
butterKnife 模块需要依赖第三方库
dependencies
    // 用来生成META-INF/services/javax.annotation.processing.Processor文件
    implementation 'com.google.auto.service:auto-service:1.0-rc2'
    // 用于创建Java文件
    implementation 'com.squareup:javapoet:1.12.1'
    // 导入javaX包
    targetCompatibility = '1.8'
    sourceCompatibility = '1.8'
对应的注解处理器是 ButterKnifeProcessor
// 用于声明该类为注解处理器
@AutoService(Processor.class)
public class ButterKnifeProcessor extends AbstractProcessor
// 用于打印日志信息
private Messager mMessager;
// 用于解析 Element
private Elements mElements;
// 存储每个类下面对应的BindView
private Map<TypeElement, List<BindModel>> mTypeElementMap = new HashMap<>();
// 存储m每个类中,id绑定的方法,即OnClick
private Map<TypeElement, Map<Integer, Element>> mOnclickElementMap = new HashMap<>();
// 用于将创建的java程序输出到相关路径下。
private Filer mFiler;
@Override
public synchronized void init(ProcessingEnvironment processingEnv)
super.init(processingEnv);
mMessager = processingEnv.getMessager();
mElements = processingEnv.getElementUtils();
mFiler = processingEnv.getFiler();
/**
* 此方法用来设置支持的注解类型,没有设置的无效(获取不到)
*/
@Override
public Set<String> getSupportedAnnotationTypes()
HashSet<String> supportTypes = new LinkedHashSet<>();
// 把支持的类型添加进去
supportTypes.add(BindView.class.getCanonicalName());
supportTypes.add(Onclick.class.getCanonicalName());
return supportTypes;
@Override
public SourceVersion getSupportedSourceVersion()
return SourceVersion.latestSupported();
@Override
public boolean process(Set<? extends TypeElement> annotations,
RoundEnvironment roundEnv)
mMessager.printMessage(Diagnostic.Kind.NOTE, "===============process start =============");
mTypeElementMap.clear();
// 解析 @BindView element.
for (Element element : roundEnv.getElementsAnnotatedWith(BindView.class))
verifyAnnotation(element, BindView.class, ElementKind.FIELD);
// 可以理解为类的element
TypeElement enclosingElement = (TypeElement) element.getEnclosingElement();
// 获取class 完整name,比如:com.example.annotation.buildtime.MainActivity
Name qualifiedName = enclosingElement.getQualifiedName();
// 获取变量名,比如 button1
Name simpleName = element.getSimpleName();
//获取到view的id
int id = element.getAnnotation(BindView.class).value();
String content = String.format("====> qualifiedName: %s simpleName: %s id: %d"
, qualifiedName, simpleName, id);
mMessager.printMessage(Diagnostic.Kind.NOTE, content);
List<BindModel> modelList = mTypeElementMap.get(enclosingElement);
if (modelList == null)
// 每个activity会有多个BindView注解
modelList = new ArrayList<>();
modelList.add(new BindModel(element, id));
mTypeElementMap.put(enclosingElement, modelList);
// 解析 @Onclick element.
for (Element element : roundEnv.getElementsAnnotatedWith(Onclick.class))
verifyAnnotation(element, Onclick.class, ElementKind.METHOD);
TypeElement enclosingElement = (TypeElement) element.getEnclosingElement();
Map<Integer, Element> methods = mOnclickElementMap.get(enclosingElement);
if (methods == null)
// 每个类会有多个Onclick注解
methods = new HashMap<>();
int[] ids = element.getAnnotation(Onclick.class).value();
for (int id : ids)
// 将id与方法绑定
methods.put(id, element);
// 将methods 与类绑定
mOnclickElementMap.put(enclosingElement, methods);
// 遍历类
mTypeElementMap.forEach((typeElement, bindModels) ->
// 获取包名
String packageName = mElements.getPackageOf(typeElement)
.getQualifiedName().toString()