Android:日常学习笔记———探究UI开发
Posted 子烁爱学习
tags:
篇首语:本文由小常识网(cha138.com)小编为大家整理,主要介绍了Android:日常学习笔记———探究UI开发相关的知识,希望对你有一定的参考价值。
android:日常学习笔记(7)———探究UI开发(4)
UI概述
View 和 ViewGrou
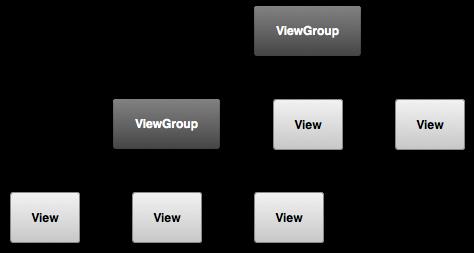
Android 应用中的所有用户界面元素都是使用 View 和 ViewGroup 对象构建而成。View 对象用于在屏幕上绘制可供用户交互的内容。ViewGroup 对象用于储存其他 View(和 ViewGroup)对象,以便定义界面的布局。

说明:
View是安卓中最基本的一种UI,它可以在屏幕上绘制一块矩形区域,并能响应这块区域的各种事件,我们使用的各种控件都是在View的基础上进行的添加和完善。ViewGroup则是一种特殊的View,他可以包含很多View和子ViewGroup,是一个用于放置控件和布局的容器。
引入布局
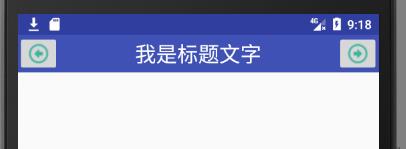
比如现在我们要替换系统默认的标题栏,改为如下所示:

即两边是两个按钮,中间是标题文字,XML配置文件如下:
<?xml version="1.0" encoding="utf-8"?>
<LinearLayout xmlns:android="http://schemas.android.com/apk/res/android"
    android:layout_width="match_parent"
    android:layout_height="wrap_content"
    android:background="@color/colorPrimary">
    <ImageButton
        android:layout_width="wrap_content"
        android:layout_height="match_parent"
        android:src="@drawable/previous_24px"
        />
    <TextView
        android:id="@+id/textView"
        android:layout_width="wrap_content"
        android:layout_height="wrap_content"
        android:layout_gravity="center"
        android:layout_weight="1"
        android:gravity="center"
        android:text="我是标题文字"
        android:textColor="#fff"
        android:textSize="24sp" />
    <ImageButton
        android:layout_width="wrap_content"
        android:layout_height="wrap_content"
        android:src="@drawable/next_24px"
        />
</LinearLayout>
我们面临一个问题,我们要让所有的活动页面都采用这个标题栏该怎么做呢?
我们可以单独将这个标题栏写到一个XML文件中,然后在其他任意使用此标题栏的活动的布局文件中引入此XML即可。
<?xml version="1.0" encoding="utf-8"?>
<LinearLayout xmlns:android="http://schemas.android.com/apk/res/android"
    android:layout_width="match_parent"
    android:layout_height="match_parent">
    <include layout="@layout/panel_title"/>
</LinearLayout>
创建自定义控件
说明:
引入布局的技巧的确实解决了重复编写布局代码的问题,但是如果布局中的一些控件要求能够响应事件,我们还是需要在每个活动中为这些控件单独编写一次事件注册的代码,比如标题栏中的返回按钮,都是销毁当前活动。为了避免重复代码,我们可以使用自定义控件的方式来解决。
代码:
1.新建TitleLayout(继承自LinearLayout)
public class TitleLayout extends LinearLayout {
    public TitleLayout(Context context, @Nullable AttributeSet attrs) {
        super(context, attrs);
        LayoutInflater.from(context).inflate(R.layout.panel_title,this);
    }
}
说明:
首先我们重写了LinerLayout的构造函数,在布局中引入TitleLayout控件就会调用这个构造函数。然后在构造函数中对标题栏布局进行动态加载,这就需要用到LayoutInflater了。通过LayoutInflater的form()方法可以构建出一个LayoutInflater对象,然后调用Inflate()就可以动态加载一个布局文件。
inflate接受两个参数:
- 第一个是布局文件的ID
- 第二个参数是给加载好的布局再添加一个父布局,此处为this
2.为按钮绑定事件
public class TitleLayout extends LinearLayout {
    public TitleLayout(Context context, @Nullable AttributeSet attrs) {
        super(context, attrs);
        LayoutInflater.from(context).inflate(R.layout.panel_title,this);
        ImageButton titleBack = (ImageButton) findViewById(R.id.title_back);
        titleBack.setOnClickListener(new OnClickListener() {
            public void onClick(View v) {
                Toast.makeText(getContext(),"活动销毁",Toast.LENGTH_LONG).show();
            }
        });
    }
}
3.在布局文件中添加这个自定义控件
<?xml version="1.0" encoding="utf-8"?>
<LinearLayout xmlns:android="http://schemas.android.com/apk/res/android"
    android:layout_width="match_parent"
    android:layout_height="match_parent">
    <com.example.zy.dealhelper.TitleLayout
        android:layout_width="match_parent"
        android:layout_height="wrap_content"/>
</LinearLayout>
说明:
添加自定义控件和添加普通控件的方式基本一样,只不过在添加自定义控件的时候需要指明控件的具体类名。
以上是关于Android:日常学习笔记———探究UI开发的主要内容,如果未能解决你的问题,请参考以下文章