文本检测DB:Real-time Scene Text Detection with Differentiable Binarization
Posted 超级无敌陈大佬的跟班
tags:
篇首语:本文由小常识网(cha138.com)小编为大家整理,主要介绍了文本检测DB:Real-time Scene Text Detection with Differentiable Binarization相关的知识,希望对你有一定的参考价值。
目录
二.Differentiable Binarization可微二值化
DB:Real-time Scene Text Detection with Differentiable Binarization
关键创新点:Differentiable Binarization(DB,可微分二值化),作者提出了一种可微分的二值化方式,相比于传统的二值化操作,DB能够在网络中进行端到端训练。另外还是用可变形卷积用于更好的处理不同长度的文本。
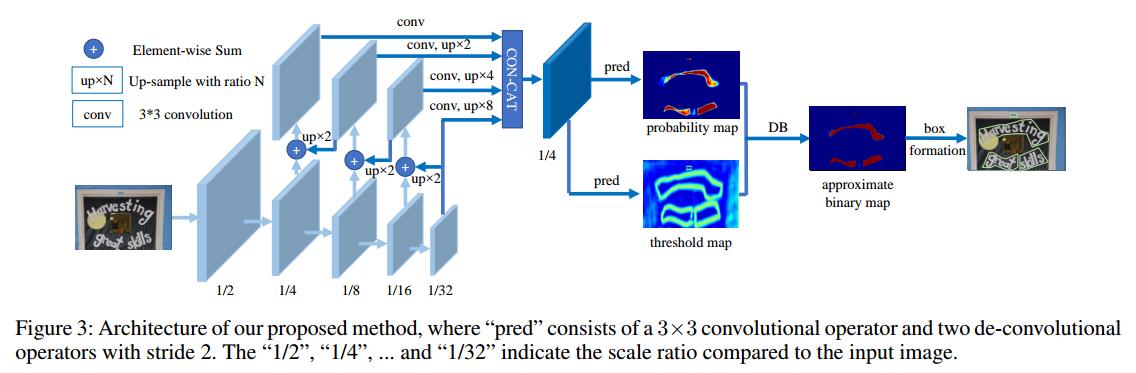
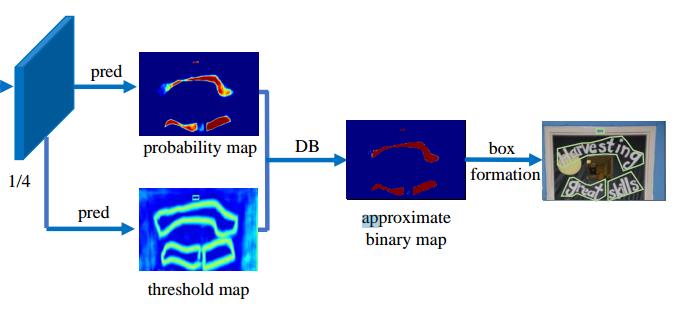
网络整体流程
网络整体流程如下图所示:
- backbone提特征 + FPN结构 进行多尺度图像特征融合
- FPN结构融合特征后会生成两个特征图 probability map(预测图) 跟 threshold map(阈值图)
- 通过probability map 与threshold map 两个特征图做DB差分操作得到文字区域二分图
- 二分图经过cv2 轮廓得到文字区域信息
一. Label generation
label生成的流程图如下所示,特征图 probability map(预测图) 跟 threshold map(阈值图)
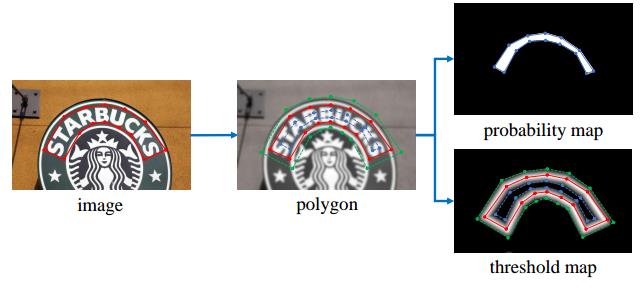
1.1 probability map生成
使用Vatti clipping algorithm 对gt多边形polygon 进行缩放,将G缩减到Gs(蓝线内部)。probability map中蓝线以内的区域取值为1,其它区域值为0。
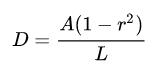
收缩的偏移量D的计算方式:
偏移量D根据原始多边形(红线区域)的周长L和面积A计算得出的,r是shrink ratio,设置为0.4。
1.2 threshold map 生成
threshold map使用与生成probability map一样的方法,向外进行扩张,得到绿线和蓝线中间的区域,并根据到红线的距离制作标签,(设置最大值为thresh_max=0.7),其他区域使用thresh_min=0.3进行填充。
- 蓝线以内区域的值为0.3
- 绿线以外区域的值也为0.3
- 绿线和蓝线中间的区域的值,越靠近红线越接近0.7,越远离红线越接近0.3
probability map 的gt是一个完全的0、1 mask ,polygon 的缩小区域为1,其他背景区域为0;
但是在threshold_map文字边框值并非0,1。

红色边框为文字区域边框,文字最外圈边缘为0.7,靠近中心区域是为0.3的值。(0.3-0.7为预设的阈值最大最小值)。图中可以看到文字边界处的阈值最大,然后根据文字实例边缘距离逐渐递减。
二.Differentiable Binarization可微二值化
可微二值化(Differentiable Binarization)是论文中的核心创新点.
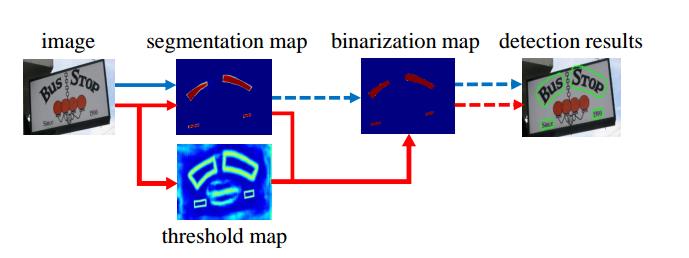
2.1 传统二值化和DB可微二值化的区别
传统二值化操作方式(上图蓝色箭头):
- 首先,使用一个固定的阈值,用于将segmentation map转换为二值化图像;
- 然后,使用像素聚类等方式将像素分组为文本实例;
DB可微二值化的操作方式(上图红色箭头):
- 将 segmentation map与threshold map做一次可微分二值化(DB)得到二值化图,然后再经过后处理得到最终结果。
- 将二值化操作放到网络中进行优化,可以自适应地预测图像每个位置的阈值,从而可以将像素与前景和背景完全区分开。 但是,标准二值化函数是不可微分的,因此,本文提出了一种二值化的近似函数,称为可微分二值化(DB),训练阶段该函数完全可微分。
传统二值化公式:
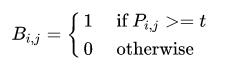
P_ij代表了probability_map中第i行第j列的概率值。将概率大于某个固定阈值t的像素作为文字像素。
标准二值化是不可微的。 因此,在训练期间无法与分割网络一起对其进行优化。 为了解决这个问题,作者使用下面的近似阶跃函数(sigmod函数)执行二值化。
2.2 ☆可微二值化
2.2.1 可微分的二值化公式:
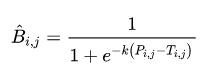
其中B是近似二值图; T是从网络获知的自适应阈值图; k表示放大因子。 k根据经验设置为50。 该近似二值化函数的行为类似于标准二值化函数,可以在训练期间与分割网络一起进行优化。 具有自适应阈值的可微分二值化不仅可以帮助区分文本区域和背景,还可以分离紧密连接的文本实例。
公式借鉴了sigmod函数的形式将输入映射到0~1之间,将概率值P_ij与阈值T_ij之间的差值作为sigmod函数的X变量,然后再经过放大系数K(取50),将其输出无限逼近两个极端 0 或者1; 如下图所示,SB为标准二值化,DB为可微二值化的函数图像.
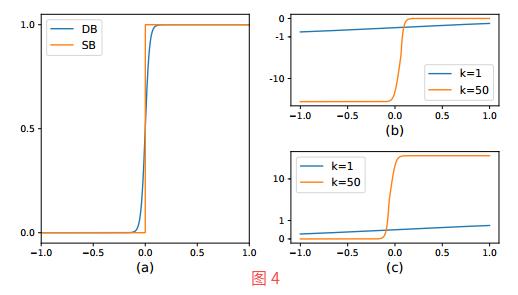
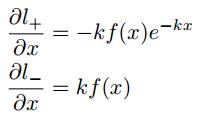
2.2.2 DB函数反向传播求导的过程

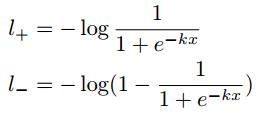
通过链式求导法则计算正负标签的导数, l+和l-的导数如上图4的(b) (c) 所示。
2.2.3 可微二值化实际计算示例
我们来根据label generation中的gt 与 threshold_map来分别计算下。经过这个可微分二值化的sigmod函数后,各个区域的像素值会变成什么样子:
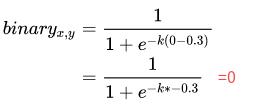
1)文字实例中心区域的像素:
- probability map 的gt为 1
- threshold map的gt值为0.3
如果不经过放大系数K的放大,那么区域正中心的像素如上图所示经过sigmod函数后趋向于0.6左右的值。但是经过放大系数k后,会往右倾向于1。
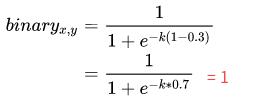
2)文字实例边缘区域像素:
- probability map 的gt为 1
- threshold map的gt值为0.7
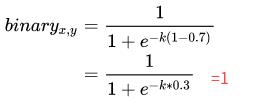
3)文字实例外的像素:
- probability map 的gt为 0
- threshold map的gt值为0.3
三. 损失函数
1)总的损失函数:

L_s是probability map的loss,L_b是binary map的loss,L_t是threshold map的loss, 和
和 设置为1和10。
2)L_s和L_b为交叉熵损失:

其中S_l表示使用OHEM进行采样,使得正负样本的比例为1:3。
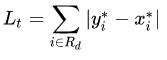
3)L_t使用L1 Loss,R_d表示绿线以内的区域。
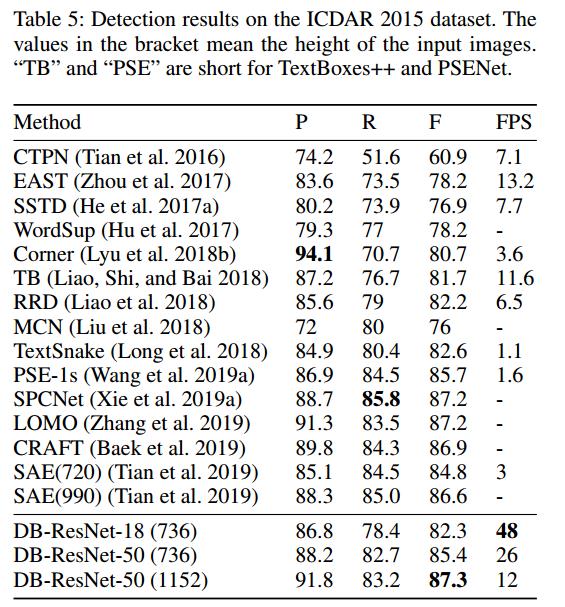
四、实验结果
附录:
probability map生成的源码:
# 使用Polygon库计算多边形区域的周长和面积,使用pyclipper库进行shrink
def shrink_polygon_pyclipper(polygon, shrink_ratio):
    from shapely.geometry import Polygon
    import pyclipper
    polygon_shape = Polygon(polygon)
    distance = polygon_shape.area * (1 - np.power(shrink_ratio, 2)) / polygon_shape.length
    subject = [tuple(l) for l in polygon]
    padding = pyclipper.PyclipperOffset()
    padding.AddPath(subject, pyclipper.JT_ROUND, pyclipper.ET_CLOSEDPOLYGON)
    shrinked = padding.Execute(-distance)
    if shrinked == []:
        shrinked = np.array(shrinked)
    else:
        shrinked = np.array(shrinked[0]).reshape(-1, 2)
    return shrinked
threshold map 生成的源码:
'''
# 当前位置到每一条变的距离
absolute_distance = self.distance(xs, ys, polygon[i], polygon[j])
# 规约到[0,1]
distance_map[i] = np.clip(absolute_distance / distance, 0, 1)
# 取该点到各条边的最小值,越靠近响应值越大
distance_map = distance_map.min(axis=0)
# 规约到[0.3,0.7]
canvas = canvas * (self.thresh_max - self.thresh_min) + self.thresh_min
'''
class MakeBorderMap():
    def __init__(self, shrink_ratio=0.4, thresh_min=0.3, thresh_max=0.7):
        self.shrink_ratio = shrink_ratio
        self.thresh_min = thresh_min
        self.thresh_max = thresh_max

    def __call__(self, data: dict) -> dict:
        """
        :param data: 'img':,'text_polys':,'texts':,'ignore_tags':
        :return:
        """
        im = data['img']
        text_polys = data['text_polys']
        ignore_tags = data['ignore_tags']

        canvas = np.zeros(im.shape[:2], dtype=np.float32)
        mask = np.zeros(im.shape[:2], dtype=np.float32)

        for i in range(len(text_polys)):
            if ignore_tags[i]:
                continue
            self.draw_border_map(text_polys[i], canvas, mask=mask)
        # 设置最大值为0.7,最小值为0.3
        canvas = canvas * (self.thresh_max - self.thresh_min) + self.thresh_min

        data['threshold_map'] = canvas
        data['threshold_mask'] = mask
        return data

    def draw_border_map(self, polygon, canvas, mask):
        polygon = np.array(polygon)
        assert polygon.ndim == 2
        assert polygon.shape[1] == 2

        polygon_shape = Polygon(polygon)
        if polygon_shape.area <= 0:
            return
        # 向外扩张
        distance = polygon_shape.area * (1 - np.power(self.shrink_ratio, 2)) / polygon_shape.length
        subject = [tuple(l) for l in polygon]
        padding = pyclipper.PyclipperOffset()
        padding.AddPath(subject, pyclipper.JT_ROUND,
                        pyclipper.ET_CLOSEDPOLYGON)

        padded_polygon = np.array(padding.Execute(distance)[0])
        cv2.fillPoly(mask, [padded_polygon.astype(np.int32)], 1.0)

        xmin = padded_polygon[:, 0].min()
        xmax = padded_polygon[:, 0].max()
        ymin = padded_polygon[:, 1].min()
        ymax = padded_polygon[:, 1].max()
        width = xmax - xmin + 1
        height = ymax - ymin + 1

        polygon[:, 0] = polygon[:, 0] - xmin
        polygon[:, 1] = polygon[:, 1] - ymin
                # 生成x、y的loc
        xs = np.broadcast_to(
            np.linspace(0, width - 1, num=width).reshape(1, width), (height, width))
        ys = np.broadcast_to(
            np.linspace(0, height - 1, num=height).reshape(height, 1), (height, width))
                # 根据不同的距离得到不同的值
        distance_map = np.zeros(
            (polygon.shape[0], height, width), dtype=np.float32)
        for i in range(polygon.shape[0]):
            j = (i + 1) % polygon.shape[0]
            absolute_distance = self.distance(xs, ys, polygon[i], polygon[j])
            distance_map[i] = np.clip(absolute_distance / distance, 0, 1)
        distance_map = distance_map.min(axis=0)
                # 将值添加到canvas中
        xmin_valid = min(max(0, xmin), canvas.shape[1] - 1)
        xmax_valid = min(max(0, xmax), canvas.shape[1] - 1)
        ymin_valid = min(max(0, ymin), canvas.shape[0] - 1)
        ymax_valid = min(max(0, ymax), canvas.shape[0] - 1)
        canvas[ymin_valid:ymax_valid + 1, xmin_valid:xmax_valid + 1] = np.fmax(
            1 - distance_map[
                ymin_valid - ymin:ymax_valid - ymax + height,
                xmin_valid - xmin:xmax_valid - xmax + width],
            canvas[ymin_valid:ymax_valid + 1, xmin_valid:xmax_valid + 1])

    def distance(self, xs, ys, point_1, point_2):
        '''
        compute the distance from point to a line
        ys: coordinates in the first axis
        xs: coordinates in the second axis
        point_1, point_2: (x, y), the end of the line
        '''
        height, width = xs.shape[:2]
        square_distance_1 = np.square(xs - point_1[0]) + np.square(ys - point_1[1])
        square_distance_2 = np.square(xs - point_2[0]) + np.square(ys - point_2[1])
        square_distance = np.square(point_1[0] - point_2[0]) + np.square(point_1[1] - point_2[1])

        cosin = (square_distance - square_distance_1 - square_distance_2) / (2 * np.sqrt(square_distance_1 * square_distance_2))
        square_sin = 1 - np.square(cosin)
        square_sin = np.nan_to_num(square_sin)

        result = np.sqrt(square_distance_1 * square_distance_2 * square_sin / square_distance)
        result[cosin < 0] = np.sqrt(np.fmin(square_distance_1, square_distance_2))[cosin < 0]
        # self.extend_line(point_1, point_2, result)
        return result
参考文档:
文字检测(三)Differentiable Binarization论文阅读 - 知乎
[AAAI2020]论文翻译DB:Real-time Scene Text Detection with Differentiable Binarization - 简书
DB:Real-time Scene Text Detection with Differentiable Binarization - 简书
以上是关于文本检测DB:Real-time Scene Text Detection with Differentiable Binarization的主要内容,如果未能解决你的问题,请参考以下文章
文本检测DB:Real-time Scene Text Detection with Differentiable Binarization
DB:Real-time Scene Text Detection with Differentiable Binarization 一些问题
Scene Text Detection(场景文本检测)论文思路总结
场景文本检测(Scene text detection) -- CTPN
20190809-scene-text-detection-component
[AAAI2021]论文翻译MANGO: A Mask Attention Guided One-Stage Scene Text Spotter