java web开发(编写第一个spring mvc)
Posted 嵌入式-老费
tags:
篇首语:本文由小常识网(cha138.com)小编为大家整理,主要介绍了java web开发(编写第一个spring mvc)相关的知识,希望对你有一定的参考价值。
【 声明:版权所有,欢迎转载,请勿用于商业用途。 联系信箱:feixiaoxing @163.com】
编写mvc并不稀奇,只要选择合适的框架就可以。那么,spring mvc是什么呢?之前,我们讨论过,spring mvc的本质还是spring,只不过在这个基础之上实现了mvc的功能。下面就看看,在IDEA环境上面开始进行spring mvc开发。部分内容参考了这个链接,https://cloud.tencent.com/developer/article/1675364,在此表示感谢。
1、IDEA创建工程,选择“Spring”=》“Spring MVC”,

2、输入工程名“Hello”,单击确定即可
默认系统帮助用户建立了三个xml文件,一个是web.xml,这个大家都熟悉,是j2ee的基本配置。一个是applicationContext.xml,这个是spring需要添加的配置,主要是bean添加。剩下的那个就是dispatcher-servlet.xml。在web.xml中大家会看到有一个dispatcher的servlet,那么这里的dispatcher-servlet就是对dispatcher做进一步属性配置。
3、准备tomcat的配置
配置有两部分,一部分是tomcat的端口(尽量不要是80、8080这些常见端口),一部分是deployment的配置。
4、启动tomcat,却发现tomcat无法正常启动
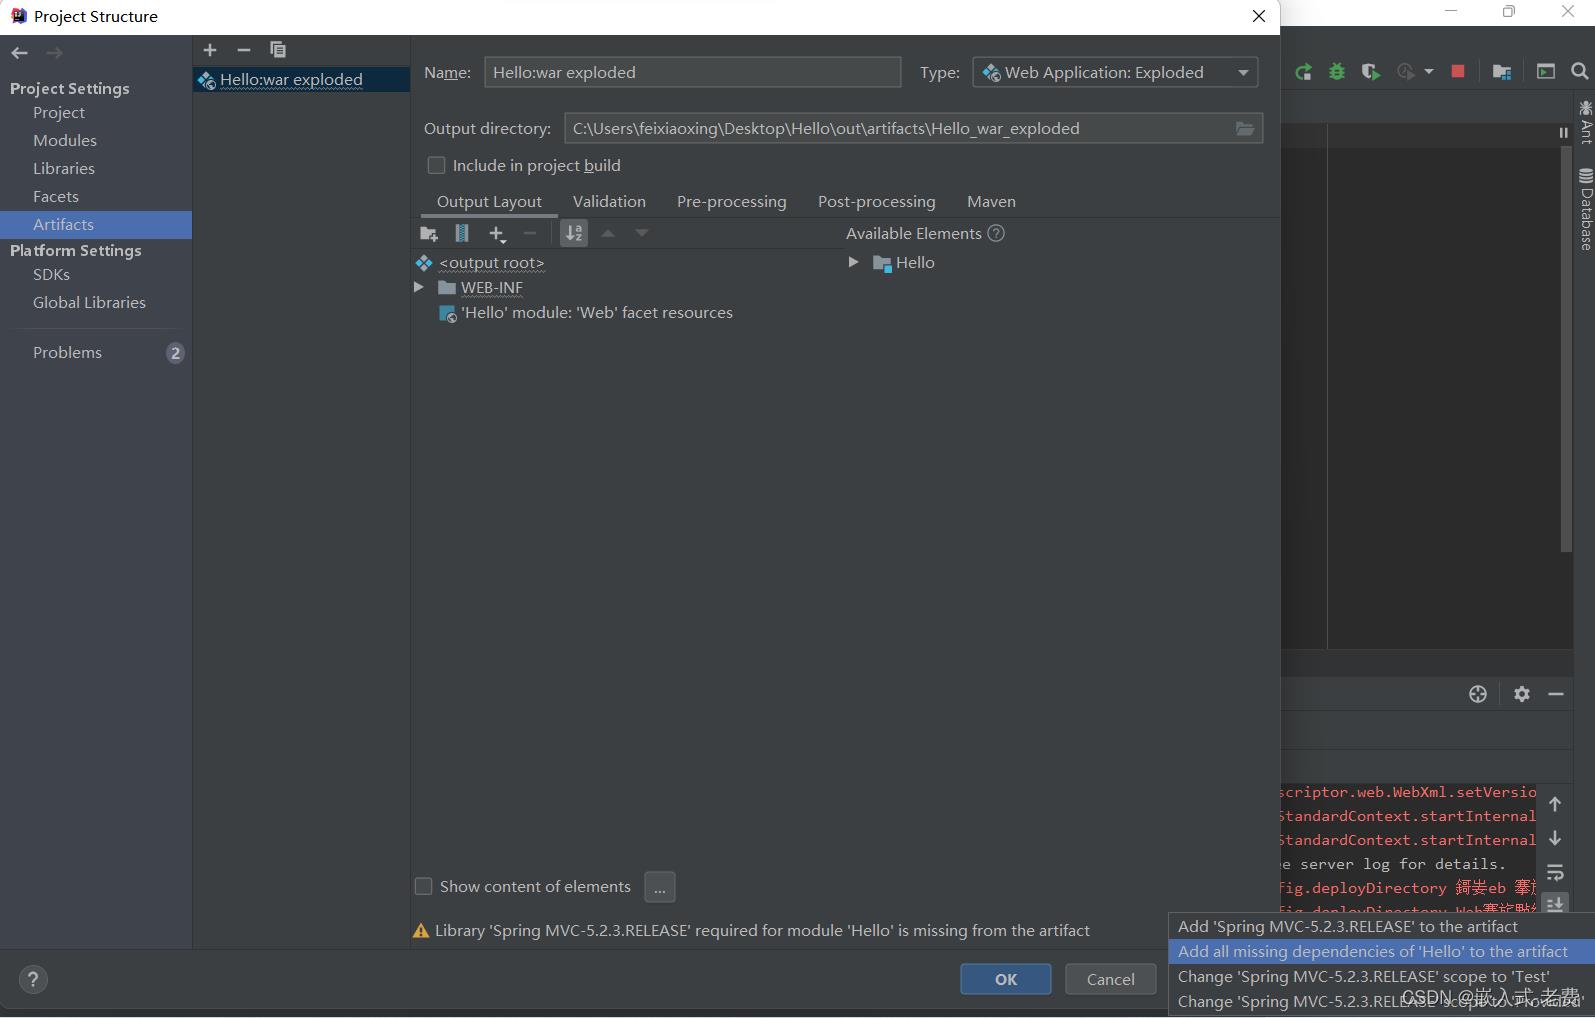
究其原因,主要是因为没有配置lib库,选择“File”->“Project structure”,单击Fix按钮,选择“Add all missing dependencies of 'Hello' in the artifact” 即可。
5、重新启动Tomcat,如果看到下面这样的网页,那就代表Tomcat启动成功了,

6、修改web.xml中的*.form,变为/
这主要是因为不想后续网页变成*.form这样的形式。
7、在src目录添加wormday.springmvc.helloworld.HiController.java代码
package wormday.springmvc.helloworld;
import org.springframework.stereotype.Controller;
import org.springframework.web.bind.annotation.RequestMapping;

@Controller
@RequestMapping("/hi")
public class HiController

    @RequestMapping("/say")
    public String say()
        return "/WEB-INF/jsp/say.jsp";
8、WEB-INF目录下添加jsp目录,jsp目录下添加say.jsp文件,补充完say.jsp内容
<%--
  Created by IntelliJ IDEA.
  User: feixiaoxing
  Date: 2022/10/6
  Time: 8:33
  To change this template use File | Settings | File Templates.
--%>
<%@ page contentType="text/html;charset=UTF-8" language="java" %>
<html>
<head>
    <title>Title</title>
</head>
<body>
Hello, World
</body>
</html>
9、补充完整dispatcher-servlet.xml文件
<?xml version="1.0" encoding="UTF-8"?>
<beans xmlns="http://www.springframework.org/schema/beans"
       xmlns:xsi="http://www.w3.org/2001/XMLSchema-instance"
       xmlns:context="http://www.springframework.org/schema/context"
       xsi:schemaLocation="http://www.springframework.org/schema/beans
       http://www.springframework.org/schema/beans/spring-beans.xsd
       http://www.springframework.org/schema/context
        http://www.springframework.org/schema/context/spring-context-3.0.xsd">

    <context:component-scan base-package="wormday.springmvc.helloworld"/>
</beans>
10、重新启动tomcat,重新输入localhost:8090/Hello_war_exploded/hi/say,就会看到这样的打印,

11、前面我们看到HiController.java中采用了绝对引用,如果改成相对引用呢,
package wormday.springmvc.helloworld;
import org.springframework.stereotype.Controller;
import org.springframework.web.bind.annotation.RequestMapping;

@Controller
@RequestMapping("/hi")
public class HiController

    @RequestMapping("/say")
    public String say()
        return "say";
这个时候就要对dispatcher-servlet.xml重新修改下,
<?xml version="1.0" encoding="UTF-8"?>
<beans xmlns="http://www.springframework.org/schema/beans"
       xmlns:xsi="http://www.w3.org/2001/XMLSchema-instance"
       xmlns:context="http://www.springframework.org/schema/context"
       xsi:schemaLocation="http://www.springframework.org/schema/beans
       http://www.springframework.org/schema/beans/spring-beans.xsd
       http://www.springframework.org/schema/context
        http://www.springframework.org/schema/context/spring-context-3.0.xsd">

    <context:component-scan base-package="wormday.springmvc.helloworld"/>

    <!--指定视图解析器-->
    <bean class="org.springframework.web.servlet.view.InternalResourceViewResolver">
        <!-- 视图的路径 -->
        <property name="prefix" value="/WEB-INF/jsp/"/>
        <!-- 视图名称后缀  -->
        <property name="suffix" value=".jsp"/>
    </bean>
</beans>
重新启动tomcat,如果还能看到一样的Hello world打印,那么代表修改成功。
12、如果希望say.jsp带参数显示,应该怎么做,首先需要修改HiController.java文件,
package wormday.springmvc.helloworld;
import org.springframework.stereotype.Controller;
import org.springframework.ui.Model; // 这里导入了一个Model类
import org.springframework.web.bind.annotation.RequestMapping;

@Controller
@RequestMapping("/hi")
public class HiController

    @RequestMapping("/say")
    public String say(Model model)  // 参数中传入Model
        model.addAttribute("name","baidu"); // 指定Model的值
        model.addAttribute("url","http://www.baidu.com"); // 指定Model的值
        return "say";
其次就是修改say.jsp文件,
<%--
  Created by IntelliJ IDEA.
  User: feixiaoxing
  Date: 2022/10/6
  Time: 8:33
  To change this template use File | Settings | File Templates.
--%>
<%@ page contentType="text/html;charset=UTF-8" language="java" %>
<html>
<head>
    <title>Title</title>
</head>
<body>
hello world,$name
<br/>$url</body>
</html>
重新启动Tomcat,输入localhost:8090/Hello_war_exploded/hi/say,就会看到这样的页面,

13、总结
之前用servlet+jsp+mysql,其实也是可以搭建一个mvc框架的。那么,使用了spring之后的mvc有什么不一样的。我个人的总结有这么几点,第一,没有了main函数,所有的入口来自于dispatcher;第二,controller类不需要继承HttpServlet;第三,url和函数之间的mapping,用RequestMapping等注解就可以解决。不需要写在web.xml里面。
以上是关于java web开发(编写第一个spring mvc)的主要内容,如果未能解决你的问题,请参考以下文章