如何在Ubuntu中安装JDK
Posted
tags:
篇首语:本文由小常识网(cha138.com)小编为大家整理,主要介绍了如何在Ubuntu中安装JDK相关的知识,希望对你有一定的参考价值。
软件环境:
虚拟机:VMware Workstation 10
操作系统:Ubuntu-12.04-desktop-amd64
JAVA版本:jdk-7u55-linux-x64
软件下载地址:
JDK:http://www.oracle.com/technetwork/java/javase/downloads/index.html (直接下载.tar.gz格式的文件)
第一阶段:先检测操作系统有没有已经安装好JDK环境,按“Ctrl+Alt+T”呼出终端,输入命令:
java –version
如果出现JDK版本信息,则说明已经安装好,否则将会显示如下结果:

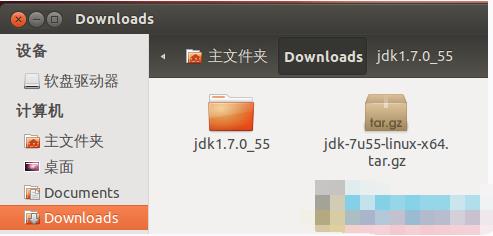
那我们继续安装,将下载好的JDK压缩包拖进ubuntu桌面,拖放一次没进去,就多试几次,直到桌面出现刚才下载的JDK压缩包为止。

然后将压缩包剪切到主文件夹的“Downloads”下面去:

右键,选择“解压缩到此处”:

然后,呼出终端,输入指令:
sudo mv Downloads/jdk1.7.0_55 /usr/lib/jvm/
注意,这个Downloads的拼写必须一模一样,如果实在搞不定就输入ls复制目录名吧。

进入到“Usr/lib/jvm”目录下,检查文件

然后,这个目录的名字你可以更改掉,只是别忘掉即可。
第二阶段:开始设置环境变量等值
呼出终端,输入指令:
gedit ~/.bashrc
会出现文本编辑界面:

将配置情况粘贴到文档末尾:

export JAVA_HOME=/usr/lib/jvm/jdk1.7.0_55
export JRE_HOME=$JAVA_HOME/jre
export CLASSPATH=.:$JAVA_HOME/lib:$JRE_HOME/lib
export PATH=$JAVA_HOME/bin:$PATH
然后按保存快捷键(Ctrl+S)关闭文本编辑。
注意,我这里没有改变JDK路径,所以使用的还是jdk1.7.0_55,如果前面您变更了目录名,请使用新名字。
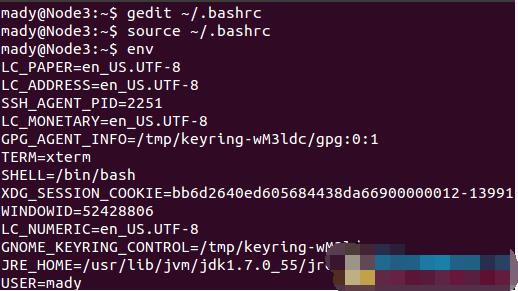
保存环境变量,退出编辑器,输入命令使之生效:
source ~/.bashrc
可输入 env 命令查看设置是否成功

也可以输入 java -version 命令测试jdk版本,查看jdk版本:
java -version
如果结果和下面界面类似,配置就成功了。

Enjoy It.
以上详细步骤在联网的情况下可以用一个命令代替掉:
sudo apt-get install openjdk-7-jdk
然后执行java -version查看安装详情。
参考技术A参考图文教程:
Ubuntu上安装配置JDK
如何在ubuntu中安装scrapy
Scrapy是Python开发的一个快速,高层次的屏幕抓取和web抓取框架,用于抓取web站点并从页面中提取结构化的数据。Scrapy用途广泛,可以用于数据挖掘、监测和自动化测试。 官网网站http://www.scrapy.org/1、安装如下软件
sudo apt-get install build-essential;
sudo apt-get install python-dev;
sudo apt-get install libxml2-dev;
sudo apt-get install libxslt1-dev;
sudo apt-get install python-setuptools;
2、安装Scrapy
sudo easy_install Scrapy;
wang@ubuntu:/usr/local/lib/python2.7/dist-packages$ sudo easy_install Scrapy
Searching for Scrapy
Best match: Scrapy 0.16.1
Processing Scrapy-0.16.1-py2.7.egg
Scrapy 0.16.1 is already the active version in easy-install.pth
Installing scrapy script to /usr/local/bin
Using /usr/local/lib/python2.7/dist-packages/Scrapy-0.16.1-py2.7.egg
Processing dependencies for Scrapy
Searching for lxml
Reading http://pypi.python.org/simple/lxml/
Reading http://codespeak.net/lxml
Best match: lxml 3.0.1
Downloading http://pypi.python.org/packages/source/l/lxml/lxml-3.0.1.tar.gz#md5=0f2b1a063ab3b6b0944cbc4a9a85dcfa
Processing lxml-3.0.1.tar.gz
Running lxml-3.0.1/setup.py -q bdist_egg --dist-dir /tmp/easy_install-qibAzL/lxml-3.0.1/egg-dist-tmp-mSvUVN
Building lxml version 3.0.1.
Building without Cython.
Using build configuration of libxslt 1.1.26
Building against libxml2/libxslt in the following directory: /usr/lib/x86_64-linux-gnu
warning: no files found matching \'*.txt\' under directory \'src/lxml/tests\'
src/lxml/lxml.etree.c: In function ‘__pyx_f_4lxml_5etree__getFilenameForFile’:
src/lxml/lxml.etree.c:26310:7: warning: variable ‘__pyx_clineno’ set but not used [-Wunused-but-set-variable]
src/lxml/lxml.etree.c:26309:15: warning: variable ‘__pyx_filename’ set but not used [-Wunused-but-set-variable]
src/lxml/lxml.etree.c:26308:7: warning: variable ‘__pyx_lineno’ set but not used [-Wunused-but-set-variable]
src/lxml/lxml.etree.c: In function ‘__pyx_pf_4lxml_5etree_4XSLT_18__call__’:
src/lxml/lxml.etree.c:132608:81: warning: passing argument 1 of ‘__pyx_f_4lxml_5etree_12_XSLTContext__copy’ from incompatible pointer type [enabled by default]
src/lxml/lxml.etree.c:130569:52: note: expected ‘struct __pyx_obj_4lxml_5etree__XSLTContext *’ but argument is of type ‘struct __pyx_obj_4lxml_5etree__BaseContext *’
src/lxml/lxml.etree.c: In function ‘__pyx_f_4lxml_5etree__copyXSLT’:
src/lxml/lxml.etree.c:133997:79: warning: passing argument 1 of ‘__pyx_f_4lxml_5etree_12_XSLTContext__copy’ from incompatible pointer type [enabled by default]
src/lxml/lxml.etree.c:130569:52: note: expected ‘struct __pyx_obj_4lxml_5etree__XSLTContext *’ but argument is of type ‘struct __pyx_obj_4lxml_5etree__BaseContext *’
src/lxml/lxml.etree.c: At top level:
src/lxml/lxml.etree.c:12128:13: warning: ‘__pyx_f_4lxml_5etree_displayNode’ defined but not used [-Wunused-function]
src/lxml/lxml.etree.c: In function ‘__pyx_f_4lxml_5etree_11_BaseParser__parseDocFromFile’:
src/lxml/lxml.etree.c:86715:3: warning: ‘__pyx_r’ may be used uninitialized in this function [-Wuninitialized]
src/lxml/lxml.etree.c: In function ‘__pyx_f_4lxml_5etree_11_BaseParser__parseDoc’:
src/lxml/lxml.etree.c:86403:3: warning: ‘__pyx_r’ may be used uninitialized in this function [-Wuninitialized]
src/lxml/lxml.etree.c: In function ‘__pyx_f_4lxml_5etree_11_BaseParser__parseUnicodeDoc’:
src/lxml/lxml.etree.c:86093:3: warning: ‘__pyx_r’ may be used uninitialized in this function [-Wuninitialized]
src/lxml/lxml.etree.c: In function ‘__pyx_f_4lxml_5etree_11_BaseParser__parseDocFromFilelike’:
src/lxml/lxml.etree.c:86925:3: warning: ‘__pyx_r’ may be used uninitialized in this function [-Wuninitialized]
Adding lxml 3.0.1 to easy-install.pth file
Installed /usr/local/lib/python2.7/dist-packages/lxml-3.0.1-py2.7-linux-x86_64.egg
Searching for w3lib>=1.2
Reading http://pypi.python.org/simple/w3lib/
Reading http://github.com/scrapy/w3lib
Best match: w3lib 1.2
Downloading http://pypi.python.org/packages/source/w/w3lib/w3lib-1.2.tar.gz#md5=f929d5973a9fda59587b09a72f185a9e
Processing w3lib-1.2.tar.gz
Running w3lib-1.2/setup.py -q bdist_egg --dist-dir /tmp/easy_install-ZAXTgy/w3lib-1.2/egg-dist-tmp-aU3vpc
zip_safe flag not set; analyzing archive contents...
Adding w3lib 1.2 to easy-install.pth file
Installed /usr/local/lib/python2.7/dist-packages/w3lib-1.2-py2.7.egg
Searching for Twisted>=8.0
Reading http://pypi.python.org/simple/Twisted/
Reading http://www.twistedmatrix.com
Reading http://twistedmatrix.com/products/download
Reading http://twistedmatrix.com/
Reading http://tmrc.mit.edu/mirror/twisted/Twisted/9.0/
Reading http://tmrc.mit.edu/mirror/twisted/Twisted/10.0/
Reading http://twistedmatrix.com/projects/core/
Reading http://tmrc.mit.edu/mirror/twisted/Twisted/8.2/
Reading http://tmrc.mit.edu/mirror/twisted/Twisted/8.1/
Best match: Twisted 12.2.0
Downloading http://pypi.python.org/packages/source/T/Twisted/Twisted-12.2.0.tar.bz2#md5=9a321b904d01efd695079f8484b37861
Processing Twisted-12.2.0.tar.bz2
Running Twisted-12.2.0/setup.py -q bdist_egg --dist-dir /tmp/easy_install-kw897y/Twisted-12.2.0/egg-dist-tmp-sZWFYb
In file included from /usr/include/python2.7/Python.h:8:0,
from twisted/internet/_sigchld.c:9:
/usr/include/python2.7/pyconfig.h:1161:0: warning: "_POSIX_C_SOURCE" redefined [enabled by default]
/usr/include/features.h:215:0: note: this is the location of the previous definition
twisted/internet/_sigchld.c: In function ‘got_signal’:
twisted/internet/_sigchld.c:15:13: warning: variable ‘ignored_result’ set but not used [-Wunused-but-set-variable]
Adding Twisted 12.2.0 to easy-install.pth file
Installing mailmail script to /usr/local/bin
Installing conch script to /usr/local/bin
Installing pyhtmlizer script to /usr/local/bin
Installing twistd script to /usr/local/bin
Installing lore script to /usr/local/bin
Installing tkconch script to /usr/local/bin
Installing tapconvert script to /usr/local/bin
Installing ckeygen script to /usr/local/bin
Installing tap2rpm script to /usr/local/bin
Installing manhole script to /usr/local/bin
Installing trial script to /usr/local/bin
Installing cftp script to /usr/local/bin
Installing tap2deb script to /usr/local/bin
Installed /usr/local/lib/python2.7/dist-packages/Twisted-12.2.0-py2.7-linux-x86_64.egg
Finished processing dependencies for Scrapy
表示安装成功。
3、测试
scrapy shell http://ziki.cn
获取所有a标签
hxs.select(\'//a\').extract()
参考资料
http://doc.scrapy.org/en/latest/intro/install.html
http://doc.scrapy.org/en/latest/intro/tutorial.html 参考技术A 这是一款提取网站数据的开源工具。Scrapy框架用Python开发而成,它使抓取工作又快又简单,且可扩展。我们已经在virtual box中创建一台虚拟机(VM)并且在上面安装了Ubuntu 14.04 LTS。
安装 Scrapy
Scrapy依赖于Python、开发库和pip。Python最新的版本已经在Ubuntu上预装了。因此我们在安装Scrapy之前只需安装pip和python开发库就可以了。
pip是作为python包索引器easy_install的替代品,用于安装和管理Python包。pip包的安装可见图 1。
sudo apt-get install python-pip
图:1 pip安装
我们必须要用下面的命令安装python开发库。如果包没有安装那么就会在安装scrapy框架的时候报关于python.h头文件的错误。
sudo apt-get install python-dev
图:2 Python 开发库
scrapy框架既可从deb包安装也可以从源码安装。在图3中我们用pip(Python 包管理器)安装了deb包了。
sudo pip install scrapy
图:3 Scrapy 安装
图4中scrapy的成功安装需要一些时间。
图:4 成功安装Scrapy框架
使用scrapy框架提取数据
关于Linux命令的介绍,看看《linux就该这么学》,具体关于这一章地址3w(dot)linuxprobe/chapter-02(dot)html
基础教程
我们将用scrapy从fatwallet.com上提取商店名称(卖卡的店)。首先,我们使用下面的命令新建一个scrapy项目“store name”, 见图5。
$sudo scrapy startproject store_name
图:5 Scrapy框架新建项目
上面的命令在当前路径创建了一个“store_name”的目录。项目主目录下包含的文件/文件夹见图6。
$sudo ls –lR store_name
以上是关于如何在Ubuntu中安装JDK的主要内容,如果未能解决你的问题,请参考以下文章
如何在 ubuntu 14.04 的 android 中安装 jdk 8
如何在默认安装openjdk的Linux系统中安装独立JDK