前端就业课 第二阶段CSS 零基础到实战(04)定位
Posted 1_bit
tags:
篇首语:本文由小常识网(cha138.com)小编为大家整理,主要介绍了前端就业课 第二阶段CSS 零基础到实战(04)定位相关的知识,希望对你有一定的参考价值。
若是大一学子或者是真心想学习刚入门的小伙伴可以私聊我,若你是真心学习可以送你书籍,指导你学习,给予你目标方向的学习路线,无套路,博客为证。
一、定位
定位分为相对定位以及绝对定位。
相对定位可以理解为在 html 中,元素会依照原有的顺序进行显示,通过相对距离(例如左右距离多少)的方式使这些元素进行位置的显示。
绝对定位可以理解为,在 HTML 中,元素并不会按照有序的方式进行排列,需要依靠自身给予的定位信息决定元素出现在 HTML 页面中的位置。
1.1 文档流
我们在了解定位前,需要了解什么是文档流。
在 HTML 中,默认情况下一个网页是多个元素从上而下自动进行排列而成,并且是一行一行组成,这些行中的元素则是从左往右默认进行排列,当元素超过其宽度大小则会进行换行,而这就是文档流。

而定位就是指对某个元素显示于在文档流(页面)中的某个位置,又或使某个元素脱离文档流进行显示,而在此所属的脱离则是表示某元素不存在于文档流中,具体是如何咱们接下来详细说明。
1.2 position 属性
在 HTML 中通过 position 属性对网页中的元素进行定位,position 属性支持以下 5 个值:
- static(默认)
- relative
- absolute
- fixed
- sticky
在本章开始时,了解了相对定位和绝对定位,而后又了解了 position 定位的属性值,这些值对应了相对定位和绝对定位,例如:
- 相对定位的 position 属性值有 relative
- 绝对定位的值有 absolute 、fixed 、sticky
其中使用 static 与 relative 定位元素,其元素不会脱离文档流,因为是相对定位,需要在有序的元素排序中使用相对的定位使其进行排列,而使用 absolute 、fixed 、sticky 定位将会使元素脱离文档流。这些元素都使用 left、top、right、bottom 进行定位(relative 也使用 left、top、right、bottom 进行定位),其作用如下:
- left:距离左侧距离多少
- top:距离顶部距离多少
- right:距离右侧距离多少
- bottom:距离底部距离多少
1.3 relative
position 属性为 relative 时,将会根据 left、top、right、bottom 进行定位,例如以下代码:
<!DOCTYPE html>
<html lang="en">
<head>
    <meta charset="UTF-8">
    <meta http-equiv="X-UA-Compatible" content="IE=edge">
    <meta name="viewport" content="width=device-width, initial-scale=1.0">
    <title>文档流</title>
    <style>
        div
            width: 50%;
            height: 60px;
            background-color: black;

        .relative
            width: 300px;
            top: 10px;
            position: relative;
            background-color: aqua;

    </style>
</head>
<body>
    <div>

    </div>
    <div class="relative">

    </div>
</body>
</html>
以上代码中定义了 div 的默认宽高,给予了正常 div 容器的背景色为黑色,随后给予了一个类 relative 为 relative 定位,使用该类后,其定位将会为 relative ;在该类中,重新定义了宽度为 300px,对应的高度则是依旧是整体定义的 div 高度,使用了 top 属性表示距离头部距离为 10px,并且给予了淡青色为背景颜色,在页面中显示如下:

我们可以明显的看到淡青色的 div 距离顶部有一定的距离,接着咱们在对应的css 中增加 right 属性:
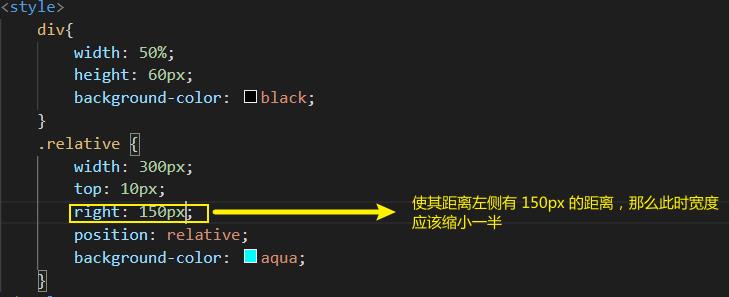
此时将会看到,在页面中淡青色的元素将会往左侧索入,因为在当前 div 右侧无元素,但增加了距离右侧的距离,那么此时只会往左侧缩入:

我们将 right 属性改为 left,该元素将会距离左侧有一定的距离:

其结果如下:

此时我们再将 left 改成 bottom 将会与顶部正常文档流的 div 发生重叠:
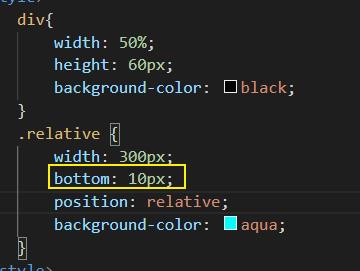
结果如下:

此时我们还需要注意使用 relative 时会出现的一个情况:使用 relative 后,即时发生了偏移覆盖掉了(以上示例情况)其他元素,其本身所占的位置依旧占据,例如如下示例:
<!DOCTYPE html>
<html lang="en">
<head>
    <meta charset="UTF-8">
    <meta http-equiv="X-UA-Compatible" content="IE=edge">
    <meta name="viewport" content="width=device-width, initial-scale=1.0">
    <title>文档流</title>
    <style>
        div
            width: 50%;
            height: 60px;
            background-color: black;

        .relative
            width: 300px;
            bottom: 10px;
            position: relative;
            background-color: aqua;

    </style>
</head>
<body>
    <div>

    </div>
    <div class="relative">

    </div>
    <div class="relative" style="top: 50px;">

    </div>
    <div>

    </div>

</body>
</html>
以上代码中新增了一个 div,并且使其距离顶部 50px:

此时这个div 将会往下移动覆盖掉下部分的 div,但是其本身的位置还是存在,我们可以通过示例看出:

index-z
在使用绝对定位时,若发生了覆盖,想使其中一个定位元素现实于另外一个定位元素之上,可以使用 z-index 属性,该属性可以更改当前页面元素的层级,z-index 的属性值为数字,数字越大则表示层级越大,可以理解层级为覆盖层数,0最小表示在最下层,数字越大层级越大,层架大的数覆盖于小的数,此时给该 div 设置 z-index 为 1则会显示在上层,z-index 的值默认为0:
<body>
    <div class="relative">

    </div>
    <div class="relative" style="top: 20px;">

    </div>
    <div class="relative" style="background-color: red;">

    </div>
</body>
以上代码为 css 样式相同时发生了 div 重叠,效果如下:
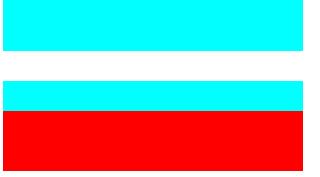
在此时需要第二个 div 不再被红色覆盖,可以在样式中添加 z-index 属性:

其效果如下:

1.4 absolute 绝对定位
绝对定位是脱离文档流而存在的,如何脱离咱们可以接下来的示例进行查看。
首先我们需要知道一个点,绝对定位的父元素不能是 static ,也就是 position不能是 static,而 static 是position 的默认值,也就是说直咱们需要一个 div 设置为 relative 后再对其进行子元素 设置定位为 absolute:
<style>
   div
       width: 50%;
       height: 160px;
       background-color: black;

   .relative
       width: 600px;
       position: relative;
       background-color: aqua;

   .absolute
       width: 300px;
       height: 60px;
       position: absolute;
       background-color: rgb(255, 0, 128);

</style>

<body>
    <div class="relative">
        <div class="absolute">

        </div>
        <div class="absolute" style="background-color: rgb(38, 0, 255);">

        </div>
    </div>
</body>
其页面效果如下:

咱们可以看到,我们设置了两个 absolute 的 div 元素在页面中只显示了第二个背景色为蓝色的 div:

其原因是定位为 absolute 定位将会使其元素脱离文档流,此时两个元素是进行了重叠,咱们只需要使用 top 这些定位属性使其显示即可:

显示效果如下:

如何使用 absolute 将会在之后文章进行讲解。
1.5 fixed 固定于窗口的定位
在定位为 fixed 时,该div 将会悬浮于整个文档流内容之上,例如在浏览一些网页时,某些可视区域(例如导航、搜索、广告等)将会一直固定于页面之上,示例如下:
<style>
    div
        width: 50%;
        height: 160px;
        background-color: black;

    .relative
        width: 600px;
        position: relative;
        background-color: aqua;

    .fixed
        position: fixed ;
        width: 100%;
        height: 10px;
        top: 20px;
        background-color:rgb(255, 145, 0);

</style>
<body>
    <div>
        <div class="fixed">

        </div>
    </div>
    <div class="relative">
        <div class="absolute" style="background-color: rgb(38, 0, 255);top: 30px;">

        </div>
    </div>
    <div></div>
    <div></div>
    <div></div>
    <div></div>
    <div></div>
    <div></div>
    <div></div>
    <div></div>
    <div></div>
    <div></div>
    <div></div>
</body>
此时示例中添加了 fixed ,并且为了使页面高度高于可视高度,增加了多个div ,其效果如下:
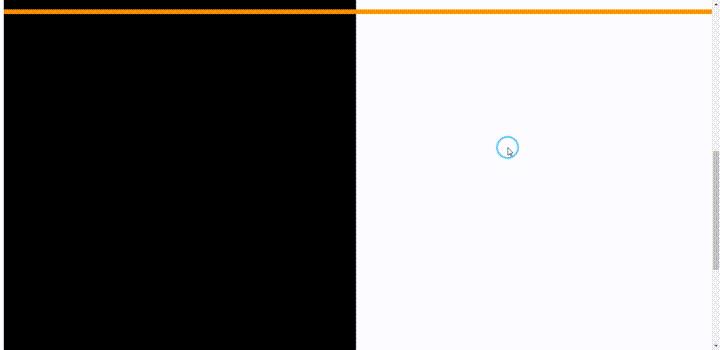
使用了 fixed 定位后,其元素将会固定于页面之上,而且不管你是否设置 fixed 在何位置,其效果都是一致的,例如:
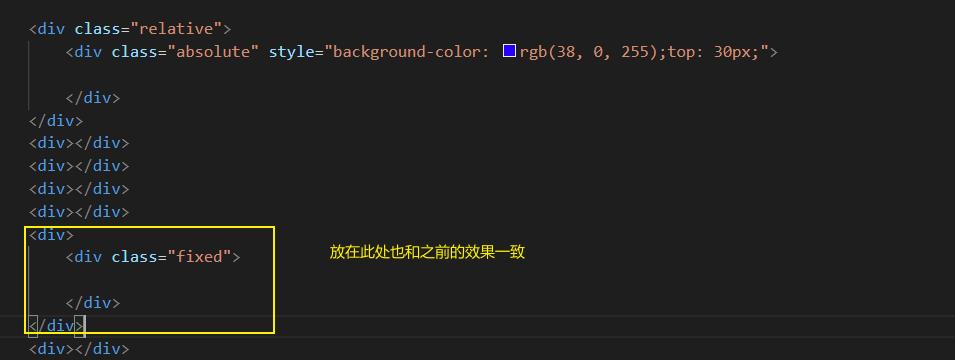
在效果演示中还可以看到,其 absolute 内容覆盖了 fixed 元素,只需要在 fixed 元素中增加 z-index 属性即可。
1.6 sticky 可在文档流中使用
之前使用的 fixed 在文档流中使用并“无效”,实现这个效果咱们可以使用 sticky,代码示例如下:
<!DOCTYPE html>
<html lang="en">
<head>
    <meta charset="UTF-8">
    <meta http-equiv="X-UA-Compatible" content="IE=edge">
    <meta name="viewport" content="width=device-width, initial-scale=1.0">
    <title>文档流</title>
    <style>
        div
            width: 50%;
            height: 160px;
            background-color: black;

        .sticky
            position: sticky ;
            top: 20px;
            background-color:rgb(0, 0, 0);
            width: 100%;
            height: 60px;

        span
            display:inline-block;
            width: 100%;
            color: aliceblue;
            text-align: center;
            height: 60px;
            line-height: 60px;

    </style>
</head>
<body>
    <div></div>
    <div></div>
    <div style="height: auto;width: 100%;">
        <div class="sticky">
            <span>这里是 sticky 定位内容——《1_bit 的前端课》</span>
        </div>
        <div style="background-color: rgb(17, 175, 69);width: 100%;"></div>
        <div style="background-color: rgb(85, 17, 175);width: 100%;"></div>
        <div style="background-color: rgb(175, 17, 101);width: 100%;"></div>
        <div style="background-color: rgb(175, 146, 17);width: 100%;"></div>
        <div style="background-color: rgb(17, 175, 175);width: 100%;"></div>
        <div style="background-color: rgb(190, 219, 23);width: 100%;"></div>
        <div style="background-color: rgb(175, 17, 114);width: 100%;"></div>
    </div>
</body>
</html>
为了方便显示我 sticky 定位中添加了 span 并且给予了 span 样式,在 span 样式中转变了其元素类型 display:inline-block;,随后给予了字体颜色白色、text-align: center;、height: 60px;、line-height: 60px;,其中 text-align: center;使其内容水平居中显示、height: 60px;设置 span 高度、line-height: 60px;设置其行高,行高与高度相同其内容将会水平居中,最终效果如下:

以上是关于前端就业课 第二阶段CSS 零基础到实战(04)定位的主要内容,如果未能解决你的问题,请参考以下文章