Unity 之 图集属性详解和代码示例 -- 拓展一键自动打包图集工具
Posted 陈言必行
tags:
篇首语:本文由小常识网(cha138.com)小编为大家整理,主要介绍了Unity 之 图集属性详解和代码示例 -- 拓展一键自动打包图集工具相关的知识,希望对你有一定的参考价值。
Unity 之 图集属性详解和代码示例 -- 拓展一键自动打包图集工具
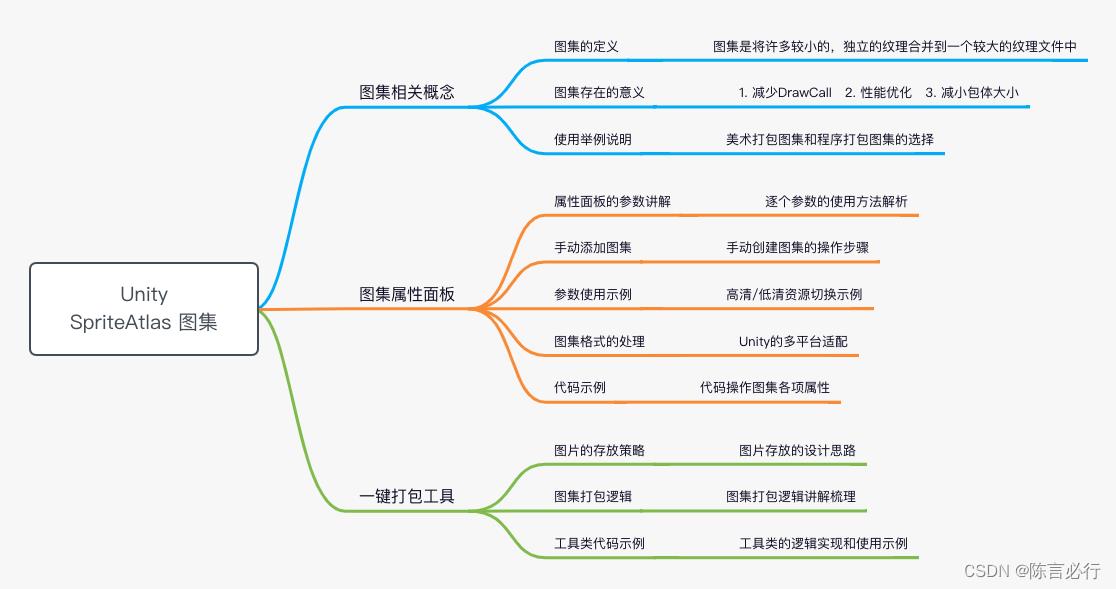
一,图集的相关概念
1.1 图集的定义
图集是将许多较小的,独立的纹理合并到一个较大的纹理文件中,从而最小化材质的数量,因此最小化所需使用的Draw Call数量。这是利用动态批处理的有效方法。
每个独特的材质都需要额外的Draw Call,但是每种材质只支持单一的主纹理。当然,它们也可以支持多个二级纹理,比如法线纹理和发射纹理。然而,将多个主纹理合并到一个大的纹理文件中,渲染这个纹理的对象时,可以最小化所使用的Draw Call数量。
⚠️ :图集只是当所有给低昂的纹理需要相同的着色器时采用的一种方法,如果一些纹理需要通过着色器应用独立的图形效果,它们就必须分离到自己的材质中,并在单独的组中打图集。
1.2 图集的意义
- 减少DrawCall:多张图片需要多次DrawCall,合并成一张大图只需要调用一次DrawCall
- 性能优化:图集将图片打包为2的幂次方的素材大小,GPU处理起来会快很多,方便unity渲染合批,降低渲染消耗,小图不可能每张都是2的n次方的大小,所以会提升效率。
- 减小包体大小:多张图片的打包占用会大于一张2的n次方的大图的大小。
- 举个例子:
游戏大厅需要这么多张图片:
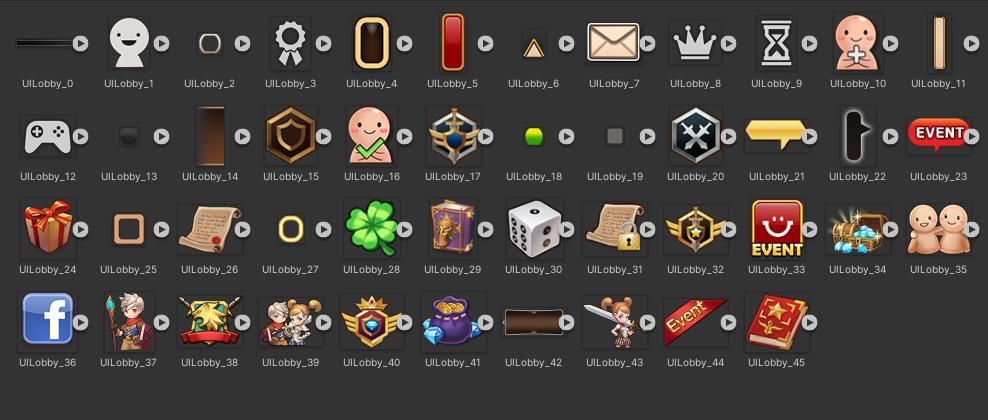
如果我么单张使用,这就存在上面说的三个问题了:多个DrawCall,效率降低,包体变大。
为了解决这三个问题,图集的存在就变得有意义了。那么可能就有同学要问了,图片是美术给的,那么图集也由美术打包,这样可行吗?
答案是:可行,但有一定的限制。
这是美术将所有用到的图片放在一起打包的图集:
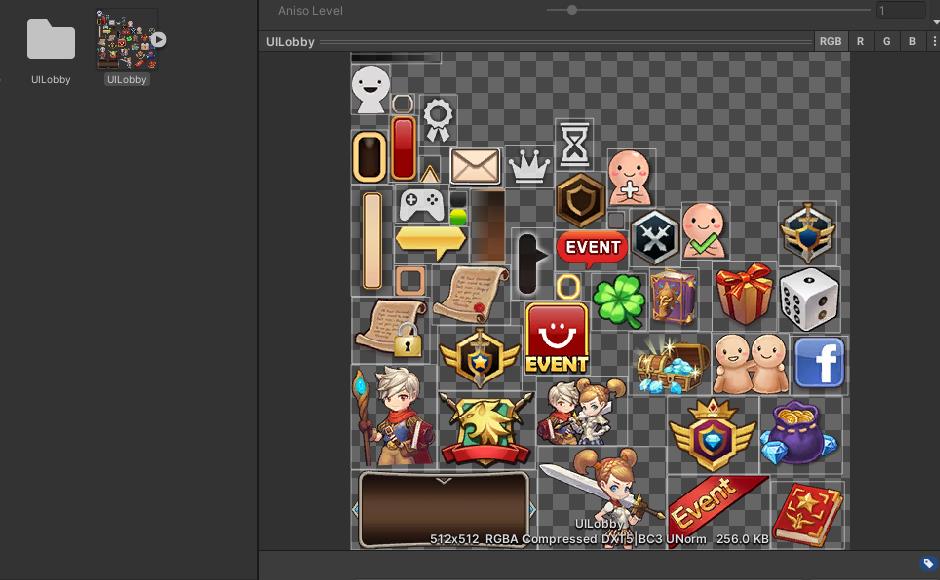
我们在使用的时候需要自己拆分,这样使用起来就不是很方便了。最关键的是以后大厅随便添加或者修改一张图都需要美术给我们一整张图集,这样明显是不合理的。 所以只有当场景资源固定了,以后不会在有任何改动的情况下,是可以由美术出图集的。
但是,稍微有点经验的程序员都不会使用上述这种情况。因为项目本身不被修改那几乎是不可能的,有的时候不但要改,而且还要大改;所以将打包图集放在程序上来出来也是更方便,更合理的,下面我们就来一起学习一下Unity的图集吧。
二,图集的属性介绍
2.1 属性面板
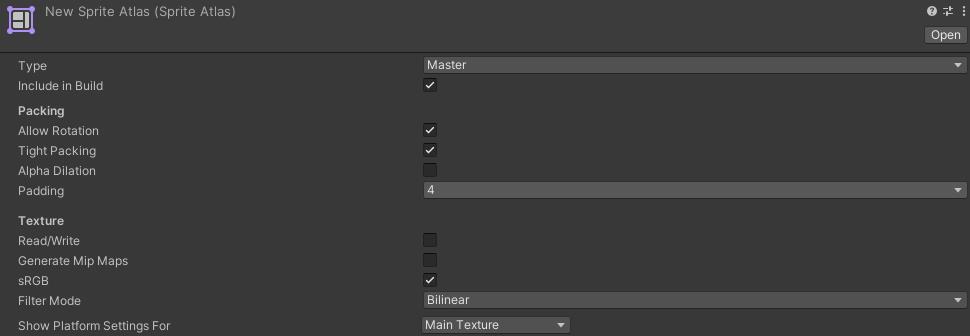
| 属性 | 功能 |
|---|---|
| Type | 将“Sprite Atlas”类型设置为Master 或Variant ,Master是默认类型设置,Variant设置一般用于高清/低清资源切换。下面会有一个示例帮助理解。 |
| Include in build | 选中此框可将Sprite Atlas资源包括在当前构建中。 |
| Allow Rotation | 选中此框可以在Unity将精灵打包到精灵地图集时允许精灵旋转。开启后图集会根据计算将一些精灵旋转排列,这样使得图集更小更紧密。被旋转的精灵在场景被使用时也会对应旋转,这样处理起来就会很麻烦,所以一般情况会关闭此选项。 |
| Tight Packing | 选中此框可根据精灵轮廓而不是默认矩形轮廓来打包精灵。开启后,精灵在图集中密集排列,甚至有时会出现一张图上有另外一张图的边角的情况,所以一般使用时会关闭这个属性。 |
| Read/Write Enabled | 选中此框可以从脚本函数(例如Texture2D.SetPixels代码访问时需要开启)访问纹理数据。开启此属性,Unity将创建纹理数据的副本。所以会增大内存占用。此属性仅对未压缩或DXT压缩的纹理有效,所以需要开启此属性的图片也不能修改压缩格式。 |
| Generate Mip Maps | 选择此选项可启用Mip-Map生成。Mip贴图是Texture的较小版本,当Texture在屏幕上很小时会使用。 |
| Filter Mode | 选择如何过滤纹理;选择Unity在变换期间拉伸时过滤压缩纹理的方式。此设置覆盖Atlas中任何打包精灵的过滤模式设置。 |
- 手动添加图集
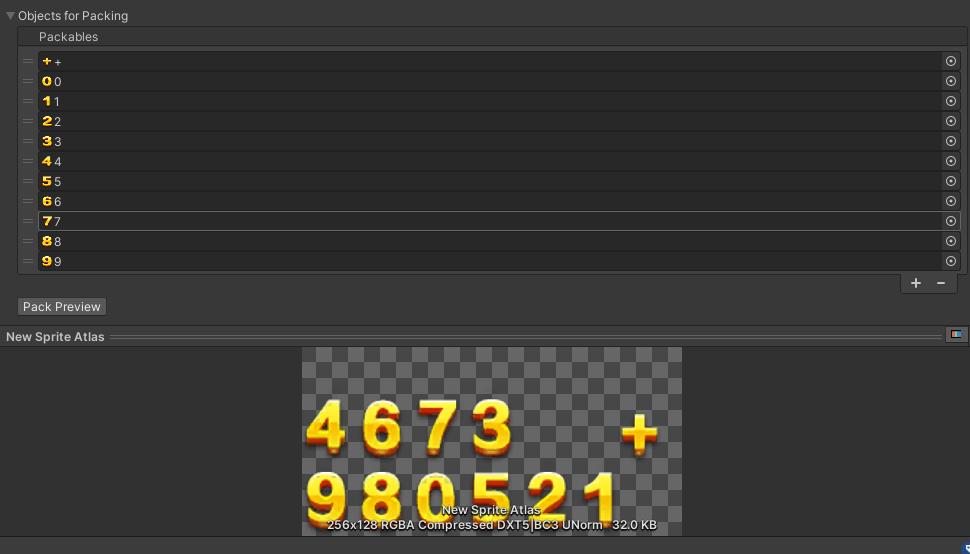
Objects For Packing:将此列表中的所有项目打包到当前选定的Sprite图集中,点击+加号,则可选择一张图片放入图集中,所有图集选择完毕后,点击Pack Preview结果如下图所示:
- Variant - 高清/低清资源切换
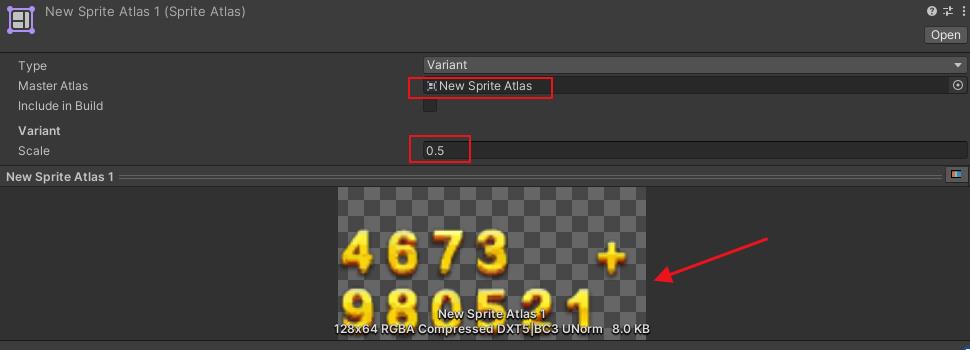
创建新的Sprite Atlas,然后设置Type为Variant类型,并设置关联的Master Atlas,修改Scale即可改变分辨率,可以看到当Scale设置为0.5时,图片以及变的模糊了:
2.2 格式处理
Platform-specific overrides panel :为Sprite Atlas的每个目标平台设置分辨率、文件大小以及相关内存大小要求、像素尺寸和纹理质量。该面板允许您覆盖精灵图集包含的各个纹理上的这些设置。

后面那些带有自己平台的标识的,都可以通过勾选Override属性,来设置对应平台的图集属性。
比如:在移动的平台(android,ios)需要控制包体,那么可以将图集格式设置为ASCT6x6;而在PC端图片的清晰度比包体大小跟重要,则图集可是就可以设置为RGBA32。

2.3 代码操作
1,创建图集
SpriteAtlas spriteAtlas = new SpriteAtlas();
AssetDatabase.CreateAsset(spriteAtlas, "Assets/CzhenyaTest.spriteatlas");
2,添加图片到Sprite Atlas图集
SpriteAtlas spriteAtlas = new SpriteAtlas();
// 获取图集下图片
List<Object> packables = new List<Object>(spriteAtlas.GetPackables());

// 每个图集的所有图片路径
private static List<string> textureFullName = new List<string>();
foreach (string item in textureFullName)

   // 加载指定目录下的图片
   Object spriteObj = AssetDatabase.LoadAssetAtPath(item, typeof(Object));
   if (!packables.Contains(spriteObj))

       // 添加到图集中
      spriteAtlas.Add(new Object[] spriteObj);
3,图集基础设置
SpriteAtlas spriteAtlas = new SpriteAtlas();

SpriteAtlasPackingSettings packSetting = new SpriteAtlasPackingSettings()

    blockOffset = 1,
    enableRotation = false,
    enableTightPacking = false,
    padding = 8,
;

spriteAtlas.SetPackingSettings(packSetting);
4,图集纹理设置
SpriteAtlas spriteAtlas = new SpriteAtlas();

SpriteAtlasTextureSettings textureSettings = new SpriteAtlasTextureSettings()

    readable = false,
    generateMipMaps = false,
    sRGB = true,
    filterMode = FilterMode.Bilinear,
;

spriteAtlas.SetTextureSettings(textureSettings);
5,分平台设置纹理
SpriteAtlas spriteAtlas = new SpriteAtlas();

TextureImporterPlatformSettings platformSetting = atlas.GetPlatformSettings("Android");
platformSetting.overridden = true;
platformSetting.maxTextureSize = 2048;
platformSetting.textureCompression = TextureImporterCompression.Compressed;
platformSetting.format = TextureImporterFormat.ASTC_6x6;

spriteAtlas.SetPlatformSettings(platformSetting);
三,拓展 – 打包图集工具
3.1 图片存放策略
创建在Editor下面一个所有图片的根目录,然后在根据游戏功能或者面板公用等条件,将同一组图片归类到一个文件夹下。比如:Editor/Textures/Login,Editor/Textures/Lobby
这是我下面Demo中使用的图片路径:Assets/CreateAtlas/Editor/Res/SpriteAtlas

PS:按照设计以后新增的图片都会按照功能再分文件夹放到SpriteAtlas文件夹下。
3.2 图集打包逻辑
- 创建图集 --> 图集基础设置 --> 图集纹理设置 --> 按需设置分平台图集格式
- 遍历文件夹 --> 根据格式过滤图片 --> 判断是否存在图集 --> 不存在则加入
3.3 图集打包代码
按照3.2的逻辑编写代码,注释写的已很详细:
注意代码放到Editor文件夹下。
using System;
using System.Collections;
using System.Collections.Generic;
using System.IO;
using UnityEditor;
using UnityEditor.U2D;
using UnityEngine;
using UnityEngine.U2D;
using Object = UnityEngine.Object;

public class CreateAtlas : MonoBehaviour

    /// <summary>
    /// 图片根目录 -- 需要打包图集的文件夹父级
    /// 适用目录结构:根部文件夹
    ///                -> 图片文件夹1
    ///                -> 图片文件夹2
    ///                ...
    /// </summary>
    private static string pathRoot = Application.dataPath + "/CreateAtlas/Editor/Res/SpriteAtlas/";

    /// <summary>
    /// 图集存储路径
    /// </summary>Assets/CreateAtlas/Editor/Res/Textures
    private static string atlasStoragePath = "Assets/CreateAtlas/Editor/Res/Textures/";

    /// <summary>
    /// 每个需要打图集的文件夹名 -- 即图集名
    /// </summary>
    private static string spritefilePathName;

    [MenuItem("Tools/打包图集")]
    public static void CreateAllSpriteAtlas()

        Debug.Log("打包图集开始执行");

        DirectoryInfo info = new DirectoryInfo(pathRoot);
        int index = 0;
        // 遍历根目录
        foreach (DirectoryInfo item in info.GetDirectories())

            spritefilePathName = item.Name;

            SpriteAtlas spriteAtlas = AssetDatabase.LoadAssetAtPath(atlasStoragePath + "/" +  spritefilePathName + ".spriteatlas", typeof(Object)) as SpriteAtlas;

            // 不存在则创建后更新图集
            if (spriteAtlas == null)

                spriteAtlas = CreateSpriteAtlas(spritefilePathName);


            string spriteFilePath = pathRoot + "/" + spritefilePathName;
            UpdateAtlas(spriteAtlas, spriteFilePath);

            // 打包进度
            EditorUtility.DisplayProgressBar("打包图集中...", "正在处理:" + item, index / info.GetDirectories().Length);
            index++;


        EditorUtility.ClearProgressBar();
        AssetDatabase.Refresh();

        Debug.Log("打包图集执行结束");


    /// <summary>
    /// 创建图集
    /// </summary>
    /// <param name="atlasName">图集名字</param>
    private static SpriteAtlas CreateSpriteAtlas(string atlasName)

        SpriteAtlas atlas = new SpriteAtlas();

        #region 图集基础设置

        SpriteAtlasPackingSettings packSetting = new SpriteAtlasPackingSettings()

            blockOffset = 1,
            enableRotation = false,
            enableTightPacking = false,
            padding = 8,
        ;
        atlas.SetPackingSettings(packSetting);

        #endregion

        #region 图集纹理设置

        SpriteAtlasTextureSettings textureSettings = new SpriteAtlasTextureSettings()

            readable = false,
            generateMipMaps = false,
            sRGB = true,
            filterMode = FilterMode.Bilinear,
        ;
        atlas.SetTextureSettings(textureSettings);

        #endregion

        #region 分平台设置图集格式

        TextureImporterPlatformSettings platformSetting = atlas.GetPlatformSettings(GetPlatformName(BuildTarget.iOS));
        platformSetting.overridden = true;
        platformSetting.maxTextureSize = 2048;
        platformSetting.textureCompression = TextureImporterCompression.Compressed;
        platformSetting.format = TextureImporterFormat.PVRTC_RGB4;
        atlas.SetPlatformSettings(platformSetting);

        // 需要多端同步,就在写一份
        platformSetting = atlas.GetPlatformSettings(GetPlatformName(BuildTarget.Android));
        platformSetting.overridden = true;
        platformSetting.maxTextureSize = 2048;
        platformSetting.textureCompression = TextureImporterCompression.Compressed;
        platformSetting.format = TextureImporterFormat.ASTC_6x6;
        atlas.SetPlatformSettings(platformSetting);

        #endregion

        string atlasPath = atlasStoragePath + "/" + atlasName + ".spriteatlas";
        AssetDatabase.CreateAsset(atlas, atlasPath);
        AssetDatabase.SaveAssets();

        return atlas;


    /// <summary>
    /// 每个图集的所有图片路径  --  记得用之前清空
    /// </summary>
    private static List<string> textureFullName = new List<string>();

    /// <summary>
    /// 更新图集内容
    /// </summary>
    /// <param name="atlas">图集</param>
    static void UpdateAtlas(SpriteAtlas atlas, string spriteFilePath)

        textureFullName.Clear();
        FileName(spriteFilePath);

        // 获取图集下图片
        List<Object> packables = new List<Object>(atlas.GetPackables());

        foreach (string item in textureFullName)

            // 加载指定目录
            Object spriteObj = AssetDatabase.LoadAssetAtPath(item, typeof(Object));
            Debug.Log("存png和jpg后缀的图片: " +item + " , " + !packables.Contains(spriteObj));
            if (!packables.Contains(spriteObj))

                atlas.Add(new Object[] spriteObj);


    /// <summary>
    /// 递归文件夹下的图
    /// </summary>
    /// <param name="folderPath"></param>
    static void FileName(string folderPath)

        DirectoryInfo info = new DirectoryInfo(folderPath);
        foreach (DirectoryInfo item in info.GetDirectories())

            FileName(item.FullName);

        foreach (FileInfo item in info.GetFiles())

            // 存png和jpg后缀的图片
            if (item.FullName.EndsWith(".png", StringComparison.Ordinal)
                || item.FullName.EndsWith(".jpg", StringComparison.Ordinal))

                textureFullName.Add("Assets" + item.FullName.Replace(Application.dataPath, ""));


    /// <summary>
    /// 不同平台枚举对应的值
    /// </summary>
    /// <param name="target"></param>
    /// <returns></returns>
    static string GetPlatformName(BuildTarget target)

        string platformName = "";
        switch (target)

            case BuildTarget.Android:
                platformName = "Android";
                break;
            case BuildTarget.iOS:
                platformName = "iPhone";
                break;
            case BuildTarget.PS4:
                platformName = "PS4";
                break;
            case BuildTarget.XboxOne:
                platformName = "XboxOne";
                break;
            case BuildTarget.NoTarget:
                platformName = "DefaultTexturePlatform";
                break;
            default:
                platformName = "Standalone";
                break;

        return platformName;
3.4 图集打包示例
-
将3.3代码添加到工程之后,当代码编译完成后,会在上方工具栏中多出一个:Tools/打包图集 菜单,如下图:

-
点击打包图集后,就会把文件夹
SpriteAtlas下面的图按照文件夹打包成图集。逻辑执行完成后就会在
Textures文件夹下生成新的图集:

-
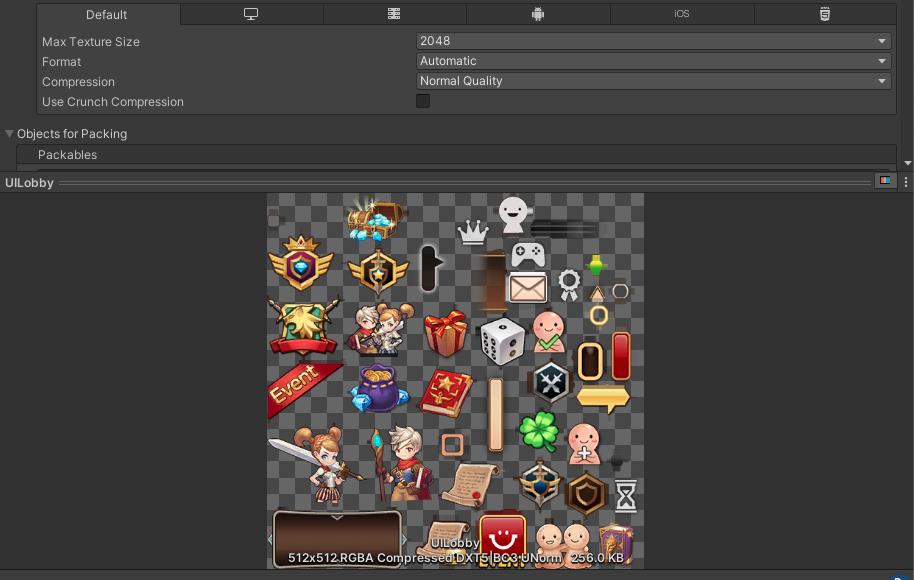
代码打包后的图集效果:
至此,关于Unity图集SpriteAtlas的相关介绍和一键打包工具就全部介绍完了。
以上是关于Unity 之 图集属性详解和代码示例 -- 拓展一键自动打包图集工具的主要内容,如果未能解决你的问题,请参考以下文章