iOS开发-iCloud的简单使用(1)-配置iCloud环境以及key-value storage的使用
Posted
tags:
篇首语:本文由小常识网(cha138.com)小编为大家整理,主要介绍了iOS开发-iCloud的简单使用(1)-配置iCloud环境以及key-value storage的使用相关的知识,希望对你有一定的参考价值。
参考技术A 苹果最近发出消息说iCloud服务要转到国内来了,正好趁着这个机会研究一下iCloud到底要怎么用。现在各大互联网厂商都会提供一点云端服务,苹果也不例外,iCloud就是苹果的云端服务,用户可以在这里备份通讯录、邮件、照片、音乐等等ios原生系统中的数据,并且可以在各个苹果设备之间无缝连接,虽然苹果在iOS5(好像是)发布的时候大吹特吹了一把iCloud,但是后来的使用过程中好像iCloud是各种坑爹。不过随着技术的提升,最近iCloud也变得越来越好,对开发者的支持也是越来越方便了。
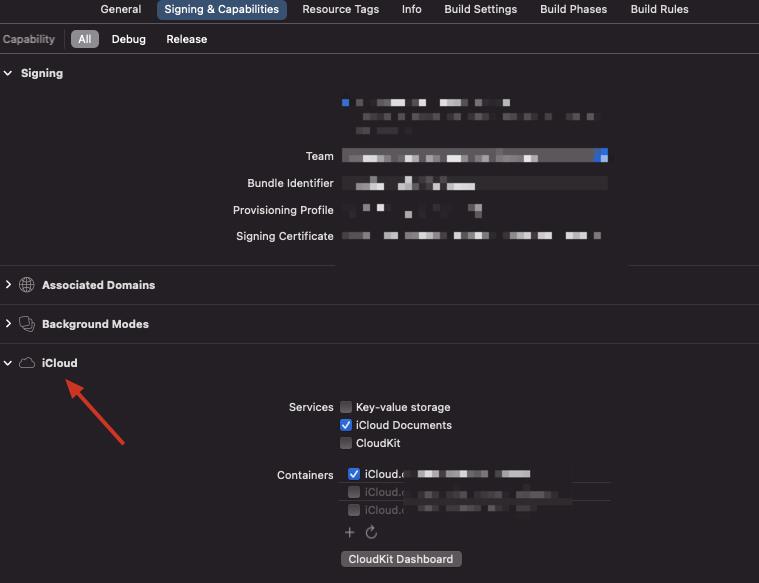
配置iCloud,首先你就先要有一个真实的苹果开发者账号,没错,就是一年688的那个。开通了之后,在Xcode中新建一个项目。然后在 TARGETS -> Capabilities -> iCloud 中打开开关就可以了。
就像这样,是不是很简单啊。
诶,可是好像有什么地方不对,有些地方爆红了。
这是因为我们还没有给这个App ID 注册,所以接下来我们去苹果的 开发者官网 添加一个App ID,在添加的时候勾选 iCloud 服务就可以啦。
什么?你说你已经创建过App ID了???没关系,在管理App ID这边选择 Edit ,然后在勾选 iCloud 也是一样的。
这时候回到Xcode中在看一下,应该就已经没有爆红了吧。
什么???还有爆红??? 那你重启一下XCode试试吧。再不行,你重启一下电脑试试好了。
在Xcode中 iCloud 下边一共有三个可以勾选的服务,其中第一个就是 key-value storage ,这个也是最简单的 iCloud 使用方法了,他跟 NSUserDefaults 的使用方法基本一样,都是以键值对的方式存储数据。只不过处理iCloud的类为 NSUbiquitousKeyValueStore 。
存储数据的方式很简单,只要使用 setObject:forkey: 之后,使用 synchronize 同步一下就可以了。
获取数据的方式也一样,是要使用 objectForKey 就可以了。
看一下 NSUbiquitousKeyValueStore 的头文件,我们发现他还有一个通知消息
注册这个通知,就可以在数据修改的时候接收到通知,然后做对应的处理。最好的验证方法就是在存储了数据之后直接删除掉这个app,然后再次安装,这个时候就会触发该通知。
先放一下demo的[ 地址 。
以上就是关于配置iCloud和key-value存储的简单使用,后边我们再看看其他两种服务是怎么样使用的。
iOS开发:浏览本地文件+iCloud配置
工欲善其事必先利其器
话不多说,直接上图了。
-
先去Apple官网配置证书

这里你可以多创建几个开发的正式的,IDENTIFIER不一样就可以了。 -
找到你项目的IDENTIFIER

点进去选择你给这个证书创建的iCloud就可以了。 -
配置Xcode,每个项目的正式和测试都有对应的ICloud,选择对应的就可以了

UIDocumentPickerViewController浏览文件
@property (nonatomic, strong) UIDocumentPickerViewController *documentPicker;
@property (nonatomic, copy) NSArray *types;
-(NSArray *)types {
    return @[
        @"public.data",

    ];
}

- (UIDocumentPickerViewController *)documentPicker {
    if (_documentPicker == nil) {
        _documentPicker = [[UIDocumentPickerViewController alloc] initWithDocumentTypes:self.types inMode:UIDocumentPickerModeOpen];
        _documentPicker.delegate = self;
        _documentPicker.modalPresentationStyle = UIModalPresentationFullScreen;
    }
    return _documentPicker;
}
[self presentViewController:self.documentPicker animated:YES completion:nil];
#pragma mark - UIDocumentPickerDelegate
- (void)documentPicker:(UIDocumentPickerViewController *)controller didPickDocumentsAtURLs:(NSArray<NSURL *> *)urls {
NSFileCoordinator *fileCoordinator = [[NSFileCoordinator alloc] init];
NSError *error;
[fileCoordinator coordinateReadingItemAtURL:urls.firstObject options:0 error:&error byAccessor:^(NSURL *newURL) {
//读取文件
NSString *fileName = [newURL lastPathComponent];
NSError *error = nil;
NSData *fileData = [NSData dataWithContentsOfURL:newURL options:NSDataReadingMappedIfSafe error:&error];
if (fileData != nil) {
}
//写入沙盒Documents
NSString *filePath = [NSTemporaryDirectory() stringByAppendingPathComponent:fileName];
// [data writeToFile:path atomically:YES];
NSFileManager *fileManager = [NSFileManager defaultManager];
BOOL isExists = [fileManager fileExistsAtPath:filePath];
if (isExists) {
[fileManager removeItemAtPath:filePath error:nil];
}
BOOL isCreate = [fileManager createFileAtPath:filePath contents:nil attributes:nil];
if (isCreate) {
BOOL isWrite = [fileData writeToFile:filePath options:NSDataWritingAtomic error:nil];
if (isWrite) {
//写入成功 写你自己的业务逻辑
}
}
}];
[urls.firstObject stopAccessingSecurityScopedResource];
}
计算文件大小 返回字节数
- (unsigned long long)fileSizeOfPath:(NSString *)path
{
    // 总大小
    unsigned long long size = 0;
    NSFileManager *manager = [NSFileManager defaultManager];
    BOOL isDir = NO;
    BOOL exist = [manager fileExistsAtPath:path isDirectory:&isDir];
    // 判断路径是否存在
    if (!exist) return size;
    if (isDir) { // 是文件夹
        NSDirectoryEnumerator *enumerator = [manager enumeratorAtPath:path];
        for (NSString *subPath in enumerator) {
            NSString *fullPath = [path stringByAppendingPathComponent:subPath];
            size += [manager attributesOfItemAtPath:fullPath error:nil].fileSize;
            }
        }else{ // 是文件
            size += [manager attributesOfItemAtPath:path error:nil].fileSize;
        }
        return size;
}
以上是关于iOS开发-iCloud的简单使用(1)-配置iCloud环境以及key-value storage的使用的主要内容,如果未能解决你的问题,请参考以下文章