Ambari-2.7.5整合HDP-3.1.5集群完整安装记录(内附安Ambari-2.7.5 + HDP-3.1.5安装包下载地址)
Posted 浮世Talk
tags:
篇首语:本文由小常识网(cha138.com)小编为大家整理,主要介绍了Ambari-2.7.5整合HDP-3.1.5集群完整安装记录(内附安Ambari-2.7.5 + HDP-3.1.5安装包下载地址)相关的知识,希望对你有一定的参考价值。
Ambari-2.7.5 + HDP-3.1.5安装包下载方式:
关注微信公众号:浮世Talk,回复ambari即可获取
介绍
Ambari是Apache软件基金会中顶级项目,由Ambari Server和Ambari Agent两部分组成,基于它的分布式架构特点,可以便捷的创建、管理、监控Hadoop整个生态圈(例如Hive、HBase、Kafka、ZooKeeper等)的集群。
集群规划
本次安装使用三台虚拟机,系统版本为7.9,分别是一台master节点,两台node节点。所使用的软件版本为ambari-2.7.5.0-72与HDP-3.1.5.0-152,该安装包可在公众号后台发送ambari自行获取。以下为集群规划:

环境配置
1.关闭防火墙
关闭防火墙步骤在所有节点操作。
查看防火墙的状态:
systemctl status firewalld.service

关闭防火墙:
systemctl stop firewalld.service

设置开机不启动:
systemctl disable firewalld.service

2.设置hostname
设置hostname步骤在所有节点操作。
设置hosts映射:
vi /etc/hosts
192.168.1.10 master.mzy.com192.168.1.11 node1.mzy.com192.168.1.12 node2.mzy.com
永久修改主机名:
vi /etc/sysconfig/network
NETWORKING=yesHOSTNAME=master.mzy.com
3.安装时间同步服务(ntp)
安装时间同步服务步骤在所有节点操作。
安装ntp服务:
yum install -y ntp
启动并查看状态:
systemctl start ntpd.servicesystemctl status ntpd.service
设置开机自启:
systemctl enable ntpd.service

4.关闭Selinux和THP
关闭Selinux和THP步骤在所有节点操作。
查看状态:sestatus

关闭SELINUX:(设置SELINUX=disabled)
vi /etc/sysconfig/selinux
# This file controls the state of SELinux on the system.# SELINUX= can take one of these three values:# enforcing - SELinux security policy is enforced.# permissive - SELinux prints warnings instead of enforcing.# disabled - No SELinux policy is loaded.SELINUX=disabled# SELINUXTYPE= can take one of three values:# targeted - Targeted processes are protected,# minimum - Modification of targeted policy. Only selected processes are protected.# mls - Multi Level Security protection.SELINUXTYPE=targeted
查看是否启动了THP:
cat /sys/kernel/mm/transparent_hugepage/defrag

以上输出[always]说明启动了透明大页。
永久关闭:
vi /etc/rc.d/rc.local(添加以下内容)
if test -f /sys/kernel/mm/transparent_hugepage/enabled; thenecho never > /sys/kernel/mm/transparent_hugepage/enabledfiif test -f /sys/kernel/mm/transparent_hugepage/defrag; thenecho never > /sys/kernel/mm/transparent_hugepage/defragfi
保存退出,然后赋予rc.local文件执行权限:
chmod +x /etc/rc.d/rc.local
重启:reboot
检查是否关闭大透明页:
cat /sys/kernel/mm/transparent_hugepage/defrag

5.设置最大打开文件数
设置最大打开文件数步骤在所有节点操作。
查看最大打开文件数:
ulimit -a

建议的最大打开文件描述符数为10000或更多。
修改配置文件:
vi /etc/security/limits.conf(添加以下内容)
* soft noproc 65535* hard noproc 65535* soft nofile 65535* hard nofile 65535
重启生效后再次查看最大打开文件数:

6.免密登录
免密登录步骤在master节点操作,该步骤设置master到master、 node1、node2之间的免密登录。
首先生成ssh公钥认证所需的公钥和私钥文件。
在master节点上执行:
ssh-keygen -t rsa(连续按三次回车键)

设置master到 master免密登录:
ssh-copy-id master.mzy.com

设置master到 node1免密登录:
ssh-copy-id node1.mzy.com

设置master到 node2免密登录:
ssh-copy-id node2.mzy.com

安装MYSQL
安装mysql步骤在master节点操作。
1.下载官方yum Repo
wget -i -c http://dev.mysql.com/get/mysql57-community-release-el7-10.noarch.rpm
2.安装yum Repo
yum -y install mysql57-community-release-el7-10.noarch.rpm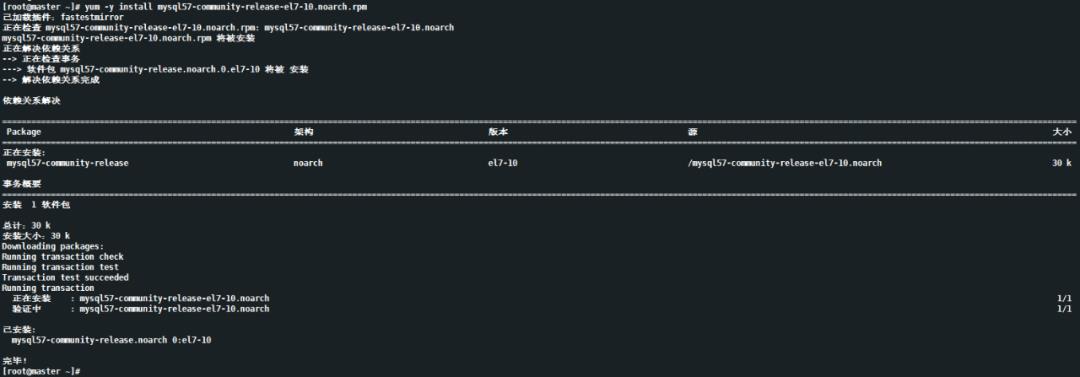
3.安装MySQL服务
yum -y install mysql-community-server安装成功:

4.启动MySQL并设置开机自启
启动MySQL:
systemctl start mysqld.service查看mysql状态:
systemctl status mysqld.service
设置开机启动:
systemctl enable mysqld.service
5.修改root密码
此时MySQL已经开始正常运行,不过要想进入MySQL还得先找出此时root用户的密码,通过如下命令可以在日志文件中找出密码:
cat /var/log/mysqld.log | grep password
使用以上默认密码,登录MySQL服务:
mysql -uroot -pWfH/4eYy:Xsd
修改密码 (这里把密码改成root):
set global validate_password_policy=0;set global validate_password_length=1;ALTER USER 'root'@'localhost' IDENTIFIED BY 'root';

利用root登录MySQL,设置允许root用户在任何地方进行远程登录,并具有所有库任何操作权限:
set global validate_password_policy=0;set global validate_password_length=1;GRANT ALL PRIVILEGES ON *.* TO 'root'@'%' IDENTIFIED BY 'root' WITH GRANT OPTION;FLUSH PRIVILEGES;
修改完后,就可以用新密码登录了,此时还有一个问题,因为安装了Yum Repo,以后每次yum操作都会自动更新,需要把这个yum Repo卸载掉:
yum -y remove mysql57-community-release-el7-10.noarch
6.配置MySQL编码
查看MySQL编码:
show variables like 'character_set_%';

可以发现character_set_client、character_set_connection、character_set_database、character_set_results、character_set_server这几个编码方式没有统一,这样会使得存储到MySQL数据库中的数据出现乱码情况,因此需要将编码方式统一起来。
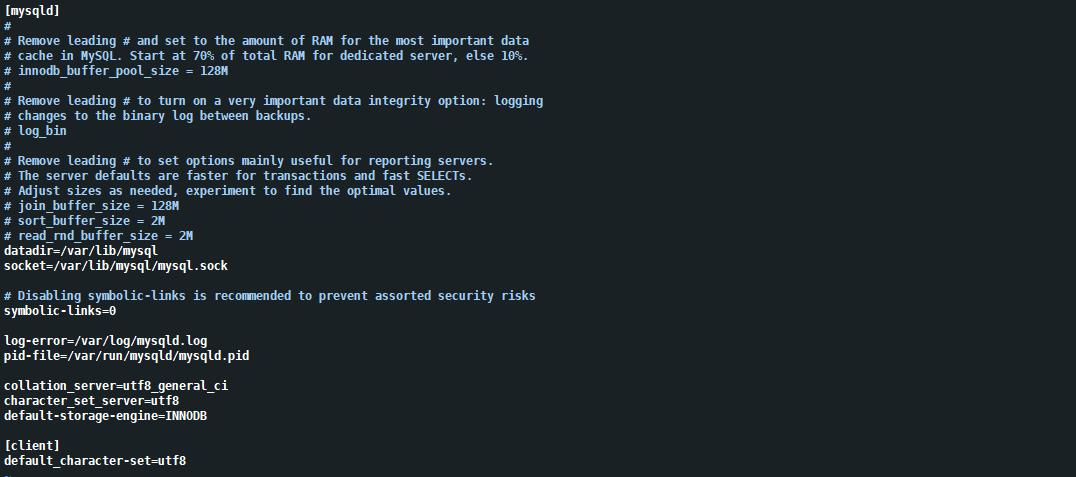
配置MySQL编码,修改MySQL配置文件:
vi /etc/my.cnf
在[mysqld]下添加:
collation_server=utf8_general_cicharacter_set_server=utf8default-storage-engine=INNODB
在[client]下添加(如果没有[client],则创建)
default_character-set=utf8配置好的文件如下所示:
重启MySQL服务使得配置生效:
systemctl restart mysqld.service
再次查看编码方式:

8.配置允许root远程访问
查询用户表命令:
select User,authentication_string,Host from mysql.user;
从以上输出看到,此时root用户只开通了localhost访问权限,由于后面配置hive、ranger等元数据步骤时需要使用到root远程访问权限,因此需要配置允许root远程访问。
登录MySQL执行以下命令:
set global validate_password_policy=0;set global validate_password_length=1;GRANT ALL PRIVILEGES ON *.* TO 'root'@'%' IDENTIFIED BY 'root';

再次查询用户表,可以发现已经给root用户开通了远程访问权限:

7.创建用户密码与数据库
这一步骤是为了后面配置ambari-server准备。
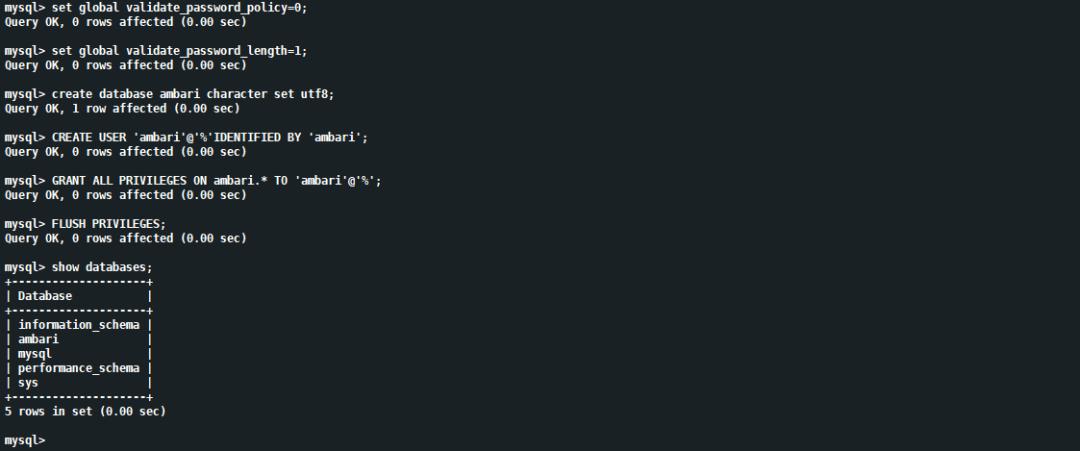
创建ambari数据库及数据库的用户名和密码:
set global validate_password_policy=0;
set global validate_password_length=1;
create database ambari character set utf8;
CREATE USER 'ambari'@'%'IDENTIFIED BY 'ambari';
GRANT ALL PRIVILEGES ON ambari.* TO 'ambari'@'%';
FLUSH PRIVILEGES;
8.下载MySQL驱动包
yum install mysql-connector-java
下载成功后,MySQL驱动包会放在/usr/share/java/目录下,该驱动包后面安装步骤需要用。

部署Ambari
ambari-server部署在master节点上。
1.安装yum相关工具
yum install yum-utils -yyum repolistyum install createrepo -y
2.安装Apache httpd
安装httpd服务:
yum install httpd -y启动httpd服务:
systemctl start httpd查看httpd状态:
systemctl status httpd设置httpd开机自启:
systemctl enable httpd访问:http://ambari.mzy.com/

httpd 会生成 /var/www/html目录(相当于Tomcat的webapps目录),进入到/var/www/html目录下,创建ambari和hdp目录,用来存放安装文件。
mkdir /var/www/html/ambarimkdir /var/www/html/hdpmkdir /var/www/html/hdp/HDP-UTILS-1.1.0.22mkdir /var/www/html/hdp/HDP-GPL-3.1.5.0
将ambari和hdp压缩包解压到以上创建的目录:
tar -zxvf /opt/hdp3.1.5/ambari-2.7.5.0-centos7.tar.gz -C /var/www/html/ambari/tar -zxvf /opt/hdp3.1.5/HDP-3.1.5.0-centos7-rpm.tar.gz -C /var/www/html/hdp/tar -zxvf /opt/hdp3.1.5/HDP-UTILS-1.1.0.22-centos7.tar.gz -C /var/www/html/hdp/HDP-UTILS-1.1.0.22/tar -zxvf /opt/hdp3.1.5/HDP-GPL-3.1.5.0-centos7-gpl.tar.gz -C /var/www/html/hdp/HDP-GPL-3.1.5.0/
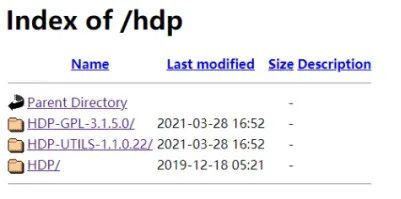
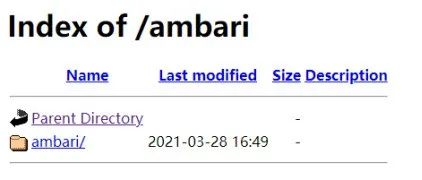
这时访问:http://ambari.mzy.com/hdp 和 http://ambari.mzy.com/ambari可以看到以下内容:
3.配置本地 Repo
配置ambari本地repo文件:
vi ambari.repo
[ambari-2.7.5.0-72]name=ambari Version - ambari-2.7.5.0-72baseurl=http://master.mzy.com/ambari/ambari/centos7/2.7.5.0-72/gpgkey=http://master.mzy.com/ambari/ambari/centos7/2.7.5.0-72/RPM-GPG-KEY/RPM-GPG-KEY-Jenkinsenabled=1gpgcheck=1priority=1
配置hdp本地repo文件:
vi hdp.repo
[HDP-3.1.5.0-152]name=HDP Version - HDP-3.1.5.0-152baseurl=http://master.mzy.com/hdp/HDP/centos7/3.1.5.0-152/gpgkey=http://master.mzy.com/hdp/HDP/centos7/3.1.5.0-152/RPM-GPG-KEY/RPM-GPG-KEY-Jenkinsenabled=1gpgcheck=1priority=1
配置hdp-utils本地repo文件:
vi hdp-utils.repo
[HDP-UTILS-1.1.0.22]name=Hortonworks Data Platform Utils Version - HDP-UTILS-1.1.0.22baseurl=http://master.mzy.com/hdp/HDP-UTILS-1.1.0.22/HDP-UTILS/centos7/1.1.0.22/gpgkey=http://master.mzy.com/hdp/HDP-UTILS-1.1.0.22/HDP-UTILS/centos7/1.1.0.22/RPM-GPG-KEY/RPM-GPG-KEY-Jenkinsgpgcheck=1enabled=1priority=1
配置hdp.gpl本地repo文件:
vi hdp.gpl.repo
[HDP-GPL-3.1.5.0-152]name=HDP-GPL Version - HDP-GPL-3.1.5.0-152baseurl=http://master.mzy.com/hdp/HDP-GPL-3.1.5.0/HDP-GPL/centos7/3.1.5.0-152/gpgkey=http://master.mzy.com/hdp/HDP-GPL-3.1.5.0/HDP-GPL/centos7/3.1.5.0-152/RPM-GPG-KEY/RPM-GPG-KEY-Jenkinsenabled=1gpgcheck=1priority=1
将以上四个repo文件放到/etc/yum.repos.d目录下:
[root@master ~]# ll /etc/yum.repos.d总用量 64-rw-r--r-- 1 root root 250 3月 28 17:10 ambari.repo-rw-r--r--. 1 root root 1664 11月 23 2020 CentOS-Base.repo-rw-r--r--. 1 root root 285 3月 28 16:51 hdp.gpl.repo-rw-r--r--. 1 root root 233 3月 28 16:51 hdp.repo-rw-r--r--. 1 root root 311 3月 28 16:51 hdp-utils.repo
并且分发到其它节点的/etc/yum.repos.d目录下:
scp ambari.repo hdp.repo hdp.gpl.repo hdp-utils.repo node1.mzy.com:/etc/yum.repos.dscp ambari.repo hdp.repo hdp.gpl.repo hdp-utils.repo node2.mzy.com:/etc/yum.repos.d
执行createrepo命令,创建yum本地源:
createrepo /var/www/html/ambari/ambari/centos7/2.7.5.0-72/createrepo /var/www/html/hdp/HDP/centos7/3.1.5.0-152/createrepo /var/www/html/hdp/HDP-UTILS-1.1.0.22/HDP-UTILS/centos7/1.1.0.22/createrepo /var/www/html/hdp/HDP-GPL-3.1.5.0/HDP-GPL/centos7/3.1.5.0-152/
执行命令更新各个节点yum源:
yum clean all && yum makecache4.安装Ambari-Server
在master.mzy.com节点上安装ambari-server,执行以下命令:
yum install ambari-server5.配置Ambari-Server
安装成功后,就可以进行ambari配置了,执行以下命令:
ambari-server setup以下是配置过程:
[root@master ~]# ambari-server setupUsing python /usr/bin/pythonSetup ambari-serverChecking SELinux...SELinux status is 'disabled'Customize user account for ambari-server daemon [y/n] (n)? nAdjusting ambari-server permissions and ownership...Checking firewall status...Checking JDK...[1] Oracle JDK 1.8 + Java Cryptography Extension (JCE) Policy Files 8[2] Custom JDK==============================================================================Enter choice (1): 2WARNING: JDK must be installed on all hosts and JAVA_HOME must be valid on all hosts.WARNING: JCE Policy files are required for configuring Kerberos security. If you plan to use Kerberos,please make sure JCE Unlimited Strength Jurisdiction Policy Files are valid on all hosts.Path to JAVA_HOME: /usr/jdk64/jdk1.8.0_112Validating JDK on Ambari Server...done.Check JDK version for Ambari Server...JDK version found: 8Minimum JDK version is 8 for Ambari. Skipping to setup different JDK for Ambari Server.Checking GPL software agreement...GPL License for LZO: https://www.gnu.org/licenses/old-licenses/gpl-2.0.en.htmlEnable Ambari Server to download and install GPL Licensed LZO packages [y/n] (n)? yCompleting setup...Configuring database...Enter advanced database configuration [y/n] (n)? yConfiguring database...==============================================================================Choose one of the following options:[1] - PostgreSQL (Embedded)[2] - Oracle[3] - MySQL / MariaDB[4] - PostgreSQL[5] - Microsoft SQL Server (Tech Preview)[6] - SQL Anywhere[7] - BDB==============================================================================Enter choice (1): 3Hostname (localhost): master.mzy.comPort (3306): 3306Database name (ambari):Username (ambari):Enter Database Password (ambari):Re-enter password:Configuring ambari database...Should ambari use existing default jdbc /usr/share/java/mysql-connector-java.jar [y/n] (y)? yConfiguring remote database connection properties...WARNING: Before starting Ambari Server, you must run the following DDL directly from the database shell to create the schema: /var/lib/ambari-server/resources/Ambari-DDL-MySQL-CREATE.sqlProceed with configuring remote database connection properties [y/n] (y)? yExtracting system views...ambari-admin-2.7.5.0-72.jar....Ambari repo file contains latest json url http://public-repo-1.hortonworks.com/HDP/hdp_urlinfo.json, updating stacks repoinfos with it...Adjusting ambari-server permissions and ownership...Ambari Server 'setup' completed successfully.[root@master ~]#
以上ambari-server配置好之后,登录MySQL创建ambari元数据表:
mysql> use ambari;mysql> source /var/lib/ambari-server/resources/Ambari-DDL-MySQL-CREATE.sql;
6.启动Ambari-Server
元数据表创建成功后,就可以启动ambari-server了:
ambari-server start执行启动命令后,看到以下输出,说明ambari-server启动成功:
Using python /usr/bin/pythonStarting ambari-serverAmbari Server running with administrator privileges.Organizing resource files at /var/lib/ambari-server/resources...Ambari database consistency check started...Server PID at: /var/run/ambari-server/ambari-server.pidServer out at: /var/log/ambari-server/ambari-server.outServer log at: /var/log/ambari-server/ambari-server.logWaiting for server start................................Server started listening on 8080DB configs consistency check: no errors and warnings were found.Ambari Server 'start' completed successfully.
如果启动失败,可以从查看日志文件/var/log/ambari-server/ambari-server.log进行原因排查。
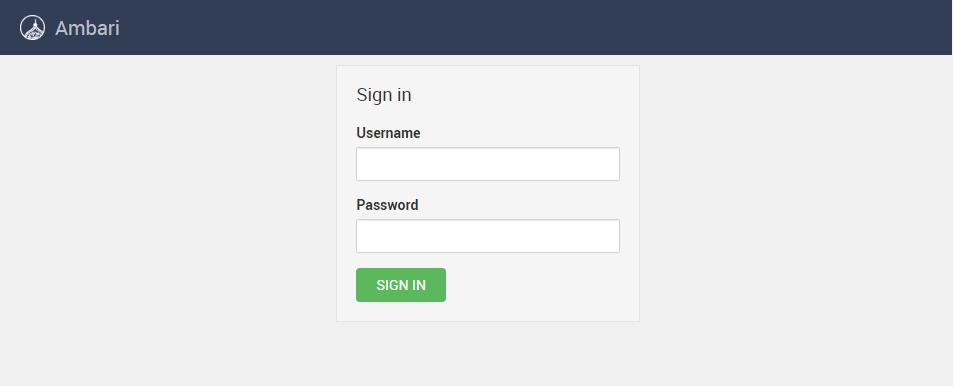
7.登录Ambari-Web
启动成功后,登录浏览器,访问:http://master.mzy.com:8080/
账号密码为:admin/admin
部署HDP集群
1.Create a Cluster
输入账号密码,点击SIGN IN就可以登录上ambari:
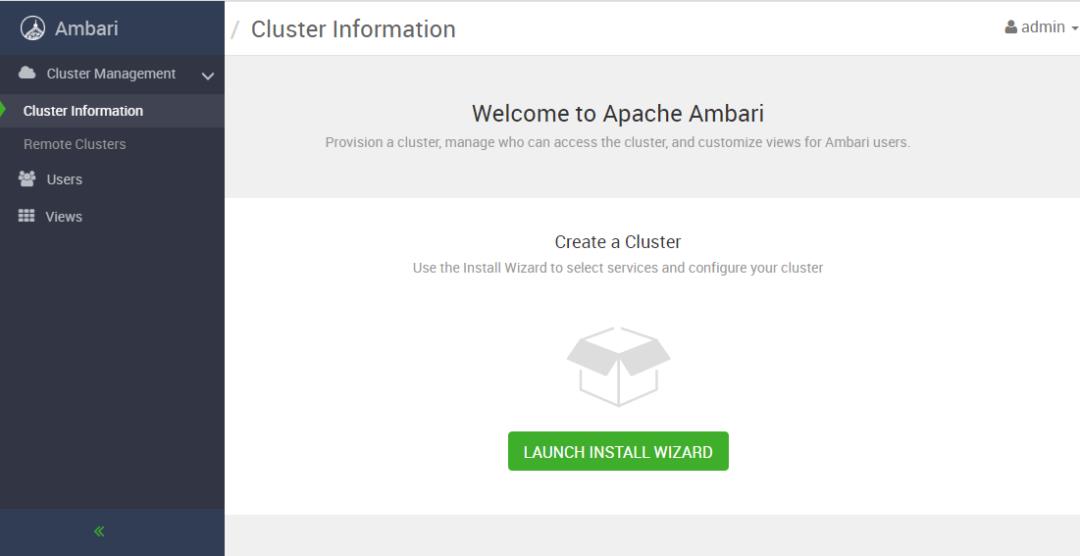
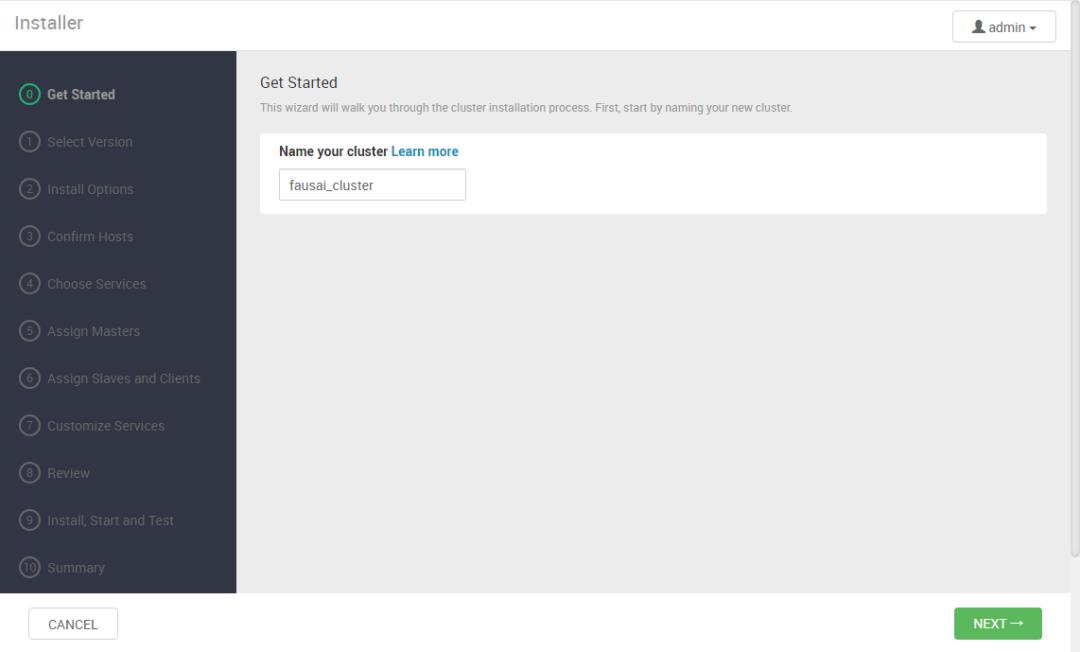
点击Launch Install Wizard跳转到设置集群名称页面,这里将集群命名为:fausai_cluster
2.Select Version
点击NEST进入下一步,进入 Select Version进行HDP版本选择和配置本地源页面:

在配置本地源页面点击右边Remove将其它选项删除,只留下redhat7:

然后进行以下配置:
HDP:http://master.mzy.com/hdp/HDP/centos7/3.1.5.0-152/HDP-GPL:http://master.mzy.com/hdp/HDP-GPL-3.1.5.0/HDP-GPL/centos7/3.1.5.0-152/HDP-UTILS:http://master.mzy.com/hdp/HDP-UTILS-1.1.0.22/HDP-UTILS/centos7/1.1.0.22/

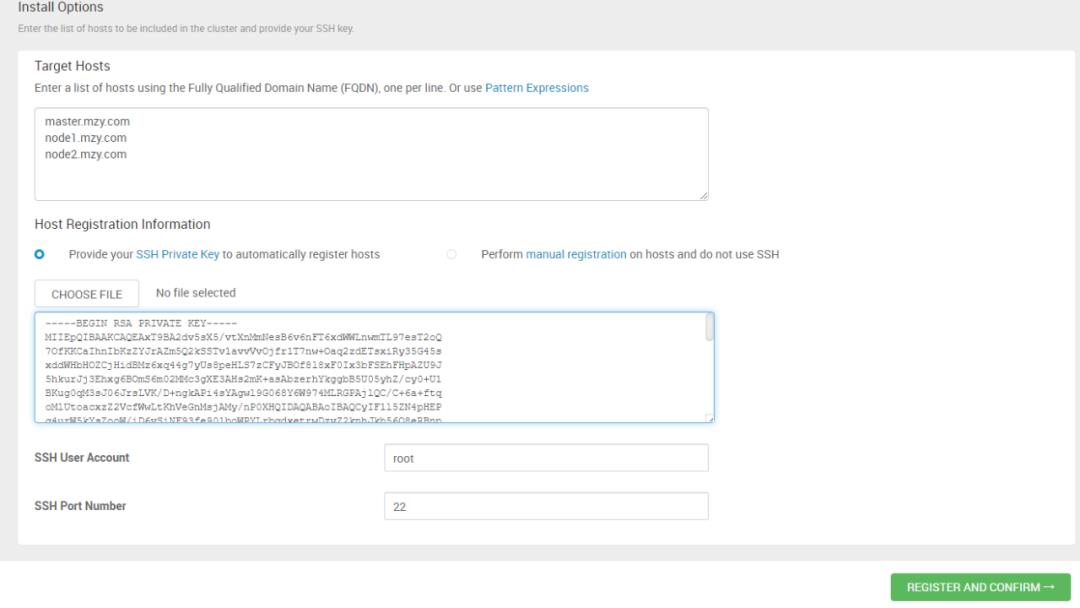
3.Install Options
点击NEXT进入下一步Install Options填写主机名和SSH私钥页面,其中目标主机名填写待安装集群的主机名,SSH私钥填写master节点上~/.ssh/id_rsa的内容。如下所示:
4.Confirm Hosts
点击REGISTER AND CONFIRM进入Confirm Hosts页面,等待命令执行成功后,会出现以下结果,说明Confirm Hosts成功:

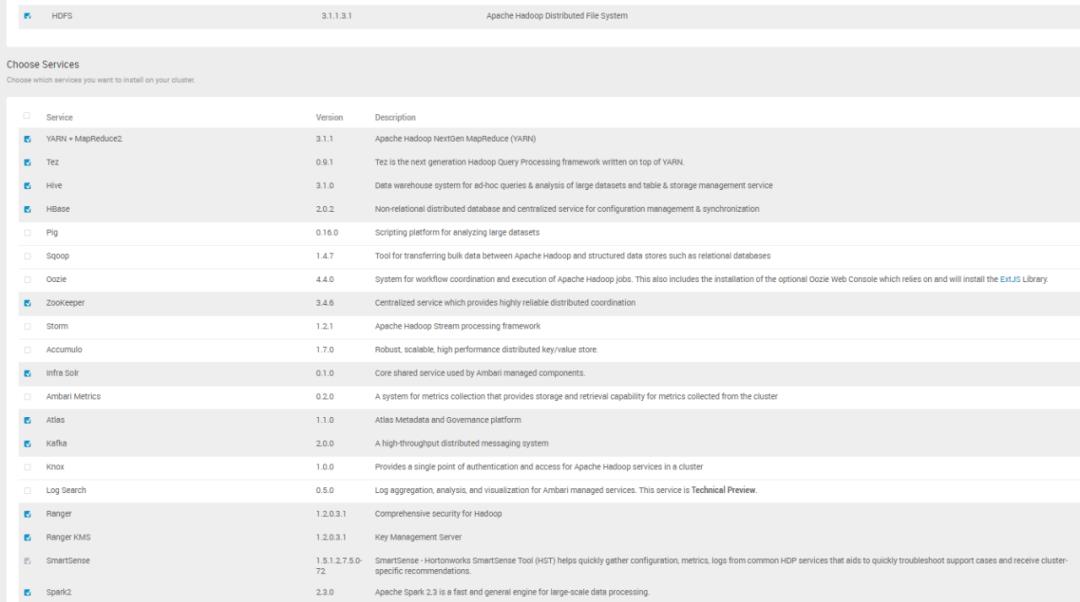
5.Choose Services
点击NEXT进入Choose Services页面,在该页面选择你需要安装的组件即可:
6.Assign Masters
点击NEXT进入Assign Masters页面,在该页面选择将master组件安装在哪些节点上:

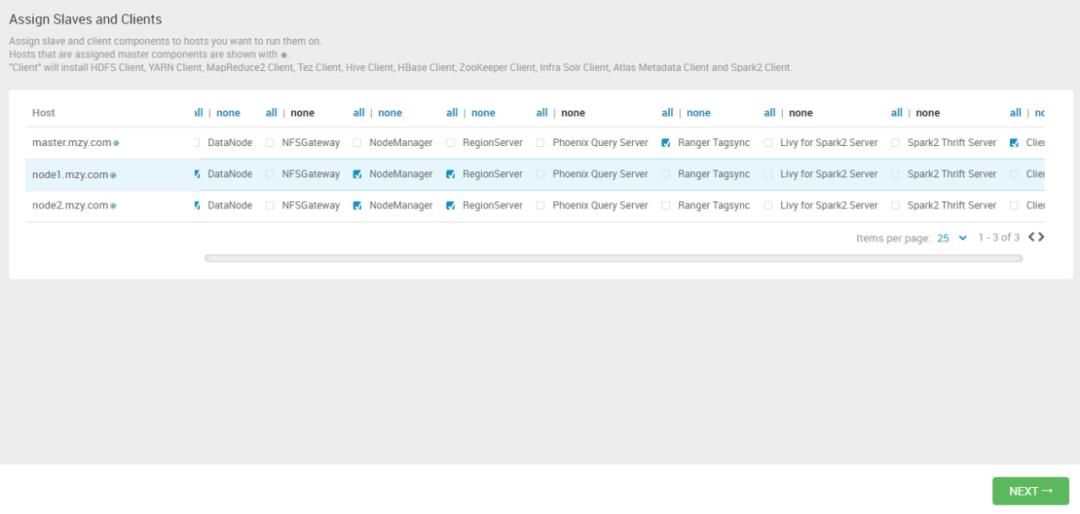
7.Assign Slaves and Clients
点击NEXT进入Assign Slaves and Clients页面,在该页面对DataNode、NodeManager以及Client组件进行节点分配:
8.Customize Services
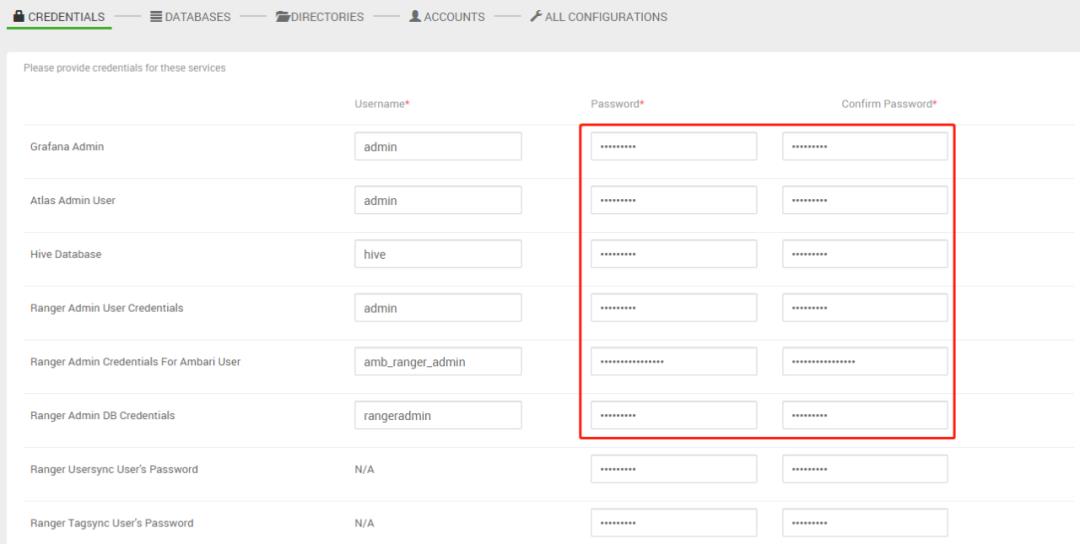
点击NEXT进入下一步Customize Services步骤,该步骤又划分为多个小步骤,首先是密码配置页面,在该页面配置各个组件涉及到的密码,密码最好设计为8位以上,并且记住:
点击NEXT进入下一步数据库配置页面,在该页面配置hive元数据需要的数据库,由于在以上的安装步骤中我们用了MySQL作为元数据存储,因此在Hive Database这一项选择Existing MySQL / MariaDB,分别填写对应的信息后点击TEST CONNECTION,发现测试不通过:
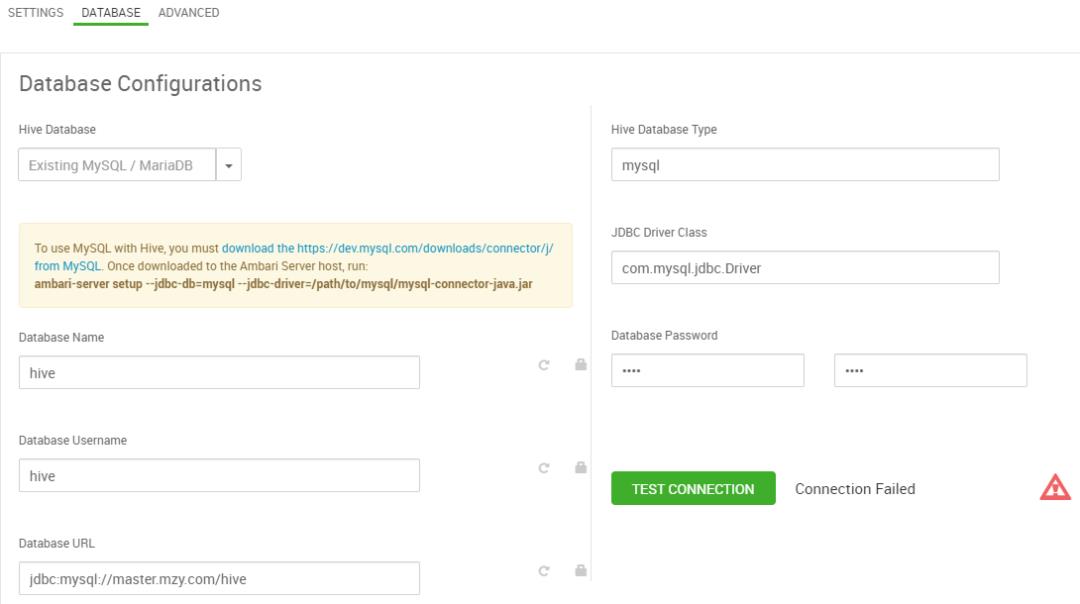
点击Connection Failed打开查看报错信息:
2021-07-17 12:30:21,860 - Check db_connection_check was unsuccessful. Exit code: 1. Message: The MySQL JDBC driver has not been set. Please ensure that you have executed 'ambari-server setup --jdbc-db=mysql --jdbc-driver=/path/to/jdbc_driver'.Traceback (most recent call last):File "/var/lib/ambari-agent/cache/custom_actions/scripts/check_host.py", line 546, in <module>CheckHost().execute()File "/usr/lib/ambari-agent/lib/resource_management/libraries/script/script.py", line 352, in executemethod(env)File "/var/lib/ambari-agent/cache/custom_actions/scripts/check_host.py", line 207, in actionexecuteraise Fail(error_message)resource_management.core.exceptions.Fail: Check db_connection_check was unsuccessful. Exit code: 1. Message: The MySQL JDBC driver has not been set. Please ensure that you have executed 'ambari-server setup --jdbc-db=mysql --jdbc-driver=/path/to/jdbc_driver'.
该报错与MySQL驱动有关,在master.mzy.com节点上执行以下命令即可解决:
ambari-server setup --jdbc-db=mysql --jdbc-driver=/usr/share/java/mysql-connector-java.jar
再次点击TEST CONNECTION,发现CONNECTION OK:
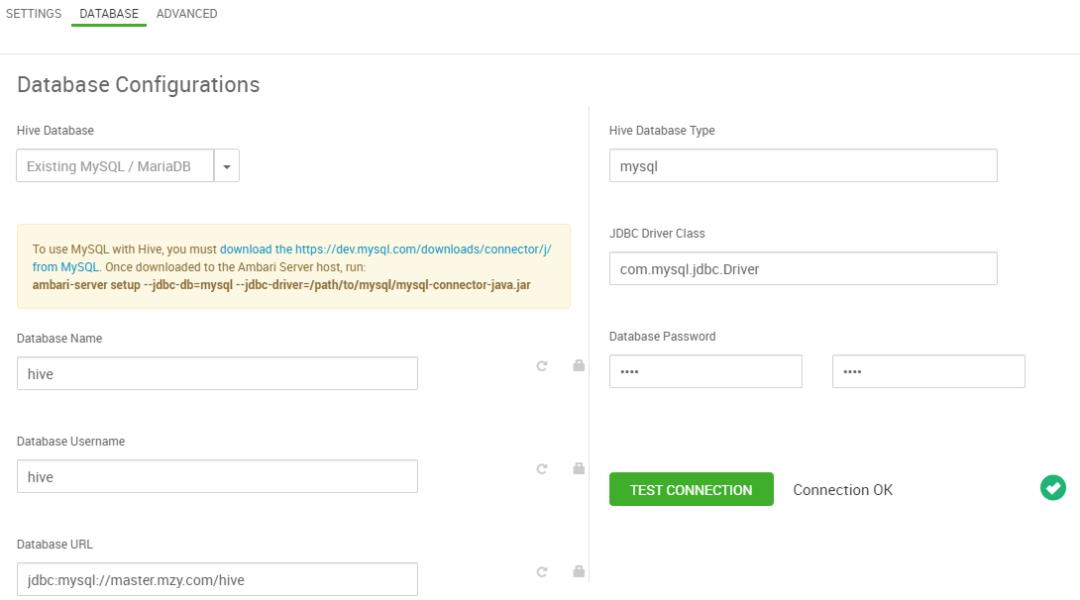
接着继续配置ranger和ranger kms的元数据存储:
其中ranger元数据存储配置:
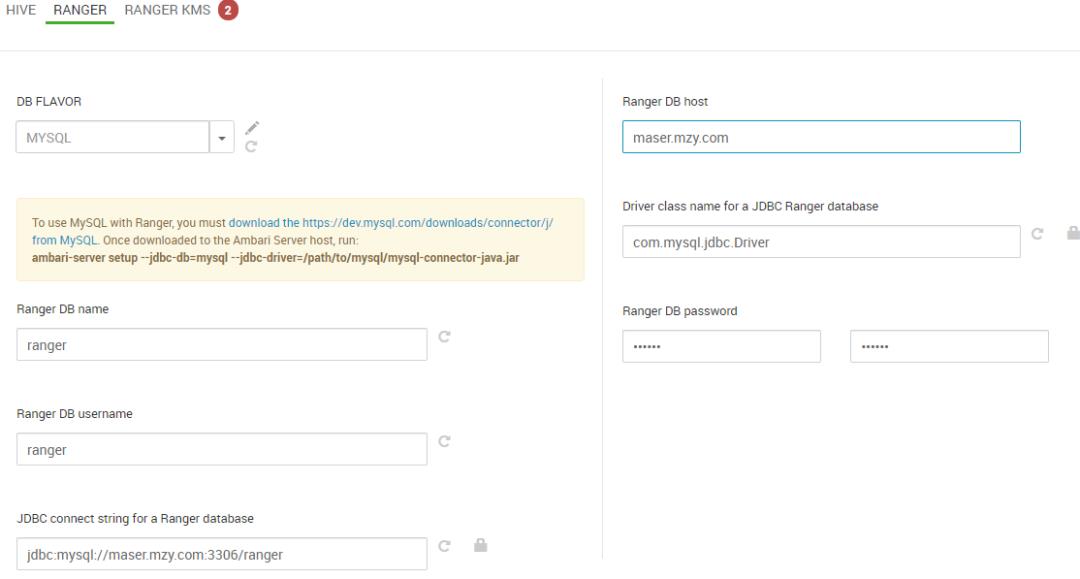
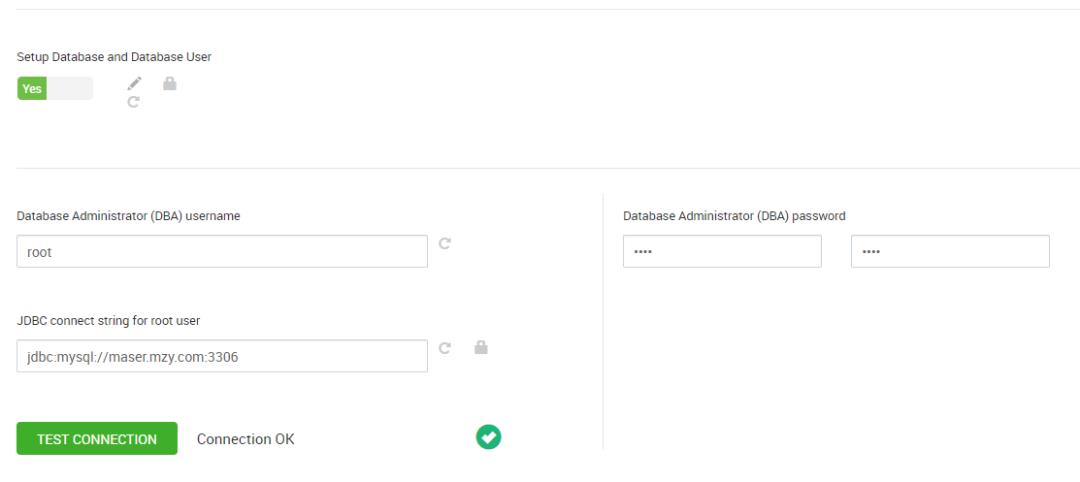
ranger kms的元数据存储配置:
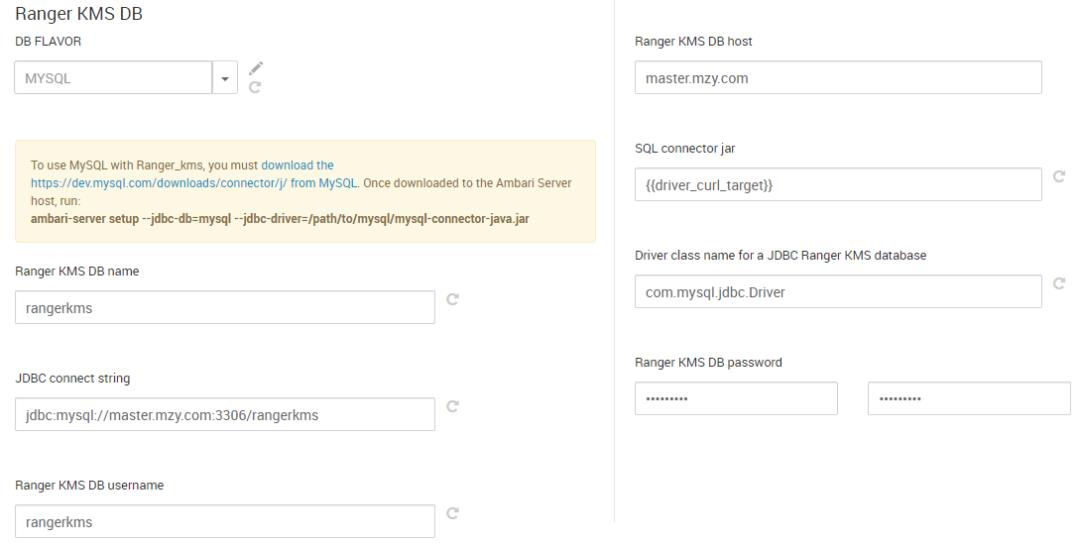
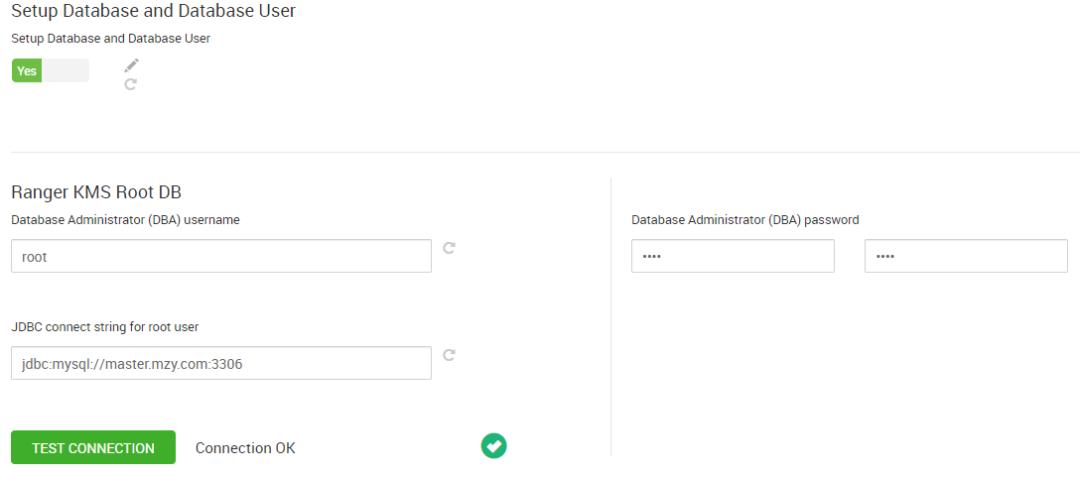
以上关于元数据的配置都配置成功后,就可以点击NEXT进入各个组件的数据与日志目录配置页面,在这里根据需要可以调整各个组件的数据和日志存放目录,也可以保持默认配置:
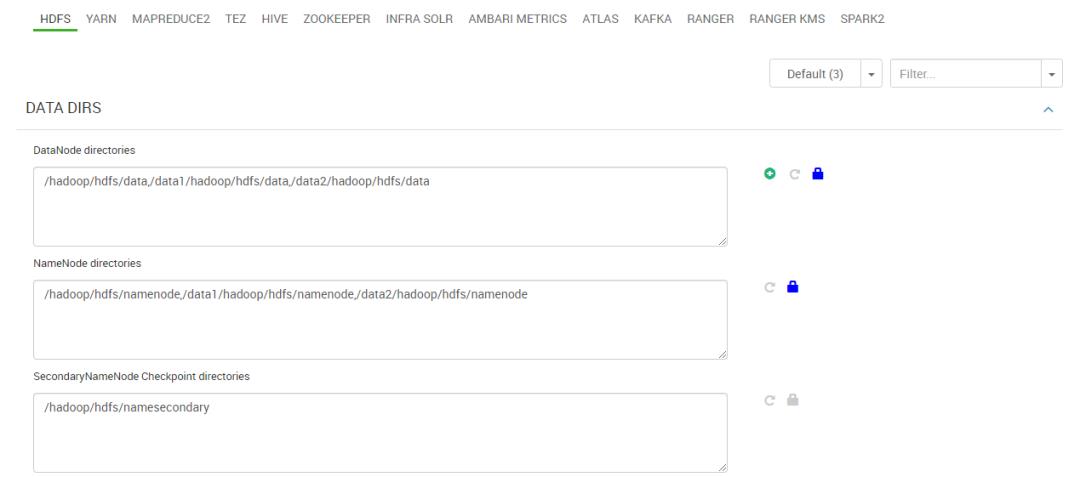
点击NEXT进入用户名预览页面,该页面展示了集群安装会根据安装组件创建的用户,不用做修改:
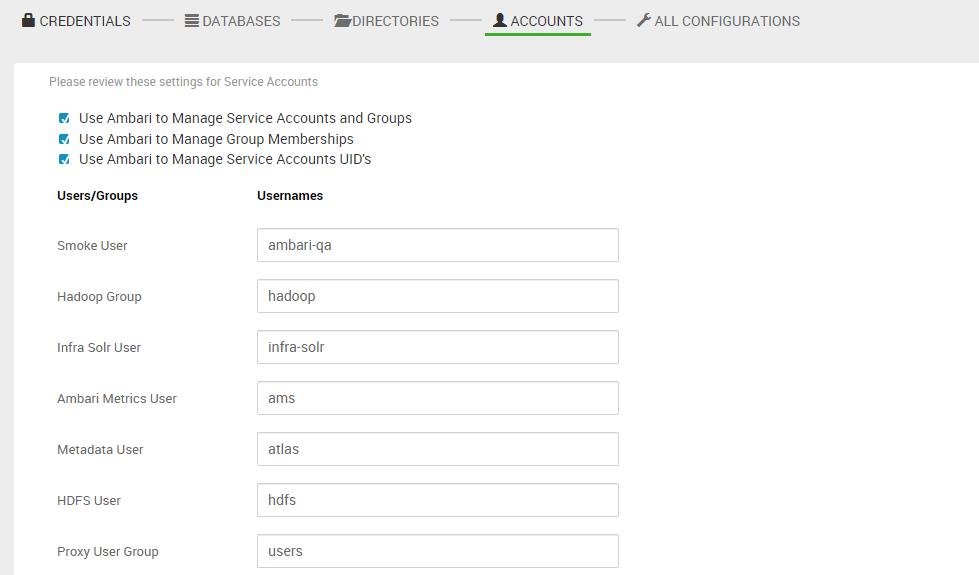
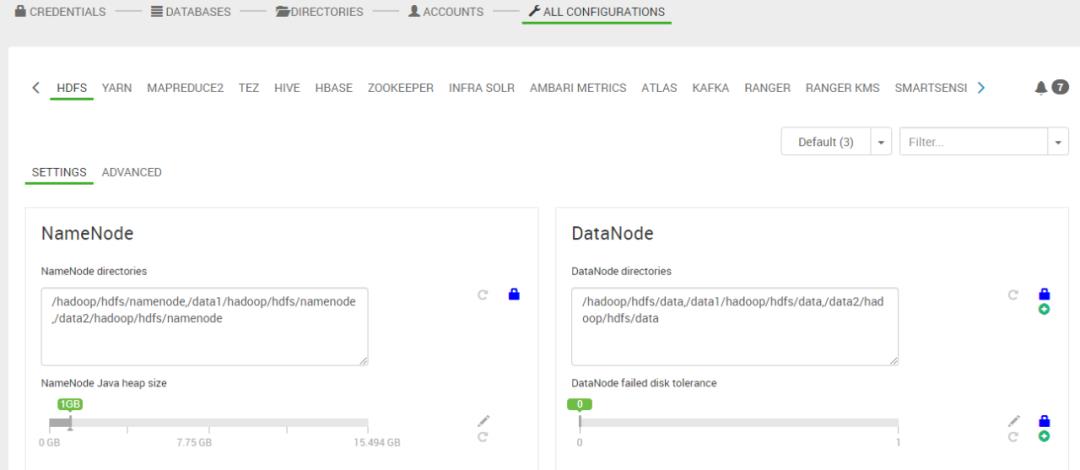
点击NEXT进入所有配置项页面,在这里可以对各个组件的各项默认配置进行修改,也可以保持默认配置:
9.Review
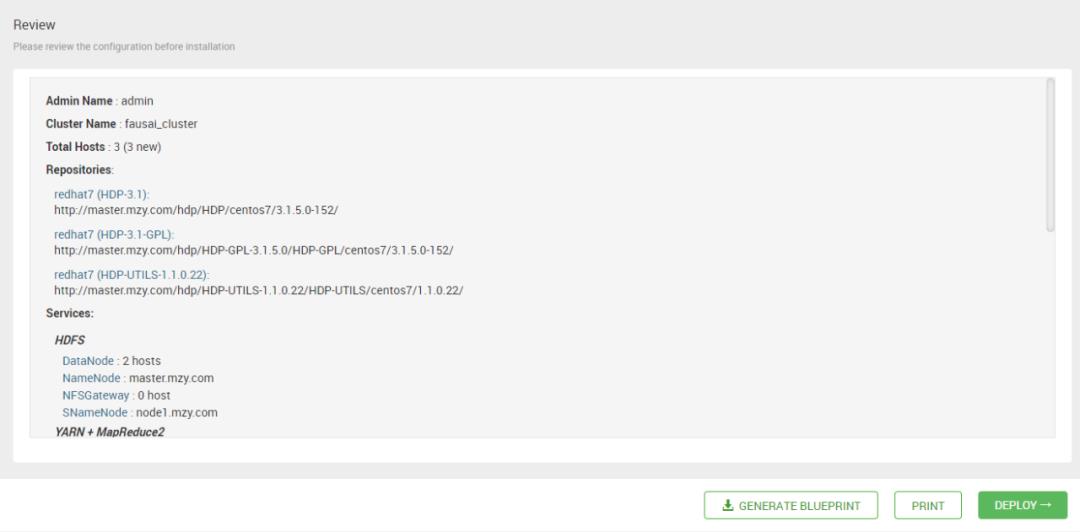
点击NEXT进入Review页面,在该页面可以对集群的配置和安装节点进行预览:
10.Install, Start and Test
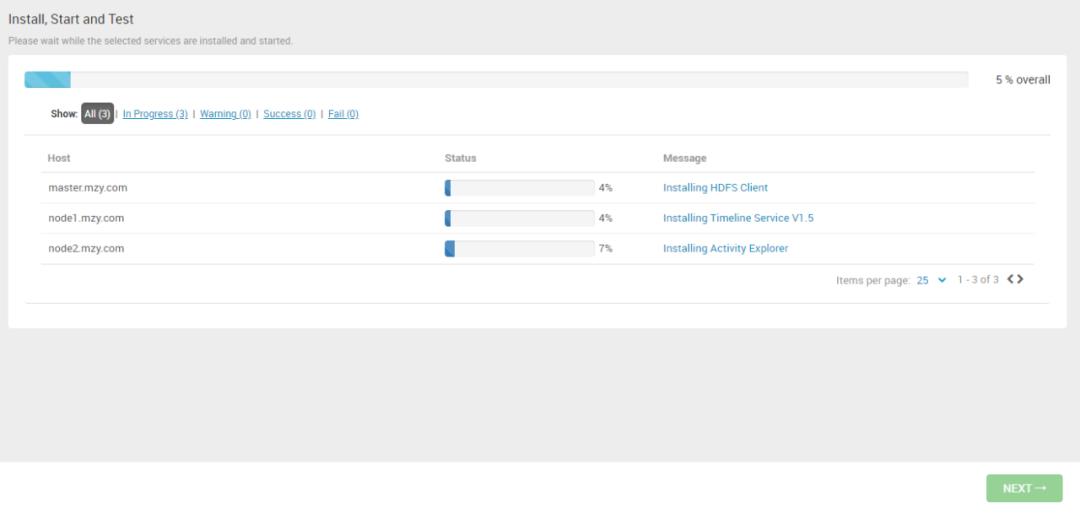
点击DEPLOY即可进入Install, Start and Test页面进行安装:
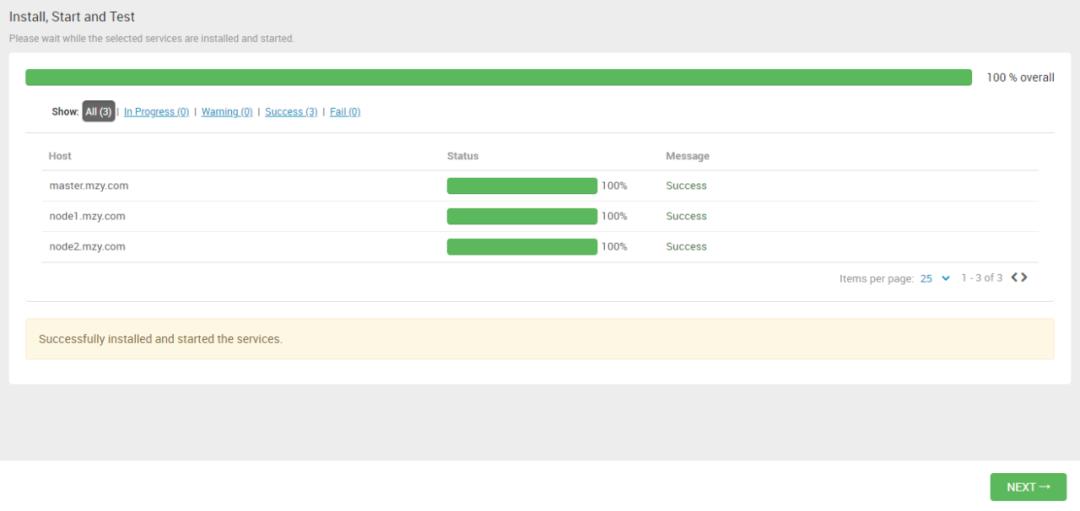
安装成功后:
11.Summary
点击NEXT,进入Summary页面:
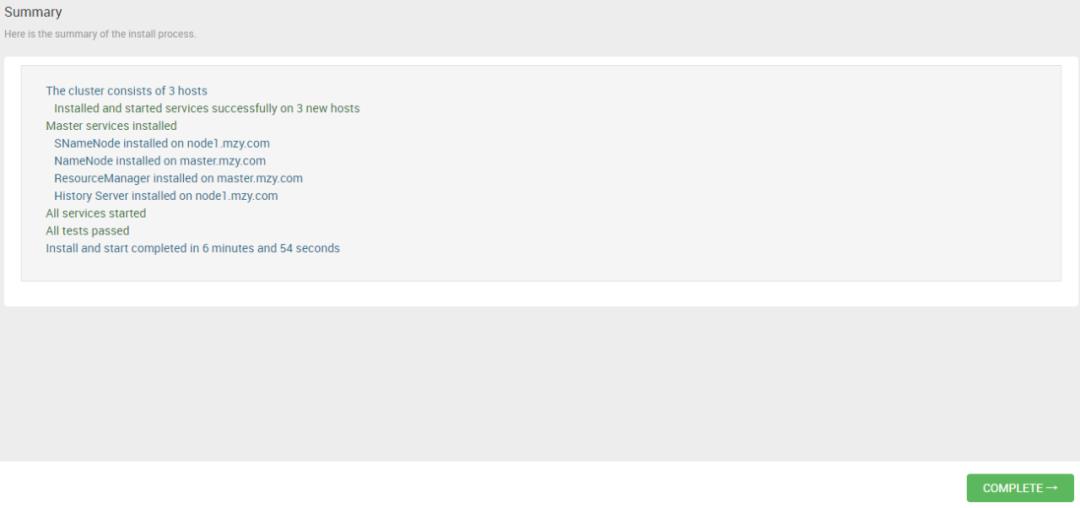
点击COMPLETE完成安装,进入ambari页面:
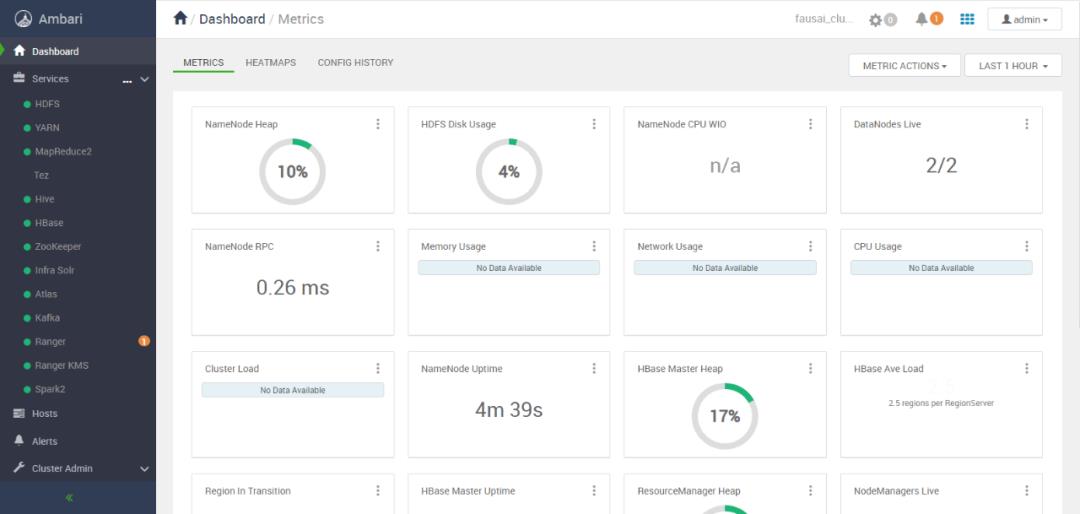
至此,HDP集群就成功安装好了。
12.简单测试
集群安装成功后,可以进行简单测试一下,这里选择Spark提供的example进行测试,在master节点上切换到hdfs用户,提交spark命令:
spark-submit --master yarn --deploy-mode client --class org.apache.spark.examples.SparkPi /usr/hdp/current/spark2-client/examples/jars/spark-examples_2.11-2.3.2.3.1.5.0-152.jar 300查看yarn页面:
http://master.mzy.com:8088/ui2/#/yarn-apps/apps
运行成功:

查看运行结果:

总结
总的来说,相对于逐个组件的手动安装方式,基于ambari安装大数据集群还是便捷很多,后面会在该集群上做一些大数据应用上的测试。
- THE END -
以上是关于Ambari-2.7.5整合HDP-3.1.5集群完整安装记录(内附安Ambari-2.7.5 + HDP-3.1.5安装包下载地址)的主要内容,如果未能解决你的问题,请参考以下文章