RN之Image
Posted
tags:
篇首语:本文由小常识网(cha138.com)小编为大家整理,主要介绍了RN之Image相关的知识,希望对你有一定的参考价值。
参考技术A 一个用于显示多种不同类型图片的React组件,包括网络图片、静态资源、临时的本地图片、以及本地磁盘上的图片(如相册)等。详细用法参阅 图片文档 。加载的图片有两种来源,一种是本地图片,一种是网络图片。
image加载本地图片的方法比较简单,一般只需要设置source 属性 即可,例如:
在React-native开发中,加载本地图片是不允许使用字符串变量来制定与加载的图片地址,因为React native实在编译时处理所有的require声明,而不是在运行时动态的处理,所以下面的写法是错误的:
加载网络图片和加载本地图片的方法相似,唯一的区别就是网络图片的地址的网络地址,所以要在图片的网络地址前加上uri标签。因为是网络图片,所以事先加载时不知道其大小,所以在设置图片的属性是需要设置图片的大小。例如:
加载网络图片是在运行时动态的处理的,所以加载网络图片是可以使用字符串变量来制定与加载的图片的地址,例如:
Image作为一个开发中经常使用的组件,他还有其他丰富的属性,详情请看官方文档之 Image组件
RN 使用第三方组件之react-native-image-picker
首先给个github地址:https://github.com/react-community/react-native-image-picker
该插件可以同时给iOS和Android两个平台下使用,但是需要配置下各自平台下的文件
1. 首先,安装下该插件:
npm install react-native-image-picker@latest --save
2. 先别link,先添加进来该库之后 再link.
下面对于各自平台进行配置即可.
iOS:
手动添加库 :
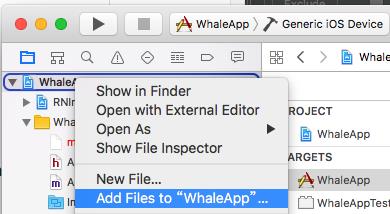
- In the XCode\'s "Project navigator", right click on your project\'s Libraries folder ➜
Add Files to <...> - Go to
node_modules➜react-native-image-picker➜ios➜ selectRNImagePicker.xcodeproj
=> 打开Xcode打开项目,点击根目录,右键选择 Add Files to \'XXX\',选中项目中的该路径下的文件即可:node_modules ➜ react-native-image-picker ➜ ios ➜ select RNImagePicker.xcodeproj
OK,添加进来之后,再进行 link命令. react-native link react-native-image-picker
3.Add RNImagePicker.a to Build Phases -> Link Binary With Libraries
(注意这里的只要出现RNImagePicker.就可以了,跟前面的图标没关系)

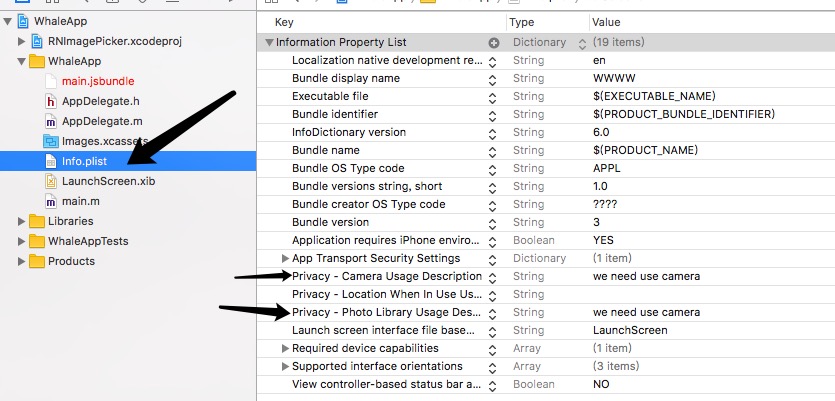
4.For iOS 10+, Add the NSPhotoLibraryUsageDescription and NSCameraUsageDescription keys to your Info.plist with strings describing why your app needs these permissions
=>对于适配iOS10,需要在info.plist中配置NSPhotoLibraryUsageDescription和NSCameraUsageDescription
(点击加号 选择privacy camera usage Description 和 privacy. PhotoLibraryUsageDescription )
iOS平台配置完毕.
Android:
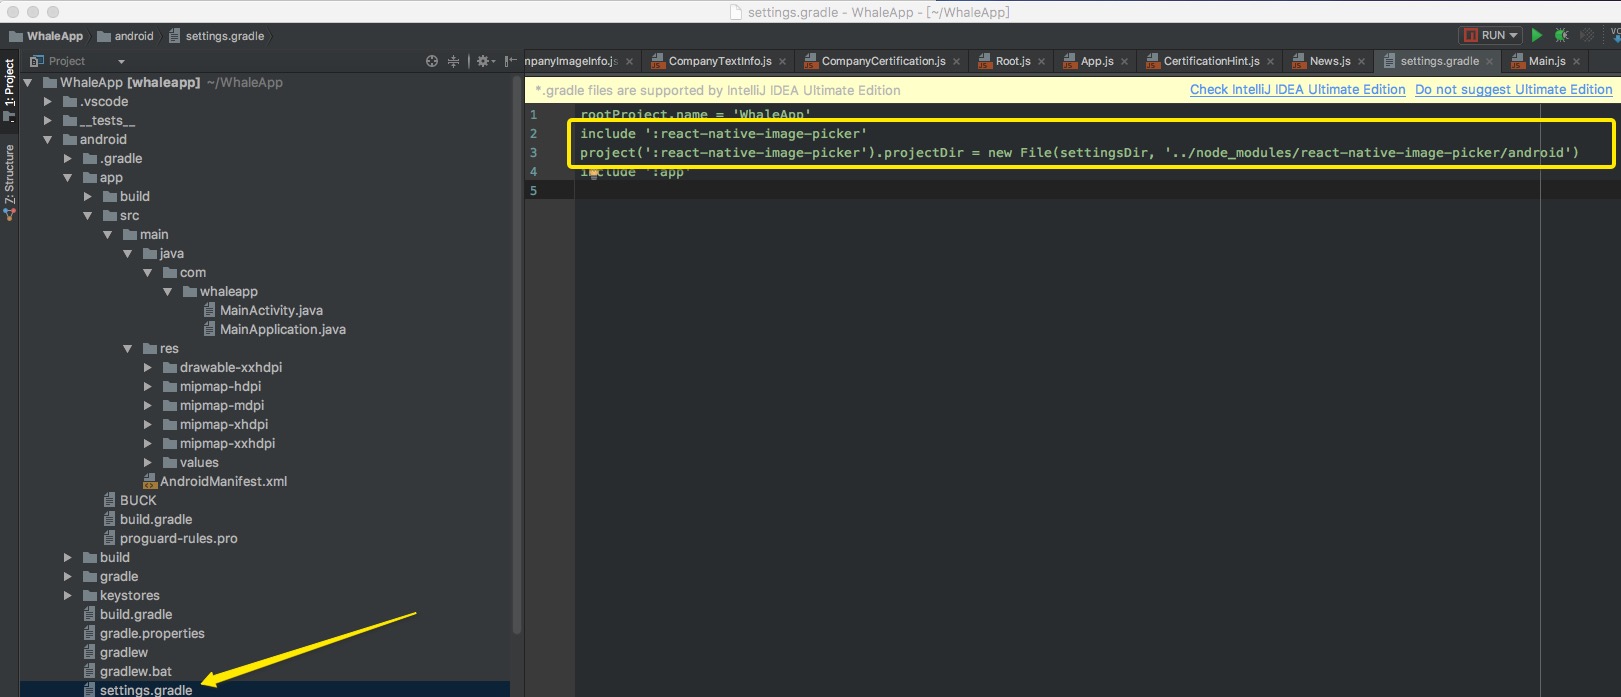
1.Add the following lines to android/settings.gradle:
|
1
2
|
include \':react-native-image-picker\'project(\':react-native-image-picker\').projectDir = new File(settingsDir, \'../node_modules/react-native-image-picker/android\') |
2.Add the compile line to the dependencies in android/app/build.gradle:
|
1
2
3
|
dependencies { compile project(\':react-native-image-picker\')} |

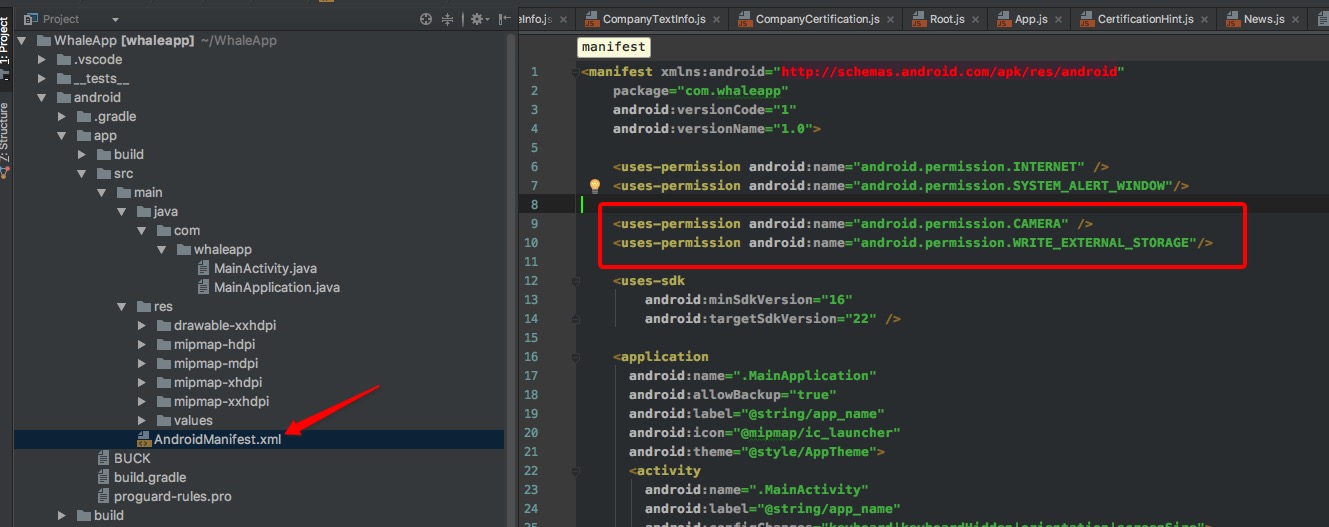
3.Add the required permissions in AndroidManifest.xml:
|
1
2
|
<uses-permission android:name="android.permission.CAMERA" /><uses-permission android:name="android.permission.WRITE_EXTERNAL_STORAGE"/> |
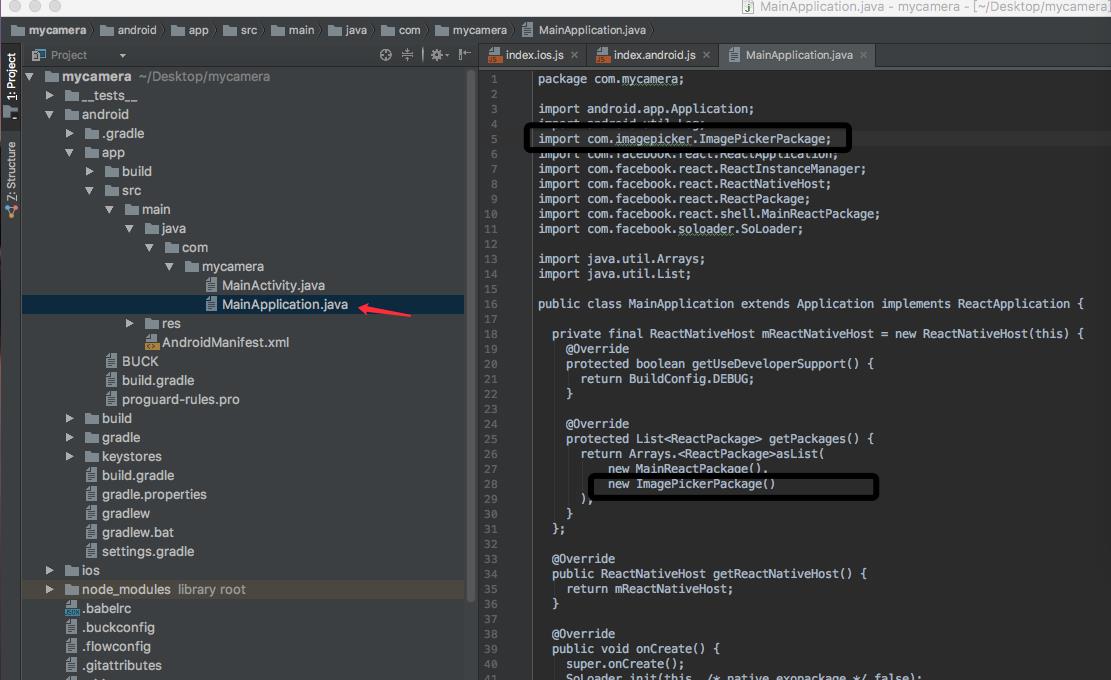
4.Add the import and link the package in MainApplication.java:

import com.imagepicker.ImagePickerPackage;


.........


 new ImagePickerPackage()
OK,安卓这边也配置完毕.
用法:
配置弹出框信息
/**底部弹出框选项*/
var photoOptions = {
title: \'请选择\',
cancelButtonTitle: \'取消\',
takePhotoButtonTitle: \'拍照\',
chooseFromLibraryButtonTitle: \'选择相册\',
quality: 0.75,
allowsEditing: true,
noData: false,
storageOptions: {
skipBackup: true,
path: \'images\'
}
}
点击事件
choosePhoto() {
ImagePicker.showImagePicker(photoOptions,(response) =>{
console.log(\'response\'+response);
if (response.didCancel){
showMsg("取消")
return
}else {
let source = { uri: response.uri };
}
})
}
以上是关于RN之Image的主要内容,如果未能解决你的问题,请参考以下文章