微信小程序实现点击左侧导航栏自动定位到对应的位置
Posted Bonny雨曦
tags:
篇首语:本文由小常识网(cha138.com)小编为大家整理,主要介绍了微信小程序实现点击左侧导航栏自动定位到对应的位置相关的知识,希望对你有一定的参考价值。
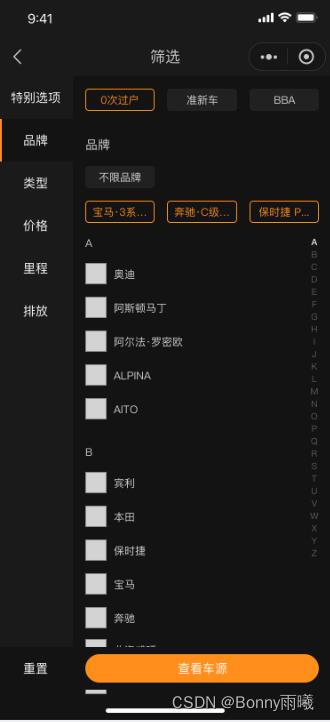
我要实现的效果是点击左侧导航栏,右侧区域会自动滚动到相应的位置显示,其中当选择品牌的时候,右侧是有索引栏的。效果图如下:
刚开始的时候我是用微信小程序自带的组件scroll-view是实现点击左侧导航栏的跳转功能,其中scroll-into-view就是用来跳转到指定的位置,scroll-into-view="index"的index是下面的view里面对应的id。
    <scroll-view scroll-y scroll-into-view=" index "  scroll-with-animation bindscroll="scroll">
      <view class="special" id="special">
        <view>特别选项</view>
      </view>
      <view class="brand" id="brand">
        <view>品牌</view>

      </view>
      <view class="type" id="type">

      </view>
      <view class="price" id="price"></view>
      <view class="mileage" id="mileage"></view>
      <view class="emissions" id="emissions"></view>
    </scroll-view>
然后右侧的字母索引这部分,我用到了vant的组件IndexBar 索引栏,这部分的实现代码如下
<van-index-bar highlight-color="#FFF" scroll-top=" scrollTop " index-list=" indexList " z-index="1000">
            <view wx:for=" customList " wx:key="index" class="indexBox">
              <van-index-anchor use-slot index=" item.firstLetter ">
                <text> item.firstLetter </text>
              </van-index-anchor>
              <van-cell clickable wx:for="item.list" wx:key="index" data-id="item.id" data-name="item.name" title="item.name" bindtap="gotoSelect" />
          </view>
          </van-index-bar>
highlight-color是指定了索引字符的高亮颜色 ,就是当你浏览的这个区域是什么索引的区域,这个字母就会显示为你指定的颜色;index-list就是你的索引列表,这个可以自定义,在js部分进行设置,页面上的索引列表就可以根据你设置的内容来显示了。
到这一步我发现了问题van-index-bar的索引效果出不来了,点击索引列表没有反应。
查阅资料才发现:由于 <van-index-bar /> 内部使用 wx.pageScrollTo 滚动到指定位置,因此只支持页面级滚动,无法在滚动元素中嵌套使用,例如:view 使用 overflow: scroll; 或者 scroll-view,具体可查看微信小程序文档
所以当同时scroll-view和van-index-bar的时候就出问题了。于是我只能修改思路,去掉scroll-view,用wx.pageScrollTo(Object object)和van-index-bar。即在js里面用
wx.pageScrollTo(
      selector:`#$kind`
)
来控制点击左侧导航栏,右侧自动滚动到指定的区域,上面代码里的kind是页面代码中view的id,这里要注意kind前一定要带#,否则识别不出来。
这个时候基本功能都实现了,但是还有点问题,就是当你滑动右侧的界面到下面的时候,左侧的导航栏会不见,为了提高使用感,我们需要将左侧的导航栏弄成悬浮的。只需要在左侧的导航栏的样式里面加上position: fixed;就可以悬浮了,再加上height: 100%;左侧导航栏的背景颜色就能够全屏展示。
微信小程序--仿京东UI样式顶部导航栏
我们先来看看京东的效果

分析
上端导航栏可以放置多个分类,可滑动
点击导航栏最右端按钮可以查看所有分类,同时背景模糊
内容部分右拉跳转到另外的分类
点击分类时导航栏的滑动部分自动滑动到合适的位置
我的实现

代码展示:
js
 /**

 * categoryView.js - 分类页面

 */

var fakeData = require(‘../../common/fakeData.js‘)

Page(

 {

 data: {

 categories: [‘全部‘],

 currentTab: 0,

 scrollLeftValue: 0,

 isPickerShow: false,

 isBgNeed: false,

 commodities: []

 },

 navbarTap: function (e) {

 //将顶部导航栏自动移动到合适的位置

 var idx = e.currentTarget.dataset.idx;

 this.autoScrollTopNav(idx);

 //自动收回

 if (this.data.isPickerShow) {

 this.navbarBtnClick();

 }

 this.setData({

 currentTab: idx

 })

 },

 /**

 * 导航栏右侧箭头按钮点击事件 - 切换模糊背景开闭状态以及展开栏开闭状态

 */

 navbarBtnClick: function(e) {

 this.data.isBgNeed = !this.data.isPickerShow

 this.setData({

 isBgNeed: this.data.isBgNeed

 })

 this.data.isPickerShow = !this.data.isPickerShow

 this.setData({

 isPickerShow: this.data.isPickerShow,

 })

 },

 /**

 * 页面左右滑动事件 - 构造滑动动画,若当前页面无数据,自动加载,需要完善加载函数

 */

 swiperChange: function (e) {

 var idx = e.detail.current;

 this.autoScrollTopNav(idx);

 this.setData({

 currentTab: e.detail.current,

 })

 //若无数据,自动加载

 if (this.data.commodities[idx].length == 0) {

 this.downloadMoreItem();

 }

 },

 /**

 * 上拉刷新

 */

 updateItem: function(e) {

 var idx = this.data.currentTab;

 this.data.commodities[idx] = [];

 this.downloadMoreItem();

 },

 /**

 * 下载更多数据 - 涉及后台拉取数据,需完善

 */

 downloadMoreItem: function(e) {

 var idx = this.data.currentTab;

 var commodities = this.data.commodities;

 //获取更多数据

 commodities[idx] = commodities[idx].concat(

 fakeData.requestForItemsOfType(commodities[idx].length, 10, this.data.categories[idx])

 );

 this.setData({

 commodities: this.data.commodities

 })

 console.log(this.data.commodities);

 },

 /**

 * 用于自动调整顶部类别滑动栏滑动距离,使滑动到用户可接受的合适位置,但自适应上还未考虑太周到

 * @param {number} idx - The index of currentTap.

 */

 autoScrollTopNav: function (idx) {

 if (idx <= 2) {

 this.data.scrollLeftValue = 0;

 } else {

 this.data.scrollLeftValue = (idx - 2) * 60;

 }

 this.setData({

 scrollLeftValue: this.data.scrollLeftValue

 })

 },

 /**

 * 模糊背景点击事件 - 点击模糊背景取消选择

 */

 bgTap: function(e) {

 if (this.data.isPickerShow) {

 this.navbarBtnClick();

 } else {

 return;

 }

 },

 /**

 * 商品点击事件 - 待完善

 */

 itemTap: function(e) {

 console.log("you selsct type " + this.data.currentTab + " item " + e.currentTarget.dataset.idx);

 },

 /**

 * 生命周期函数--监听页面加载,在加载的时候抓取数据

 */

 onLoad: function (options) {

 //首先获取类别项

 this.data.categories = fakeData.requestForCategories();

 this.setData({

 categories: this.data.categories

 })

 //然后默认请求 全部 分类

 for (var i in this.data.categories) {

 this.data.commodities.push([]);

 }

 this.data.commodities[0] = fakeData.requestForItemsOfType(0, 10);

 console.log(this.data.commodities);

 this.setData({

 commodities: this.data.commodities

 })

 }

})
json
{

 "navigationBarTitleText": "商城"

}
wxml
<!--categoryView.wxml-->

<import src="../../common/wxmlTemplate.wxml" />

<!--顶部分类导航条-->

<view class="">

 <view class="navbar">

 <view class="nav-1">

 <scroll-view scroll-x="true" class="nav-1-left" scroll-left="{{scrollLeftValue}}" wx:if="{{!isPickerShow}}">

 <view wx:for="{{categories}}" data-idx="{{index}}" class="item {{currentTab==index ? ‘active‘ : ‘‘}}"

 wx:key="unique" bindtap="navbarTap">{{item}}</view>

 </scroll-view>

 <view class="nav-1-left" wx:if="{{isPickerShow}}">

 <view class="item left2Font">{{categories[currentTab]}}</view>

 </view>

 <!-- <view class="blankblock"></view> -->

 <button class="navbarBtn" bindtap="navbarBtnClick">

 <image src="../../resources/返回.png" class="navbarBtn icon {{isPickerShow ? ‘active‘ : ‘‘}}"></image>

 </button>

 </view>

 <view class="picker" wx:if="{{isPickerShow}}">

 <view class="spitLine"></view>

 <view class="picker-contain">

 <view wx:for="{{categories}}" data-idx="{{index}}" class="item {{currentTab==index ? ‘active‘ : ‘‘}}"

 wx:key="unique" bindtap="navbarTap">{{item}}</view>

 </view>

 </view>

 </view>

 <swiper class="itemContainer" bindchange="swiperChange" current="{{currentTab}}">

 <block wx:for="{{categories}}" wx:for-item="cItem" wx:key="unique">

 <swiper-item>

 <scroll-view scroll-y="true" bindscrolltolower="downloadMoreItem" bindscrolltoupper="updateItem">

 <view class="child" bindtap="itemTap" wx:for="{{commodities[currentTab]}}"

 data-idx="{{index}}" wx:key="unique" wx:if="{{item.category == cItem || cItem == ‘全部‘}}">

 <template is="itemInfoTemplate" data="{{item}}"/>

 </view>

 </scroll-view>

 </swiper-item>

 </block>

 </swiper>

 <!-- 透明遮盖层 -->

 <view class="picker-contain-bg {{isPickerShow? ‘show‘ : ‘‘}}" wx:if="{{isBgNeed}}" bindtap="bgTap"></view>

</view>
wxss
@import "../../common/flexGridStyle.wxss";

@import "../../common/itemShowStyle.wxss";

page {

 display: flex;

 flex-direction: column;

 height: 100%;

}

.navbar {

 position: fixed;

 z-index: 2;

 background-color: RGB(247, 247, 247);

 width: 100%

}

.nav-1{

 flex: none;

 display: flex;

 background: #fff;

 background-color: RGB(247, 247, 247);

 height: 80rpx;

}

.nav-1 .wrapBar {

 display: flex;

}

.nav-1 .item{

 position: relative;

 text-align: center;

 font-size: 30rpx;

 line-height: 80rpx;

 color: gray;

 display: inline-block;

 padding-left: 20rpx;

 padding-right: 20rpx;

}

.nav-1 .item.active{

 color: black;

}

.nav-1 .item.active:after{

 content: "";

 display: block;

 position: absolute;

 bottom: 0;

 left: 0;

 right: 0;

 height: 4rpx;

 background: black;

}

button {

 background: transparent;

}

button::after {

 border: 0;

}

.navbarBtn {

 flex: 0 0 15%;

}

.navbarBtn.icon {

 transform: rotate(90deg);

 width: 20rpx;

 height: 40rpx;

}

.navbarBtn.icon.active{

 transform: rotate(-90deg);

}

.blankblock {

 flex: 0 0 10%;

}

.nav-1-left {

 white-space: nowrap;

 overflow: hidden;

 flex: 0 0 85%;

}

.picker {

}

.item.left2Font {

 color: black;

}

.spitLine {

 margin: 0;

 height: 2rpx;

 background-color: gray;

}

.picker-contain {

 display: flex;

 flex-wrap: wrap;

 justify-content: center;

}

.picker-contain-bg {

 position: fixed;

 background-color: black;

 transition: all 1s;

 width: 100%;

 height: 100%;

 z-index: 1;

 top: 0;

 opacity: 0

}

.picker-contain-bg.show {

 opacity: 0.5;

}

.picker-contain .item {

 background-color: RGB(215, 215, 215);

 border-radius:20px;

 margin: 20rpx;

 padding: 50rpx;

 padding-top: 10rpx;

 padding-bottom: 10rpx;

 font-size: 30rpx;

 color: RGB(161, 161, 161);

}

.picker-contain .item.active{

 color: black;

 background-color: RGB(153, 153, 153);

}

swiper-item scroll-view {

 display: inline;

}

swiper.itemContainer{

 margin-top: 80rpx;

 height: 1136rpx;

}
作者:极乐叔
链接:http://www.jianshu.com/p/03796e8c4504
來源:简书
著作权归作者所有。商业转载请联系作者获得授权,非商业转载请注明出处。
以上是关于微信小程序实现点击左侧导航栏自动定位到对应的位置的主要内容,如果未能解决你的问题,请参考以下文章