Spring Security —— 自定义配置
Posted _瞳孔
tags:
篇首语:本文由小常识网(cha138.com)小编为大家整理,主要介绍了Spring Security —— 自定义配置相关的知识,希望对你有一定的参考价值。
一:自定义资源认证规则
自定义资源认证规则可以通过重写WebSecurityConfigurerAdapter的configure方法实现,如下是一个简单案例。
@Configuration
public class WebSecurityConfig extends WebSecurityConfigurerAdapter
    @Override
    protected void configure(HttpSecurity http) throws Exception
        http.authorizeRequests()
        		// 匹配路径为/hello的请求,并直接放行
                .mvcMatchers("/hello").permitAll()  // 放行资源需要写在前面
                // 对剩下的所有请求拦截做登录验证
                .anyRequest().authenticated()
                .and()
                // 认证方式为表单登录
                .formLogin();
当然也可以不用一次性写完,还可以分两次写:
@Configuration
public class WebSecurityConfig extends WebSecurityConfigurerAdapter
    @Override
    protected void configure(HttpSecurity http) throws Exception
        http.authorizeRequests()
                .mvcMatchers("/hello1").permitAll()
                .anyRequest().authenticated();
        http.formLogin();
1.1:请求处理策略
请求处理策略由ExpressionUrlAuthorizationConfigurer的内部类AuthorizedUrl提供:
	public class AuthorizedUrl
		private List<? extends RequestMatcher> requestMatchers;
		private boolean not;

		/**
		 * 创建一个新的实例
		 * @param requestMatchers 要映射的RequestMatcher实例
		 */
		private AuthorizedUrl(List<? extends RequestMatcher> requestMatchers)
			this.requestMatchers = requestMatchers;


		protected List<? extends RequestMatcher> getMatchers()
			return this.requestMatchers;


		/**
		 * Negates the following expression.
		 * @return the @link ExpressionUrlAuthorizationConfigurer for further
		 */
		public AuthorizedUrl not()
			this.not = true;
			return this;


		/**
		 * 指定匹配资源访问需要的角色
		 * @param role 需要的角色(即用户、管理员等)。它不能以“ROLE_”开头,因为这是自动插入的
		 */
		public ExpressionInterceptUrlRegistry hasRole(String role)
			return access(ExpressionUrlAuthorizationConfigurer.hasRole(role));


		/**
		 * 指定匹配资源访问需要的角色
		 * @param roles 所需角色,可以穿多个,请求只要有其中任意一个角色即视为通过
		 */
		public ExpressionInterceptUrlRegistry hasAnyRole(String... roles)
			return access(ExpressionUrlAuthorizationConfigurer.hasAnyRole(roles));


		/**
		 * 指定匹配资源访问需要的特定权限。
		 * @param authority 要求的权限(类似于ROLE_USER, ROLE_ADMIN之类的).
		 */
		public ExpressionInterceptUrlRegistry hasAuthority(String authority)
			return access(ExpressionUrlAuthorizationConfigurer.hasAuthority(authority));


		/**
		 * 指定匹配资源访问需要的特定权限。
		 * @param authorities 要求的权限,可以传多个,请求只有有其中任意一个权限即视为通过
		 */
		public ExpressionInterceptUrlRegistry hasAnyAuthority(String... authorities)
			return access(ExpressionUrlAuthorizationConfigurer
					.hasAnyAuthority(authorities));


		/**
		 * 指定能访问匹配的资源的固定IP
		 * @param ipaddressExpression ip地址 (例如192.168.1.79) 或者本地子网(例如 192.168.0/24)
		 */
		public ExpressionInterceptUrlRegistry hasIpAddress(String ipaddressExpression)
			return access(ExpressionUrlAuthorizationConfigurer
					.hasIpAddress(ipaddressExpression));


		/**
		 * 任何请求都允许访问匹配资源
		 */
		public ExpressionInterceptUrlRegistry permitAll()
			return access(permitAll);


		/**
		 * 允许匿名用户访问匹配资源
		 */
		public ExpressionInterceptUrlRegistry anonymous()
			return access(anonymous);


		/**
		 * 匹配资源只允许rememberMe用户访问
		 */
		public ExpressionInterceptUrlRegistry rememberMe()
			return access(rememberMe);


		/**
		 * 不允许任何用户访问匹配资源
		 */
		public ExpressionInterceptUrlRegistry denyAll()
			return access(denyAll);


		/**
		 * 匹配资源只能被已认证用户访问
		 */
		public ExpressionInterceptUrlRegistry authenticated()
			return access(authenticated);


		/**
		 * 匹配资源只能被已认证且不是rememberMe用户访问
		 */
		public ExpressionInterceptUrlRegistry fullyAuthenticated()
			return access(fullyAuthenticated);


		/**
		 * 语文不好不知道怎么翻译,所以放上原文
		 * Allows specifying that URLs are secured by an arbitrary expression
		 * @param attribute the expression to secure the URLs (i.e.
		 * "hasRole('ROLE_USER') and hasRole('ROLE_SUPER')")
		 */
		public ExpressionInterceptUrlRegistry access(String attribute)
			if (not)
				attribute = "!" + attribute;

			interceptUrl(requestMatchers, SecurityConfig.createList(attribute));
			return ExpressionUrlAuthorizationConfigurer.this.REGISTRY;
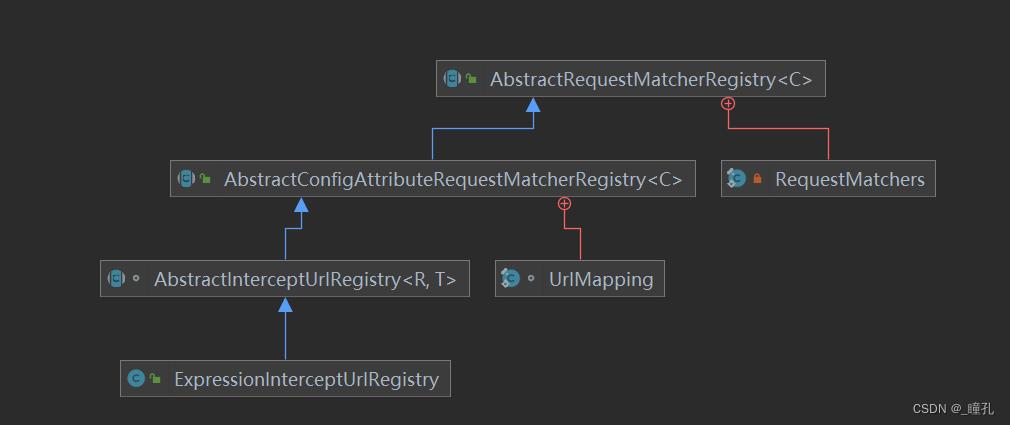
可以看到以上处理策略返回的都是ExpressionInterceptUrlRegistry类,可以通过下面的类图知道,ExpressionInterceptUrlRegistry继承了AbstractRequestMatcherRegistry抽象类

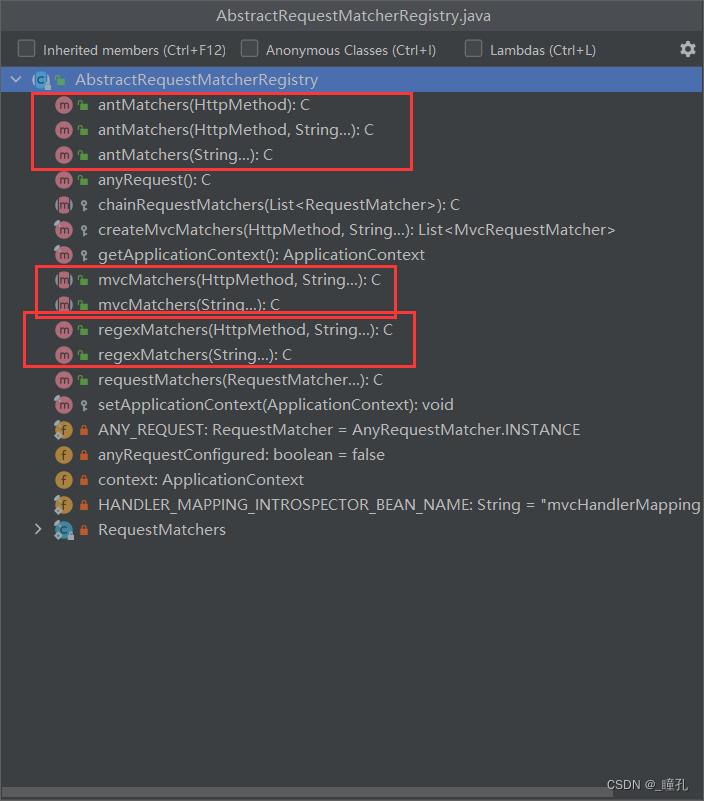
AbstractRequestMatcherRegistry抽象类的方法如下

可以看到其具有三大匹配器的所有重载方法,因此我们可以知道匹配器可以多次使用,以及不同匹配器可以搭配使用:
http.authorizeRequests()
	.mvcMatchers("/hello1").permitAll()
    .mvcMatchers("/hello2").permitAll()
http.authorizeRequests()
	.mvcMatchers("/hello1").permitAll()
    .antMatchers("/hello2").permitAll()
1.2:匹配器
Spring Security 提供了三种强大的匹配器(Matcher)来实现这一目标,分别是MVC 匹配器、Ant 匹配器以及正则表达式匹配器。
1.2.1:MVC 匹配器
MVC 匹配器的使用方法比较简单,就是基于 HTTP 端点的访问路径进行匹配,如下所示:
http.authorizeRequests()
	.mvcMatchers("/hello1").permitAll()
    .mvcMatchers("/hello2").permitAll()
查看mvcMatchers方法源码:
		@Override
		public MvcMatchersAuthorizedUrl mvcMatchers(String... patterns)
			return mvcMatchers(null, patterns);
可知,参数为不定项参数,因此可以同时传入多个字符串:
http.authorizeRequests()
	.mvcMatchers("/hello1", "/hello2").permitAll();
同时,如果我们想要对某个路径下的所有子路径都指定同样的访问控制,那么只需要在该路径后面添加“ * ”号即可,示例代码如下所示:
http.authorizeRequests()
	.mvcMatchers("/hello/*").permitAll();
实际开发中一个 Controller 中可能存在两个路径完全一样的 HTTP 端点,因为对于 HTTP 端点而言,就算路径一样,只要所使用的 HTTP 方法不同,那就是不同的两个端点。针对这种场景,MVC 匹配器还提供了重载的 mvcMatchers 方法,如下所示:
@Override
public MvcMatchersAuthorizedUrl mvcMatchers(HttpMethod method, String... mvcPatterns)
	return new MvcMatchersAuthorizedUrl(createMvcMatchers(method, mvcPatterns));
这样,我们就可以把 HTTP 方法作为一个访问的维度进行控制,示例代码如下所示:
http.authorizeRequests()
	.mvcMatchers(HttpMethod.POST, "/hello/*").permitAll();
而如果没有匹配器匹配到的路径其访问不受任何的限制,如下示例:
http.authorizeRequests()
    .mvcMatchers(HttpMethod.POST, "/hello").authenticated()
    .mvcMatchers(HttpMethod.GET, "/hello").authenticated()
如果仅仅只配置了这两个,那么如果有个"/hello1"请求,将会直接获取资源,不收限制,效果类似于下面:
http.authorizeRequests()
    .mvcMatchers(HttpMethod.POST, "/hello").authenticated()
    .mvcMatchers(HttpMethod.GET, "/hello").authenticated()
    .anyRequest().permitAll();
1.2.2:Ant 匹配器
Ant 匹配器的表现形式和使用方法与前面介绍的 MVC 匹配器非常相似,它也提供了如下所示的三个重载方法来完成请求与 HTTP 端点地址之间的匹配关系:
	public C antMatchers(HttpMethod method)
		return antMatchers(method, new String[]  "/**" );


	public C antMatchers(HttpMethod method, String... antPatterns)
		Assert.state(!this.anyRequestConfigured, "Can't configure antMatchers after anyRequest");
		return chainRequestMatchers(RequestMatchers.antMatchers(method, antPatterns));


	public C antMatchers(String... antPatterns)
		Assert.state(!this.anyRequestConfigured, "Can't configure antMatchers after anyRequest");
		return chainRequestMatchers(RequestMatchers.antMatchers(antPatterns));
从方法定义上不难明白,我们可以组合指定请求的 HTTP 方法以及匹配的模式,例如:
http.authorizeRequests()
    .antMatchers("/hello").authenticated();
虽然,从使用方式上看,Ant 匹配器和 MVC 匹配器并没有什么区别,但在日常开发过程中,一般推荐使用 MVC 匹配器而不是 Ant 匹配器,原因就在于 Ant 匹配器在匹配路径上有一些风险,主要体现在对于"/"的处理上。为了更好地说明,我举一个简单的例子。
基于上面的这行配置,如果你发送一个这样的 HTTP 请求,但事实上这个请求是匹配不到的
http://localhost:8080/hello
现在,如果你把 HTTP 请求调整为这样,在请求地址最后添加了一个”/”符号,那么就会得到正确的访问结果:
http://localhost:8080/hello/
显然,Ant 匹配器处理请求地址的方式有点让人感到困惑,而 MVC 匹配器则没有这个问题,无论在请求地址最后是否存在“/”符号,它都能完成正确的匹配。
1.2.3:正则表达式匹配器
最后我要介绍的是正则表达式匹配器,它提供了如下所示的两个配置方法:
	public C regexMatchers(String... regexPatterns)
		Assert.state(!this.anyRequestConfigured, "Can't configure regexMatchers after anyRequest");
		return chainRequestMatchers(RequestMatchers.regexMatchers(regexPatterns));


	public C requestMatchers(RequestMatcher... requestMatchers)
		Assert.state(!this.anyRequestConfigured, "Can't configure requestMatchers after anyRequest");
		return chainRequestMatchers(Arrays.asList(requestMatchers));
使用这一匹配器的主要优势在于它能够基于复杂的正则表达式对请求地址进行匹配,这是 MVC 匹配器和 Ant 匹配器无法实现的,可以看一下如下所示的这段配置代码:
http.authorizeRequests()
   .mvcMatchers("/email/email:.*(.+@.+\\\\.com)")
   .permitAll()
   .anyRequest()
   .denyAll();
可以看到,这段代码就对常见的邮箱地址进行了匹配,只有输入的请求是一个合法的邮箱地址才能允许访问。
二:自定义登录界面
自定义登录页面配置如下:
@Configuration
public class WebSecurityConfig extends WebSecurityConfigurerAdapter
    @Override
    protected void configure(HttpSecurity http) throws Exception
        http.authorizeRequests()
                .regexMatchers("/login1").permitAll()  // 注意要开放登录请求接口
                .mvcMatchers("/hello1").permitAll()
                .anyRequest().authenticated()
                .and()
                .formLogin()
                .loginPage("/login1")  // 指定登录页面路径
                .loginProcessingUrl("/doLogin");  // 自定义登录界面就必须指定登录请求路径
当然一般来说这里应该要演示页面跳转,但是在开发中,路由跳转应该由前端控制,后端不应该干预路由,后端路由通常用在前后端不分离项目中,而现在前后端分离才是主流的开发方式,所以我就不演示跳转登录页面了,但我会说一下流程
当客户端发送请求时,会进入Spring Security的过滤器,如果请求访问的资源需要认证,而客户端没有携带认证信息,那么会在请求到达FilterSecurityInterceptor时会拦截请求并抛出AccessDeniedException异常,抛出的AccessDeniedException异常会被ExceptionTranslationFilter捕获,这个Filter中会调用LoginUrlAuthenticationEntryPoint#commence方法给客户端302,要求客户端重定向请求loginPage()配置的路径,默认为/login
然后前后端分离与不分离的处理方式就在这一步开始有所区分,对于不分离的项目,后端控制路由,那么需要写如下controller
@Controller
public class TestController
    @GetMapping("/login1")
    public String login1()
        return "login.html";
从上面的配置我们知道,当我们自定义了登录路径,也就是loginPage("/login1"),那么ExceptionTranslationFilter捕获到未登录异常的时候会要求客户端访问我们自定义的登录路径,也就是"/login1",然后再由我们自己写的login1()方法去重定向到我们自己写的login.html页面
要注意的是,捕获到未认证异常,客户端会重定向请求"/login1",而如果"/login1"是跳转页面指令,那么才会跳转页面,而前后端分离的处理,就是在login1()方法中直接返回权限失败信息而非页面跳转,自定义一个状态码,前端的响应拦截器拦截后识别状态码由前端进行相关处理,前端可以选择跳转到页面,也可以选择弹出一个登录窗提示用户,这些都由前端决定,可见这种处理方式比后端路由更加灵活自由。当然目前来说可以借助loginPage实现这一效果,但是事实上Spring Security有更直接的方法,也就是通过successHandler来实现,这个会在后面详细说明。
说完登录页面,那么接下来是登录请求,也就是我们配置的loginProcessingUrl("/doLogin"),我们可以看看处理登录的formLogin()源码:
	public FormLoginConfigurer<HttpSecurity> formLogin() throws Exception
		return getOrApply(new FormLoginConfigurer<>());
可见其调用了FormLoginConfigurer的实现,从其源码可以看到,FormLoginConfigurer是调用了UsernamePasswordAuthenticationFilter过滤器,
	public FormLoginConfigurer()
		super(new UsernamePasswordAuthenticationFilter(), null);
		usernameParameter("username");
		passwordParameter("password");
而过滤器会调用attemptAuthentication方法处理登录请求,我们从源码可以看出,登录请求必须是POST请求,否则会抛出异常Authentication method not supported: " + request.getMethod()
public Authentication attemptAuthentication(HttpServletRequest request,
			HttpServletResponse response) throws AuthenticationException
		if (postOnly && !request.getMethod().equals("POST"))
			throw new AuthenticationServiceException(
					"Authentication method not supported: " + request.getMethod());


		String username = obtainUsername(request);
		String password = obtainPassword(request);

		if (username == null)
			username = "";


		if (password == null)
			password = "";


		username = username.trim();

		UsernamePasswordAuthenticationToken authRequest = new UsernamePasswordAuthenticationToken(
				username, password);

		// Allow subclasses to set the "details" property
		setDetails(request, authRequest);

		return this.getAuthenticationManager().authenticate(authRequest);
可以看到,这个过滤器调用obtainUsername()和obtainPassword()方法从请求中分别拿到用户名和密码,但我们需要注意的是,他怎么知道用户名和密码是http请求里的哪个字段?Spring Security当然不知道,因此Spring Security默认用户名字段默认叫做username,密码字段默认叫做password,因此如果不做额外配置,登录请求时,用户名必须叫做username,密码必须叫做password,否则无法正确认证,我们可以继续看源码,看Spring Security的处理

进入obtainUsername()方法,可以看到,usernameParameter是用户名字段名
	@Nullable
	protected String obtainUsername(HttpServletRequest request)
		return request.getParameter(usernameParameter);
查看usernameParameter的定义,可以看到,用户名字段默认叫做username,密码字段默认叫做password
	public static final String SPRING_SECURITY_FORM_USERNAME_KEY = "username";
	public static final String SPRING_SECURITY_FORM_PASSWORD_KEY = "password";

	private String usernameParameter = SPRING_SECURITY_FORM_USERNAME_KEY;
	private String passwordParameter = SPRING_SECURITY_FORM_PASSWORD_KEY;
如果我们要自定义用户名和密码,可以这样指定:
@Configuration
public class WebSecurityConfig extends WebSecurityConfigurerAdapter
    @Override
    protected void configure(HttpSecurity http) throws Exception
        http.authorizeRequests()
                .regexMatchers("/login1").permitAll()
                .mvcMatchers("/hello1").permitAll()
                .anyRequest().authenticated()
                .and()
                .formLogin()
                .loginPage("/login1")
                .loginProcessingUrl("/doLogin")
                .usernameParameter("user")	// 自定义用户名字段名
                .passwordParameter("psd");	// 自定义密码字段名
查看源码可以知道,usernameParameter调用了setUsernameParameter方法,并把我们自定义的字符串传了进去
以上是关于Spring Security —— 自定义配置的主要内容,如果未能解决你的问题,请参考以下文章