hyperedger +fabric 区块链实践
Posted 朱培
tags:
篇首语:本文由小常识网(cha138.com)小编为大家整理,主要介绍了hyperedger +fabric 区块链实践相关的知识,希望对你有一定的参考价值。
---------------------------------------------------------------------------------------------
[版权申明:本文系作者原创,转载请注明出处]
文章出处:https://blog.csdn.net/sdksdk0/article/details/82222792
作者:朱培 ID:sdksdk0
--------------------------------------------------------------------------------------------
一、Fabric开发基础必备
hash:相同的数据内容,会生成相同的hash值。
区块:区块有区块的编号、交易数据、时间戳等来生成一系列的哈希值
挖矿:去计算一个随机数、满足我们hash值的一个随机数。
安装nodejs环境:
https://nodejs.org/en/download/
下载安装
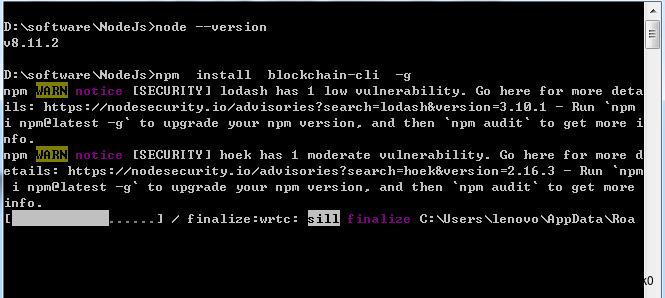
windows安装NodeJS
npm install blockchain-cli -g

安装完成后直接输入 blockchain 进入
输入内容,从创世区块开始,例如我这里输入bc

挖矿,通过 mine 这个命令
例如: mime "ab 100"

可以通过创世区块的名称 我这边是 bc来查看区块,目前一共两个区块了。当前区块的 pre Hash就是上一个区块的哈希值。
挖矿的时候回有竞争的问题,类似于在猜某个数字,猜中表示为挖矿成功,然后广播给各个节点,然后再验证是否正确,如果正确,就设置为下一个区块。假设有100个人,如果两个人同时猜对了,就会出现两个分叉的问题,矿池与矿池之间的竞争,
hash值的4个前导0,是有效散列的最低要求,所需的前导0的数量为难度。
https://anders.com/blockchain/block.html
http://remix.ethereum.org/#optimize=false&version=builtin
有时报错mock compiler: source not found的话可以使用这个地址,就换成这个地址:https://ethereum.github.io/browser-solidity/#optimize=false&version=soljson-v0.4.23+commit.124ca40d.js
pragma solidity ^0.413;
contract Ballot
struct Voter
uint weight;
bool voted;
uint8 vote;
address delegate;
struct Proposal
uint voteCount;
address chairperson;
mapping(address => Voter) voters;
Proposal[] proposals;
/// Create a new ballot with $(_numProposals) different proposals.
function Ballot(uint8 _numProposals) public
chairperson = msg.sender;
voters[chairperson].weight = 1;
proposals.length = _numProposals;
/// Give $(toVoter) the right to vote on this ballot.
/// May only be called by $(chairperson).
function giveRightToVote(address toVoter) public
if (msg.sender != chairperson || voters[toVoter].voted) return;
voters[toVoter].weight = 1;
/// Delegate your vote to the voter $(to).
function delegate(address to) public
Voter storage sender = voters[msg.sender]; // assigns reference
if (sender.voted) return;
while (voters[to].delegate != address(0) && voters[to].delegate != msg.sender)
to = voters[to].delegate;
if (to == msg.sender) return;
sender.voted = true;
sender.delegate = to;
Voter storage delegateTo = voters[to];
if (delegateTo.voted)
proposals[delegateTo.vote].voteCount += sender.weight;
else
delegateTo.weight += sender.weight;
/// Give a single vote to proposal $(toProposal).
function vote(uint8 toProposal) public
Voter storage sender = voters[msg.sender];
if (sender.voted || toProposal >= proposals.length) return;
sender.voted = true;
sender.vote = toProposal;
proposals[toProposal].voteCount += sender.weight;
function winningProposal() public constant returns (uint8 _winningProposal)
uint256 winningVoteCount = 0;
for (uint8 prop = 0; prop < proposals.length; prop++)
if (proposals[prop].voteCount > winningVoteCount)
winningVoteCount = proposals[prop].voteCount;
_winningProposal = prop;
metamask 以太坊钱包:
下载好之后,在谷歌浏览器中添加扩展插件;metamask_extension_4_3_0_0.crx
获得测试币的方法:
http://ju.outofmemory.cn/entry/344321
pragma solidity ^0.4.13;
contract Apple
uint price;
uint size;
function Apple() public
price = 11000;
size = 15;
function getSize() constant returns(uint)
return size;
二、Hyperledger
区块是一组有序的交易集合,在通道中经过加密后与前序区块连接。
Instancetiate -实例化
Invoke - 调用
Leading Peer -主导节点
https://cn.hyperledger.org/members
三、hyperedger fabric centos 环境搭建
1、安装cURL
查看版本: curl --version
2、安装docker 和docker compose
yum install –y docker gcc gcc-c++
首先安装epel扩展源:
sudo yum -y install epel-release
然后安装python-pip
sudo yum -y install python-pip
pip install docker-compose
docker-compose --version #查询版本
yum -y install nodejs npm --enablerepo=epel #使用epel源安装nodejs及npm
验证npm安装:
npm install npm@latest
查看npm版本:
npm -v
3、go语言
yum install go
4、Nodejs运行环境
curl -o- https://raw.githubusercontent.com/creationix/nvm/v0.31.1/install.sh | bash
vim ~/.bashrc
export NVM_DIR="/root/.nvm"
[ -s "$NVM_DIR/nvm.sh" ] && . "$NVM_DIR/nvm.sh" # This loads nvm
source ~/.bashrc
nvm install 6.9.5
5、安装git
1.安装依赖包:
sudo yum install curl-devel expat-devel gettext-devel openssl-devel zlib-devel gcc perl-ExtUtils-MakeMaker
2.下载git源码并解压:
$ wget https://github.com/git/git/archive/v2.3.0.zip
$ unzip v2.3.0.zip
$ cd git-2.3.0
3.编译安装:
3.编译安装:
make prefix=/usr/local/git all
sudo make prefix=/usr/local/git install
4.修改环境变量:
sudo vim /etc/profile
然后在文件的最后一行,添加下面的内容,然后保存退出。
export PATH=/usr/local/git/bin:$PATH
5.使用source命令立即保存
source /etc/profile
6.查看版本
git version
镜像安装
1、下载Hyperledger的simple demo
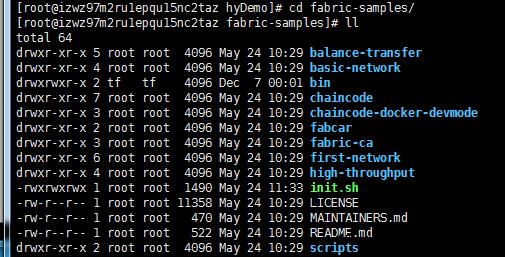
git clone https://github.com/hyperledger/fabric-samples.git
cd 到这个目录中
2、平台特定二进制文件安装:
curl -sSL https:goo.gl/byy2Qj | bash -s 1.0.5
离线地址:
选择:linux-amd64-1.1.0/进行下载
将这个文件解压到fabric-samples中的bin目录下
3、启动文件配置
这个时候还需要一个init.sh
https://raw.githubusercontent.com/hyperledger/fabric/v1.0.5/scripts/bootstrap.sh
注释掉这两行内容:
echo "===> Downloading platform binaries"
curl https://nexus.hyperledger.org/content/repositories/releases/org/hyperledger/fabric/hyperledger-fabric/$ARCH-$VERSION/hyperledger-fabric-$ARCH-$VERSION.tar.gz | tar xz

4、赋权:
chmod -R 777 init.sh
5、运行:
./init.sh 1.0.5
这个时候会安装镜像
-----------------------
备用网址:
https://github.com/hyperledger/fabric/blob/master/scripts/bootstrap.sh
https://raw.githubusercontent.com/hyperledger/fabric/master/scripts/
wget https://github.com/hyperledger/fabric-samples/archive/release-1.0.zip
https://registry.docker-cn.com
---------------------------------
在fabric-samples文件夹中
$ cd first-network/
先把所有网络关闭掉:
./byfn.sh -m down
然后再开始
$ ./byfn.sh -m generate
生成初始的区块:
.$ ../bin/cryptogen generate --config=./crypto-config.yaml
$ export FABRIC_CFG_PATH=$PWD
../bin/configtxgen -profile TwoOrgsOrdererGenesis -outputBlock ./channel-artifacts/genesis.block
生成应用通道的配置信息
$ export CHANNEL_NAME=mychannel
$ ../bin/configtxgen -profile TwoOrgsChannel -outputCreateChannelTx ./channel-artifacts/channel.tx -channelID $CHANNEL_NAME
生成锚节点配置更新文件
$ ../bin/configtxgen -profile TwoOrgsChannel -outputAnchorPeersUpdate ./channel-artifacts/Org1MSPanchors.tx -channelID $CHANNEL_NAME -asOrg Org1MSP
$ ../bin/configtxgen -profile TwoOrgsChannel -outputAnchorPeersUpdate ./channel-artifacts/Org2MSPanchors.tx -channelID $CHANNEL_NAME -asOrg Org2MSP
操作网络
编辑docker-compose-cli.yaml ,注释command命令
# command: /bin/bash -c './scripts/script.sh $CHANNEL_NAME $DELAY; sleep $TIMEOUT'
在命令行执行:
$ CHANNEL_NAME=$CHANNER_NAME TIMEOUT=600 docker-compose -f docker-compose-cli.yaml up -d

创建和加入通道
进入docker容器
$ docker exec -it cli bash
进入docker中创建通道:
$ export CHANNEL_NAME=mychannel
peer channel create -o orderer.example.com:7050 -c $CHANNEL_NAME -f ./channel-artifacts/channel.tx --tls $CORE_PEER_TLS_ENABLED --cafile /opt/gopath/src/github.com/hyperledger/fabric/peer/crypto/ordererOrganizations/example.com/orderers/orderer.example.com/msp/tlscacerts/tlsca.example.com-cert.pem
加入通道
peer channel join -b mychannel.block
链码:
peer chaincode install -n mycc -v 1.0 -p github.com/hyperledger/fabric/examples/chaincode/go/chaincode_example02
实例化链码
peer chaincode instantiate -o orderer.example.com:7050 --tls $CORE_PEER_TLS_ENABLED --cafile /opt/gopath/src/github.com/hyperledger/fabric/peer/crypto/ordererOrganizations/example.com/orderers/orderer.example.com/msp/tlscacerts/tlsca.example.com-cert.pem -C $CHANNEL_NAME -n mycc -v 1.0 -c '"Args":["init","a", "100", "b","200"]' -P "OR('Org1MSP.member','Org2MSP.member')"
查询:
peer chaincode query -C $CHANNEL_NAME -n mycc -c '"Args":["query","a"]'
现操作A转账给B 10 块钱
peer chaincode invoke -o orderer.example.com:7050 --tls $CORE_PEER_TLS_ENABLED --cafile /opt/gopath/src/github.com/hyperledger/fabric/peer/crypto/ordererOrganizations/example.com/orderers/orderer.example.com/msp/tlscacerts/tlsca.example.com-cert.pem -C $CHANNEL_NAME -n mycc -c '"Args":["invoke","a","b","10"]'
查询 a 账户的金额
peer chaincode query -C $CHANNEL_NAME -n mycc -c '"Args":["query","a"]'
遇到的问题:
在阿里的服务器(CentOS 7.3、CentOS 7.2、Ubuntu 16)运行first-network报错
运行cli容器的script.sh时候,创建渠道时cli控制台错误摘要:

添加这样一行:
- GODEBUG=netdns=go
1
你删除的镜像可能被其他容器使用,可以试试这条命令:
root@192.168.0.109:~# sudo docker rmi -f 1dd
docker rm$(docker ps -a -q)
docker rmi $(docker images -q)
四、nodejs sdk和fabice合约互动。
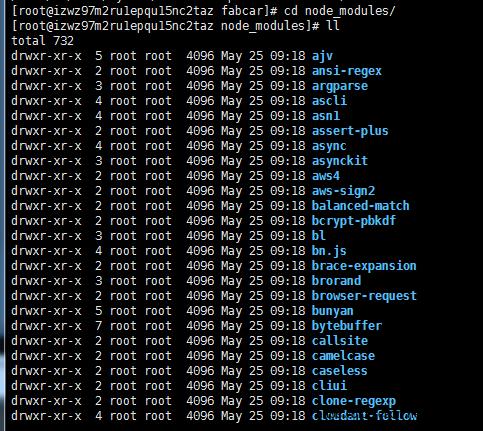
1、在fabric-samples-release-1.0/fabcar目录下执行: npm install 进行安装node_modules,安装好之后就会有很多文件出现。

2、杀掉活跃的相关容器
docker rm -f $(docker ps -aq)
3、清理缓存的网络
docker network prune
4、删除fabcar智能合约的底层链码图像,如果是第一次运行这个项目可以不执行(可以通过 docker images来查询需要删除的镜像)
docker rmi dev-peer0.org1.example.com-mycc-1.0-384f11f484b9302df90b453200cfb25174305fce8f53f4e94d45ee3b6cab0ce9
5、启动网络
./startFabric.sh node
6、注册管理员用户
node enrollAdmin.js
注册user1 用户
node registerUser.js查询账目
node query.js运行结果:
Store path:/Users/fujinliang/fabric/fabric-samples/fabcar/hfc-key-store
Successfully loaded user1 from persistence
Query has completed, checking results
Response is ["Key":"CAR0", "Record":"colour":"blue","make":"Toyota","model":"Prius","owner":"Tomoko","Key":"CAR1", "Record":"colour":"red","make":"Ford","model":"Mustang","owner":"Brad","Key":"CAR2", "Record":"colour":"green","make":"Hyundai","model":"Tucson","owner":"Jin Soo","Key":"CAR3", "Record":"colour":"yellow","make":"Volkswagen","model":"Passat","owner":"Max","Key":"CAR4", "Record":"colour":"black","make":"Tesla","model":"S","owner":"Adriana","Key":"CAR5", "Record":"colour":"purple","make":"Peugeot","model":"205","owner":"Michel","Key":"CAR6", "Record":"colour":"white","make":"Chery","model":"S22L","owner":"Aarav","Key":"CAR7", "Record":"colour":"violet","make":"Fiat","model":"Punto","owner":"Pari","Key":"CAR8", "Record":"colour":"indigo","make":"Tata","model":"Nano","owner":"Valeria","Key":"CAR9", "Record":"colour":"brown","make":"Holden","model":"Barina","owner":"Shotaro"]
查询某一个的账目
修改 query.js , 可以查询key为CAR4 的记录
const request =
//targets : --- letting this default to the peers assigned to the channel
chaincodeId: 'fabcar',
fcn: 'queryCar',
args: ['CAR4']
;
运行 node query.js,
Response is "colour":"black","make":"Tesla","model":"S","owner":"Adriana"更新账目
修改 invoke.js, 添加一条数据
var request =
//targets: let default to the peer assigned to the client
chaincodeId: 'fabcar',
fcn: 'createCar',
args: ['CAR10', 'Chevy', 'Volt', 'Red', 'Nick'],
chainId: 'mychannel',
txId: tx_id
;
执行 node invoke.js,可以添加一条数据进入账目
修改 query.js,
const request =
//targets : --- letting this default to the peers assigned to the channel
chaincodeId: 'fabcar',
fcn: 'queryCar',
args: ['CAR10']
;
运行 node query.js ,
Response is "colour":"Red","make":"Chevy","model":"Volt","owner":"Nick"修改 invoke.js, 修改CAR10的拥有者为 Dave
var request =
//targets: let default to the peer assigned to the client
chaincodeId: 'fabcar',
fcn: 'changeCarOwner',
args: ['CAR10', 'Dave'],
chainId: 'mychannel',
txId: tx_id
;
执行 node invoke.js, 再运行 node query.js , 运行结果:
Response is "colour":"Red","make":"Chevy","model":"Volt","owner":"Dave"
五、链码开发环境搭建:
1、链码存放: 将chaincode002 复制到fabric-samples/chaincode目录下
2、开启3个终端
终端1:启动网络
cd chaincode-docker-devmode/
docker-compose -f docker-compose-simple.yaml up
遇到的问题:启动时报错:
Error: Invalid channel create transaction : mismatched channel ID mycc != myc
解决方案:
修改chaincode-docker-devmode目录下的scripts.sh
将里面的myc 换成mycc

终端2:编译且启动链码
docker exec -it chaincode bash
cd chaincode002
go build
CORE_PEER_ADDRESS=peer:7051 CORE_CHAINCODE_ID_NAME=myccc:0 ./chaincode002
终端3: 操作链码
docker exec -it cli bash
安装链码
peer chaincode install -p chaincodedev/chaincode/chaincode002 -n myccc -v 0
实例化链码
peer chaincode instantiate -n mycc -v 0 -c '"Args":["str","helloworld"]' -C mycc
以上是关于hyperedger +fabric 区块链实践的主要内容,如果未能解决你的问题,请参考以下文章