Android蓝牙开发
Posted u小鬼
tags:
篇首语:本文由小常识网(cha138.com)小编为大家整理,主要介绍了Android蓝牙开发相关的知识,希望对你有一定的参考价值。
前言
这是我大二做的一个智能小车配套使用的APP,用android的蓝牙接口实现,当时有些os相关的内容Thread之类还有一些Android接口、java语法,我其实不是很理解。学了操作系统,再来回顾一下,并整理项目代码,项目具有很高的复用性,特别是蓝牙部分。
reference
项目参考了稚晖君的开源项目 https://github.com/peng-zhihui/BluetoothTouch
Android蓝牙开发官方文档 https://developer.android.google.cn/guide/topics/connectivity/bluetooth
开启蓝牙权限
为APP开启蓝牙权限,将以下config添加到项目配置文件AndroidManifest.xml中:
<manifest>
    <!-- Request legacy Bluetooth permissions on older devices. -->
    <uses-permission android:name="android.permission.BLUETOOTH"
                     android:maxSdkVersion="30" />
    <uses-permission android:name="android.permission.BLUETOOTH_ADMIN"
                     android:maxSdkVersion="30" />

    <!-- Needed only if your app looks for Bluetooth devices.
         If your app doesn't use Bluetooth scan results to derive physical
         location information, you can strongly assert that your app
         doesn't derive physical location. -->
    <uses-permission android:name="android.permission.BLUETOOTH_SCAN" />

    <!-- Needed only if your app makes the device discoverable to Bluetooth
         devices. -->
    <uses-permission android:name="android.permission.BLUETOOTH_ADVERTISE" />

    <!-- Needed only if your app communicates with already-paired Bluetooth
         devices. -->
    <uses-permission android:name="android.permission.BLUETOOTH_CONNECT" />

    <!-- Needed only if your app uses Bluetooth scan results to derive physical location. -->
    <uses-permission android:name="android.permission.ACCESS_FINE_LOCATION" />
    ...
</manifest>
设置蓝牙
这个在MainActivity中设置,分为两步:
- 获取
BluetoothAdapter,这是所有蓝牙活动的基础;
protected void onCreate(Bundle savedInstanceState)

    super.onCreate(savedInstanceState);
    // Get local Bluetooth adapter
    if (Build.VERSION.SDK_INT >= Build.VERSION_CODES.JELLY_BEAN_MR2)
        mBluetoothAdapter = ((BluetoothManager) getSystemService(Context.BLUETOOTH_SERVICE)).getAdapter();
    else
        mBluetoothAdapter = BluetoothAdapter.getDefaultAdapter();

    // If the adapter is null, then Bluetooth is not supported
    if (mBluetoothAdapter == null)
        showToast("Bluetooth is not available", Toast.LENGTH_LONG);
        finish();
        return;
- 使能蓝牙,首先确定蓝牙是否启用,若未启用,调用
startActivityForResult,传递ACTION_REQUEST_ENABLE目标动作,这些 大写变量 实际是Android定义好的字符串;若以启用,传入BluetoothHandler和BluetoothAdapter,实例化我们自定义的蓝牙服务类BluetoothChatService(后面慢慢介绍,实际就是蓝牙接口封装起来的一个类);
public void onStart()

	super.onStart();
    // If BT is not on, request that it be enabled.
    // setupChat() will then be called during onActivityResult
    if (!mBluetoothAdapter.isEnabled())
        Intent enableIntent = new Intent(BluetoothAdapter.ACTION_REQUEST_ENABLE);
        startActivityForResult(enableIntent, REQUEST_ENABLE_BT);
     else
        setupBTService(); // Otherwise, setup the chat session


private void setupBTService()

    if (mChatService != null)
        return;
    if (mBluetoothHandler == null)
        mBluetoothHandler = new BluetoothHandler(this);
    mChatService = new BluetoothChatService(mBluetoothHandler, mBluetoothAdapter); // Initialize the BluetoothChatService to perform Bluetooth connections
连接设备
通过retry判断是否断线重连,否则创建新连接,像http协议有 ipv4 和 ipv6 地址,以太网协议有 MAC 地址,蓝牙也有地址,在蓝牙构建的网络中标识设备或者蓝牙对象。
private void connectDevice(Intent data, boolean retry)

    if (retry)
        if (btDevice != null && !stopRetrying)
            mChatService.start(); // This will stop all the running threads
            mChatService.connect(btDevice, btSecure); // Attempt to connect to the device

     else  // It's a new connection
        stopRetrying = false;
        mChatService.newConnection = true;
        mChatService.start(); // This will stop all the running threads
        if (data.getExtras() == null)
            return;

        // 获取设备蓝牙地址并连接设备
        String address = data.getExtras().getString(DeviceListActivity.EXTRA_DEVICE_ADDRESS); // Get the device Bluetooth address
        btSecure = data.getExtras().getBoolean(DeviceListActivity.EXTRA_NEW_DEVICE); // If it's a new device we will pair with the device
        btDevice = mBluetoothAdapter.getRemoteDevice(address); // Get the BluetoothDevice object

        mChatService.nRetries = 0; // Reset retry counter
        mChatService.connect(btDevice, btSecure); // Attempt to connect to the device
        showToast(getString(R.string.connecting), Toast.LENGTH_SHORT);
BluetoothChatService.connect
connect方法的定义如下,这里有mConnectThread和mConnectedThread两个用于连接和保持连接的线程,先cancel之前的线程,再重新连接start,这里synchronized关键字是声明了线程的同步锁(坑,详细解释)。
public synchronized void connect(BluetoothDevice device, boolean secure)

    stopReading = true;

    // Cancel any thread attempting to make a connection
    if (mConnectThread != null)
        mConnectThread.cancel();
        mConnectThread = null;


    // Cancel any thread currently running a connection
    if (mConnectedThread != null)
        mConnectedThread.cancel();
        mConnectedThread = null;


    // Start the thread to connect with the given device
    mConnectThread = new ConnectThread(device, secure);
    mConnectThread.start();
    setState(STATE_CONNECTING);
BluetoothChatService.ConnectThread
这里final关键字修饰变量在初始化后不可更改。这里BluetoothSocket是用于收发数据的工具,在网络通信的编程开发中很常见。这里仅实现了作为客户端进行连接(坑,补充作为服务端等待连接的线程实现)。基本连接流程如下:
- 使用
BluetoothDevice调用createRfcommSocketToServiceRecord(UUID)获取蓝牙套接字BluetoothSocket,这个UUID是由服务端和客户端共同协商的,RFCOMM就是蓝牙通信所使用的的信道; - 阻塞调用
socket的connect()方法,系统执行SDP查找具有指定UUID的设备,若查找成功并且对方设备接受连接,开始蓝牙通信,共享RFCOMM信道;若超时则抛出一个IOException; - 蓝牙连接完毕,之后调用
BluetoothChatService.connected(类似BluetoothChatService.connect),用于启动保持连接线程(或者说通信线程)BluetoothChatService.ConnectedThread.
private class ConnectThread extends Thread

    private final BluetoothSocket mmSocket;
    private final BluetoothDevice mmDevice;
    private String mSocketType;

    public ConnectThread(BluetoothDevice device, boolean secure)

        mmDevice = device;
        BluetoothSocket tmp = null;
        mSocketType = secure ? "Secure" : "Insecure";

        // Get a BluetoothSocket for a connection with the
        // given BluetoothDevice
        try
            if (secure)
                tmp = mmDevice.createRfcommSocketToServiceRecord(UUID_RFCOMM_GENERIC);
            else
                tmp = mmDevice.createInsecureRfcommSocketToServiceRecord(UUID_RFCOMM_GENERIC);
         catch (IOException e)
            if (D)
                Log.e(TAG, "Socket Type: " + mSocketType + "create() failed", e);

        mmSocket = tmp;


    public void run()

        // Always cancel discovery because it will slow down a connection
        mAdapter.cancelDiscovery();
        newConnection = false;

        // Make a connection to the BluetoothSocket
        try
            // This is a blocking call and will only return on a
            // successful connection or an exception
            mmSocket.connect();
         catch (IOException e)
            // Close the socket
            try
                mmSocket.close();
             catch (IOException e2)
                if (D)
                    Log.e(TAG, "unable to close() " + mSocketType
                            + " socket during connection failure", e2);

            if (!newConnection)
                connectionFailed();
            return;


        // Reset the ConnectThread because we're done
        synchronized (BluetoothChatService.this)
            mConnectThread = null;


        // Start the connected thread
        connected(mmSocket, mmDevice, mSocketType);


    public void cancel()

        try
            mmSocket.close();
         catch (IOException e)
            if (D)
                Log.e(TAG, "close() of connect " + mSocketType
                        + " socket failed", e);
传递数据
BluetoothChatService.ConnectedThread
成功连接蓝牙设备后,双方均有一个BluetoothSocket,这时可以分享信息,数据传递流程如下:
- 通过
BluetoothSocket获取I/O对象InputStream和OutputStream; - 通过
read(byte[])和write(byte[])进行以字节为单位数据读写,实际上读要不断进行,因此在线程的run()方法中实现,这里读到后直接解析了,更好地做法应该定义一个parser类负责数据的解析(坑)。
private class ConnectedThread extends Thread

    private final BluetoothSocket mmSocket;
    private final InputStream mmInStream;
    private final OutputStream mmOutStream;

    public ConnectedThread(BluetoothSocket socket, String socketType)

        if (D)
            Log.d(TAG, "create ConnectedThread: " + socketType);
        mmSocket = socket;
        InputStream tmpIn = null;
        OutputStream tmpOut = null;

        // Get the BluetoothSocket input and output streams
        try
            tmpIn = socket.getInputStream();
            tmpOut = socket.getOutputStream();
         catch (IOException e)
            if (D)
                Log.e(TAG, "temp sockets not created", e);


        mmInStream = tmpIn;
        mmOutStream = tmpOut;
        stopReading = false;


    public void run()

        if (D)
            Log.i(TAG, "BEGIN mConnectedThread");
        byte[] buffer = new byte[1024];
        int bytes;

        // Keep listening to the InputStream while connected
        while (!stopReading)
            try
                if (mmInStream.available() > 0)  // Check if new data is available
                    bytes = mmInStream.read(buffer); // Read from the InputStream

                    /***************  解释器  **************/

                    String readMessage = new String(buffer, 0, bytes);
                    String[] splitMessage = readMessage.split(",");

                    if (D)
                        Log.i(TAG, "Received string: " + readMessage);
                        for (int i = 0; i < splitMessage.length; i++)
                            Log.i(TAG, "splitMessage[" + i + "]: " + splitMessage[i]);


                   // 命令解析...

             catch (IOException e)
                if (D)
                    Log.e(TAG, "disconnected", e);
                if (!stopReading)
                    cancel();
                    connectionLost();

                return;


    /**
     * Write to the connected OutStream.
     *
     * @param buffer The bytes to write
     */
    public void write(byte[] buffer)

        try
            mmOutStream.write(buffer);
         catch (IOException e)
            if (D)
                Log.e(TAG, "Exception during write", e);


    public void cancel()

        stopReading = true;

        if (mmInStream != null)
            try
                mmInStream.close();
             catch (Exception ignored)


        if (mmOutStream != null)
            try
                mmOutStream.close();
             catch (Exception ignored)


        if (mmSocket != null)
            try
                mmSocket.close();
             catch (Exception ignored)
查找设备
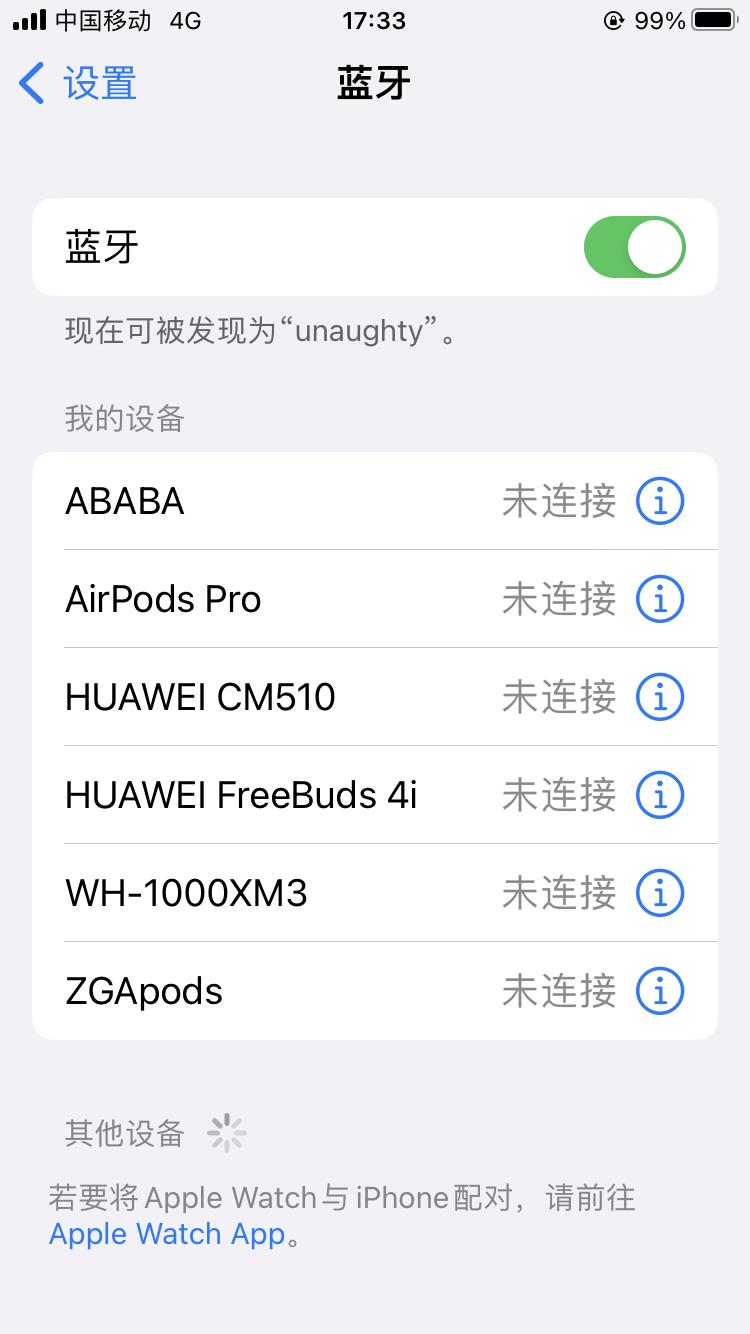
最后补充一下,设备之间是如何相互发现的,这个就是我们使用蓝牙耳机,通过功能键打开耳机的可发现模式,通过系统设置去匹配、连接耳机的过程。如果设备已经匹配可以在“我的设备”(苹果手机)中看见设备信息,但显示“未连接”意味着没有建立RFCOMM共享信道,不可通信,而“匹配”意味着已经交换了建立连接所必要的信息。
通过BluetoothAdapter可以搜索蓝牙设备或者查询已配对设备列表,已匹配,就是双方协商好了连接使用的UUID,蓝牙MAC地址等等信息。
通过getBondedDevices()查询已匹配设备。
Set<BluetoothDevice> pairedDevices = bluetoothAdapter.getBondedDevices();

if (pairedDevices.size() > 0)
   // There are paired devices. Get the name and address of each paired device.
   for (BluetoothDevice device : pairedDevices)
       String deviceName = device.getName();
       String deviceHardwareAddress = device.getAddress(); // MAC address
通过startDiscovery()开始搜索蓝牙设备,为了接收对方设备的反馈,必须基于ACTION_FOUND的intent注册一个BroadcastReceiver,
@Override
protected void onCreate(Bundle savedInstanceState)
   ...

   // Register for broadcasts when a device is discovered.
   IntentFilter filter = new IntentFilter(BluetoothDevice.ACTION_FOUND);
   registerReceiver(receiver, filter);


// Create a BroadcastReceiver for ACTION_FOUND.
private final BroadcastReceiver receiver = new BroadcastReceiver()
   public void onReceive(Context context, Intent intent)
       String action = intent.getAction();
       if (BluetoothDevice.ACTION_FOUND.equals(action))
           // Discovery has found a device. Get the BluetoothDevice
           // object and its info from the Intent.
           BluetoothDevice device = intent.getParcelableExtra(BluetoothDevice.EXTRA_DEVICE);
           String deviceName = device.getName();
           String deviceHardwareAddress = device.getAddress(); // MAC address


;

@Override
protected void onDestroy()
   super.onDestroy();
   ...

   // Don't forget to unregister the ACTION_FOUND receiver.
   unregisterReceiver(receiver);
调用startActivityForResult(Intent,int)使设备处于可发现状态,持续两分钟,用于服务端,这个隐含了搜索要求服务客户双方你情我愿的。
int requestCode = 1;
Intent discoverableIntent =
new Intent(BluetoothAdapter.ACTION_REQUEST_DISCOVERABLE);
discoverableIntent.putExtra(BluetoothAdapter.EXTRA_DISCOVERABLE_DURATION, 300);
startActivityForResultAndroid 蓝牙开发(一) – 传统蓝牙聊天室
Android 蓝牙开发(三) – 低功耗蓝牙开发
项目工程BluetoothDemo
前面已经学习了经典蓝牙开发,学习了蓝牙的配对连接和通信,又通过 配置 A2DP 文件,实现手机和蓝牙音响的连接和播放语音。
这篇,我们来学习蓝牙开发的最后一章,低功耗蓝牙 BLE,也就是我们常说的蓝牙 4.0 。
今天要完成的效果如下:
中心设备 外围设备 
一. 简介
与传统蓝牙不同,低功耗蓝主要为了降低设备功耗,支持更低功耗(如心率检测仪,健身设备)等设备进行通信。
Android 在 4.3(API 18) 后将低功耗蓝牙内置,并提供对应的 API,以便于应用发现设备,查询服务和传输信息
1.1 相关概念
低功耗蓝牙有两个角色,分别是中心设备和外围设备
- 外围设备:指功耗更低的设备,会不断的发出广播,直到与中心设备连接
- 中心设备:可以进行扫描,寻找外设广播,并从广播中拿到数据
一般我们的手机会充当中心设备,去搜索周围外设的广播,比如健康设备等,然后健康设备就是外围设备,一直发广播,直到中心设备连接上。在Android 5.0 后,手机也可以充当外围设备。
1.2 关键术语
关于 BLE 的关键术语如下:
- 通用属性配置文件(GATT) : GATT 配置文件是一种通用规范,内容主要针对的是 BLE 通信读写时的简短的数据片段,目前 BLE 的通信均以 GATT 为基础
- 属性协议(ATT) : ATT 是 GATT 的基础,由它来传输属性和特征服务,这些属性都有一个特定的 UUID来作为唯一标识,为通信的基础。
- GATT Service : 通常中心设备与外围设备要进行,首先要知道服务的 UUID,并与之建立通信,然后通过特征和描述符等进行数据通信,这些等后面我们再来理解
二. 权限配置
首先,你需要使用 BLUETOOTH 的权限,考虑到 LE 信标通常与位置相关联,还须声明 ACCESS_FINE_LOCATION 权限。没有此权限,扫描将无法返回任何结果。
注意:如果您的应用适配 Android 9(API 级别 28)或更低版本,则您可以声明 ACCESS_COARSE_LOCATION 权限而非 ACCESS_FINE_LOCATION 权限。
<uses-permission android:name="android.permission.BLUETOOTH"/>
<uses-permission android:name="android.permission.BLUETOOTH_ADMIN"/>
<!-- If your app targets Android 9 or lower, you can declare
ACCESS_COARSE_LOCATION instead. -->
<uses-permission android:name="android.permission.ACCESS_FINE_LOCATION" />
注意!Android 10 需要你开启gps,否则蓝牙不可用
如果你想要你的设备只支持 BLE ,还可以有以下神明:
<uses-permission android:name="android.permission.BLUETOOTH"/>
<uses-permission android:name="android.permission.BLUETOOTH_ADMIN"/>
<!-- If your app targets Android 9 or lower, you can declare
ACCESS_COARSE_LOCATION instead. -->
<uses-permission android:name="android.permission.ACCESS_FINE_LOCATION" />
如果设置 required=“false”,你也可以在运行时使用 PackageManager.hasSystemFeature() 确定 BLE 的可用性:
private fun PackageManager.missingSystemFeature(name: String): Boolean = !hasSystemFeature(name)
...
packageManager.takeIf it.missingSystemFeature(PackageManager.FEATURE_BLUETOOTH_LE) ?.also
Toast.makeText(this, R.string.ble_not_supported, Toast.LENGTH_SHORT).show()
finish()
三. 查找 BLE 设备
关于蓝牙的开启,请参考 Android 蓝牙开发(一) – 传统蓝牙聊天室
要查找 BLE 设备,在 5.0 之前,使用 startLeScan() 方法,它会返回当前设备和外设的广播数据。不过在 5.0 之后,使用 startScan() 去扫描,这里为了方便手机充当外围设备,统一使用 5.0 之后的方法。
而扫描是耗时的,我们应该在扫描到想要的设备后就立即停止或者在规定时间内停止,扫描代码如下:
fun scanDev(callback: BleDevListener)
devCallback = callback
if (isScanning)
return
//扫描设置
val builder = ScanSettings.Builder()
/**
* 三种模式
* - SCAN_MODE_LOW_POWER : 低功耗模式,默认此模式,如果应用不在前台,则强制此模式
* - SCAN_MODE_BALANCED : 平衡模式,一定频率下返回结果
* - SCAN_MODE_LOW_LATENCY 高功耗模式,建议应用在前台才使用此模式
*/
.setScanMode(ScanSettings.SCAN_MODE_LOW_LATENCY)//高功耗,应用在前台
if (Build.VERSION.SDK_INT >= Build.VERSION_CODES.M)
/**
* 三种回调模式
* - CALLBACK_TYPE_ALL_MATCHED : 寻找符合过滤条件的广播,如果没有,则返回全部广播
* - CALLBACK_TYPE_FIRST_MATCH : 仅筛选匹配第一个广播包出发结果回调的
* - CALLBACK_TYPE_MATCH_LOST : 这个看英文文档吧,不满足第一个条件的时候,不好解释
*/
builder.setCallbackType(ScanSettings.CALLBACK_TYPE_ALL_MATCHES)
//判断手机蓝牙芯片是否支持皮批处理扫描
if (bluetoothAdapter.isOffloadedFilteringSupported)
builder.setReportDelay(0L)
isScanning = true
//扫描是很耗电的,所以,我们不能持续扫描
handler.postDelayed(
bluetoothAdapter.bluetoothLeScanner?.stopScan(scanListener)
isScanning = false;
, 3000)
bluetoothAdapter.bluetoothLeScanner?.startScan(null, builder.build(), scanListener)
//过滤特定的 UUID 设备
//bluetoothAdapter?.bluetoothLeScanner?.startScan()
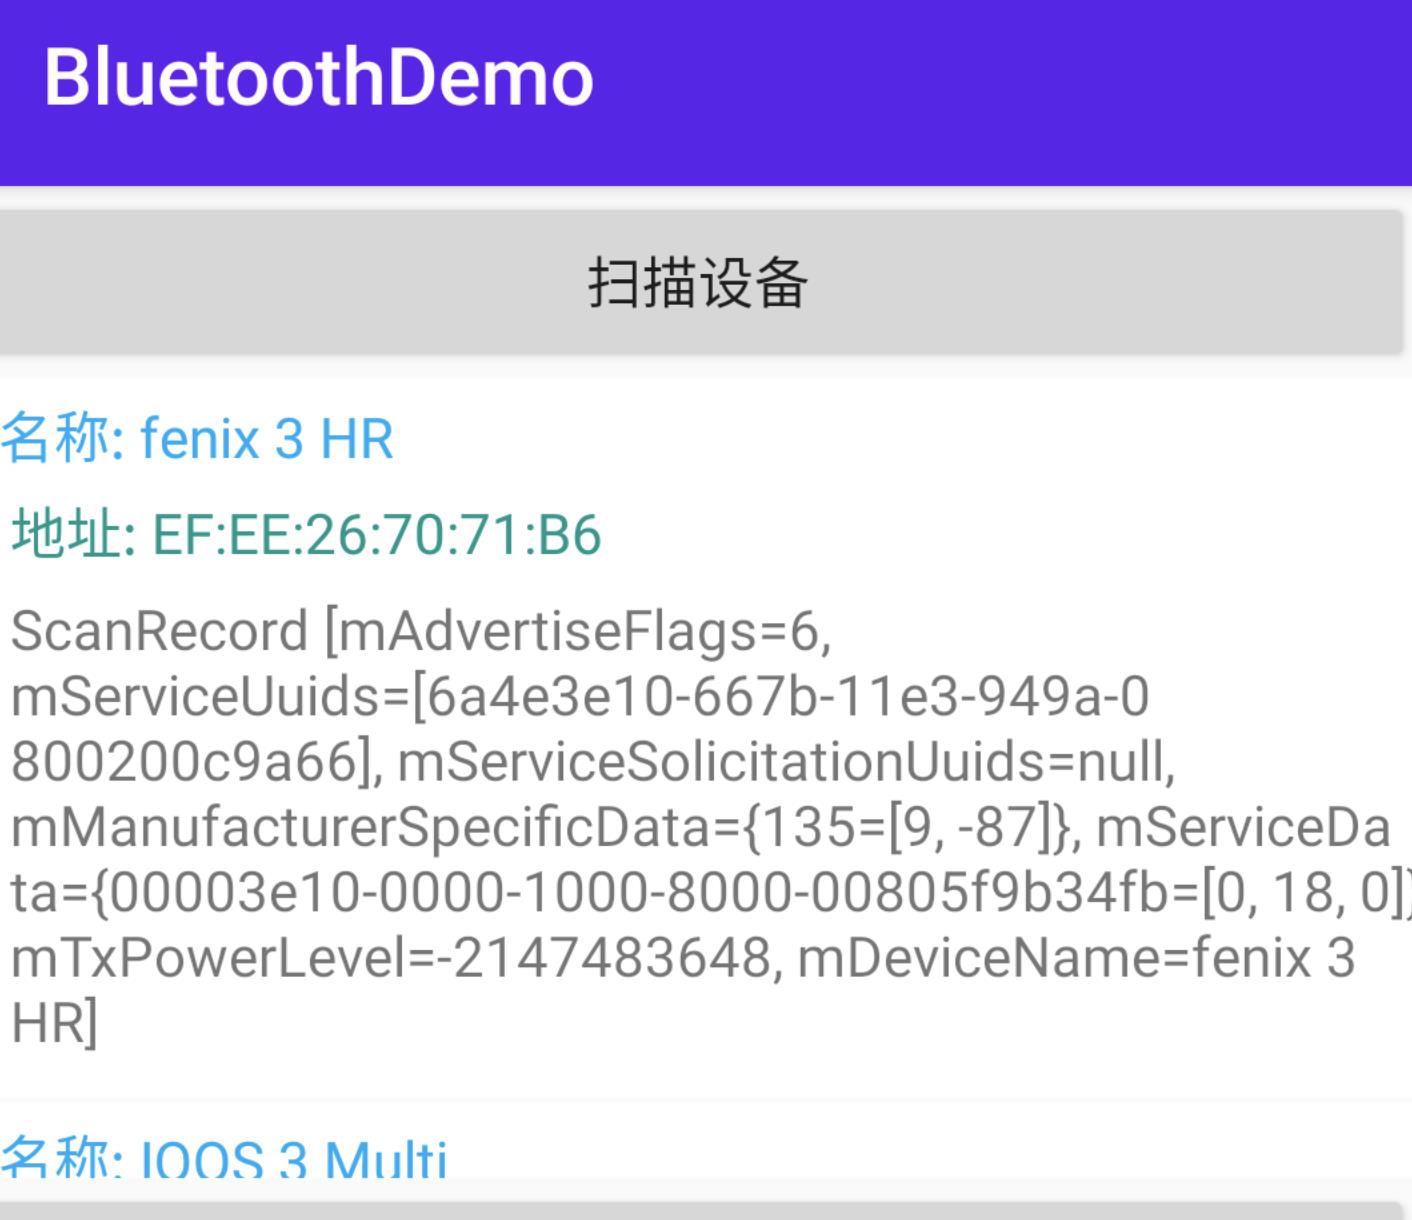
可以看到,在 5.0 之后可以通过 ScanSettings 进行扫描的一些设备,比如设置扫描模式 setScanMode ,在 startScan() 中,也可以过滤自己的 UUID,从而省去一些时间。接着在扫描回调中,把能获取名字的设备通过回调给 recyclerview 去回调。
private val scanListener = object : ScanCallback()
override fun onScanResult(callbackType: Int, result: ScanResult?)
super.onScanResult(callbackType, result)
//不断回调,所以不建议做复杂的动作
result ?: return
result.device.name ?: return
val bean = BleData(result.device, result.scanRecord.toString())
devCallback?.let
it(bean)
效果如下:
四. 手机充当外围设备(服务端)
上面说到,Android 5.0 之后,手机也能充当外围设备,这里我们也来实践一下;
首先,Android要完成一个外围设备,需要完成以下步骤:
- 编写广播设置,比如发送实践,发送功率等
- 编写广播数据,这个是需要的,需要设置 service 的uuid,或者显示名字等
- 编写扫描广播(可选),这个广播当中心设备扫描时,数据能被接受的广播,通常我们会在这里编写一些厂商数据
- 添加 Gatt service ,用来跟中心设备通信
4.1 广播设置
在发送广播之前,我们可以先对广播进行一些配置:
/**
* GAP广播数据最长只能31个字节,包含两中: 广播数据和扫描回复
* - 广播数据是必须的,外设需要不断发送广播,让中心设备知道
* - 扫描回复是可选的,当中心设备扫描到才会扫描回复
* 广播间隔越长,越省电
*/
//广播设置
val advSetting = AdvertiseSettings.Builder()
//低延时,高功率,不使用后台
.setAdvertiseMode(AdvertiseSettings.ADVERTISE_MODE_LOW_LATENCY)
// 高的发送功率
.setTxPowerLevel(AdvertiseSettings.ADVERTISE_TX_POWER_HIGH)
// 可连接
.setConnectable(true)
//广播时限。最多180000毫秒。值为0将禁用时间限制。(不设置则为无限广播时长)
.setTimeout(0)
.build()
可以看到,这里设置成可连接广播,且广播模式设置为 SCAN_MODE_LOW_LATENCY 高功耗模式 ,它共有三种模式:
- SCAN_MODE_LOW_POWER : 低功耗模式,默认此模式,如果应用不在前台,则强制此模式
- SCAN_MODE_BALANCED : 平衡模式,一定频率下返回结果
- SCAN_MODE_LOW_LATENCY 高功耗模式,建议应用在前台才使用此模式
发送功率也是可选的:
- 使用高TX功率级别进行广播:AdvertiseSettings#ADVERTISE_TX_POWER_HIGH
- 使用低TX功率级别进行广播:AdvertiseSettings#ADVERTISE_TX_POWER_LOW
- 使用中等TX功率级别进行广播:AdvertiseSettings#ADVERTISE_TX_POWER_MEDIUM
- 使用最低传输(TX)功率级别进行广播:AdvertiseSettings#ADVERTISE_TX_POWER_ULTRA_LOW
4.2 配置发送广播数据
接着,是广播数据包:
//设置广播包,这个是必须要设置的
val advData = AdvertiseData.Builder()
.setIncludeDeviceName(true) //显示名字
.setIncludeTxPowerLevel(true)//设置功率
.addServiceUuid(ParcelUuid(BleBlueImpl.UUID_SERVICE)) //设置 UUID 服务的 uuid
.build()
比较好理解,让广播显示手机蓝牙名字,并设置服务的 UUID
4.3 配置扫描广播(可选)
扫描广播是当中心设备在扫描时,能够显示出来的广播,它可以添加一些必要数据,如厂商数据,服务数据等,注意!与上面的广播一样,不能超过31个字节。
//测试 31bit
val byteData = byteArrayOf(-65, 2, 3, 6, 4, 23, 23, 9, 9,
9,1, 2, 3, 6, 4, 23, 23, 9, 9, 8,23,23,23)
//扫描广播数据(可不写,客户端扫描才发送)
val scanResponse = AdvertiseData.Builder()
//设置厂商数据
.addManufacturerData(0x19, byteData)
.build()
最后,使用 startAdvertising() 就可以开始发送广播了:
val bluetoothLeAdvertiser = bluetoothAdapter?.bluetoothLeAdvertiser
//开启广播,这个外设就开始发送广播了
bluetoothLeAdvertiser?.startAdvertising(
advSetting,
advData,
scanResponse,
advertiseCallback
)
使用 去监听广播开启成功与否:
private val advertiseCallback = object : AdvertiseCallback()
override fun onStartSuccess(settingsInEffect: AdvertiseSettings?)
super.onStartSuccess(settingsInEffect)
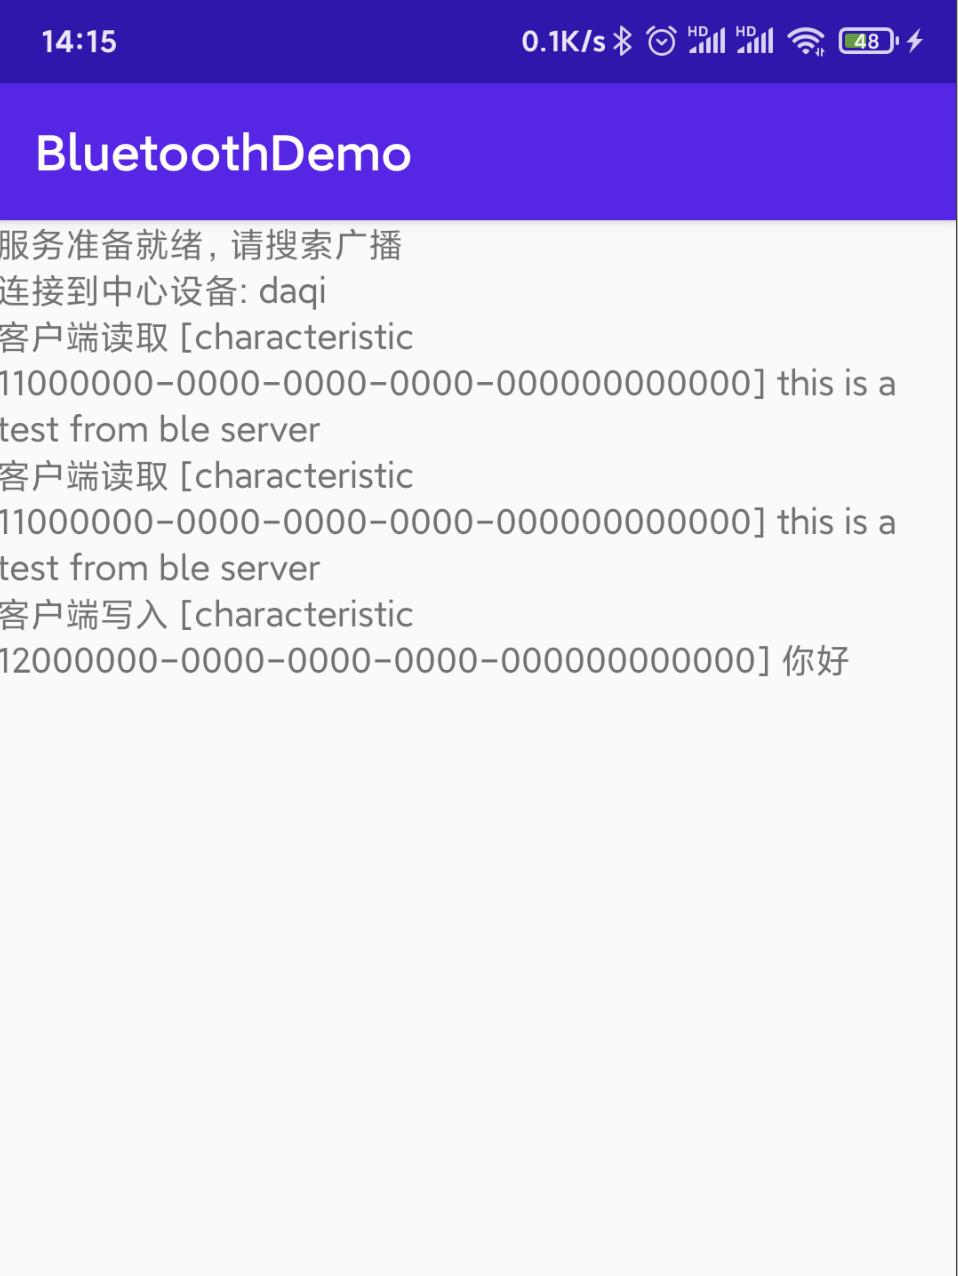
logInfo("服务准备就绪,请搜索广播")
override fun onStartFailure(errorCode: Int)
super.onStartFailure(errorCode)
if (errorCode == ADVERTISE_FAILED_DATA_TOO_LARGE)
logInfo("广播数据超过31个字节了 !")
else
logInfo("服务启动失败: $errorCode")
此时,你去搜索,就能搜到你手机的蓝牙名称和对应的广播数据了。
4.4 Gatt Service
但如果外围设备想要与中心设备通信,还需要启动 Gatt service 才行,上面说到,启动Service 时,我们需要配置特征 Characteristic 和 描述符 Descriptor,这里我们来解释以下。
4.3 特征 Characteristic
Characteristic 是Gatt通信最小的逻辑单元,一个 characteristic 包含一个单一 value 变量 和 0-n个用来描述 characteristic 变量的 描述符 Descriptor。与 service 相似,每个 characteristic 用 16bit或者32bit的uuid作为标识,实际的通信中,也是通过 Characteristic 进行读写通信的。
所以为了方便通信,这里我们要添加读写的 Characteristic。
//添加读+通知的 GattCharacteristic
val readCharacteristic = BluetoothGattCharacteristic(
BleBlueImpl.UUID_READ_NOTIFY,
BluetoothGattCharacteristic.PROPERTY_READ or BluetoothGattCharacteristic.PROPERTY_NOTIFY,
BluetoothGattCharacteristic.PERMISSION_READ
)
//添加写的 GattCharacteristic
val writeCharacteristic = BluetoothGattCharacteristic(
BleBlueImpl.UUID_WRITE,
BluetoothGattCharacteristic.PROPERTY_WRITE,
BluetoothGattCharacteristic.PERMISSION_WRITE
)
描述符 Descriptor
它的定义就是描述 GattCharacteristic 值已定义的属性,比如指定可读的属性,可接受范围等,比如为写的 特征添加描述符:
//添加 Descriptor 描述符
val descriptor =
BluetoothGattDescriptor(
BleBlueImpl.UUID_DESCRIBE,
BluetoothGattDescriptor.PERMISSION_WRITE
)
//为特征值添加描述
writeCharacteristic.addDescriptor(descriptor)
接着,把特征添加到服务中,并使用openGattServer() 去打开 Gatt 服务:
/**
* 添加 Gatt service 用来通信
*/
//开启广播service,这样才能通信,包含一个或多个 characteristic ,每个service 都有一个 uuid
val gattService =
BluetoothGattService(
BleBlueImpl.UUID_SERVICE,
BluetoothGattService.SERVICE_TYPE_PRIMARY
)
gattService.addCharacteristic(readCharacteristic)
gattService.addCharacteristic(writeCharacteristic)
val bluetoothManager = getSystemService(Context.BLUETOOTH_SERVICE) as BluetoothManager
//打开 GATT 服务,方便客户端连接
mBluetoothGattServer = bluetoothManager.openGattServer(this, gattServiceCallbak)
mBluetoothGattServer?.addService(gattService)
代码比较简单,接着就可以使用 gattServiceCallbak 去监听数据成功与读写的数据了:
private val gattServiceCallbak = object : BluetoothGattServerCallback()
override fun onConnectionStateChange(device: BluetoothDevice?, status: Int, newState: Int)
super.onConnectionStateChange(device, status, newState)
device ?: return
Log.d(TAG, "zsr onConnectionStateChange: ")
if (status == BluetoothGatt.GATT_SUCCESS && newState == 2)
logInfo("连接到中心设备: $device?.name")
else
logInfo("与: $device?.name 断开连接失败!")
...
五. 中心设备连接外设(客户端)
上面已经配置了服务端的代码,接着,通过扫描到的广播,使用 BluetoothDevice 的 connectGatt() 方法,来连接 GATT 服务:
override fun onItemClick(adapter: BaseQuickAdapter<*, *>, view: View, position: Int)
//连接之前先关闭连接
closeConnect()
val bleData = mData[position]
blueGatt = bleData.dev.connectGatt(this, false, blueGattListener)
logInfo("开始与 $bleData.dev.name 连接.... $blueGatt")
此时,如果你的配置没有出错的话,就可以通过 BluetoothGattCallback 回调连接到设备了:
private val blueGattListener = object : BluetoothGattCallback()
override fun onConnectionStateChange(gatt: BluetoothGatt?, status: Int, newState: Int)
super.onConnectionStateChange(gatt, status, newState)
val device = gatt?.device
if (newState == BluetoothProfile.STATE_CONNECTED)
isConnected = true
//开始发现服务,有个小延时,最后200ms后尝试发现服务
handler.postDelayed(
gatt?.discoverServices()
,300)
device?.letlogInfo("与 $it.name 连接成功!!!")
else if (newState == BluetoothProfile.STATE_DISCONNECTED)
isConnected = false
logInfo("无法与 $device?.name 连接: $status")
closeConnect()
override fun onServicesDiscovered(gatt: BluetoothGatt?, status: Int)
super.onServicesDiscovered(gatt, status)
// Log.d(TAG, "zsr onServicesDiscovered: $gatt?.device?.name")
val service = gatt?.getService(BleBlueImpl.UUID_SERVICE)
mBluetoothGatt = gatt
logInfo("已连接上 GATT 服务,可以通信! ")
代码应该好看懂,就是 onConnectionStateChange() 中的 newState 为 BluetoothProfile.STATE_CONNECTED 时,表示已经连接上了,这个时候,尝试去发现这个服务,如果也能回调 onServicesDiscovered() 方法,则证明此时 GATT 服务已经成功建立,可以进行通信了。
5.1 读数据
此时就可以来读取外围设备的数据,这个数据是外围设备给中心设备去读的,所以,外围设备的读回调是这样的:
外围设备的BluetoothGattServerCallback
override fun onDescriptorReadRequest(
device: BluetoothDevice?,
requestId: Int,
offset: Int,
descriptor: BluetoothGattDescriptor?
)
super.onDescriptorReadRequest(device, requestId, offset, descriptor)
val data = "this is a test"
mBluetoothGattServer?.sendResponse(
device, requestId, BluetoothGatt.GATT_SUCCESS,
offset, data.toByteArray()
)
logInfo("客户端读取 [descriptor $descriptor?.uuid] $data")
很简单,就是发送一个 "this is a test " 的字符传
中心设备读
/**
* 读数据
*/
fun readData(view: View)
//找到 gatt 服务
val service = getGattService(BleBlueImpl.UUID_SERVICE)
if (service != null)
val characteristic =
service.getCharacteristic(BleBlueImpl.UUID_READ_NOTIFY) //通过UUID获取可读的Characteristic
mBluetoothGatt?.readCharacteristic(characteristic)
// 获取Gatt服务
private fun getGattService(uuid: UUID): BluetoothGattService?
if (!isConnected)
Toast.makeText(this, "没有连接", Toast.LENGTH_SHORT).show()
return null
val service = mBluetoothGatt?.getService(uuid)
if (service == null)
Toast.makeText(this, "没有找到服务", Toast.LENGTH_SHORT).show()
return service
如果找得到 GATT 服务,则通过 getCharacteristic() 拿到 GATT 通信的最小单元 Characteristic,通过 mBluetoothGatt?.readCharacteristic(characteristic) 读取数据,这样就会在 BluetoothGattCallback回调的 onCharacteristicRead 拿到数据:
override fun onCharacteristicRead(
gatt: BluetoothGatt?,
characteristic: BluetoothGattCharacteristic?,
status: Int
)
super.onCharacteristicRead(gatt, characteristic, status)
characteristic?.let
val data = String(it.value)
logInfo("CharacteristicRead 数据: $data")
同理写也一样,这样我们的 BLE 低功耗蓝牙就学习结束了
参考:
https://www.jianshu.com/p/d273e46f47b1
https://developer.android.google.cn/guide/topics/connectivity/bluetooth-le
以上是关于Android蓝牙开发的主要内容,如果未能解决你的问题,请参考以下文章