SpringSpring 用注解 储存bean(类注解方法注解)Spring如何制作出类注解beanName
Posted Perceus
tags:
篇首语:本文由小常识网(cha138.com)小编为大家整理,主要介绍了SpringSpring 用注解 储存bean(类注解方法注解)Spring如何制作出类注解beanName相关的知识,希望对你有一定的参考价值。
@TOC
如何更简单的储存spring
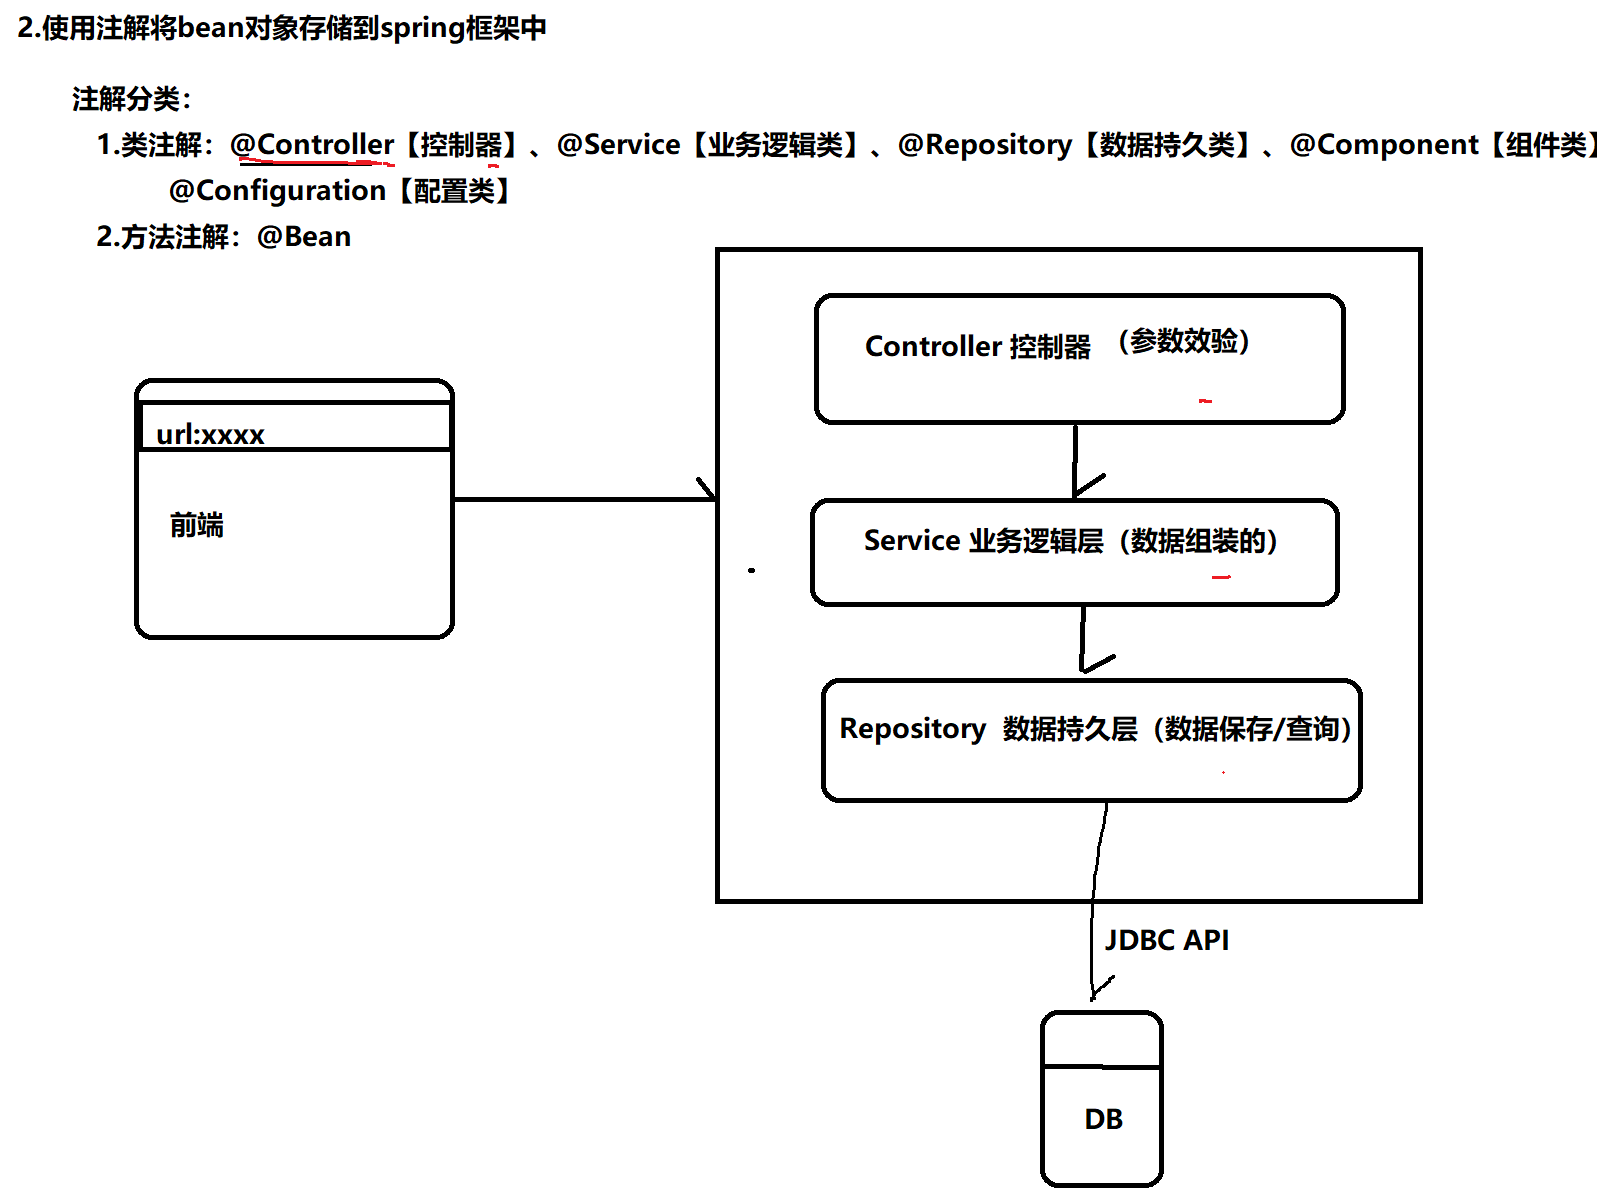
在 Spring 中想要更简单的存储和读取对象的核⼼是使⽤注解,也就是我们接下来要学习 Spring 中的相关注解,来存储和读取 Bean 对象。
以前需要在储存一个bean对象时,需要手动的在配置文件中创建bean,这里直接配置一个扫描路径,将所有需要储存的对象放到该目录下,当我们用在代码中用注解标识该类时,spring会自动的扫描这个路径,将对应的对象自动添加到spring框架中。
1、前置⼯作:配置扫描路径(重要)
在使用注解之前,我们需要配置扫描路径,将所有的对象直接放在该路径下,spring会自动扫描对应的bean并添加到框架中。
创建一个xml配置文件:
<?xml version="1.0" encoding="UTF-8"?>
<beans xmlns="http://www.springframework.org/schema/beans"
       xmlns:xsi="http://www.w3.org/2001/XMLSchema-instance"
       xmlns:content="http://www.springframework.org/schema/context"
       xsi:schemaLocation="http://www.springframework.org/schema/beans http://www.springframework.org/schema/beans/spring-beans.xsd http://www.springframework.org/schema/context https://www.springframework.org/schema/context/spring-context.xsd">

    <content:component-scan base-package="model"></content:component-scan>

</beans>这里的base-package属性中写入对象存放的路径,这里是放在了model包下。

配置完成后,就可以使用注解了。
2、添加注解存储 Bean 对象
想要将对象存储在 Spring 中,有两种注解类型可以实现:
接下来我们分别来看。
1. 类注解:
类注解也可以称为组件类注解,即把一些类当做组件进行使用。
- @Component:
标识一个普通的bean类 - @Controller:
标识一个控制器组件类,一般用在控制前后端交互的类中,进行数据校验。 - @Service :
标识一个业务逻辑组件类,进行数据的组装。 - @Repository:
标识一个DAO组件类,即数据访问层组件,用来访问数据,像连接数据库,进行增删查改操作。 - @Configuration:
标识一个类作为加载spring的配置类,这个类的作用是配置spring并启动spring容器。
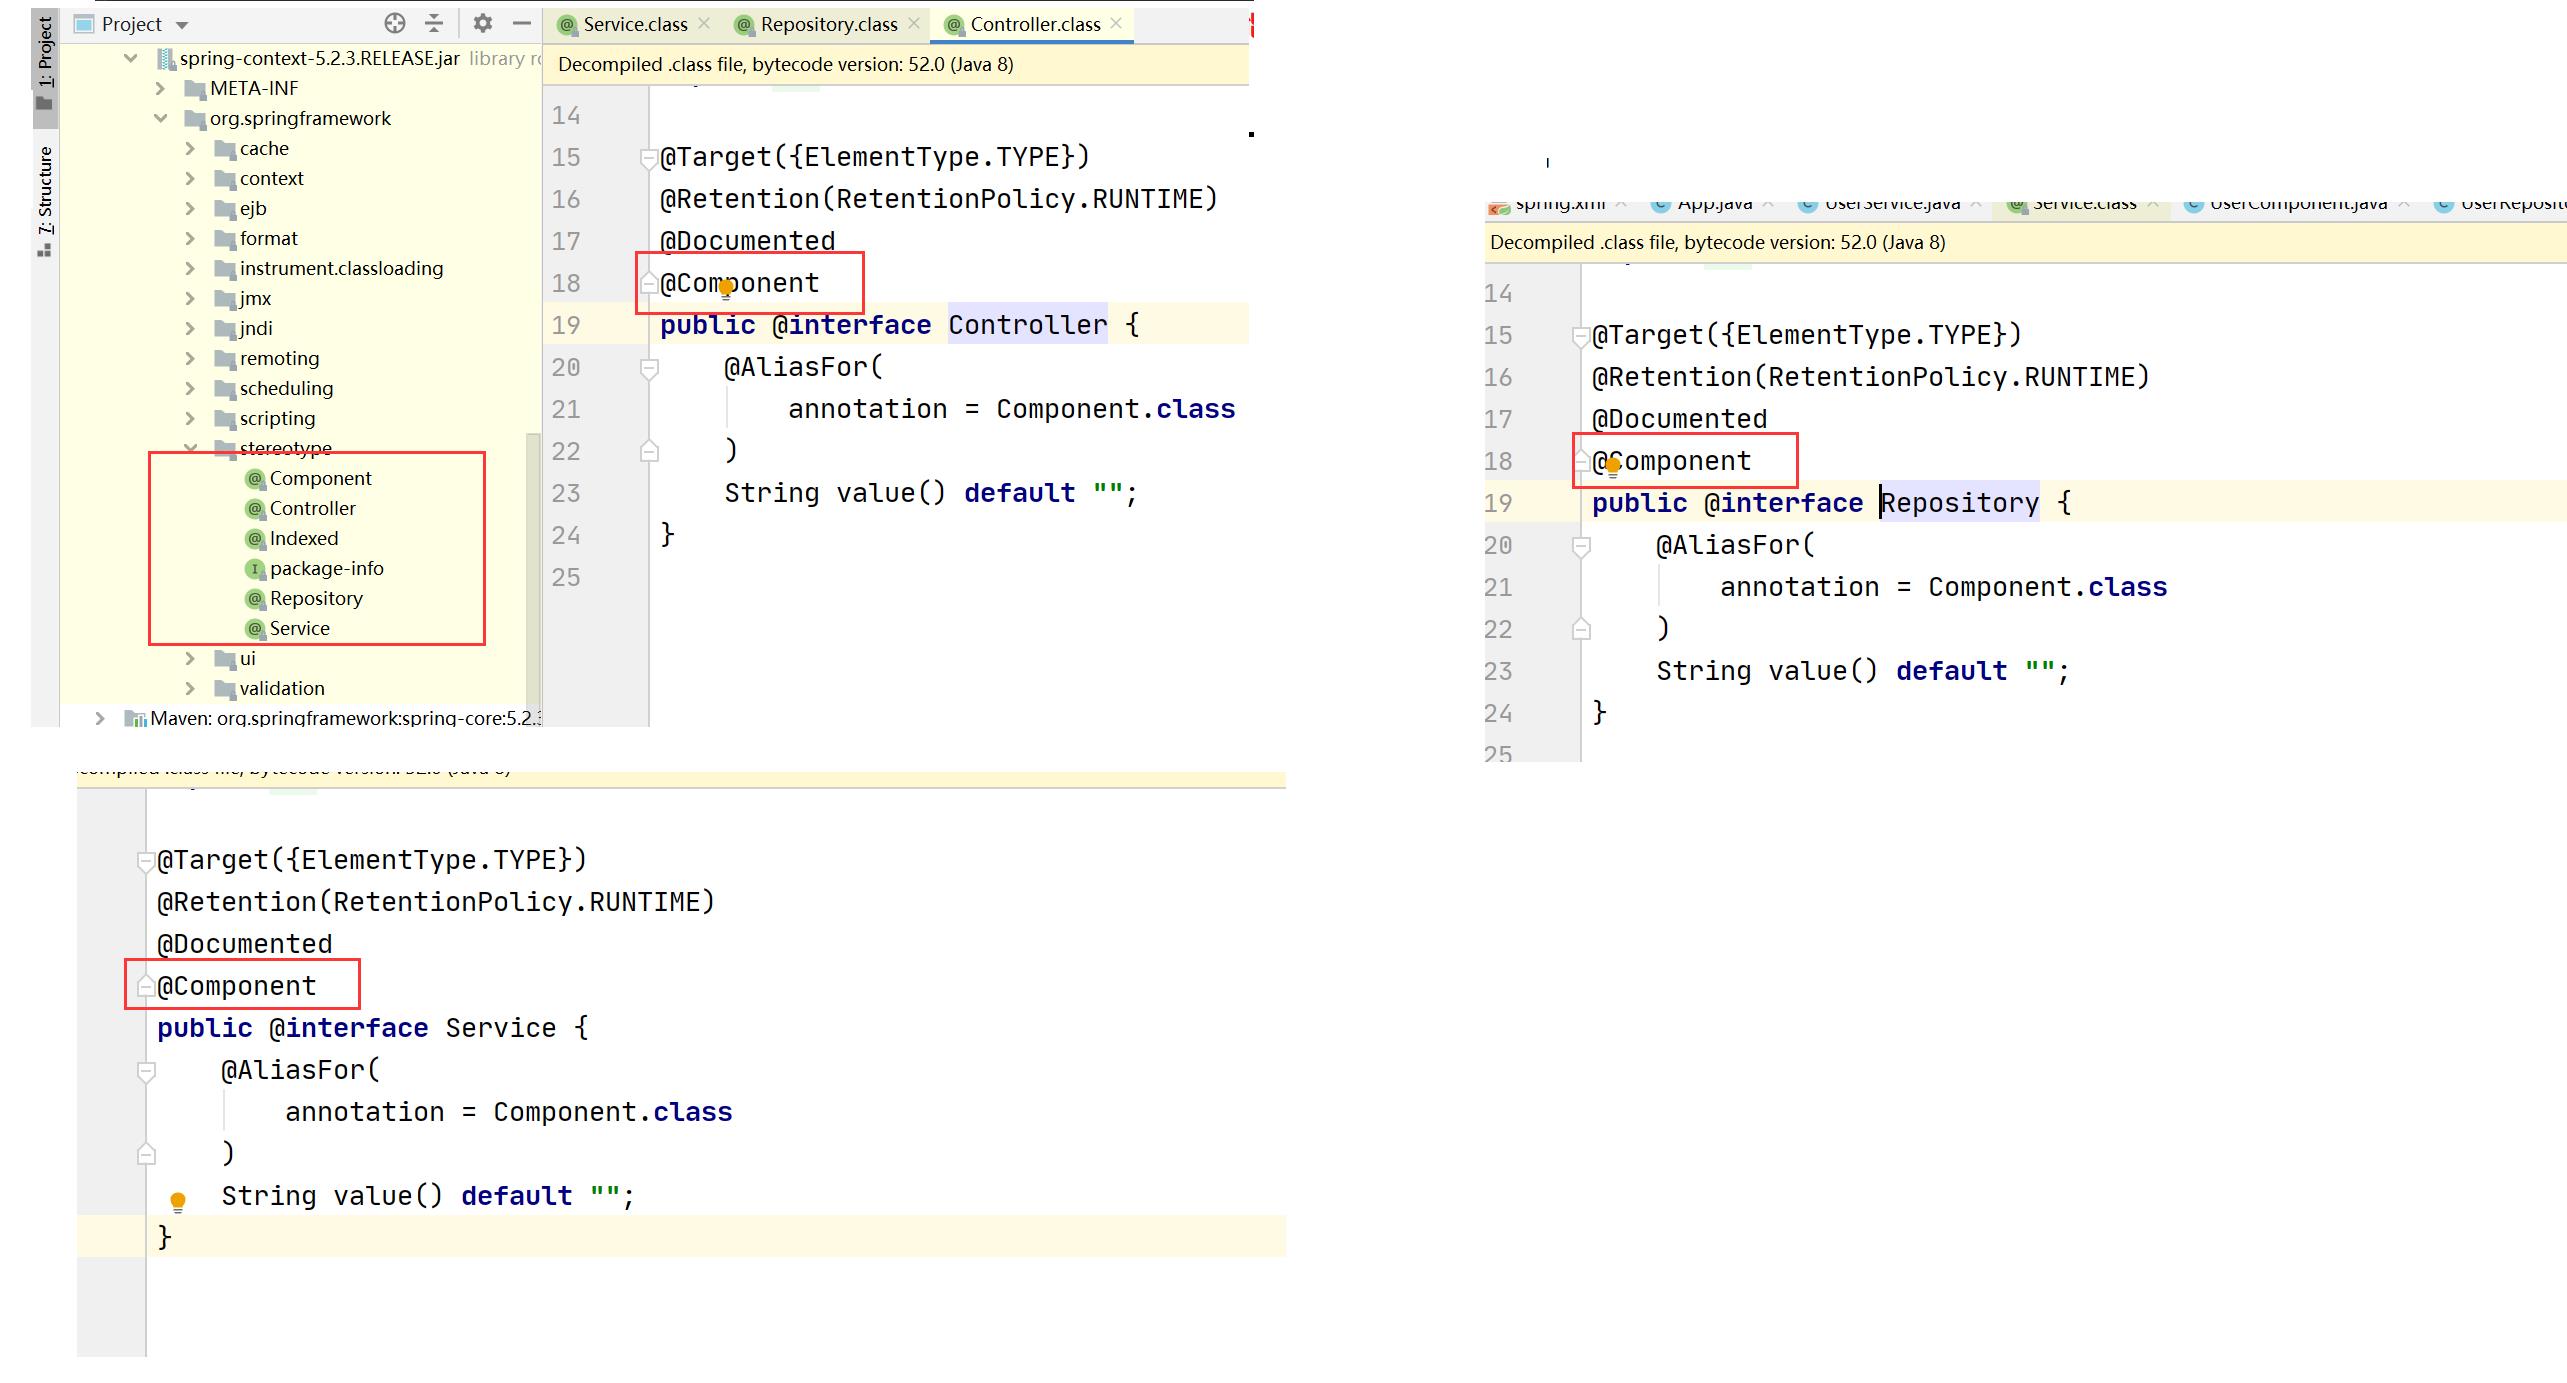
类注解之间的关系
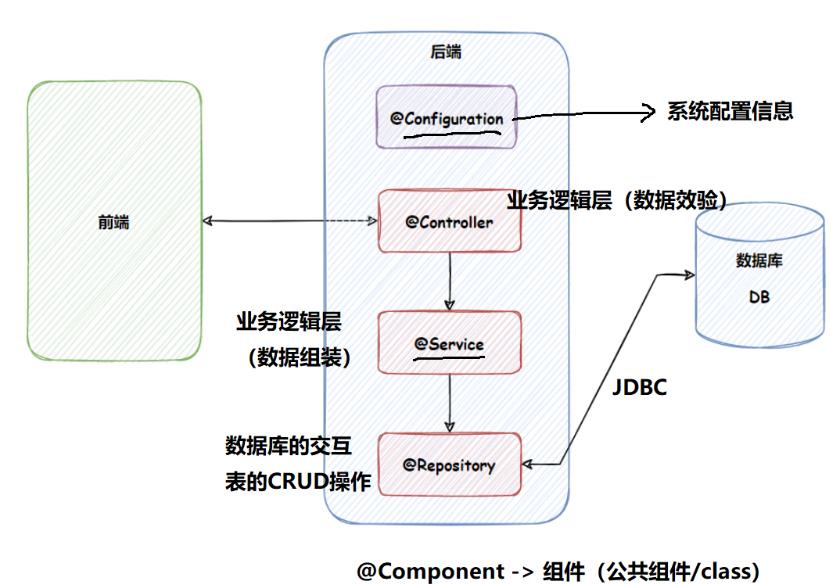
@Component、@Controller、@Service、@Repository这四个注解实际上一类注解,功能相同,用法相同,区别在于标识当前类是什么组件类型,方便程序员快速了解当前类的作用。
@Component可以替代@Controller、@Service、@Repository,因为这三个注解是被@Component标注的,从逻辑上可以理解为是Component的子类。
如下图:
Controller、Service、Repository三者都是被Component标注。
① @Controller(控制器存储)
使⽤ @Controller 存储 bean 的代码如下所示:
package model;

import org.springframework.stereotype.Controller;

@Controller //将当前类储存到Spring,标识此类为控制交互层
public class UserController
    public void firstUseController(String name)
        System.out.println("Hi,Controller:"+name);
在测试类中使用:
读取对象的⽅式来读取上⾯的 UserController 对象
import model.HelloApplicationContext;
import model.UserController;
import org.springframework.context.ApplicationContext;
import org.springframework.context.support.ClassPathXmlApplicationContext;

public class App
    public static void main(String[] args)

     ApplicationContext context=new ClassPathXmlApplicationContext("spring.xml");

     //
     UserController userController=(UserController) context.getBean("userController");

     userController.firstUseController("Hello!");
输出结果:
Hi,Controller:Hello!注意事项:

② @Service(服务存储)
使⽤ @Service 存储 bean 的代码如下所示:
package model;

import org.springframework.stereotype.Service;

@Service //将此类储存到String中,这个类中可以进行数据组装
public class UserService
    public void firstUseService(String name)
        System.out.println("Hi,Service:"+name);
在测试类中读取 bean :
import model.HelloApplicationContext;
import model.UserController;
import model.UserService;
import org.springframework.context.ApplicationContext;
import org.springframework.context.support.ClassPathXmlApplicationContext;

public class App
    public static void main(String[] args)

      ApplicationContext context=new ClassPathXmlApplicationContext("spring.xml");

      UserService userService=(UserService) context.getBean("userService");

      userService.firstUseService("Hello!");
输出:
Hi,Service:Hello!③ @Repository
package model;

import org.springframework.stereotype.Repository;

@Repository//将此类储存到String中,标识此类是数据访问组件
public class UserRepository
    public void firstUseRepository(String name)
        System.out.println("Hi,Repository:"+name);
在测试类中使用:
import model.HelloApplicationContext;
import model.UserController;
import model.UserRepository;
import model.UserService;
import org.springframework.context.ApplicationContext;
import org.springframework.context.support.ClassPathXmlApplicationContext;

public class App
    public static void main(String[] args)
      ApplicationContext context=new ClassPathXmlApplicationContext("spring.xml");
      UserRepository userRepository=(UserRepository) context.getBean("userRepository");
      userRepository.firstUseRepository("Hello!");
输出:
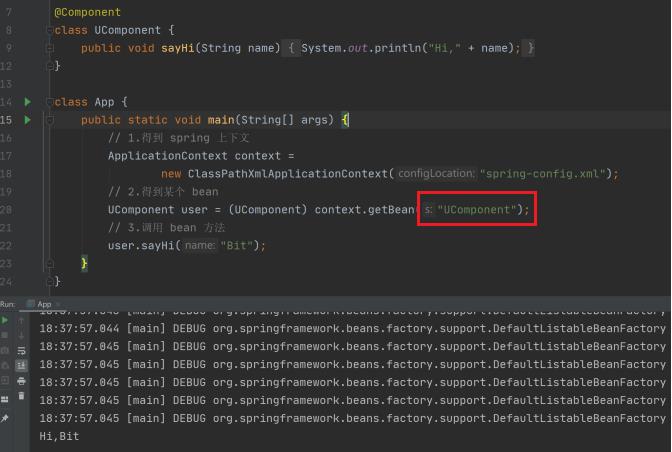
Hi,Repository:Hello!④ @Component
package model;

import org.springframework.stereotype.Component;

@Component
public class UserComponent
    public void firstUseComponent(String name)
        System.out.println("Hi,Component:"+name);
在测试类中使用:
import model.*;
import org.springframework.context.ApplicationContext;
import org.springframework.context.support.ClassPathXmlApplicationContext;

public class App
    public static void main(String[] args)
      ApplicationContext context=new ClassPathXmlApplicationContext("spring.xml");
      UserComponent userComponent=(UserComponent) context.getBean("userComponent");
      userComponent.firstUseComponent("Hello!");
输出:
Hi,Component:Hello!注意点:
2. 方法注解
@Bean

package model;

import org.springframework.context.annotation.Bean;
import org.springframework.stereotype.Component;

@Component
public class UserBean
    private String name;
    private int Id;
    private int age;
    public void setName(String name)
        this.name = name;

    public void setId(int id)
        Id = id;

    public void setAge(int age)
        this.age = age;


    @Override
    public String toString()
        return "UserBean" +
                "name=" + name + \\ +
                ", Id=" + Id +
                ", age=" + age +
                ;


    @Bean
    public UserBean users()
        UserBean user=new UserBean();
        user.setName("张三");
        user.setId(01);
        user.setAge(18);
        return user;
在测试类中运行:
import model.*;
import org.springframework.context.ApplicationContext;
import org.springframework.context.support.ClassPathXmlApplicationContext;

import javax.jws.soap.SOAPBinding;

public class App
    public static void main(String[] args)
        //1.获取上下文对象
      ApplicationContext context=new ClassPathXmlApplicationContext("spring.xml");
      //2.获取spring中存入的bean对象,id默认是类名首字母小写,其余不变
       UserBean user=(UserBean)context.getBean("users");
       //3.调用方法
        System.out.println(user.toString());
运行结果如下:
UserBeanname=张三, Id=1, age=18注意:
@Bean 重命名
这个重命名的 name 其实是⼀个数组,⼀个 bean 可以有多个名字

    @Bean(name="u1","userinfo1")
    public UserBean users()
        UserBean user=new UserBean();
        user.setName("张三");
        user.setId(1);
        user.setAge(18);
        return user;
当创建了多个名字后,原来的方法名就失效,我们可以使用重命名来获取bean对象。

为什么要有这么多 类注解?
那么为什么需要怎么多的类注解也是相同的原因,就是让程序员看到类注解之后,就能直接了解当前类 的⽤途,⽐如:
程序的⼯程分层,调⽤流程如下:

类注解之间的关系?
查看 @Controller / @Service / @Repository / @Configuration 等注解的源码发现:

其实这些注解⾥⾯都有⼀个注解 @Component,说明它们本身就是属于 @Component 的“⼦类”。
Spring 如何制作出类注解的 beanName?
通过上⾯示例,我们可以看出:
通常我们 bean 使⽤的都是标准的⼤驼峰命名,
⽽读取的时候⾸字⺟⼩写就可以获取到 bean 了,如下图所示:

然⽽,当我们⾸字⺟和第⼆个字⺟都是⼤写时,就不能正常读取到 bean 了,如下图所示:
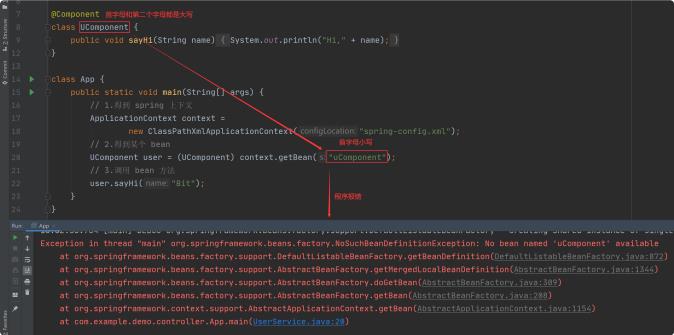
如果使用原名就又可以读取了,这是为什么呢?

这个时候,我们就要查询 Spring 关于 bean 存储时⽣成的命名规则了。
我们可以在 Idea 中使⽤搜索关键字 beanName 可以看到以下内容:

顺藤摸⽠,我们最后找到了 bean 对象的命名规则的⽅法
它使⽤的是 JDK Introspector 中的 decapitalize ⽅法,源码如下:

所以对于上⾯报错的代码,我们只要改为以下代码就可以正常运⾏了:
以上是关于SpringSpring 用注解 储存bean(类注解方法注解)Spring如何制作出类注解beanName的主要内容,如果未能解决你的问题,请参考以下文章