android7.x Launcher3源码解析---workspace和allapps加载流程
Posted Picasso_L
tags:
篇首语:本文由小常识网(cha138.com)小编为大家整理,主要介绍了android7.x Launcher3源码解析---workspace和allapps加载流程相关的知识,希望对你有一定的参考价值。
Launcher系列目录:
一、android7.x Launcher3源码解析(1)—启动流程
二、android7.x Launcher3源码解析(2)—框架结构
三、android7.x Launcher3源码解析(3)—workspace和allapps加载流程
前两篇博客分别对Lancher的启动和Launcher的框架结构进行了一些分析,这一篇,将着重开始分析界面的加载流程。
1、整体流程
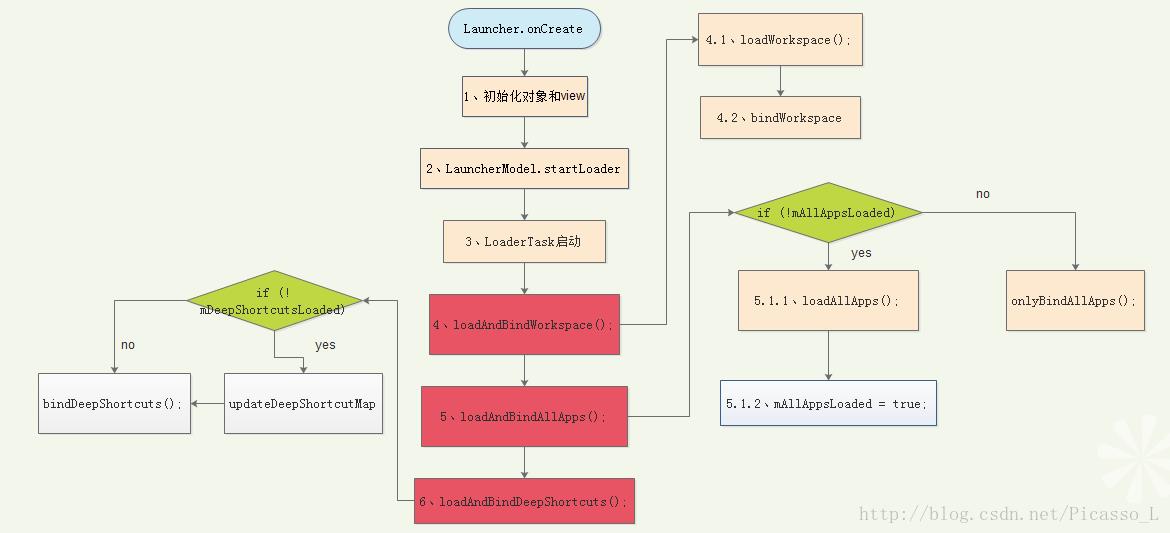
先上一张整体的流程图吧。(图片看不清可以下载下来看或者右击新开个页面查看图片)

先从Launcher.java的onCreate方法开始,
protected void onCreate(Bundle savedInstanceState) {
    ......
    //建立LauncherAppState对象
    LauncherAppState.setApplicationContext(getApplicationContext());
    LauncherAppState app = LauncherAppState.getInstance();

    ......
    //建立LauncherModel对象
    mModel = app.setLauncher(this);

    //一些其他对象初始化
    ......
    setContentView(R.layout.launcher);
    setupViews();
    if (!mRestoring) {
            if (DISABLE_SYNCHRONOUS_BINDING_CURRENT_PAGE) {
                // If the user leaves launcher, then we should just load items asynchronously when
                // they return.
                mModel.startLoader(PagedView.INVALID_RESTORE_PAGE);
            } else {
                // We only load the page synchronously if the user rotates (or triggers a
                // configuration change) while launcher is in the foreground
                mModel.startLoader(mWorkspace.getRestorePage());
            }
    }
    ......
}重点调用了LauncherModel的startLoader的方法,startLoader里面,最重要的就是启动了LoaderTask,mLoaderTask = new LoaderTask(mApp.getContext(), synchronousBindPage);
我们接着分析LoaderTask的run方法。
public void run() {
            ......
            keep_running: {
                if (DEBUG_LOADERS) Log.d(TAG, "step 1: loading workspace");
                loadAndBindWorkspace();

                if (mStopped) {
                    break keep_running;
                }

                waitForIdle();

                // second step
                if (DEBUG_LOADERS) Log.d(TAG, "step 2: loading all apps");
                loadAndBindAllApps();

                waitForIdle();

                // third step
                if (DEBUG_LOADERS) Log.d(TAG, "step 3: loading deep shortcuts");
                loadAndBindDeepShortcuts();
            }

            ......
}这里一共就几步,loadAndBindWorkspace–>waitForIdle()—>loadAndBindAllApps()—>waitForIdle()—>loadAndBindDeepShortcuts()
3步加载流程里面都穿插了waitForIdle,这个方法是干嘛的呢?
private void waitForIdle() {
          ......
            synchronized (LoaderTask.this) {
                final long workspaceWaitTime = DEBUG_LOADERS ? SystemClock.uptimeMillis() : 0;

                mHandler.postIdle(new Runnable() {
                        public void run() {
                            synchronized (LoaderTask.this) {
                                mLoadAndBindStepFinished = true;
                                if (DEBUG_LOADERS) {
                                    Log.d(TAG, "done with previous binding step");
                                }
                                LoaderTask.this.notify();
                            }
                        }
                    });

                while (!mStopped && !mLoadAndBindStepFinished) {
                    try {
                        // Just in case mFlushingWorkerThread changes but we aren't woken up,
                        // wait no longer than 1sec at a time
                        this.wait(1000);
                    } catch (InterruptedException ex) {
                        // Ignore
                    }
                }
               ......
            }
        }
load数据时我们是去UI线程中处理的,UI线程正常情况下是不能阻塞的,否则有可能产生ANR,这将严重影响用户体验。所有这里LoaderTask在将结果发送给UI线程之后,为了保证界面绑定任务可以高效的完成,往往会将自己的任务暂停下来,等待UI线程处理完成。
分析下这个方法:
首先,创建一个UI线程闲时执行的任务,这个任务负责设置某些关键的控制标志,并将其通过PostIdle方法加入处理器的消息队列中。一旦任务得到执行,就会将mLoadAndBindStepFinished 置为true,以控制即将来临的有条件的无限等待。 最后 设置一个有条件的无限等待,等待来自UI线程的指示。
2、workspace的加载流程
从总流程图上可以看到,workspace的加载流程主要分为loadWorkspace();和bindWorkspace(mPageToBindFirst);
a、loadWorkspace()
loadWorkspace()的代码实在是太多了,这里就不全部贴出来了,主要功能就是负责从数据库表中读取数据并转译为Launcher桌面项的数据结构。
以下为步骤:
1、进行一些预处理
2、加载默认值
LauncherAppState.getLauncherProvider().loadDefaultFavoritesIfNecessary()之前Launcher2的loadDefaultFavoritesIfNecessary这个方法,是这样加载默认布局的:
workspaceResId = sp.getInt(DEFAULT_WORKSPACE_RESOURCE_ID, R.xml.default_workspace);但是Launcher3中,是这样加载的:
int workspaceResId = partnerRes.getIdentifier(Partner.RES_DEFAULT_LAYOUT,
                            "xml", partner.getPackageName());
这个地方,我暂时还没理解,到底默认布局是哪个?
3、初始化数据
清空之前的内存数据
/** Clears all the sBg data structures */
        private void clearSBgDataStructures() {
            synchronized (sBgLock) {
                sBgWorkspaceItems.clear();
                sBgAppWidgets.clear();
                sBgFolders.clear();
                sBgItemsIdMap.clear();
                sBgWorkspaceScreens.clear();
            }
        }
4、查询ContentProvider,返回favorites表的结果集
final HashMap<String, Integer> installingPkgs = PackageInstallerCompat
                        .getInstance(mContext).updateAndGetActiveSessionCache();

                final ArrayList<Long> itemsToRemove = new ArrayList<Long>();
                final ArrayList<Long> restoredRows = new ArrayList<Long>();
                final Uri contentUri = LauncherSettings.Favorites.CONTENT_URI;
                if (DEBUG_LOADERS) Log.d(TAG, "loading model from " + contentUri);
                final Cursor c = contentResolver.query(contentUri, null, null, null, null);
5、根据不同的类型,将数据保存到对应的arrayList中。
类型包含下面这几种:
ITEM_TYPE_APPLICATION
ITEM_TYPE_SHORTCUT

ITEM_TYPE_FOLDER

ITEM_TYPE_APPWIDGET
ITEM_TYPE_CUSTOM_APPWIDGET
根据以上类型,将数据保存到一下全局变量里面
sBgItemsIdMap,sBgWorkspaceItemsm,sBgAppWidgets,sBgFolders
另外,如果有空的文件夹、空的屏幕,也会delete掉,最终,把所有屏幕加载进全局变量sBgWorkspaceScreens中。
......
           // Remove any empty folder
                    for (long folderId : LauncherAppState.getLauncherProvider()
                            .deleteEmptyFolders()) {
                        sBgWorkspaceItems.remove(sBgFolders.get(folderId));
                        sBgFolders.remove(folderId);
                        sBgItemsIdMap.remove(folderId);
                    }

                    ......

 sBgWorkspaceScreens.addAll(loadWorkspaceScreensDb(mContext));

                // Remove any empty screens
                ArrayList<Long> unusedScreens = new ArrayList<Long>(sBgWorkspaceScreens);
                for (ItemInfo item: sBgItemsIdMap) {
                    long screenId = item.screenId;
                    if (item.container == LauncherSettings.Favorites.CONTAINER_DESKTOP &&
                            unusedScreens.contains(screenId)) {
                        unusedScreens.remove(screenId);
                    }
                }

                // If there are any empty screens remove them, and update.
                if (unusedScreens.size() != 0) {
                    sBgWorkspaceScreens.removeAll(unusedScreens);
                    updateWorkspaceScreenOrder(context, sBgWorkspaceScreens);
                }
b、bindWorkspace
bindWorkspace的功能是将上面获取到的数据由Launcher显示出来。
步骤:
1、首先复制数据:
            synchronized (sBgLock) {
                workspaceItems.addAll(sBgWorkspaceItems);
                appWidgets.addAll(sBgAppWidgets);
                orderedScreenIds.addAll(sBgWorkspaceScreens);

                folders = sBgFolders.clone();
                itemsIdMap = sBgItemsIdMap.clone();
            }
2、装载数据并排序
            //装载桌面项数据
            filterCurrentWorkspaceItems(currentScreenId, workspaceItems, currentWorkspaceItems,
                    otherWorkspaceItems);
            //装载widget
            filterCurrentAppWidgets(currentScreenId, appWidgets, currentAppWidgets,
                    otherAppWidgets);
            //装载文件夹
            filterCurrentFolders(currentScreenId, itemsIdMap, folders, currentFolders,
                    otherFolders);
            //排序
            sortWorkspaceItemsSpatially(currentWorkspaceItems);
            sortWorkspaceItemsSpatially(otherWorkspaceItems);
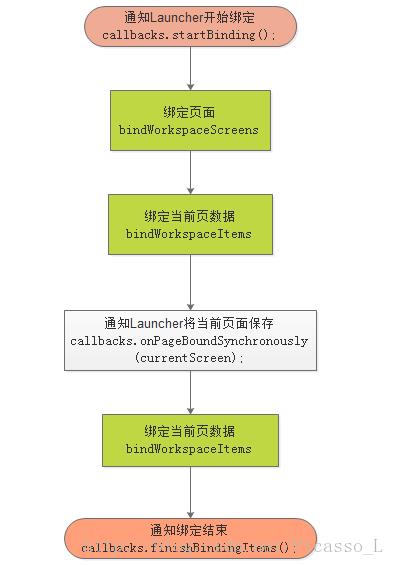
3、开始绑定

就上个流程图吧。
3、应用程序apps的加载
加载apps的主要流程,最上面那张流程图已经给出了,如果所有app没有加载,则loadAllApps();,不然直接onlyBindAllApps();
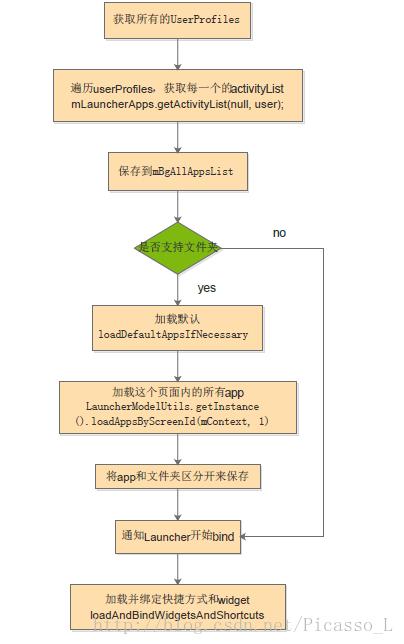
1、loadAllApps()

根据代码,画了下流程图,但是我不明白userProfile是个什么鬼?
2、onlyBindAllApps()
这里的函数比绑定workspace简单多了,直接通知Launcher绑定
            Runnable r = new Runnable() {
                public void run() {
                    final long t = SystemClock.uptimeMillis();
                    final Callbacks callbacks = tryGetCallbacks(oldCallbacks);
                    if (callbacks != null) {
                        callbacks.bindAllApplications(list);
                        callbacks.bindAllPackages(widgetList);
                    }
                    if (DEBUG_LOADERS) {
                        Log.d(TAG, "bound all " + list.size() + " apps from cache in "
                                + (SystemClock.uptimeMillis()-t) + "ms");
                    }
                }
};看一下Launcher的bindAllApplications函数,当然这个函数在loadAllApps函数里面也有,就是如何绑定数据来显示呢?
Launcher.java的bindAllApplications函数里面会给AllAppsContainerView设置数据
if (mAppsView != null) {
            mAppsView.setApps(apps);
        }
再跟代码到AllAppsContainerView,
public void setApps(List<AppInfo> apps) {
        mApps.setApps(apps);
    }
这个apps在哪里用到呢?比较明显的就是onFinishInflate()函数,
.....
        // Load the all apps recycler view
        mAppsRecyclerView = (AllAppsRecyclerView) findViewById(R.id.apps_list_view);
        mAppsRecyclerView.setApps(mApps);
        mAppsRecyclerView.setLayoutManager(mLayoutManager);
        mAppsRecyclerView.setAdapter(mAdapter);
        mAppsRecyclerView.setHasFixedSize(true);
.....设置给了recyclerView,很显然,Launcher的应用程序界面就是一个自定义的RecyclerView,给这个recyclerview绑定的adpter是AllAppsGridAdapter,看一下这个adpter的onCreateViewHolder函数,很明显,这里根据不同的类型加载了不同的布局(应用程序界面有app和文件夹,头上还有个搜索框,用recyclerview的这个功能是最容易实现的),关于Recyclerview如何可以根据不同的类型加载不同的布局,可以参考我很久之前写的博客 RecyclerView的不同position加载不同View实现。
好了,Launcher3的workspace和应用程序apps的加载流程就讲到这,后面还会对Launcher里面的内容做具体的分析。
以上是关于android7.x Launcher3源码解析---workspace和allapps加载流程的主要内容,如果未能解决你的问题,请参考以下文章