CentOS8提高篇19:Centos8使用SSM管理LVM卷
Posted 北方的流星
tags:
篇首语:本文由小常识网(cha138.com)小编为大家整理,主要介绍了CentOS8提高篇19:Centos8使用SSM管理LVM卷相关的知识,希望对你有一定的参考价值。
系统存储管理器(SSM)提供了一个命令行接口来管理各种技术中的存储。通过使用DM、LVM和MD,存储系统变得越来越复杂。这就造成了一个对用户不友好的系统,使错误和问题更容易出现。SSM通过创建统一的用户界面来缓解这一问题。
一、环境
- Centos8.5 Minimal
- system-storage-manager 0.4-9
二、安装SSM
[root@localhost ~]# yum -y install system-storage-manager
三、列出设备、卷等信息
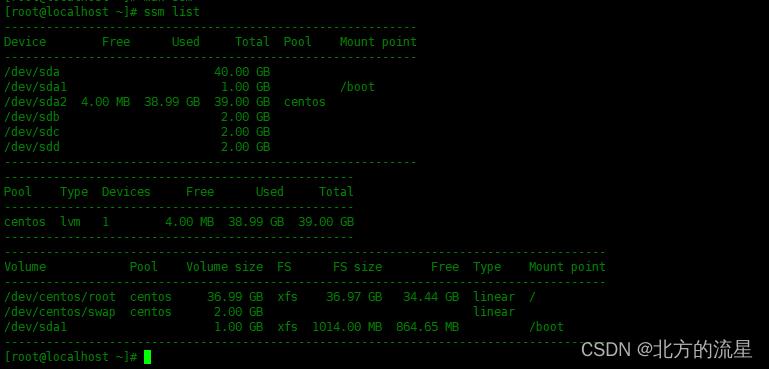
使用ssm list 显示所有检测到的设备、池、卷和快照的信息:
[root@localhost ~]# ssm list
-----------------------------------------------------------
Device Free Used Total Pool Mount point
-----------------------------------------------------------
/dev/sda 40.00 GB
/dev/sda1 1.00 GB /boot
/dev/sda2 4.00 MB 38.99 GB 39.00 GB centos
/dev/sdb 2.00 GB
/dev/sdc 2.00 GB
/dev/sdd 2.00 GB
-----------------------------------------------------------
--------------------------------------------------
Pool Type Devices Free Used Total
--------------------------------------------------
centos lvm 1 4.00 MB 38.99 GB 39.00 GB
--------------------------------------------------
--------------------------------------------------------------------------------------
Volume Pool Volume size FS FS size Free Type Mount point
--------------------------------------------------------------------------------------
/dev/centos/root centos 36.99 GB xfs 36.97 GB 34.44 GB linear /
/dev/centos/swap centos 2.00 GB linear
/dev/sda1 1.00 GB xfs 1014.00 MB 864.65 MB /boot
--------------------------------------------------------------------------------------
[root@localhost ~]#

可以使用ssm list --help查询帮助信息。
四、 创建新的池、逻辑卷、和文件系统
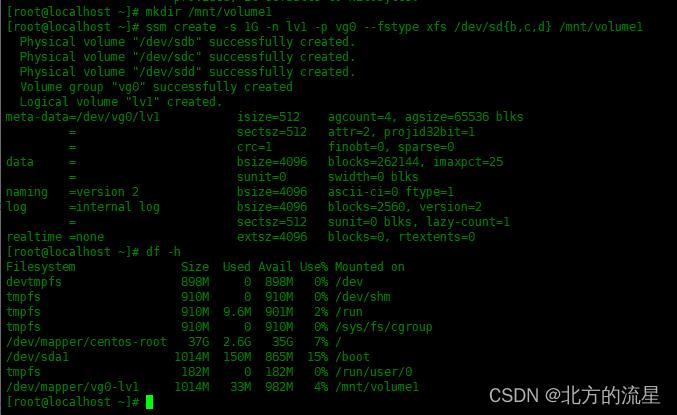
使用/dev/sdb,/dev/sdc,/dev/sdd三块硬盘创建vg0池,创建lv1逻辑卷,大小为1G,格式化为xfs文件系统格式,挂载到/mnt/volume1目录。
# 创建挂载目录
[root@localhost ~]# mkdir /mnt/volume1
# 创建逻辑卷
[root@localhost ~]# ssm create -s 1G -n lv1 -p vg0 --fstype xfs /dev/sdb,c,d /mnt/volume1
Physical volume "/dev/sdb" successfully created.
Physical volume "/dev/sdc" successfully created.
Physical volume "/dev/sdd" successfully created.
Volume group "vg0" successfully created
Logical volume "lv1" created.
meta-data=/dev/vg0/lv1 isize=512 agcount=4, agsize=65536 blks
= sectsz=512 attr=2, projid32bit=1
= crc=1 finobt=0, sparse=0
data = bsize=4096 blocks=262144, imaxpct=25
= sunit=0 swidth=0 blks
naming =version 2 bsize=4096 ascii-ci=0 ftype=1
log =internal log bsize=4096 blocks=2560, version=2
= sectsz=512 sunit=0 blks, lazy-count=1
realtime =none extsz=4096 blocks=0, rtextents=0
# 查看是否挂载
[root@localhost ~]# df -h
Filesystem Size Used Avail Use% Mounted on
devtmpfs 898M 0 898M 0% /dev
tmpfs 910M 0 910M 0% /dev/shm
tmpfs 910M 9.6M 901M 2% /run
tmpfs 910M 0 910M 0% /sys/fs/cgroup
/dev/mapper/centos-root 37G 2.6G 35G 7% /
/dev/sda1 1014M 150M 865M 15% /boot
tmpfs 182M 0 182M 0% /run/user/0
/dev/mapper/vg0-lv1 1014M 33M 982M 4% /mnt/volume1

--fstype选项支持的文件类型,目前支持的有:
- ext3
- ext4
- xfs
- btrfs
-s选项指定逻辑卷的大小。
-n选项指定指定逻辑卷的名称
-p选项需要使用哪一个池,如果池不存在,会创建池。
/dev/sdb,c,d使用/dev/sdb , /dev/sdc ,/dev/sdd这三个磁盘。
五、扩展逻辑卷
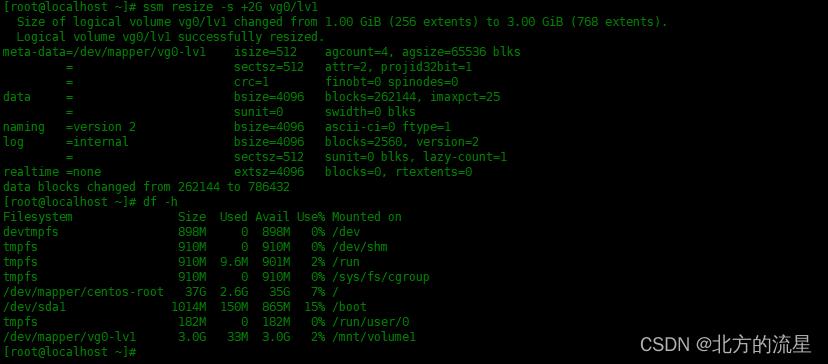
ssm resize命令可以调整卷的大小。下面的例子是给lv1逻辑卷增加2G空间,总空间为3G。
[root@localhost ~]# ssm resize -s +2G vg0/lv1
Size of logical volume vg0/lv1 changed from 1.00 GiB (256 extents) to 3.00 GiB (768 extents).
Logical volume vg0/lv1 successfully resized.
[root@localhost ~]# df -h
Filesystem Size Used Avail Use% Mounted on
devtmpfs 898M 0 898M 0% /dev
tmpfs 910M 0 910M 0% /dev/shm
tmpfs 910M 9.6M 901M 2% /run
tmpfs 910M 0 910M 0% /sys/fs/cgroup
/dev/mapper/centos-root 37G 2.6G 35G 7% /
/dev/sda1 1014M 150M 865M 15% /boot
tmpfs 182M 0 182M 0% /run/user/0
/dev/mapper/vg0-lv1 3.0G 33M 3.0G 2% /mnt/volume1
 六、创建快照
为lv1逻辑卷创建快照
[root@localhost ~]# ssm snapshot /dev/vg0/lv1
Rounding up size to full physical extent 412.00 MiB
Logical volume "snap20200325T195111" created.
[root@localhost ~]# ssm list snap
------------------------------------------------------------------------
Snapshot Origin Pool Volume size Used Type
------------------------------------------------------------------------
/dev/vg0/snap20200325T195111 lv1 vg0 412.00 MB 0.00 KB linear
七、删除卷、池
在这里删除卷和池。首先要卸载分区。
[root@localhost ~]# umount /mnt/volume1/
# 删除vg0池和lv1卷
[root@localhost ~]# ssm remove vg0
Do you really want to remove volume group "vg0" containing 2 logical volumes? [y/n]: y
Do you really want to remove active origin logical volume vg0/lv1 with 1 snapshot(s)? [y/n]: y
Logical volume "snap20200325T195111" successfully removed
Logical volume "lv1" successfully removed
Volume group "vg0" successfully removed

然后从物理卷里面把/dev/sdb,/dev/sdc,/dev/sdd移除掉。
[root@localhost ~]# pvremove /dev/sdb,c,d
Labels on physical volume "/dev/sdb" successfully wiped.
Labels on physical volume "/dev/sdc" successfully wiped.
Labels on physical volume "/dev/sdd" successfully wiped.
总结
SSM通过创建统一的用户界面来缓解这一问题。
centos下安装SS5服务器
ss5服务器安装步骤记录,首先是安装软件:
wget http://jaist.dl.sourceforge.net/project/ss5/ss5/3.8.9-8/ss5-3.8.9-8.tar.gz
tar zxvf ss5-3.8.9-2.tar.gz
cd ss5-3.8.9
./configure
make
make install
设置开机自启动
chmod +x /etc/init.d/ss5
chkconfig --add ss5
chkconfig ss5 on
默认使用1080端口,也可以自己设置/etc/rc.d/init.d/ss5:改如下这一行
daemon /usr/sbin/ss5 -t $SS5_OPTS  改为:
daemon /usr/sbin/ss5 -t $SS5_OPTS -b 0.0.0.0:1888
可以通过修改 /etc/opt/ss5/ss5.conf 添加用户名和密码,如下:
# SHost                  SPort           Authentication
#
auth 0.0.0.0/0           -                -
修改为:
# SHost                  SPort           Authentication
#
auth 0.0.0.0/0           -                  u
在 /etc/opt/ss5/ss5.passwd 中添加 用户名和密码(一行一个用户信息,格式:用户名+空格+密码) 如:
user password
启动ss5服务:
service ss5 restart
本文出自 “帝心禅影” 博客,请务必保留此出处http://yedee.blog.51cto.com/513852/1745473
以上是关于CentOS8提高篇19:Centos8使用SSM管理LVM卷的主要内容,如果未能解决你的问题,请参考以下文章