React 面向组件编程(下)
Posted 清风 与我
tags:
篇首语:本文由小常识网(cha138.com)小编为大家整理,主要介绍了React 面向组件编程(下)相关的知识,希望对你有一定的参考价值。
目录
前言:
在React面向组件编程中,除了上一章节的组件实例的三大核心属性以外,还有很多重要的内容比如:React 的生命周期,受控组件与非受控组件,高阶函数和函数柯里化的理解等,在本文中会给大家继续讲解React 面向组件编程中剩余的内容。
一、受控组件与非受控组件
表单的组件分类:
- 受控组件
- 非受控组件
多数情况下,推荐使用受控组件实现表单。在受控组件中,表单数据由组件控制。
另外一种是非受控组件,这种方式下表单组件由DOM自身控制。
1. 受控组件
- 受控组件通过
props获取其当前值,并通过回调函数(比如onChange)通知变化 - 表单状态发生变化时,都会通知
React,将状态交给React进行处理,比如可以使用useState存储 - 受控组件中,组件渲染出的状态与它的
value或checked属性相对应 - 受控组件会更新
state的流程
class Login extends React.Component
    // 初始化状态
    state =
        username:'', // 用户名
        password:'', // 密码

    // 保存用户名到状态中
    saveUsername=(event)=>
        this.setState(username:event.target.value)

    // 保存密码到状态中
    savePassword=(event)=>
        this.setState(password:event.target.value)

    // 表单提交的回调
    handleSubmit=(event)=>
        event.preventDefault(); // 阻止默认事件

        let username,password = this.state
        alert(`你输入的用户名是$username,密码是$password`)

    render()
        return(
            <div>
                <form action="https://www.baidu.com/" onSubmit=this.handleSubmit>
                    用户名:<input type="text" onChange=this.saveUsername name="username" />
                    密码:<input type="text" onChange=this.savePassword name="password" />
                    <button type="submit">登录</button>
                </form>
            </div>
        )
2. 非受控组件
非受控组件将数据存储在 DOM 中,而不是组件内,这比较类似于传统的 html 表单元素。
- 非受控组件的值不受组件自身的
state和props控制 - 非受控组件使用
ref从DOM中获取元素数据
class Login extends React.Component
    handleSubmit=(event)=>
        // console.log(e>=event)
        event.preventDefault(); // 阻止默认事件

        let username,password = this
        alert(`你输入的用户名是$username.value,密码是$password.value`)

    render()
        return(
            <div>
                <form action="https://www.baidu.com/" onSubmit=this.handleSubmit>
                    用户名:<input type="text" ref=c=>this.username = c name="username" />
                    密码:<input type="text" ref=c=>this.password = c name="password" />
                    <button type="submit">登录</button>
                </form>
            </div>
        )
3. 效果展示

4. 总结:
React中的组件分为受控组件和非受控组件- 受控组件的两个要点:
- 组件的
value属性与React中的状态绑定 - 组件内声明了
onChange事件处理value的变化
- 组件的
- 非受控组件更像是传统的
HTML表单元素,数据存储在DOM中,而不是组件内部,获取数据的方式是通过ref引用 - 一些建议:
- 尽可能使用受控组件
- 受控组件是将状态交由
React处理,可以是任何元素,不局限于表单元素 - 对于有大量表单元素的页面,使用受控组件会使程序变得繁琐难控,此时使用非受控组件更为明智
- 在受控组件中,数据流是单向的(
state是变化来源),因此在改变state时都应该使用setState,而不要强制赋值 Refs不能用于函数式组件,因为函数式组件没有实例- 在函数式组件内部,是可以使用
Refs的
二、组件的生命周期
所谓的React生命周期,就是指组件从被创建出来,到被使用,最后被销毁的这么一个过程;
而在这个过程中,React提供了我们会自动执行的不同的钩子函数,我们称之为生命周期函数;
组件的生命周期大致分为三个阶段:组件挂载阶段,组件更新阶段,组件销毁卸载阶段
react在版本16.3前后存在两套生命周期,16.3之前为旧版,之后则是新版,虽有新旧之分,但主体上大同小异。
1. 对生命周期的理解
- 组件从创建到死亡它会经历一些特定的阶段。
- React组件中包含一系列勾子函数(生命周期回调函数), 会在特定的时刻调用。
- 我们在定义组件时,会在特定的生命周期回调函数中,做特定的工作。
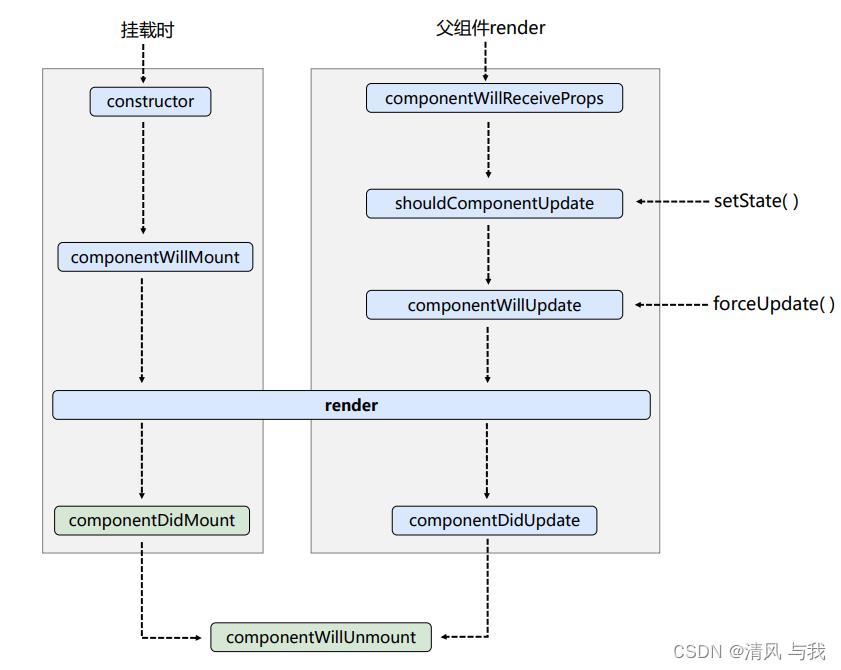
2. 生命周期的三个阶段(旧)

- 初始化阶段: 由ReactDOM.render()触发—初次渲染
- constructor()
- componentWillMount()
- render()
- componentDidMount()
- 更新阶段: 由组件内部this.setSate()或父组件重新render触发
- shouldComponentUpdate()
- componentWillUpdate()
- render()
- componentDidUpdate()
- 卸载组件: 由ReactDOM.unmountComponentAtNode()触发
- componentWillUnmount()
<!DOCTYPE html>
<html lang="en">
<head>
    <meta charset="UTF-8">
    <meta http-equiv="X-UA-Compatible" content="IE=edge">
    <meta name="viewport" content="width=device-width, initial-scale=1.0">
    <title>生命周期旧</title>
</head>
<body>
    <!-- 准备好一个容器 -->
    <div id="test"></div>
    <!-- 引入 React 核心库 -->
    <script src="../js/react.development.js"></script>
    <!-- 引入 react-dom 用于支持 react 操作 DOM -->
    <script src="../js/react-dom.development.js"></script>

    <!-- 引入babel:
            1. ES6 ==> ES5
            2. jsx ==> js
    -->
    <script src="../js/babel.min.js"></script>

    <script type="text/babel">
        class Count extends React.Component
            state =
                count:0

            add = ()=>
                // 获取原状态
                let count = this.state
                // 更新状态
                this.setState(count:count+1)

            death = ()=>
                ReactDOM.unmountComponentAtNode(document.getElementById('test'))

            force = ()=>
                this.forceUpdate() // 强制更新

            // 数据更新的 ‘阀门~’
            shouldComponentUpdate()
                console.log("Count --- shouldComponentUpdate");
                return true // 这里必须有返回4值,其次返回值默认是true

            // 组件将要更新的钩子
            componentWillUpdate()
                console.log("Count ---- componentWillUpdate");

            // 组件更新完成的钩子
            componentDidUpdate()
                console.log("Count ---- componentDidUpdate");

            render()
                console.log("render");
                let count = this.state
                return(
                    <div>
                        <h2>当前求和为:count</h2>
                        <button onClick=this.add>点我+1</button>
                        <button onClick=this.death>卸载组件</button>
                        <button onClick=this.force>不更改任何状态中的数据,强制更新</button>
                    </div>
                )


        // 父组件
        class A extends React.Component
            state = carName:'小三轮'
            changeCar = ()=>
                this.setState(carName:"宾利")

            render()
                console.log('A ---- render');
                return(
                    <div>
                        <div>我是A组件</div>
                        <button onClick=this.changeCar>换车</button>
                        <B carName=this.state.carName></B>
                    </div>
                )


        // 子组件
        class B extends A
            // 组件将要接收新的props的钩子
            componentWillReceiveProps()
                console.log('B ---- componentWillReceiveProps');

            // 数据更新的 ‘阀门~’
            shouldComponentUpdate()
                console.log("B --- shouldComponentUpdate");
                return true // 这里必须有返回4值,其次返回值默认是true

            // 组件将要更新的钩子
            componentWillUpdate()
                console.log("B ---- componentWillUpdate");

            // 组件更新完成的钩子
            componentDidUpdate()
                console.log("B ---- componentDidUpdate");

            render()
                console.log('B ---- render');
                return(
                    <div>
                        我是B组件,接收到的车是:this.props.carName
                    </div>
                )


        ReactDOM.render(<A />,document.getElementById('test'))
    </script>
</body>
</html>
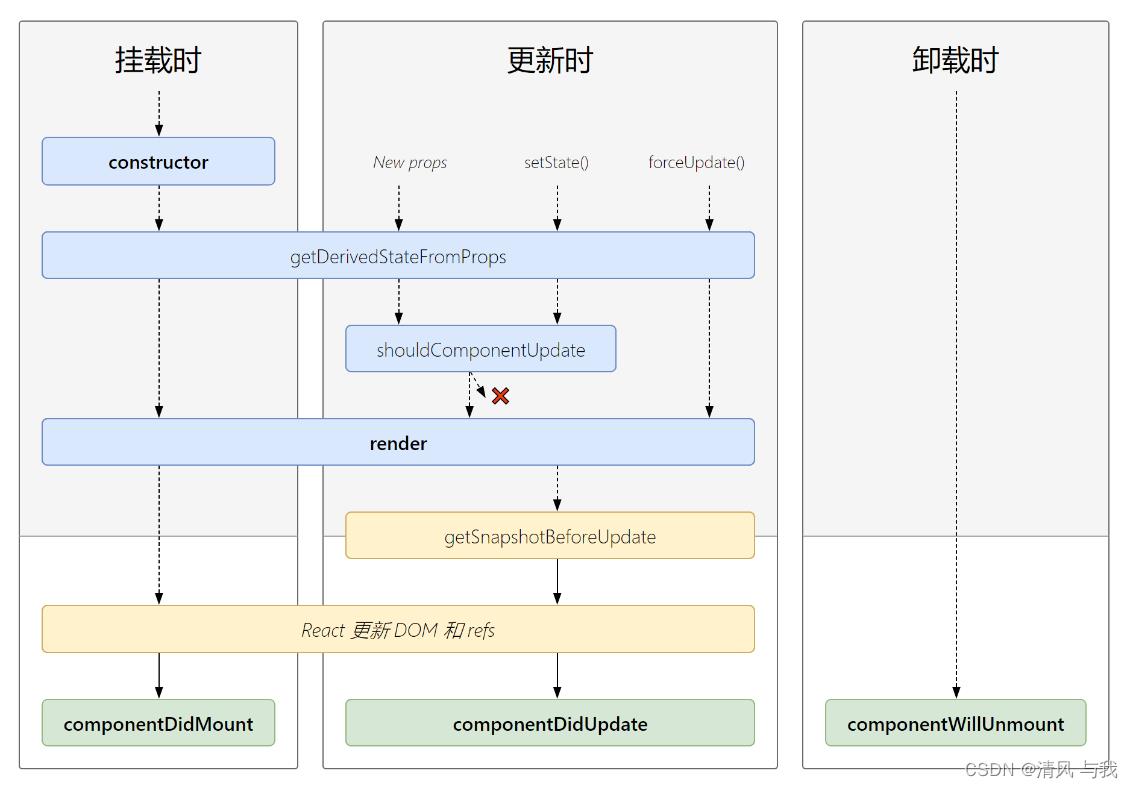
3. 生命周期的三个阶段(新)

- 初始化阶段: 由ReactDOM.render()触发—初次渲染
- constructor()
- getDerivedStateFromProps
- render()
- componentDidMount()
- 更新阶段: 由组件内部this.setSate()或父组件重新render触发
- getDerivedStateFromProps
- shouldComponentUpdate()
- render()
- getSnapshotBeforeUpdate
- componentDidUpdate()
- 卸载组件: 由ReactDOM.unmountComponentAtNode()触发
- componentWillUnmount()
<!DOCTYPE html>
<html lang="en">
<head>
<meta charset="UTF-8">
<meta http-equiv="X-UA-Compatible" content="IE=edge">
<meta name="viewport" content="width=device-width, initial-scale=1.0">
<title>生命周期新</title>
</head>
<body>
<!-- 准备好一个容器 -->
<div id="test"></div>
<!-- 引入 React 核心库 -->
<script src="../js/17.0.1/react.development.js"></script>
<!-- 引入 react-dom 用于支持 react 操作 DOM -->
<script src="../js/17.0.1/react-dom.development.js"></script>
<!-- 引入babel:1. ES6 ==> ES52. jsx ==> js -->
<script src="../js/17.0.1/babel.min.js"></script>
<script type="text/babel">
class Count extends React.Component
state =
count:0
add = ()=>
// 获取原状态
let count = this.state
// 更新状态
this.setState(count:count+1)
death = ()=>
ReactDOM.unmountComponentAtNode(document.getElementById('test'))
force = ()=>
this.forceUpdate() // 强制更新
// 数据更新的 ‘阀门~’
shouldComponentUpdate()
console.log("Count --- shouldComponentUpdate");
return true // 这里必须有返回4值,其次返回值默认是true
// 组件将要更新的钩子
componentWillUpdate()
console.log("Count ---- componentWillUpdate");
// 组件更新完成的钩子
componentDidUpdate()
console.log("Count ---- componentDidUpdate");
render()
console.log("render");
let count = this.state
return(
<div>
<h2>当前求和为:count</h2>
<button onClick=this.add>点我+1</button>
<button onClick=this.death>卸载组件</button>
<button onClick=this.force>不更改任何状态中的数据,强制更新</button>
</div>
)
// 父组件
class A extends React.Component
state = carName:'小三轮'
constructor(props)
state
changeCar = ()=>
this.setState(carName:"宾利")
static getDerivedStateFromProps(props, state)
// 这里必须要一个返回值 ==> state or null
// 这里的state会覆盖掉原本的状态,并且后续也无法修改
// 能将外部的接收的props 赋值给组件自身的 state
// 如果你希望自身的state一直,全部依赖于外部的props,那么可以使用这个生命周期函数
return carName:"QQ"
// 获取护具更新前的快照,能拿到旧的props和state
// 必须有返回值
getSnapshotBeforeUpdate = (prevProps, prevState) =>
render()
console.log('A ---- render');
return(
<div>
<div>我是A组件</div>
<button onClick=this.changeCar>换车</button>
<B carName=this.state.carName></B>
</div>
)
// 子组件
class B extends A
// 组件将要接收新的props的钩子
UNSAFE_componentWillReceiveProps()
console.log('B ---- componentWillReceiveProps');
// 数据更新的 ‘阀门~’
shouldComponentUpdate()
console.log("B --- shouldComponentUpdate");
return true // 这里必须有返回4值,其次返回值默认是true
// 将要挂载时
UNSAFE_componentWillMount()
console.log("Count --- componentWillUnMount");
// 组件将要更新的钩子
UNSAFE_componentWillUpdate()
console.log("B ---- componentWillUpdate");
// 组件更新完成的钩子
componentDidUpdate()
console.log("B ---- componentDidUpdate");
render()
console.log('B ---- render');
return(
<div>
我是B组件,接收到的车是:this.props.carName
</div>
)
ReactDOM.render(React 面向组件化编程
React 面向组件化编程
面向对象----> 面向模块 ----> 面向组件
套路:
注意:
组件名必须大写开头;
只能有一个根标签;
<input />虚拟DOM 元素必须有结束标签
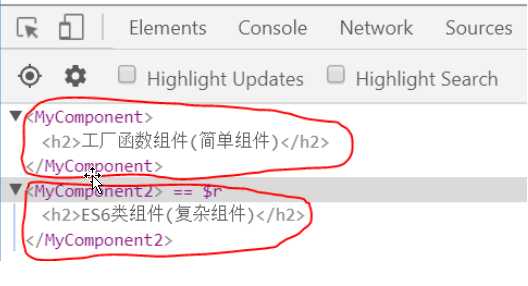
方式1. 工厂函数组件 (简单组件)

-
function MyComponent(){ // 只能 大写开头,区别于普通函数
return <h2>工厂函数组件(简单组件)</h2>
}
// 渲染函数组件标签
// 内部直接调用 工厂组件函数 得到虚拟组件函数
ReactDOM.render(<MyComponent/>, document.getElementById("outer"))

方式2: ES6 类组件 (复杂组件)
-
class MyComponent2 extends React.Component {
// 1. 必须继承
// 2. 必须大写开头
// 3. 必须重写 render 方法, 指定 return 返回值
render (){
return <h2>ES6类组件(复杂组件)</h2>
}
}
// 渲染类组件标签
// 内部会自动创建类的实例,并调用其 render() 方法得到需要渲染的虚拟 DOM
React.render(<MyComponent/>, document.getElementById("outer"));
5
500
5
5
5
5
5
5
5
5
5
5
5
5
5
5
5
5
5
5
5
5
5
5
5
5
5
5
5
5
5
5
5
5
5
5
5
以上是关于React 面向组件编程(下)的主要内容,如果未能解决你的问题,请参考以下文章