postgreSQL15发布,难掩激动快速尝鲜
Posted IT邦德
tags:
篇首语:本文由小常识网(cha138.com)小编为大家整理,主要介绍了postgreSQL15发布,难掩激动快速尝鲜相关的知识,希望对你有一定的参考价值。
📢📢📢📣📣📣
哈喽!大家好,我是【IT邦德】,江湖人称jeames007,10余年DBA工作经验
一位上进心十足的【大数据领域博主】!😜😜😜
中国DBA联盟(ACDU)成员,目前从事DBA及程序编程
擅长主流数据Oracle、mysql、PG 运维开发,备份恢复,安装迁移,性能优化、故障应急处理等。
✨ 如果有对【数据库】感兴趣的【小可爱】,欢迎关注【IT邦德】💞💞💞
❤️❤️❤️感谢各位大可爱小可爱!❤️❤️❤️
文章目录
前言
PostgreSQL全球开发小组与2022年10月13日,宣布发布PostgreSQL15,这是世界上最先进的开源数据库的最新版本📣 1.新版本发布
1.官方网址:
https://www.postgresql.org/
PostgreSQL是一个功能强大的开放源码对象关系数据库系统,经过35年的积极开发,它在可靠性、功能健壮性和性能方面享有盛誉。

PostgreSQL全球开发小组与2022年10月13日,宣布发布PostgreSQL15,这是世界上最先进的开源数据库的最新版本。
PostgreSQL 15基于最近版本的性能改进,在管理本地和分布式部署中的工作负载方面取得了显著的进步。

PostgreSQL 15包含许多新功能和增强功能,大致包括:
1.支持SQL MERGE命令。
2.通过指定列列表和行筛选条件,在逻辑复制发布中选择性地发布表的内容。
3.更多压缩选项,包括支持Zstandard(zstd)压缩。这包括支持在pg_basebackup期间在服务器端执行压缩。
4.支持使用JSON格式的结构化服务器日志输出。
5.性能改进,特别是在内存和磁盘排序方面。

📣 2.yum在线安装
✨ 2.1 删除原有PG
yum remove -y postgresql*
rm -rf  /var/lib/pgsql
rm -rf  /usr/pgsql*
userdel -r postgres
groupdel postgres
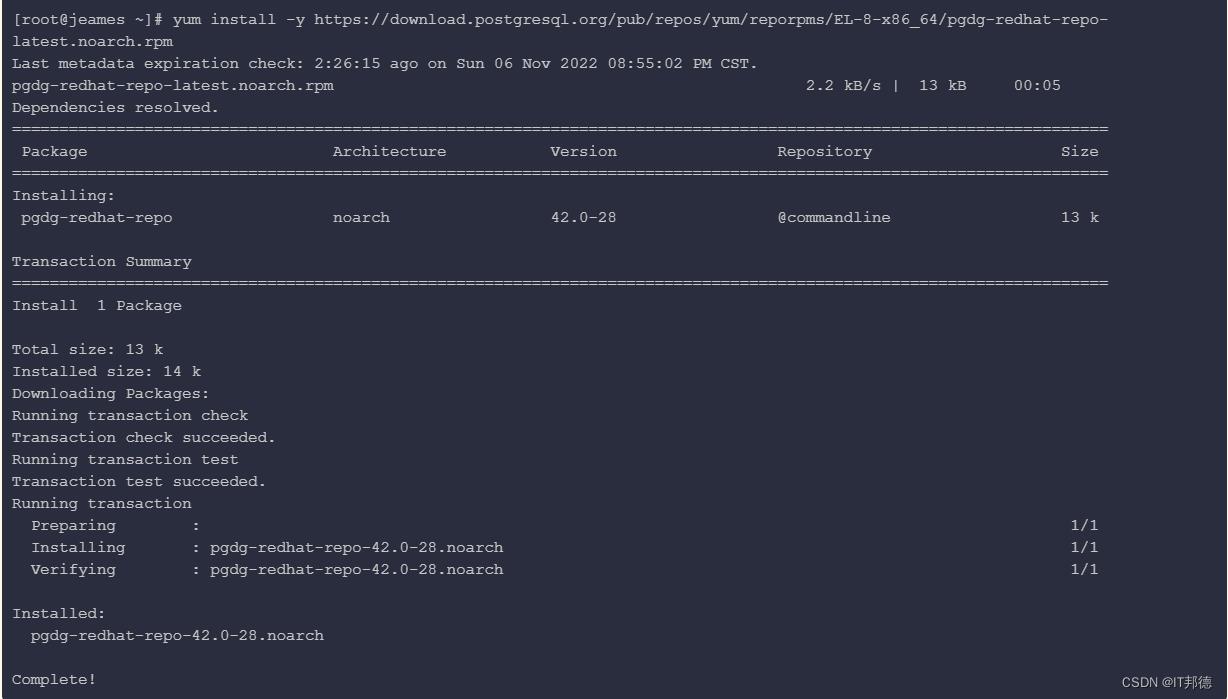
✨ 2.2 安装yum源
[root@jeames ~]# yum install -y https://download.postgresql.org/pub/repos/yum/reporpms/EL-8-x86_64/pgdg-redhat-repo-latest.noarch.rpm
✨ 2.3 安装PG15
[root@jeames ~]# yum-config-manager --enable pgdg15
[root@jeames ~]# yum repolist enabled | grep pgdg
pgdg-common                PostgreSQL common RPMs for RHEL / Rocky 8 - x86_64
pgdg10                     PostgreSQL 10 for RHEL / Rocky 8 - x86_64
pgdg11                     PostgreSQL 11 for RHEL / Rocky 8 - x86_64
pgdg12                     PostgreSQL 12 for RHEL / Rocky 8 - x86_64
pgdg13                     PostgreSQL 13 for RHEL / Rocky 8 - x86_64
pgdg14                     PostgreSQL 14 for RHEL / Rocky 8 - x86_64
pgdg15                     PostgreSQL 15 for RHEL / Rocky 8 - x86_64

[root@jeames ~]# yum module disable postgresql
[root@jeames ~]# yum install -y postgresql15 postgresql15-server postgresql15-libs postgresql15-contrib
✨ 2.4 验证安装
[root@jeames ~]# rpm -aq| grep postgres
postgresql15-15.0-1PGDG.rhel8.x86_64
postgresql15-server-15.0-1PGDG.rhel8.x86_64
postgresql15-contrib-15.0-1PGDG.rhel8.x86_64
postgresql15-libs-15.0-1PGDG.rhel8.x86_64

以上说明已经全部安装OK
✨ 2.5 环境变量设置
[root@jeames ~]# which psql
/usr/bin/psql

[root@jeames ~]# echo "export PATH=/usr/pgsql-15/bin:$PATH" >> /etc/profile
[root@jeames ~]# source /etc/profile
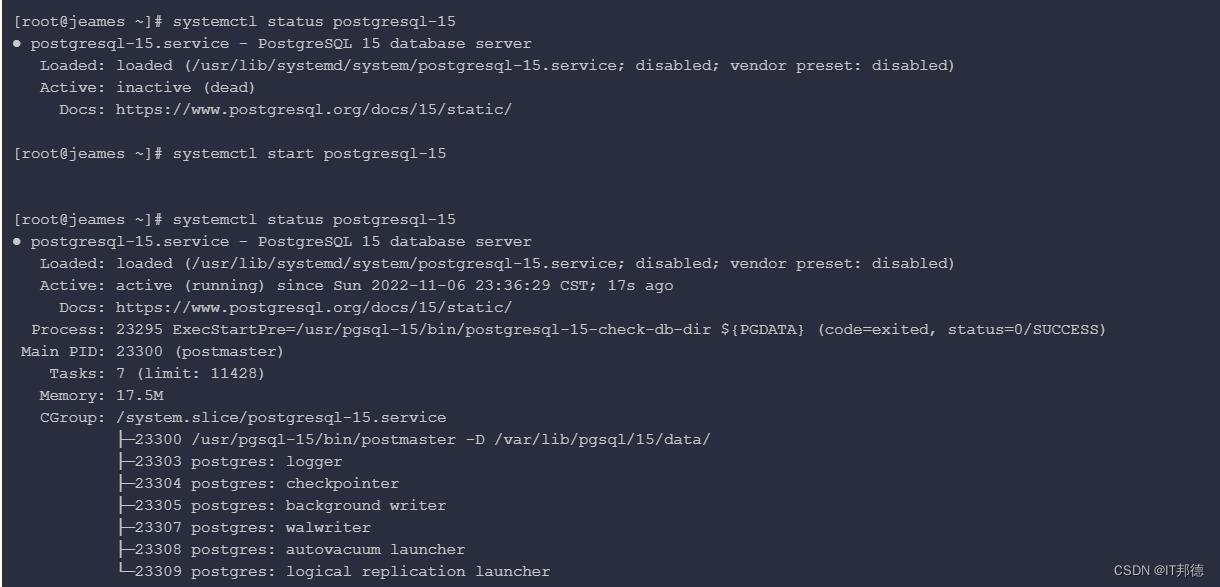
✨ 2.6 初始化PG
[root@jeames ~]# /usr/pgsql-15/bin/postgresql-15-setup initdb
Initializing database ... OK


[root@jeames ~]# systemctl status postgresql-15
[root@jeames ~]# systemctl start postgresql-15
[root@jeames ~]# systemctl enable postgresql-15
✨ 2.7 登陆PG
以下方法是本地登陆
[root@jeames ~]# su - postgres
[postgres@jeames ~]$ psql
psql (15.0)
Type "help" for help.

postgres=# \\c
You are now connected to database "postgres" as user "postgres".
postgres=# \\l
                                                 List of databases
   Name    |  Owner   | Encoding |   Collate   |    Ctype    | ICU Locale | Locale Provider |   Access privileges
-----------+----------+----------+-------------+-------------+------------+-----------------+-----------------------
 postgres  | postgres | UTF8     | en_US.UTF-8 | en_US.UTF-8 |            | libc            |
 template0 | postgres | UTF8     | en_US.UTF-8 | en_US.UTF-8 |            | libc            | =c/postgres          +
           |          |          |             |             |            |                 | postgres=CTc/postgres
 template1 | postgres | UTF8     | en_US.UTF-8 | en_US.UTF-8 |            | libc            | =c/postgres          +
           |          |          |             |             |            |                 | postgres=CTc/postgres
(3 rows)
✨ 2.8 postgres密码修改
postgres=# \\password
Enter new password for user "postgres":
Enter it again:

注意:以上输入密码即可

📣 3.PG参数设置
[root@jeames ~]# su - postgres
cat >> /var/lib/pgsql/15/data/postgresql.conf <<"EOF"
listen_addresses = '*'
port=5432
unix_socket_directories='/var/lib/pgsql/15/data'
logging_collector = on
log_directory = 'pg_log'
log_filename = 'postgresql-%a.log'
log_truncate_on_rotation = on
EOF
📣 4.PG白名单设置
[root@jeames ~]# su - postgres

cat  > /var/lib/pgsql/15/data/pg_hba.conf << EOF
# TYPE  DATABASE    USER    ADDRESS       METHOD
host      all       all    0.0.0.0/0      trust
EOF

## root用户下启动
[root@jeames ~]# systemctl restart postgresql-15
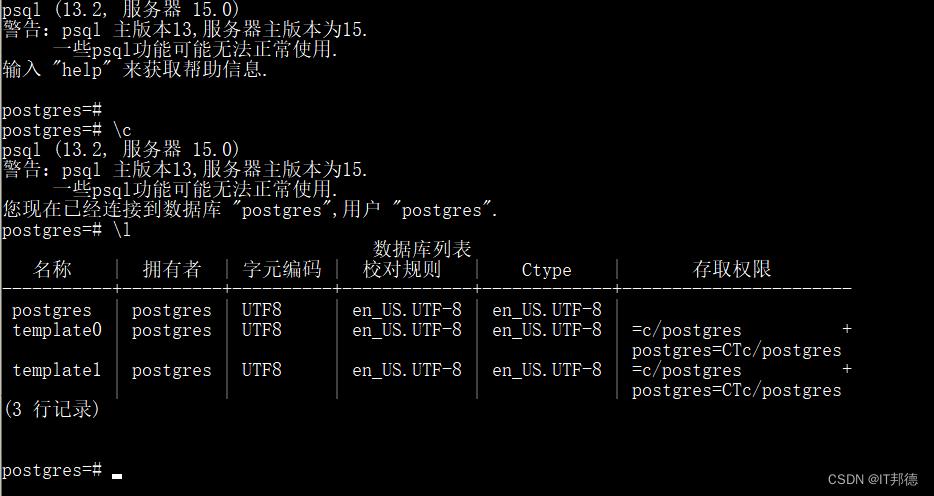
📣 5.远程登陆
其他服务器:
C:\\Users\\wangd> psql -U postgres -h X.X.X.X -d postgres -p5432
📣 6.建表测试
postgres=# CREATE DATABASE mesdb WITH OWNER=postgres ENCODING='UTF-8';
CREATE DATABASE

postgres=# \\c mesdb
You are now connected to database "mesdb" as user "postgres".


create table student (
id integer not null,
name character(32),
number char(5),
constraint student_pkey primary key (id)
);

mesdb=# \\d student
                 Table "public.student"
 Column |     Type      | Collation | Nullable | Default
--------+---------------+-----------+----------+---------
 id     | integer       |           | not null |
 name   | character(32) |           |          |
 number | character(5)  |           |          |
Indexes:
    "student_pkey" PRIMARY KEY, btree (id)


mesdb=# INSERT INTO student (id, name, number) VALUES (1, 'IT邦德', '10086');
INSERT 0 1
mesdb=# SELECT * FROM student WHERE id=1;
 id |                name                | number
----+------------------------------------+--------
  1 | IT邦德                             | 10086
(1 row)
利用Conda尝鲜Python 3.10
1 简介
就在几天前,Python3.10的第一个正式版本3.10.0发布,之前我们只是从其各个测试版本中捕风捉影地知晓了一些可能加入的新特性,而在正式版本中,我们得以一睹其正式加入的诸多新特性。

本文我就将带大家学习如何通过conda快速安装3.10正式版本的Python,并体验其重要的一些新特性。
2 Python 3.10正式版本重要特性一览
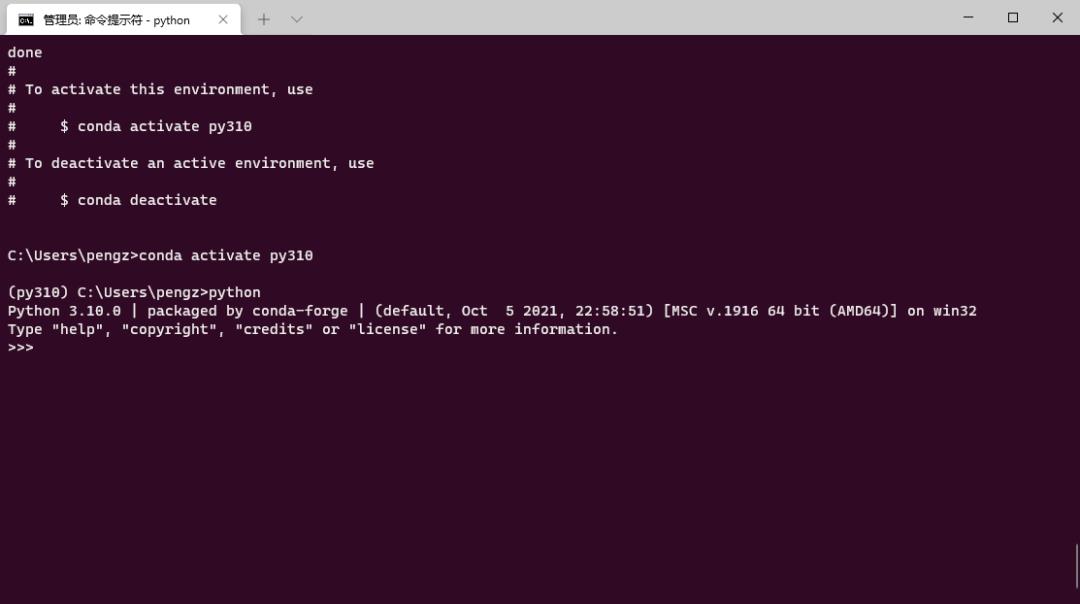
如果你已经安装了conda,那么直接通过conda-forge的channel,只需要下面这一行命令即可创建新的Python3.10正式版本虚拟环境:
conda create -n py310 python=3.10 -c conda-forge -y完成安装之后,激活环境进入Python的shell,可以看到版本为3.10.0,离谱的是我在使用pycharm设置环境后,崭新的3.10.0环境竟然被识别为3.1(真是醉了)😂,于是我换成用vscode进行演示:

下面就让我们来体验其重要的一些新特性吧~
2.1 新的结构模式匹配语法
上一次为Python引入新的语法和关键字还是async,而在这次的新版本中,引入了新的关键字match与case,从而帮助我们得以在Python中使用到其他语言中类似switch的语法,使用方式如下面例子所示,对于match其后声明的值,后续的每个case会验证是否与其对应值相等,最后的case _中的_代表Irrefutable Pattern,相当于通配符,但是只允许置于「最后」一个case中:
import sys

match sys.argv[1]:
    case '1':
        print(1)
    case '2':
        print(2)
    case '3':
        print(3)
    case _:
        print('其他输入')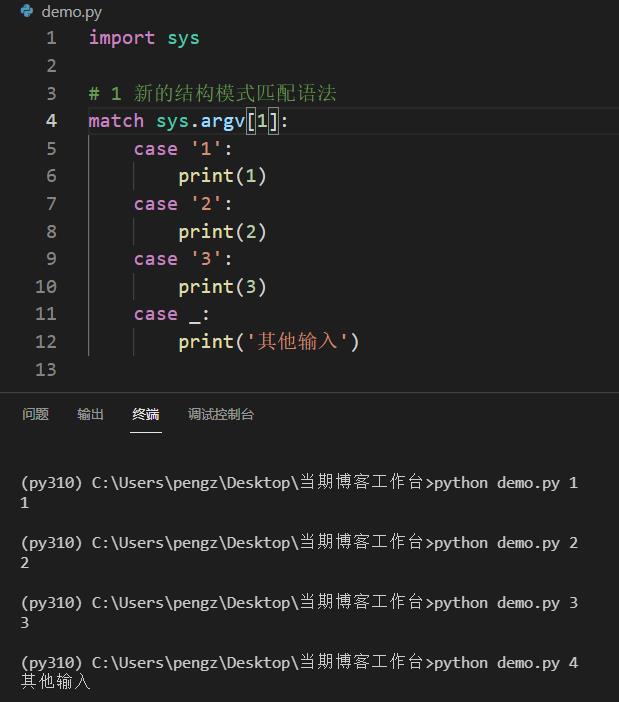
match-case语法配合上通配符_,当输入容器类型的数据结构时,可以进行一些更加自由的判断:
import sys

# 1 新的结构模式匹配语法
match sys.argv[1:]:
    case ['1', '2', '3']:
        print('分支1')
    case ['4', _, '6']:
        print('分支2')
    case ['7', '8', _]:
        print('分支3')
    case _:
        print('超出已知选项!')
更有趣的是,我们还可以使用任意自定义变量名,在match-case的作用域内辅助通配匹配,从而实现类似下面例子的效果:
import sys

# 1 新的结构模式匹配语法
match (int(sys.argv[1]), int(sys.argv[2])):
    case (0, 0):
      print("原点")
    case (0, y):
      print(f"Y={y}")
    case (x, 0):
      print(f"X={x}")
    case (x, y):
      print(f"X={x}, Y={y}")
    case _:
      print('输入非法!')
类似的,针对对象的属性值,也可以进行类似的通配判断,更多用法你可以参考下面的例子进行拓展:
import sys

class Demo:
    x: int
    y: int

demo = Demo()
demo.x = int(sys.argv[1])
demo.y = int(sys.argv[2])

# 1 新的结构模式匹配语法
match demo:
    case Demo(x=0, y=0):
      print("原点")
    case Demo(x=0, y=y):
      print(f"Y={y}")
    case Demo(x=x, y=0):
      print(f"X={x}")
    case Demo(x=x, y=y):
      print(f"X={x}, Y={y}")
    case _:
      print('输入非法!')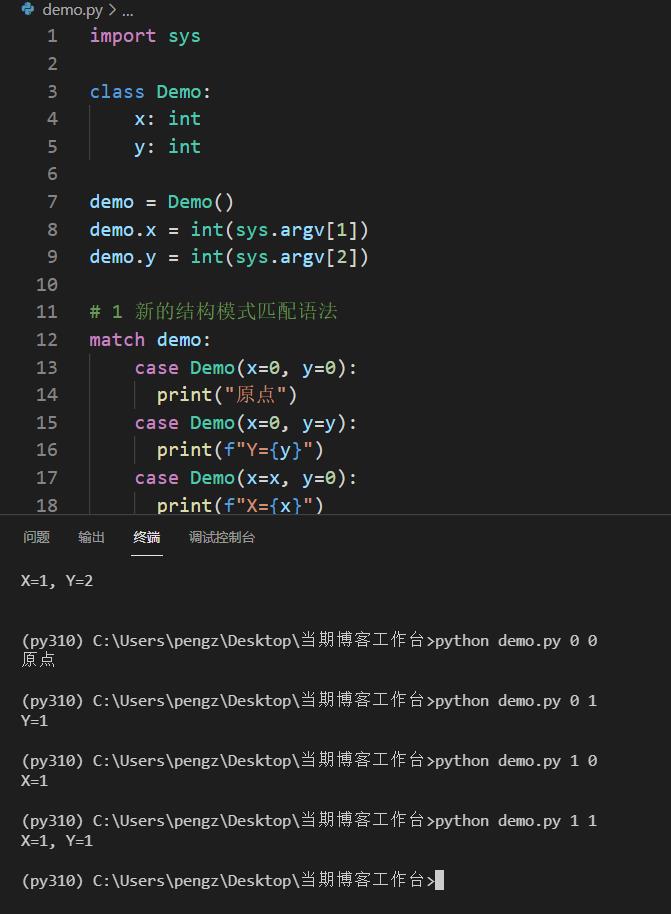
2.2 更清晰的错误提示
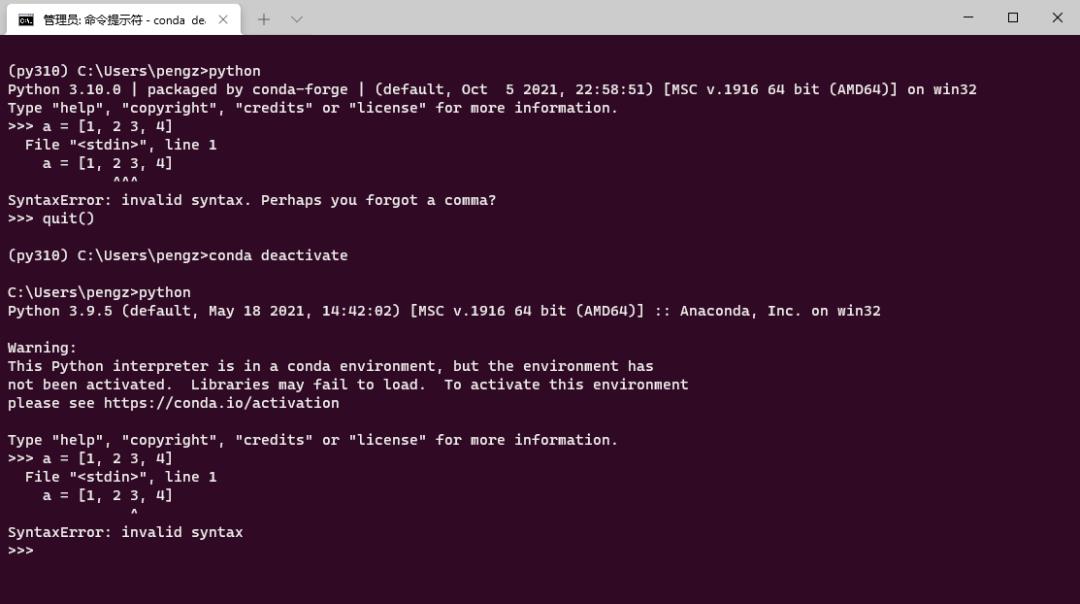
在Python3.10中,针对常见的各种错误类型,执行代码后的错误提示更加明确,譬如下面是3.9与3.10针对同一种错误的错误输出信息对比:
2.3 支持括号包裹的多上下文管理器
这个特性其实在3.9中就开始出现,在3.10中进一步得到完善,使得下面的用法合法(与3.7进行对比):

2.4 更方便的联合类型提示设置
在之前的版本中,当我们用到多类型提示时,得这样写:
from typing import Union, string

def some_funcion(flexible_parameter: Union[int, string]) -> Union[int, string]:
return flexible_parameter而在3.10中,多类型联合不再必须用到Union,使用|连接即可,非常的方便:
from typing import string

def some_funcion(flexible_parameter: int | string) -> int | string:
    return flexible_parameter
2.5 更加准确的错误代码行位置提示
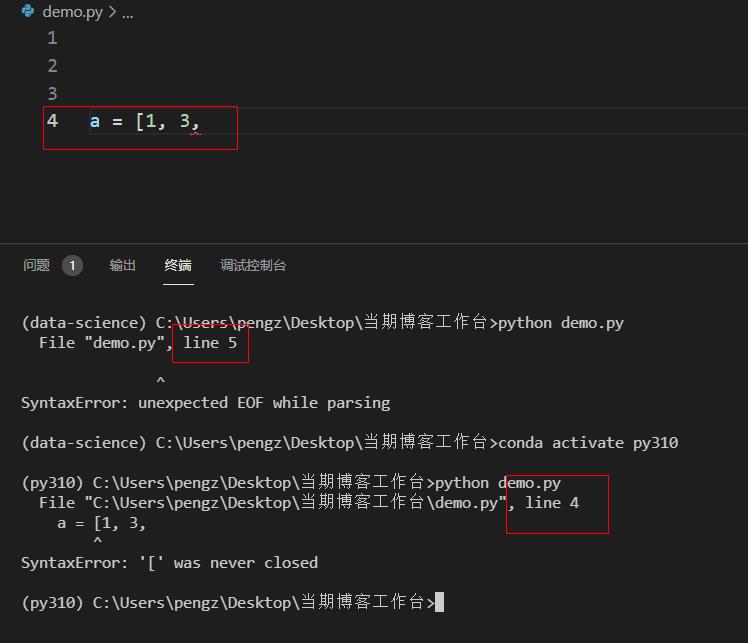
在Python3.10中,代码的错误提示,对于具体错误行位置的提示更加准确了:
以上就是本文的全部内容,欢迎在评论区与我进行讨论。
觉得还不错就给我一个小小的鼓励吧!以上是关于postgreSQL15发布,难掩激动快速尝鲜的主要内容,如果未能解决你的问题,请参考以下文章