Android基础:常用布局和数据存储
Posted Jack-Chan
tags:
篇首语:本文由小常识网(cha138.com)小编为大家整理,主要介绍了Android基础:常用布局和数据存储相关的知识,希望对你有一定的参考价值。
1. 相对布局RelativeLayout
特点:相对布局所有组件可以叠加在一起;各个组件的布局是独立的,互不影响;所有组件的默认位置都是在左上角(顶部、左部对齐)
| 属性 | 功能描述 |
|---|---|
| android:layout_toRightOf | 在指定控件的右边 |
| android:layout_toLeftOf | 在指定控件的左边 |
| android:layout_above | 在指定控件的上边 |
| android:layout_below | 在指定控件的下边 |
| android:layout_alignBaseline | 跟指定控件水平对齐 |
| android:layout_alignLeft | 跟指定控件左对齐 |
| android:layout_alignRight | 跟指定控件右对齐 |
| android:layout_alignTop | 跟指定控件顶部对齐 |
| android:layout_alignBottom | 跟指定控件底部对齐 |
| android:layout_alignParentLeft | 是否跟父元素左对齐 |
| android:layout_alignParentTop | 是否跟父元素顶部对齐 |
| android:layout_alignParentRight | 是否跟父元素右对齐 |
| android:layout_alignParentBottom | 是否跟父元素底部对齐 |
| android:layout_centerVertical | 在父元素中垂直居中 |
| android:layout_centerHorizontal | 在父元素中水平居中 |
| android:layout_centerInParent | 在父元素中居中 |
示例1:res\\layout\\activity_main.xml
<RelativeLayout xmlns:android="http://schemas.android.com/apk/res/android"
xmlns:tools="http://schemas.android.com/tools"
android:layout_width="match_parent"
android:layout_height="match_parent"
tools:context=".MainActivity" >
<!-- android:layout_alignParentRight="true"表示与父元素右对齐(这里,父元素指的就是RelativeLayout,而RelativeLayout占满了整个屏幕) -->
<TextView
android:layout_width="wrap_content"
android:layout_height="wrap_content"
android:text="第一个"
android:layout_alignParentRight="true"/>
<!-- android:layout_alignParentBottom="true"表示与父元素底部对齐(这里,父元素指的就是RelativeLayout,而RelativeLayout占满了整个屏幕) -->
<TextView
android:layout_width="wrap_content"
android:layout_height="wrap_content"
android:text="第二个"
android:layout_alignParentBottom="true"/>
<!-- android:layout_centerVertical="true"表示在父元素中垂直居中(这里,父元素指的就是RelativeLayout,而RelativeLayout占满了整个屏幕) -->
<TextView
android:layout_width="wrap_content"
android:layout_height="wrap_content"
android:text="第三个"
android:layout_centerVertical="true"
/>
<!-- android:layout_centerHorizontal="true"表示在父元素中水平居中(这里,父元素指的就是RelativeLayout,而RelativeLayout占满了整个屏幕) -->
<TextView
android:layout_width="wrap_content"
android:layout_height="wrap_content"
android:text="第四个"
android:layout_centerHorizontal="true"
/>
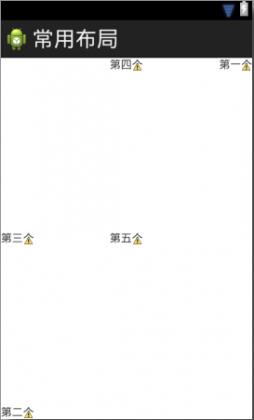
<!-- android:layout_centerInParent="true"表示在父元素中水平垂直都居中(这里,父元素指的就是RelativeLayout,而RelativeLayout占满了整个屏幕) -->
<TextView
android:layout_width="wrap_content"
android:layout_height="wrap_content"
android:text="第五个"
android:layout_centerInParent="true"
/>
</RelativeLayout>运行结果:
示例2:res\\layout\\activity_main.xml
<RelativeLayout xmlns:android="http://schemas.android.com/apk/res/android"
xmlns:tools="http://schemas.android.com/tools"
android:layout_width="match_parent"
android:layout_height="match_parent"
tools:context=".MainActivity" >
<TextView
android:id="@+id/tv1"
android:layout_width="wrap_content"
android:layout_height="wrap_content"
android:text="第一一一一个" />
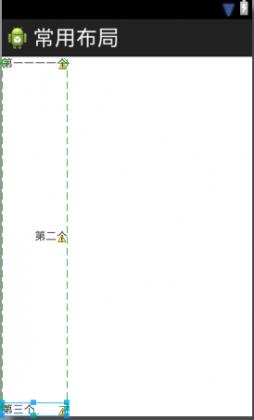
<!-- android:layout_alignRight="true"表示与指定组件右对齐。 -->
<!-- @+id/就是为组件添加id,@id就是通过id引用组件 -->
<TextView
android:layout_width="wrap_content"
android:layout_height="wrap_content"
android:text="第二个"
android:layout_centerVertical="true"
android:layout_alignRight="@id/tv1"
/>
<!-- 如果同时使用android:layout_alignRight="true",android:layout_alignLeft="true",组件就会被拉伸 -->
<TextView
android:layout_width="wrap_content"
android:layout_height="wrap_content"
android:text="第三个"
android:layout_alignParentBottom="true"
android:layout_alignRight="@id/tv1"
android:layout_alignLeft="@id/tv1"
/>
</RelativeLayout> 运行结果:
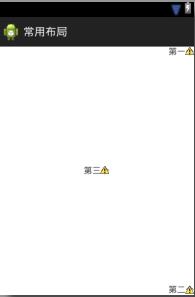
示例3:res\\layout\\activity_main.xml
<RelativeLayout xmlns:android="http://schemas.android.com/apk/res/android"
xmlns:tools="http://schemas.android.com/tools"
android:layout_width="match_parent"
android:layout_height="match_parent"
tools:context=".MainActivity" >
<TextView
android:id="@+id/tv1"
android:layout_width="wrap_content"
android:layout_height="wrap_content"
android:text="第一个"
android:layout_centerHorizontal="true"/>
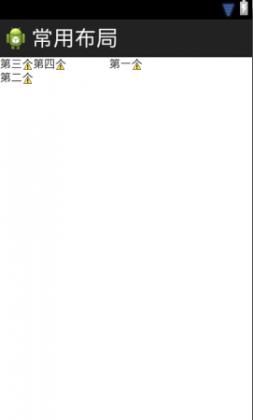
<!-- android:layout_below="@id/tv1"表示在对应组件的下面 -->
<TextView
android:id="@+id/tv2"
android:layout_width="wrap_content"
android:layout_height="wrap_content"
android:text="第二个"
android:layout_below="@id/tv1"
/>
<!-- android:layout_above="@id/tv2"表示在对应组件的上面 -->
<TextView
android:layout_width="wrap_content"
android:layout_height="wrap_content"
android:text="第三个"
android:layout_above="@id/tv2"
/>
<!-- android:layout_toRightOf="@id/tv2"表示在对应组件的右边 -->
<TextView
android:layout_width="wrap_content"
android:layout_height="wrap_content"
android:text="第四个"
android:layout_toRightOf="@id/tv2"
/>
</RelativeLayout>运行结果:
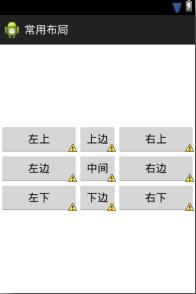
练习:实现如下效果

代码:res\\layout\\activity_main.xml
<?xml version="1.0" encoding="utf-8"?>
<RelativeLayout xmlns:android="http://schemas.android.com/apk/res/android"
    android:layout_width="match_parent"
    android:layout_height="match_parent" >
    <Button
        android:id="@+id/center"
        android:layout_width="wrap_content"
        android:layout_height="wrap_content"
        android:text="中间"
        android:layout_centerInParent="true"/>
    <Button
        android:layout_width="wrap_content"
        android:layout_height="wrap_content"
        android:text="上边"
        android:layout_above="@id/center"
        android:layout_alignLeft="@id/center"
        android:layout_alignRight="@id/center"/>
    <Button
        android:layout_width="wrap_content"
        android:layout_height="wrap_content"
        android:text="下边"
        android:layout_below="@id/center"
        android:layout_alignLeft="@id/center"
        android:layout_alignRight="@id/center"/>
    <Button
        android:layout_width="wrap_content"
        android:layout_height="wrap_content"
        android:text="左边"
        android:layout_toLeftOf="@id/center"
        android:layout_alignTop="@id/center"
        android:layout_alignBottom="@id/center"
        android:layout_alignParentLeft="true"/>
    <Button
        android:layout_width="wrap_content"
        android:layout_height="wrap_content"
        android:text="右边"
        android:layout_toRightOf="@id/center"
        android:layout_alignTop="@id/center"
        android:layout_alignBottom="@id/center"
        android:layout_alignParentRight="true"/>
        <Button
        android:layout_width="wrap_content"
        android:layout_height="wrap_content"
        android:text="左上"
        android:layout_toLeftOf="@id/center"
        android:layout_above="@id/center"
        android:layout_alignParentLeft="true"/>
        <Button
        android:layout_width="wrap_content"
        android:layout_height="wrap_content"
        android:text="左下"
        android:layout_toLeftOf="@id/center"
        android:layout_below="@id/center"
        android:layout_alignParentLeft="true"/>
        <Button
        android:layout_width="wrap_content"
        android:layout_height="wrap_content"
        android:text="右上"
        android:layout_toRightOf="@id/center"
        android:layout_above="@id/center"
        android:layout_alignParentRight="true"/>
        <Button
        android:layout_width="wrap_content"
        android:layout_height="wrap_content"
        android:text="右下"
        android:layout_toRightOf="@id/center"
        android:layout_below="@id/center"
        android:layout_alignParentRight="true"/>
</RelativeLayout>
运行结果:
2. 帧布局FrameLayout
特点:帧布局和相对布局一样,组件可以重叠;所有组件的默认位置是在左上角(顶部、左部对齐)
示例:res\\layout\\activity_main.xml
<FrameLayout xmlns:android="http://schemas.android.com/apk/res/android"
    xmlns:tools="http://schemas.android.com/tools"
    android:layout_width="match_parent"
    android:layout_height="match_parent"
    tools:context=".MainActivity" >
    <!-- 帧布局中,修改组件的位置使用android:layout_gravity -->
    <TextView
        android:layout_width="wrap_content"
        android:layout_height="wrap_content"
        android:text="第一个"
        android:layout_gravity="right"
        />
    <!-- android:layout_gravity="bottom|right" ,表示组件的位置在右下角 -->
    <TextView
        android:layout_width="wrap_content"
        android:layout_height="wrap_content"
        android:text="第二个"
        android:layout_gravity="bottom|right"
        />
    <TextView
        android:layout_width="wrap_content"
        android:layout_height="wrap_content"
        android:text="第三个"
        android:layout_gravity="center"
        />
</FrameLayout>
运行结果:
练习:实现如下效果

代码:res\\layout\\activity_main.xml
<FrameLayout xmlns:android="http://schemas.android.com/apk/res/android"
    xmlns:tools="http://schemas.android.com/tools"
    android:layout_width="match_parent"
    android:layout_height="match_parent"
    tools:context=".MainActivity" >
    <TextView
        android:layout_width="240dp"
        android:layout_height="240dp"
        android:background="#ff0000"
        android:layout_gravity="center"
        />
    <TextView
        android:layout_width="200dp"
        android:layout_height="200dp"
        android:background="#00ff00"
        android:layout_gravity="center"
        />
    <TextView
        android:layout_width="160dp"
        android:layout_height="160dp"
        android:background="#0000ff"
        android:layout_gravity="center"
        />
    <TextView
        android:layout_width="120dp"
        android:layout_height="120dp"
        android:background="#ffff00"
        android:layout_gravity="center"
        />
    <TextView
        android:layout_width="80dp"
        android:layout_height="80dp"
        android:background="#ff00ff"
        android:layout_gravity="center"
        />
    <TextView
        android:layout_width="40dp"
        android:layout_height="40dp"
        android:background="#ffffff"
        android:layout_gravity="center"
        />
</FrameLayout>
运行结果:
3. 表格布局TableLayout
示例:res\\layout\\activity_main.xml
<TableLayout xmlns:android="http://schemas.android.com/apk/res/android"
    xmlns:tools="http://schemas.android.com/tools"
    android:layout_width="match_parent"
    android:layout_height="match_parent"
    tools:context=".MainActivity" >
    <!-- 表格布局宽高可以不用设置,TableRow的宽度只能是match_parent,高度只能是wrap_content。调正宽度可以通过权重解决。-->
    <TableRow>
        <TextView
                android:text="姓名:"/>
        <EditText
            android:layout_weight="1"
            />
    </TableRow>
    <TableRow>
        <TextView
                android:text="年龄:"/>
        <EditText
            android:layout_weight="1"
            />
    </TableRow>
</TableLayout>*复制代码*   运行结果: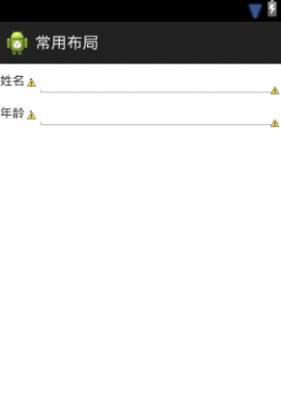
4. 绝对布局AbsoluteLayout
绝对布局是直接使用android:layout_x,android:layout_y定位控件的坐标,做不了屏幕适配,所以不常使用。某些没有必要做屏幕适配的开发可以用绝对布局,例如:电视屏幕固定,做机顶盒开发。
示例:res\\layout\\activity_main.xml
<AbsoluteLayout xmlns:android="http://schemas.android.com/apk/res/android"
    xmlns:tools="http://schemas.android.com/tools"
    android:layout_width="match_parent"
    android:layout_height="match_parent"
    tools:context=".MainActivity" >
    <Button
        android:id="@+id/button1"
        android:layout_width="wrap_content"
        android:layout_height="wrap_content"
        android:layout_x="109dp"
        android:layout_y="83dp"
        android:text="Button" />
</AbsoluteLayout>*复制代码*   运行结果: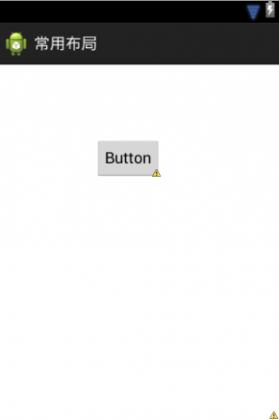
4. LogCat
Console只能显示Windows下运行的平台信息,例如:模拟器的运行状态(模拟器是运行在Windows平台上的程序)。但模拟器内的程序运行状态就不能显示在Console上了,因为这些程序不是运行到Windows上,这些信息会在LogCat中显示。
LogCat分为5个等级,依次为:error(错误)、warn(情报)、info(信息)、debug(调试)、verbose(冗余)

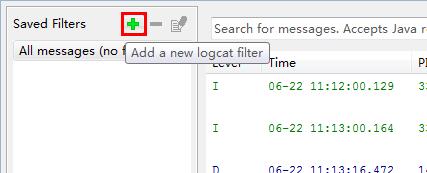
示例:为LogCat添加过滤器,便于筛选信息
src/cn.itcast.logcat/MainActivity.java
package cn.itcast.logcat;
import android.os.Bundle;
import android.app.Activity;
import android.util.Log;
import android.view.Menu;
public class MainActivity extends Activity {
    @Override
    protected void onCreate(Bundle savedInstanceState) {
        String tag = "黑马程序员";
        super.onCreate(savedInstanceState);
        setContentView(R.layout.activity_main);
        System.out.println("云鹤,儿童节快乐");
        //tag表示标签,msg表示正文
        //下面这种写法是在日志需要长期保留时使用。
        Log.v(tag, "云鹤就业薪资13000");
        Log.d(tag, "云鹤就业薪资13000");
        Log.i(tag, "云鹤就业薪资13000");
        Log.w(tag, "云鹤就业薪资13000");
        Log.e(tag, "云鹤就业薪资13000");
   }
}
运行结果:

第一步:点击加号
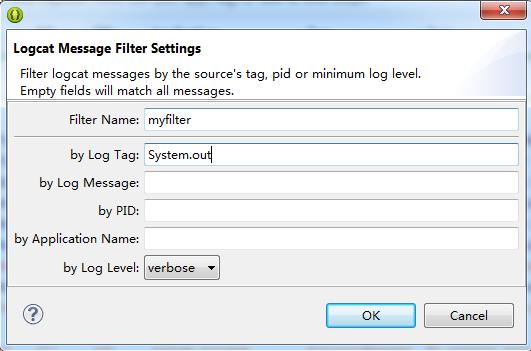
第二步:填入过滤器设置信息。
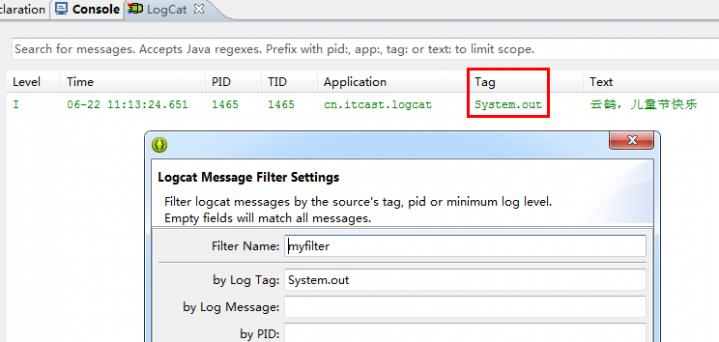
第三步:进行过滤。
5. 在内部存储中读写文件
Android内存
- RAM:运行内存,相当于电脑内存。关机,数据就会丢失。
- ROM:内部存储空间,Android系统必须的存储空间,持久化保持数据,相当于电脑的硬盘。
- SD卡/USB存储器(内置在手机内):外部存储空间,对于Android系统是可有可无的,相当于移动硬盘。
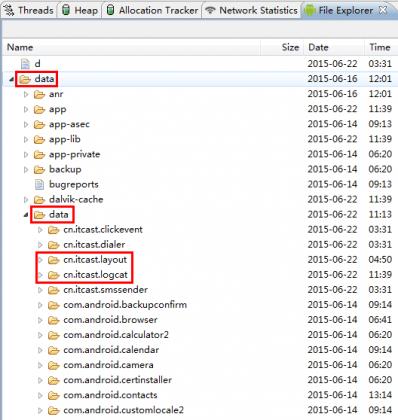
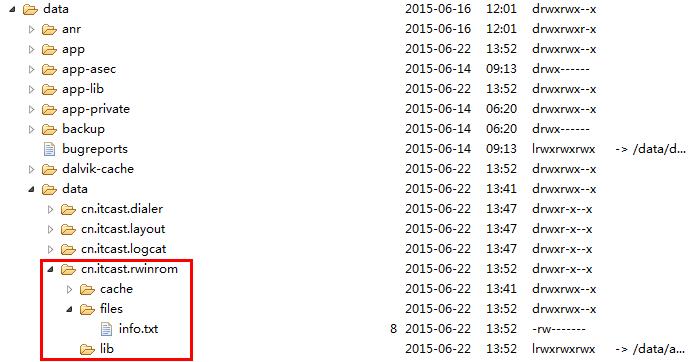
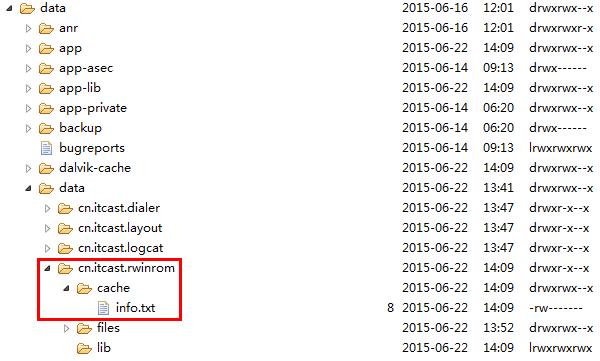
- 内部存储路径:data/data/包名文件夹/,每个包名文件夹都是一个应用的专属空间。
示例:res\\layout\\activity_main.xml
<LinearLayout xmlns:android="http://schemas.android.com/apk/res/android"
    xmlns:tools="http://schemas.android.com/tools"
    android:layout_width="match_parent"
    android:layout_height="match_parent"
    android:paddingBottom="@dimen/activity_vertical_margin"
    android:paddingLeft="@dimen/activity_horizontal_margin"
    android:paddingRight="@dimen/activity_horizontal_margin"
    android:paddingTop="@dimen/activity_vertical_margin"
    tools:context=".MainActivity"
    android:orientation="vertical">
    <EditText
        android:id="@+id/et_name"
        android:layout_width="match_parent"
        android:layout_height="wrap_content"/>
    <!-- android:inputType="textPassword"表示输入的是密码,显示时用密文代替 -->
    <EditText
        android:id="@+id/et_pass"
        android:layout_width="match_parent"
        android:layout_height="wrap_content"
        android:inputType="textPassword"/>
    <RelativeLayout
        android:layout_width="match_parent"
        android:layout_height="wrap_content">
            <CheckBox
                android:id="@+id/cb"
                android:layout_width="wrap_content"
                android:layout_height="wrap_content"
                android:text="记住账号密码"
                android:layout_centerVertical="true"
                />
            <Button
                android:layout_width="wrap_content"
                android:layout_height="wrap_content"
                android:text="登陆"
                android:onClick="login"
                android:layout_alignParentRight="true"
                />
        </RelativeLayout>
</LinearLayout>
src/cn.itcast.rwinrom/MainActivity.java
package cn.itcast.rwinrom;
import java.io.BufferedReader;
import java.io.File;
import java.io.FileInputStream;
import java.io.FileOutputStream;
import java.io.InputStreamReader;
import android.app.Activity;
import android.os.Bundle;
import android.view.View;
import android.widget.CheckBox;
import android.widget.EditText;
import android.widget.Toast;
public class MainActivity extends Activity {
private EditText et_name;
private EditText et_pass;
@Override
protected void onCreate(Bundle savedInstanceState) {
super.onCreate(savedInstanceState);
setContentView(R.layout.activity_main);
et_name = (EditText) findViewById(R.id.et_name);
et_pass = (EditText) findViewById(R.id.et_pass);
readAccount();
}
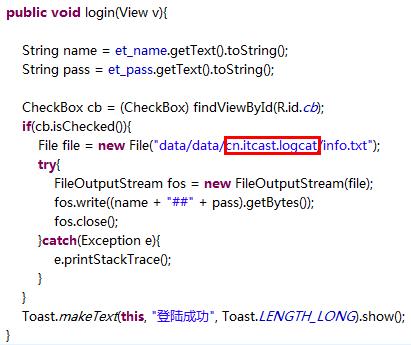
public void login(View v){
//获取用户输入的数据
String name = et_name.getText().toString();
String pass = et_pass.getText().toString();
CheckBox cb = (CheckBox) findViewById(R.id.cb);
if(cb.isChecked()){
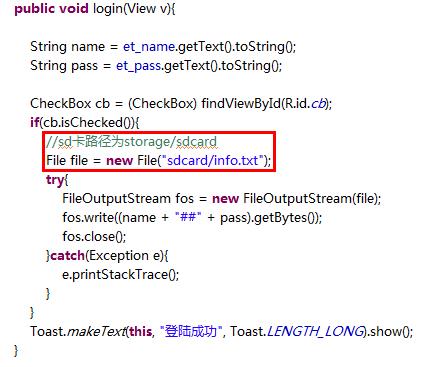
File file = new File("data/data/cn.itcast.rwinrom/info.txt");
try{
FileOutputStream fos = new FileOutputStream(file);
fos.write((name + "##" + pass).getBytes());
fos.close();
}catch(Exception e){
e.printStackTrace();
}
}
//弹出吐司对话框
//Activity是Context的子类
//Toast.LENGTH_LONG表示显示5秒
//Toast.LENGTH_SHORT表示显示3秒
Toast.makeText(this, "登陆成功", Toast.LENGTH_LONG).show();
}
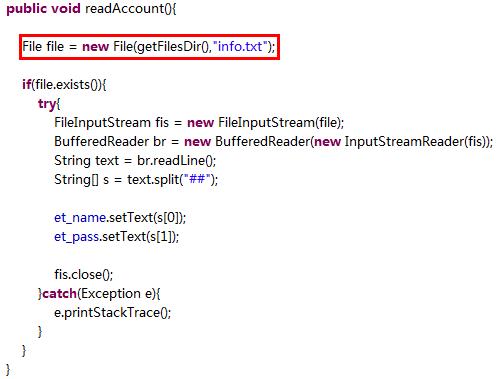
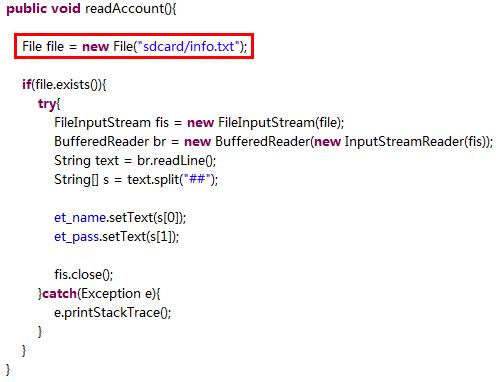
public void readAccount(){
File file = new File("data/data/cn.itcast.rwinrom/info.txt");
if(file.exists()){
try{
FileInputStream fis = new FileInputStream(file);
//把字节流转换成字符流
BufferedReader br = new BufferedReader(new InputStreamReader(fis));
String text = br.readLine();
String[] s = text.split("##");
et_name.setText(s[0]);
et_pass.setText(s[1]);
fis.close();
}catch(Exception e){
e.printStackTrace();
}
}
}
}运行结果:
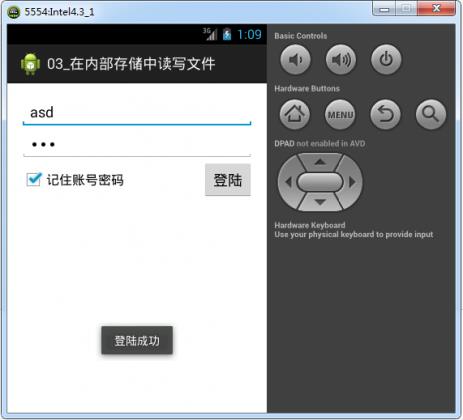
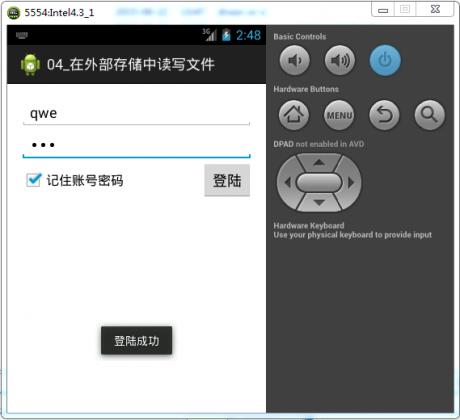
1、在模拟器上运行应用程序,输入用户名、密码,勾上记住账号密码,点击登陆。可以看到弹出吐司,登陆成功。
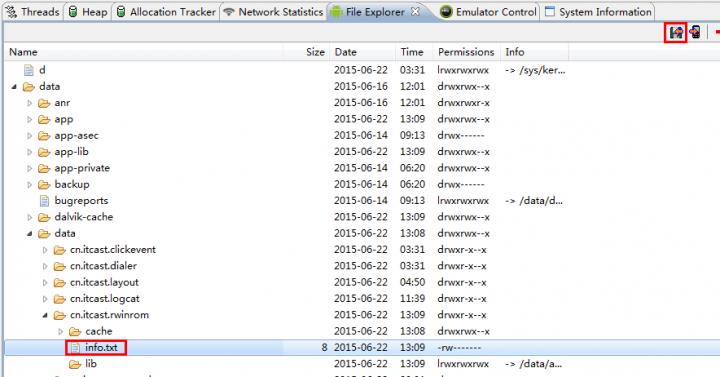
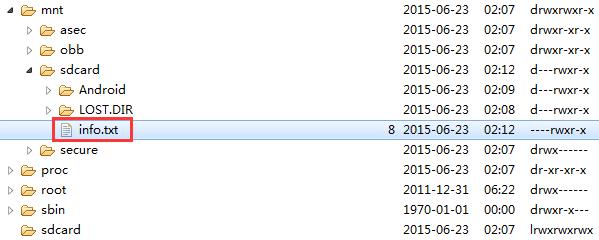
2、在Android设备文件目录下,可以看到成功生成info.txt文件,点击右上角的“pull a file from the device”按钮,将info.txt提取出来,保存到桌面。
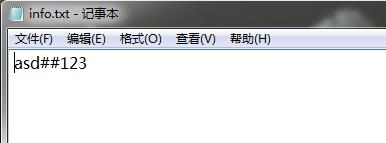
3、打开info.txt文件,可以看到成功存入数据。
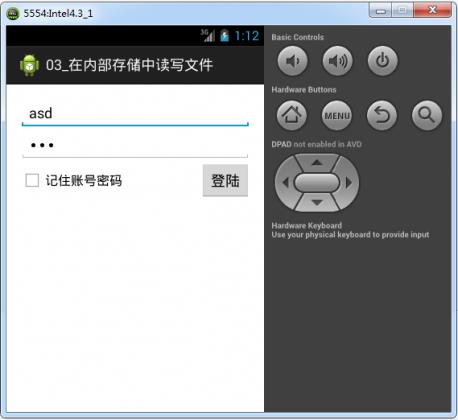
4、重新运行应用程序,可以看到读取数据成功,用户名、密码成功显示。
PS:
1、点击返回键,会摧毁当前Activity,重新点击应用图标,会重新创建Activity。
2、点击HOME键,只会将Activity放到后台去,重新点击图标,只是重新提取出来。
所以,上面的应用程序,即使是第一次运行,输入用户名、密码,并且不勾选“记住账户密码”。如果此时点击HOME键,Activity消失。然后,再点击应用程序图标,竟然可以看到Activity显示出了用户名、密码!然而,这根本不是回显,Activity只是暂时放到后台,然后重新提取出来罢了。
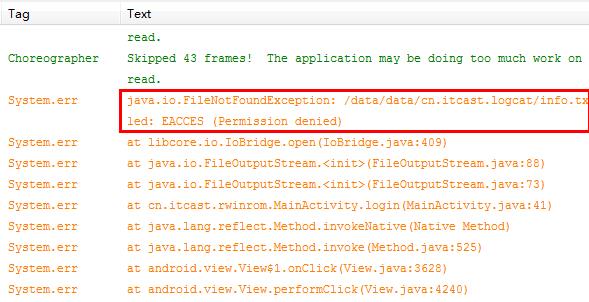
3、在内部存储空间中读写不需要任何权限!
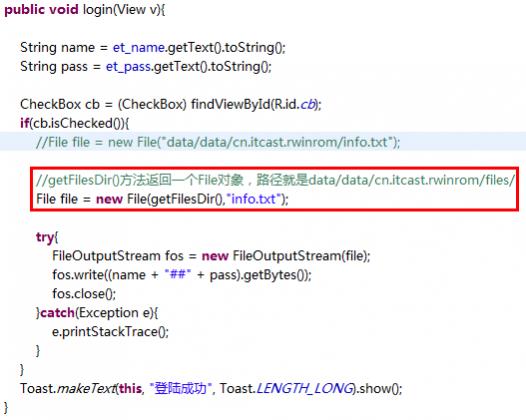
5.1 使用API获取内部存储空间的路径
如果将上面应用程序的MainActivity类中的代码进行如下修改,可以看到后台报警告。原因是不能访问其他应用程序的专属空间,只能访问自己的。
为了防止内部存储空间不小心写错,API提供了获取内部存储空间路径的方法。修改后,代码如下:
运行结果,如下:
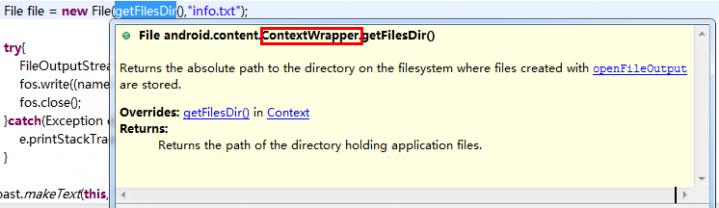
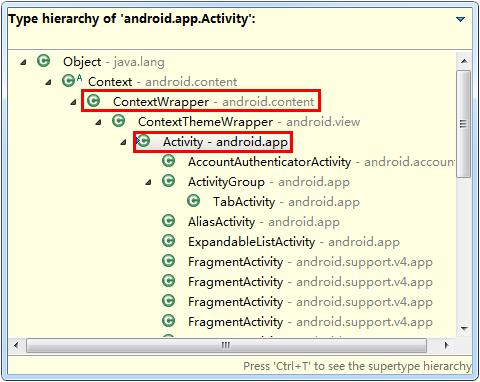
getFilesDir方法所在的类为上下文包装类,ContextWrapper。
并且,Activity就是ContextWrapper的子类。
所谓的上下文就是一个应用环境全局信息的接口,也就是说,通过上下文的API可以拿到应用环境的全局信息,例如:包名、版本号、内部存储等信息。
Toast.makeText(this,”登陆成功”,0).show();语句中的this就是上下文,表示吐司需要显示在哪个上下文中。
Button bt = new Button(this);语句中的this也是上下文,表示该组件创建出来之后,显示在哪个上下文中。
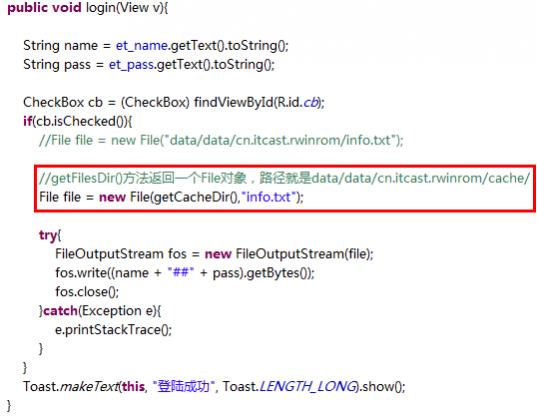
谷歌的API还提供了另一个方法获取内部存储空间路径:getCacheDir(),它返回的路径为data/data/cn.itcast.rwinrom/cache,得到的是缓存路径,也就是cache文件夹路径。修改后,代码如下:
运行结果,如下:
区别:
- getFilesDir方法返回的路径中的files文件夹是持久化保存数据的。
- getCacheDir方法返回的路径中的Cache文件夹是保存缓存数据的。当设备内存可用存储空间比较少时,Cache中的文件可能会被系统删除。
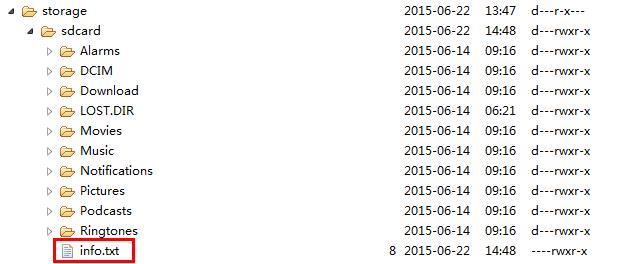
6. 在外部存储中读写文件
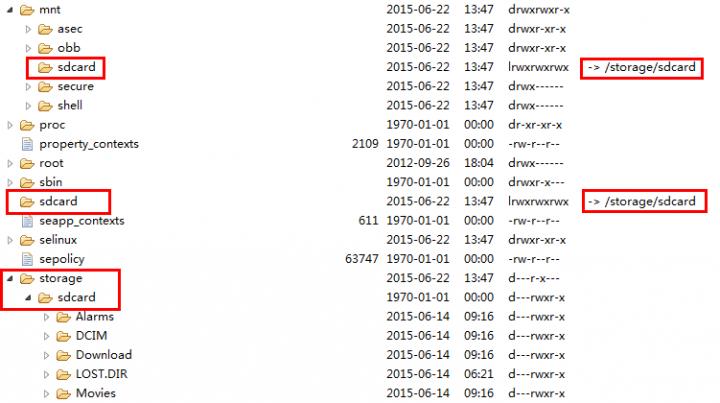
SD卡路径为storage/sdcard(4.3版本),之所以还存在根目录sdcard(2.3版本之前)及mnt/sdcard(2.3版本~4.3版本),是因为早期版本的sd卡路径正是在根目录,后期移到了mnt/sdcard,为了与低版本兼容,所以现在他们还存在,其实只是快捷方式而已,指向的路径依然是storage/sdcard。
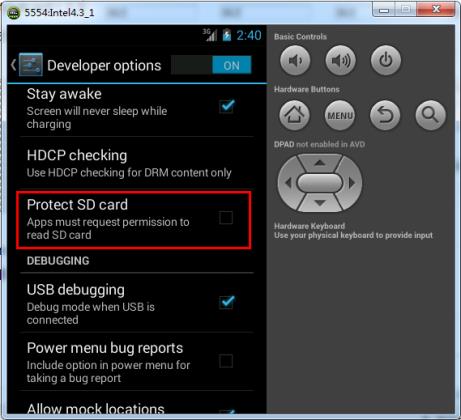
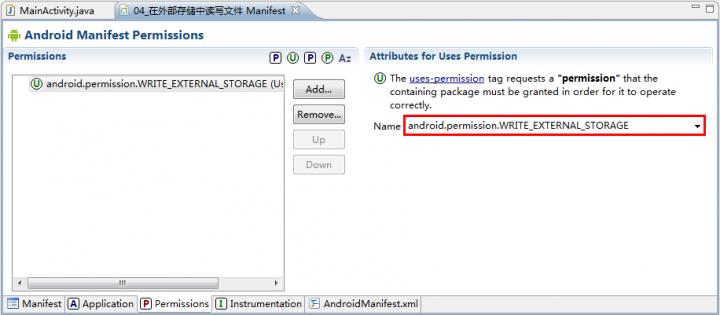
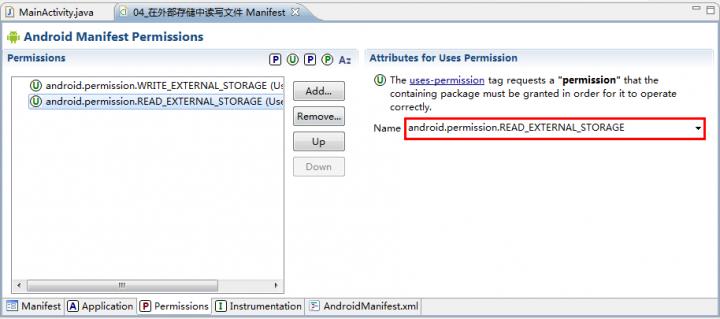
往SD卡中写数据需要权限。而从SD卡中读取数据在4.0版本以前是不需要权限,后来谷歌在Android系统中添加了保护SD卡的选项(如下图)。如果勾选了,那么在真机上是有效的(也就是说,模拟器上是无效的)。不过,一般情况下,不勾选。因为,很多应用程序并没有申请读取SD卡的权限,一旦勾上,很多应用程序将无法读取SD卡。因此,为了向下兼容,一般不勾。
示例:将上面“在内部存储中读取文件”中示例的MainActivity类中代码做一下修改,如下。
为读写SD卡添加权限(读SD卡权限可加可不加):
运行结果:
6.1 检测SD卡状态
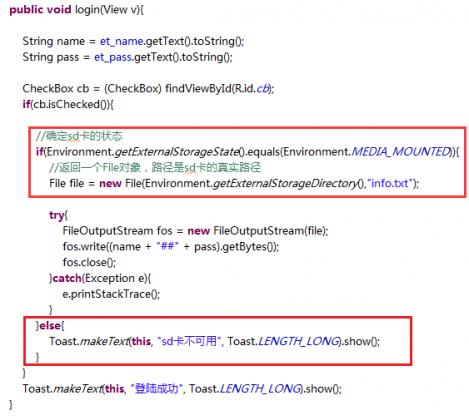
很多手机厂商都修改了SD卡路径,因此,很多手机SD卡的路径不是storage/sdcard。但是,sdcard的快捷方式基本上都是存在的,并且指向真实的SD卡路径。因此,访问SD卡路径,可以通过获取SD卡快捷方式的方法。当然,也可以调用API中提供的相应方法获取SD卡路径:Environment.getExternalStorageDirectory()
外部存储空间对于手机来说并不一定是必须的。所以,在使用前,一定要做确认手机的SD卡是否存在。可以通过Environment.getExternalStorageState()确定SD卡的状态,此方法的常见返回值说明如下:
- MEDIA_REMOVED:sd卡被拔出
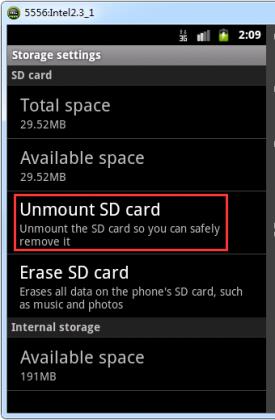
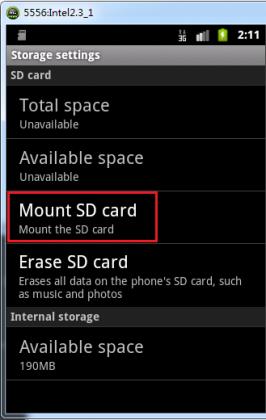
- MEDIA_UNMOUNTED:sd卡未挂载(4.0版本以前,手机可以通过点击settings–>Storage–>Storage settings–>Unmounted SD card,使SD卡未挂载)
- MEDIA_- CHECKING:sd卡正在准备
- MEDIA_MOUNTED:sd卡已挂载,当前可用
- MEDIA_READ_ONLY:sd卡挂载可用,但是只读
示例:将上面“在内部存储中读取文件”中示例的MainActivity类中代码做一下修改,如下
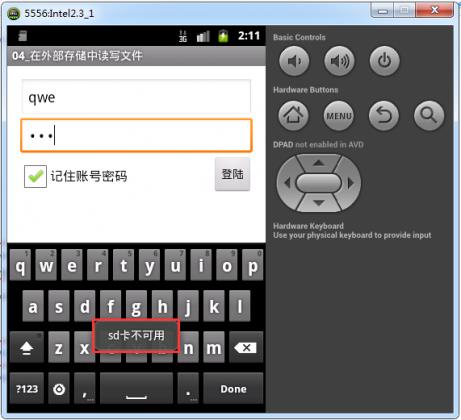
运行结果:由于在4.0版本之前才有手动使SD卡未挂载的功能,这里使用2.3.3版本测试。首先,Unmounted SD card,观察效果,可以看到提示:sd不可用。
然后,mounted SD card,观察效果,成功保存用户名、密码信息。
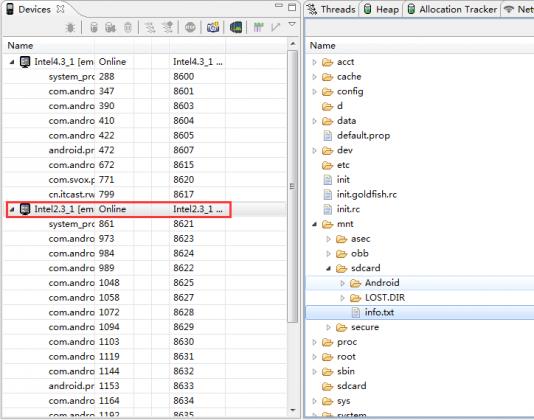
当有多个模拟器运行时,想要观察某一个模拟器的文件目录,只需要在Devices选项卡中点击那个模拟器,即可在File Explorer选项卡中看到那个模拟器的文件目录。
6.2 获取SD卡剩余容量
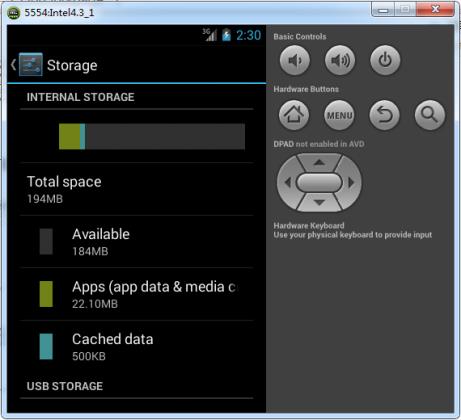
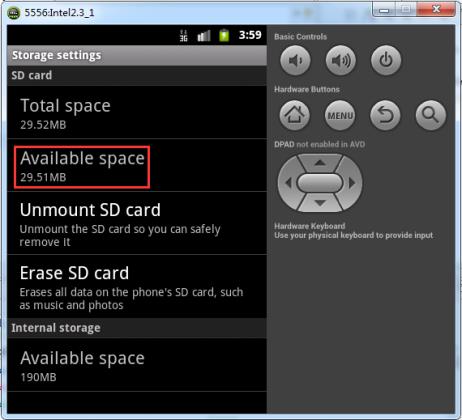
当用户做下载等操作时,SD卡的空间可能不足,所以需要提前获取SD卡剩余容量,给予用户提示信息。在Android系统中,可以查看SD卡剩余容量,点击Setting–>Storage
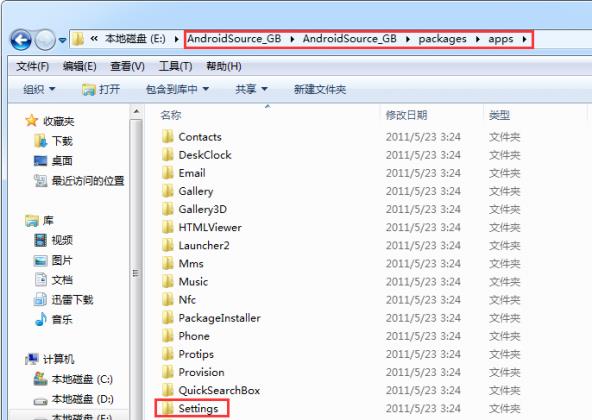
sdk文件夹中的sources文件夹中的源码是Android jar包的源码,Android系统源码则不同,一定要区分开。如下图。
其中,packages/apps路径为Android系统级应用程序所在的目录,可以看到settings应用程序。
7. 查看settings应用程序的源码
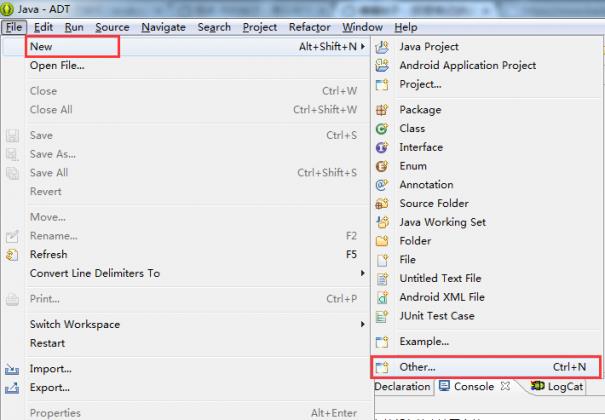
7.1 导入settings应用程序到eclipse中
点击File–>New–>Other….
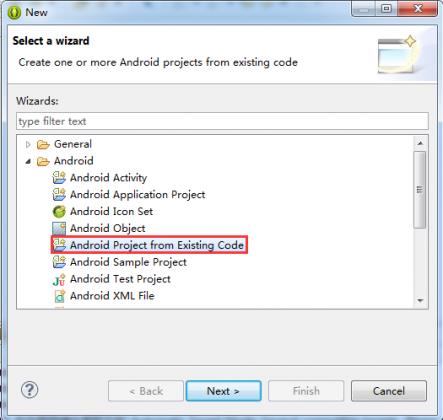
点击Android下的Android Project from Existing Code–>Next
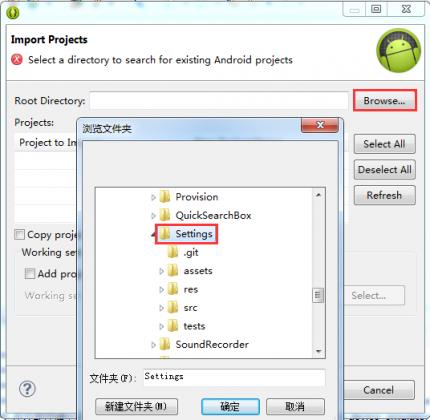
点击Root Directory右侧的Browse…按钮,找到settings应用程序所在的目录,点击确定
下图中的tests为测试settings的应用程序,不勾

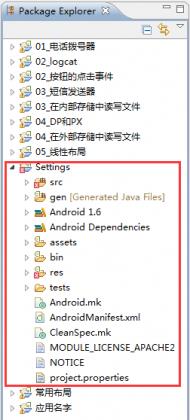
导入成功
之所以会报错,是因为普通应用开发是无法访问系统级API的(settings工程导入eclipse就成为了一个普通应用开发项目)
7.2 查找实现查看SD卡剩余空间的源码
通过搜索关键字“Available space”开始查找
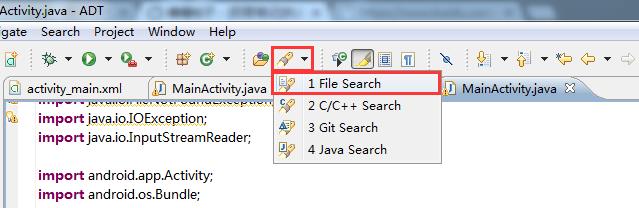
通过eclipse的“File Search”在整个工作空间中搜索“Available space”
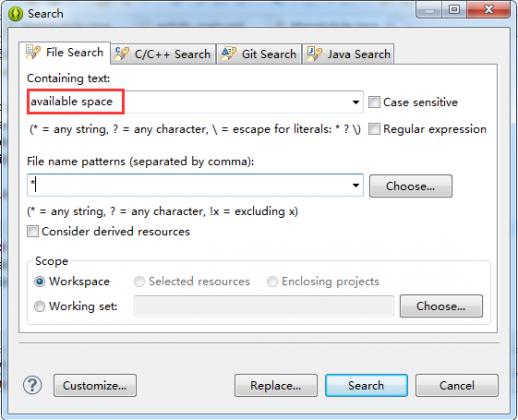
查找到以后,双击
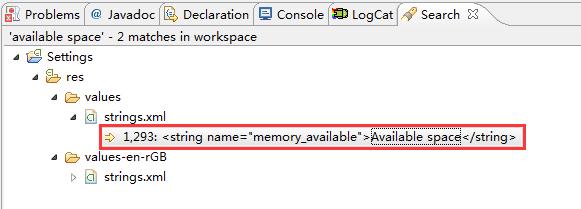
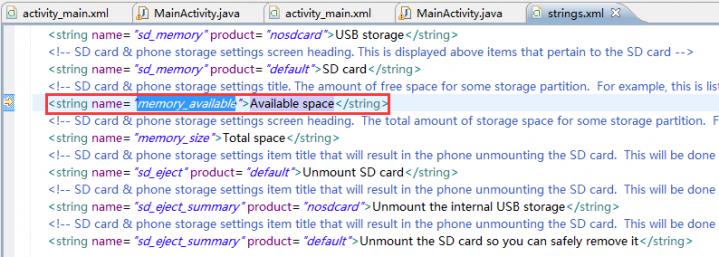
再搜索“memory_available”
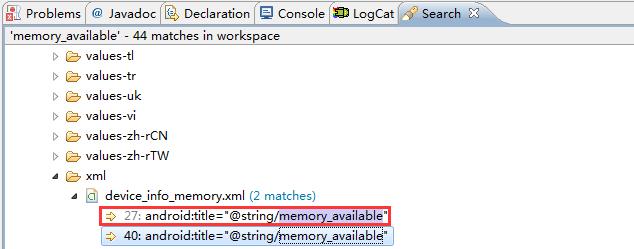
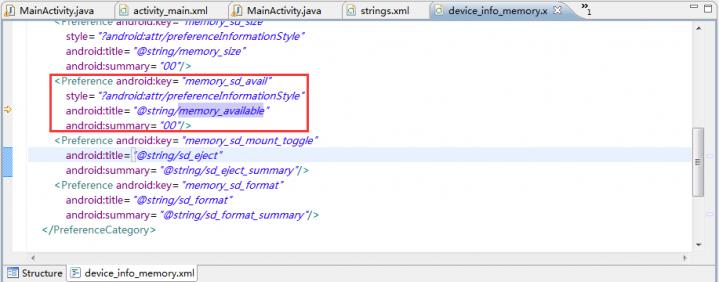
再搜索“memory_sd_avail”
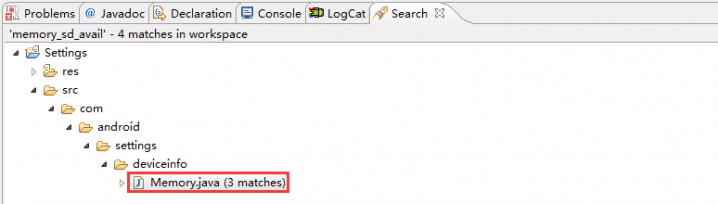
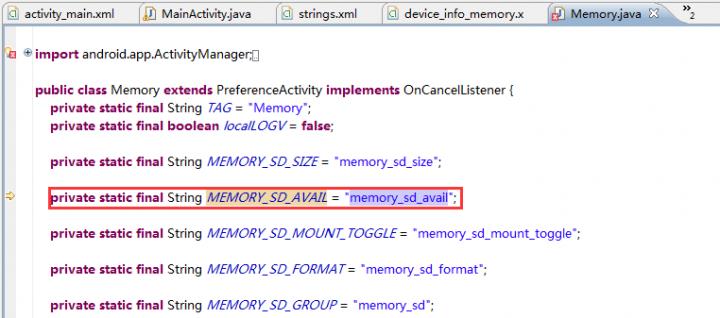
再在本文件内搜索“MEMORY_SD_AVAIL”
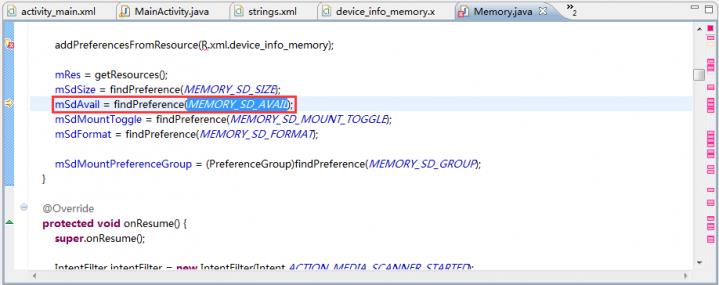
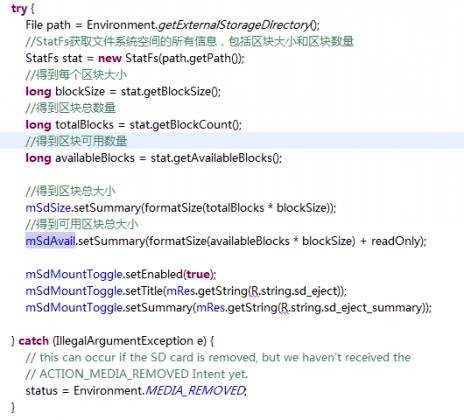
再在本文件内搜索“mSdAvail”,可以看到,已经查找到了该段代码
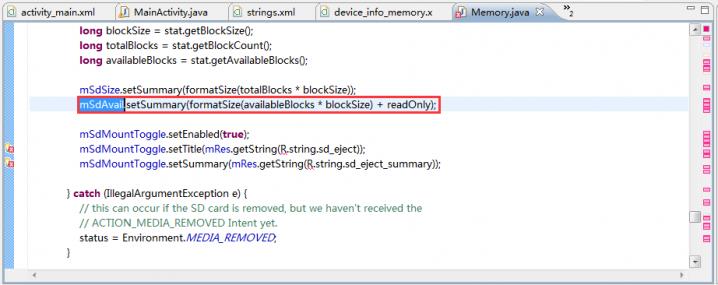
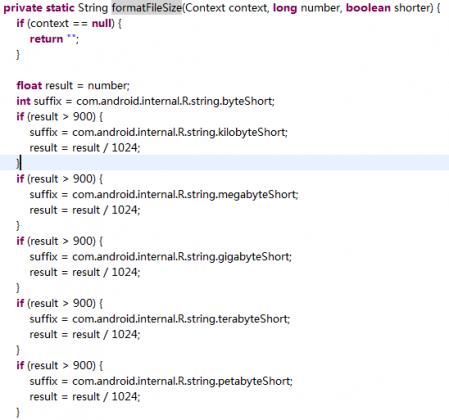
7.3 解析源码
所有存储设备都会被划分成若干个区块,存储设备的总容量 = 每个区块大小 * 区块总数量
其中的formatSize函数实际上就是将得出的字节数,转换成MB、GB、TB及PB显示给用户
示例:我们自己写程序获取SD卡剩余容量
res\\layout\\activity_main.xml
<RelativeLayout xmlns:android=