flutter 按钮组件详解
Posted
tags:
篇首语:本文由小常识网(cha138.com)小编为大家整理,主要介绍了flutter 按钮组件详解相关的知识,希望对你有一定的参考价值。
参考技术A 按钮组件详解[flutter专题]详解AppBar小部件
大家好,我是坚果,公众号“坚果前端”

AppBar
应用栏是各种应用程序中最常用的组件之一。它可用于容纳搜索字段、以及在页面之间导航的按钮,或者只是页面标题。由于它是一个如此常用的组件,因此 Flutter 为该功能提供了一个名为AppBar的专用小部件。
在本教程中,我们将通过一些实际示例向您展示如何在 Flutter 应用程序中自定义 AppBar。
以下是我们将介绍的内容:
- Flutter 中的 AppBar 是什么?
- 应用栏布局
- 自定义 AppBar
Flutter 中的 AppBar 是什么?
Flutter AppBar 是根据Material Design指南构建的应用程序组件。它通常位于屏幕顶部,并且能够在其布局中包含其他小部件。AppBar 通常显示品牌信息,例如徽标和标题,并且通常包含按钮或其他用户交互点。
以下是 Flutter 中默认的 AppBar 的样子:
// Mostly, AppBar is used inside a Scaffold widget.
Scaffold(
  appBar: AppBar(),
),
应用栏布局
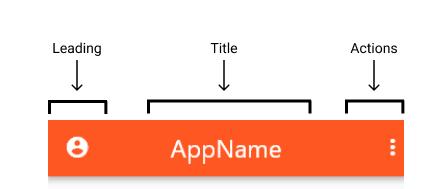
在Flutter中,AppBar的布局主要包括三个组成部分:leading,title,和actions。leading放置在AppBar的最左边位置;title并actions出现在它的右边。

leading
leading 接受一个小部件,可以分配任何东西——文本、图标,甚至一行中的多个小部件。
AppBar(
  leading: Icon(Icons.account_circle_rounded),
),

您可以控制leading可以占用多少宽度:
AppBar(
  leading: Icon(Icons.account_circle_rounded),
  leadingWidth: 100, // default is 56
),

如果leading未提供,AppBar 会自动为我们暗示。示例包括返回上一页的导航箭头或打开抽屉的菜单图标。
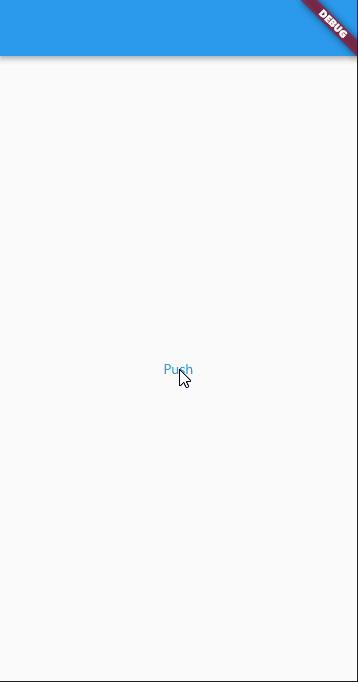
当上一条路线可用时,导航箭头会自动出现。
class HomePage extends StatelessWidget
  @override
  Widget build(BuildContext context)
    return Scaffold(
      body: Center(
        child: TextButton(
          child: Text('Push'),
          onPressed: () => Navigator.push(context, MaterialPageRoute(
            builder: (context)
              return SecondPage();
            ,
          )),
        ),
      ),
    );


class SecondPage extends StatelessWidget
  @override
  Widget build(BuildContext context)
    return Scaffold(
      appBar: AppBar(),
    );

当我们将 添加Drawer到Scaffold时 ,会分配一个菜单图标leading来打开抽屉。
class HomePage extends StatelessWidget
  @override
  Widget build(BuildContext context)
    return Scaffold(
      appBar: AppBar(),
      drawer: Drawer(),
    );

如果需要,可以通过设置automaticallyImplyLeadingfalse来防止这种行为。
AppBar(
  automaticallyImplyLeading: false, // simple as that!
),
title
顾名思义,它主要用于显示标题,例如应用程序标题或页眉。
AppBar(
  title: Text('Profile Page'),
),

但您不仅限于此,因为也title需要一个小部件。您可以使用它来显示图标、图像、形状或使用布局小部件(例如row和 )的任意组合column。
下面是一个例子:
AppBar(
  title: Container(
    width: 40,
    child: Image.network(url),
  ),
),

默认情况title下,根据 Material 指南与 AppBar 的左侧对齐。您可以更改此设置以使其居中对齐:
AppBar( title: Container( width: 40, child: Image.network(url), ), centerTitle: true, // like this!),

actions
actions是与 AppBar 右侧对齐的小部件列表。我们通常在用作按钮的应用程序中看到它们来触发下拉菜单、个人资料头像等。
AppBar( actions: [ Icon(Icons.more_vert), ],),

让我们再向列表中添加一个小部件:
AppBar( actions: [ Container( width: 30, child: Image.asset( 'assets/images/profile_pic.png', ), ), Icon(Icons.more_vert), ],),
在 Flutter 中自定义 AppBar
现在我们熟悉了 AppBar 的布局,让我们通过使用主题选项将自定义提升到一个新的水平。AppBar 包含各种属性,包括颜色、大小、图标主题、文本主题等等。
背景颜色
以下代码将 AppBar 的背景颜色更改为深橙色。500添加以访问颜色的特定阴影,900即最暗和最亮50。
AppBar( backgroundColor: Colors.deepOrange[500],),
图标主题
下面的代码将图标的颜色更改为绿色,将大小更改为36:
AppBar( actionsIconTheme: IconThemeData(color: Colors.green, size: 36),),
文字主题
假设您想将文本颜色更改为带有较浅阴影的琥珀色,200并将字体大小设置为24:
AppBar( textTheme: TextTheme( headline6: TextStyle( // headline6 is used for setting title's theme color: Colors.amber[200], fontSize: 24, ), ),),
Elevation
如果你想给 AppBar 一点高度,你可以使用elevation. 以下代码将 AppBar 的高度增加到15.
AppBar( elevation: 15,),
请注意 AppBar 被抬起并且阴影跨越了更大的区域。
阴影颜色
你甚至可以弄乱阴影的颜色。下面的代码将 AppBar 的阴影颜色更改为orangeAccent。
AppBar( shadowColor: Colors.orangeAccent,),
很酷,对吧?
工具栏高度和不透明度
最后,我们有工具栏属性。工具栏包含文字,图标,按钮,和其他任何公司的前景,除了小部件,如Container和Image。
要更改 AppBar 工具栏项目的高度和不透明度:
AppBar( toolbarHeight: 100, // default is 56 toolbarOpacity: 0.5,),
结论
如果你已经做到了这一步,你现在应该明白:
- AppBar 是什么以及它如何在 Flutter 中使用
- AppBar 的布局 (
leading,title, 和actions) - 如何自定义 AppBar 的布局和添加小部件
- 如何为 AppBar 的图标、文本、背景、高度、阴影颜色和工具栏设置主题
所以我们有了!关于 Flutter 的 AppBar 必须提供的所有内容的完整演练。我希望这篇文章能帮助你在未来所有的 Flutter 应用程序中创建漂亮的 AppBars。
最后附上AppBar的一些属性
AppBar( Key? key, this.leading,//左侧显示的图标 通常首页显示的为应用logo 在其他页面为返回按钮 this.automaticallyImplyLeading = true,//配合leading使用 this.title,//标题文本 this.actions,//右侧item this.flexibleSpace,//显示在 AppBar 下方的控件,高度和 AppBar 高度一样, // 可以实现一些特殊的效果,该属性通常在 SliverAppBar 中使用 this.bottom,//一个 AppBarBottomWidget 对象,通常是 TabBar。用来在 Toolbar 标题下面显示一个 Tab 导航栏 this.elevation,//控件的 z 坐标顺序,默认值 4,对于可滚动的 SliverAppBar,当 SliverAppBar 和内容同级的时候,该值为 0, // 当内容滚动 SliverAppBar 变为 Toolbar 的时候,修改 elevation 的值。 this.shape, this.backgroundColor,//AppBar背景色 this.brightness,//AppBar亮度 有黑白两种主题 this.iconTheme,//AppBar上图标的样式 this.actionsIconTheme,//AppBar上actions图标的样式 this.textTheme,//AppBar上文本样式 this.primary = true, this.centerTitle,//标题是否居中 this.titleSpacing = NavigationToolbar.kMiddleSpacing,//标题与其他控件的空隙 this.toolbarOpacity = 1.0,//AppBar tool区域透明度 this.bottomOpacity = 1.0,//bottom区域透明度 this.toolbarHeight, this.backwardsCompatibility, this.toolbarTextStyle, this.titleTextStyle, this.systemOverlayStyle, )
希望大家能够喜欢本文,谢谢
以上是关于flutter 按钮组件详解的主要内容,如果未能解决你的问题,请参考以下文章