Android Studio中Gradle统一管理版本号引用配置
Posted gao_chun
tags:
篇首语:本文由小常识网(cha138.com)小编为大家整理,主要介绍了Android Studio中Gradle统一管理版本号引用配置相关的知识,希望对你有一定的参考价值。
转载注明gao_chun的Blog:http://blog.csdn.net/gao_chun/article/details/58105089
Gradle统一管理版本号引用配置
为了提高项目开发效率,在实际项目开发过程中往往会引入一些开源框架,还有项目中使用的各种Module,当引入Module过多时最好提供一种统一的方式去管理版本号,如:compileSdkVersion、buildToolsVersion、androidTestCompile 等,便于日后对版本号进行维护,此处记录2种方式处理上述问题。推荐方式二和方式三
方式一
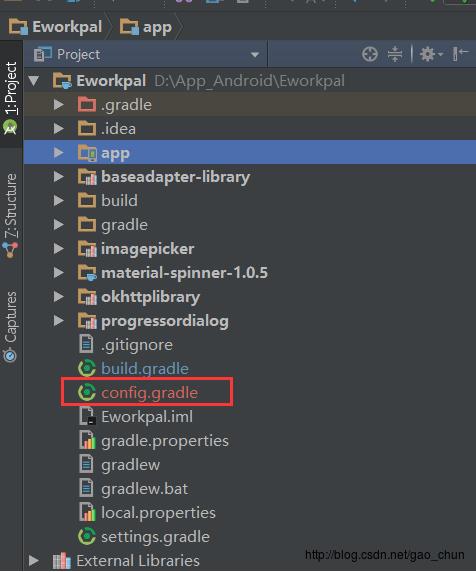
1.在项目根目录下创建.gradle文件,如:config.gradle

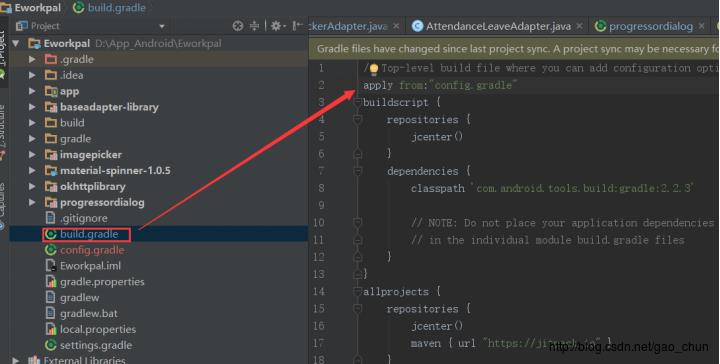
2.在根目录下的build.gradle文件中引入我们创建的配置文件

3.config.gradle中文件内容可以自己定义,如下示例:
ext {
    // 用于编译的SDK版本
    COMPILE_SDK_VERSION = 23

    // 用于Gradle编译项目的工具版本
    BUILD_TOOLS_VERSION = "24.0.2"

    // 最低支持Android版本
    MIN_SDK_VERSION = 14

    // 目标版本
    TARGET_SDK_VERSION = 23

    // 设置是否使用混淆
    MINIFY_ENABLED = true
    MINIFY_DISABLED = false

    // 应用程序包名
    APPLICATION_ID = 'com.mainiway.eworkpal'

    // Version of "com.android.support:appcompat-v7", refer it as folow:
    //  compile "com.android.support:appcompat-v7:${APPCOMPAT_VERSION}"
    APPCOMPAT_VERSION = '23.2.1'

}dependencies {
compile fileTree(include: ['*.jar'], dir: 'libs')
compile "com.android.support:cardview-v7:${APPCOMPAT_VERSION}"
compile "com.android.support:appcompat-v7:${APPCOMPAT_VERSION}"
compile "com.android.support:design:${APPCOMPAT_VERSION}"
compile 'com.github.bumptech.glide:glide:3.7.0'
}方式二(推荐)
1.在根目录下的build.gradle文件下添加 ext{ .... } 中的内容
// Top-level build file where you can add configuration options common to all sub-projects/modules.
buildscript {
    repositories {
        jcenter()
    }
    dependencies {
        classpath 'com.android.tools.build:gradle:2.2.3'

        // NOTE: Do not place your application dependencies here; they belong
        // in the individual module build.gradle files
    }
}
allprojects {
    repositories {
        jcenter()
        maven { url "https://jitpack.io" }
    }
}
task clean(type: Delete) {
    delete rootProject.buildDir
}

// Define versions in a single place
ext {

    // SDK And Tools
    minSdkVersion = 14
    targetSdkVersion = 23
    compileSdkVersion = 23
    buildToolsVersion = '24.0.2'

    //Dependencies
    supportLibraryVersion = '23.2.1'

}2.在app目录下build.gradle中使用 $rootProject.supportLibraryVersion
apply plugin: 'com.android.application'

android {
    compileSdkVersion rootProject.ext.compileSdkVersion
    buildToolsVersion rootProject.ext.buildToolsVersion

    defaultConfig {
        applicationId 'com.mainiway.demo'
        minSdkVersion  rootProject.ext.minSdkVersion
        targetSdkVersion rootProject.ext.targetSdkVersion
        versionCode 1
        versionName "1.0.0"
    }
}

dependencies {
    compile fileTree(include: ['*.jar'], dir: 'libs')
    compile "com.android.support:cardview-v7:$rootProject.supportLibraryVersion"
    compile "com.android.support:appcompat-v7:$rootProject.supportLibraryVersion"
    compile "com.android.support:design:$rootProject.supportLibraryVersion"
}
方式三(推荐)
也可以在根目录下的 build.gradle 文件中声明 ext{ .... } 时, 加上一个变量 var ,如:
ext {
    var = [
            // SDK And Tools
            minSdkVersion        : 14,
            targetSdkVersion     : 25,
            compileSdkVersion    : 25,
            buildToolsVersion    : "25.0.2",
            versionName              : "1.0.0",
            //Dependencies
            supportLibraryVersion: "25.2.0"
    ]

}
对应的引用方式:
android {
    compileSdkVersion var.compileSdkVersion
    buildToolsVersion var.buildToolsVersion

    defaultConfig {
        applicationId "com.xxx.xxx"
        minSdkVersion var.minSdkVersion
        targetSdkVersion var.targetSdkVersion
        versionCode 1
        versionName var.version
    }

    ......
}

dependencies {
    compile "com.android.support:appcompat-v7:$var.supportLibraryVersion"
    compile "com.android.support:recyclerview-v7:$var.supportLibraryVersion"
    compile "com.android.support:cardview-v7:$var.supportLibraryVersion"

}
或者像这样:
ext {

    minSdkVersion: 14,
    targetSdkVersion: 25,
    compileSdkVersion: 25,
    buildToolsVersion: "25.0.2",
    versionName: "1.0.0",
    //Dependencies
    supportLibraryVersion: "25.2.0"

    var = [

		SupportV7 : "com.android.support:appcompat-v7:$supportLibraryVersion",
		SupportV4 : "com.android.support:support-v4:$supportLibraryVersion",
		SupportRecyclerviewV7 : "com.android.support:recyclerview-v7:$supportLibraryVersion"
    ]
}
那么对应的引用方式要做一点点变化:
android {
    compileSdkVersion rootProject.compileSdkVersion
    buildToolsVersion rootProject.buildToolsVersion

    defaultConfig {
        applicationId "com.xxx.xxx"
        minSdkVersion rootProject.minSdkVersion
        targetSdkVersion rootProject.targetSdkVersion
        versionCode 1
        versionName var.version
    }
    ... ...
}

dependencies {
    compile var.SupportV7
    compile var.SupportV4
    compile var.SupportRecyclerviewV7
}
选一种适合规范方式,这样一来,管理各个版本号就方便多了。
以上是关于Android Studio中Gradle统一管理版本号引用配置的主要内容,如果未能解决你的问题,请参考以下文章
Android Studio使用Composing builds统一依赖管理
Android Studio使用Composing builds统一依赖管理