如何将android linux烧到Raspberry Pi及其调试
Posted
tags:
篇首语:本文由小常识网(cha138.com)小编为大家整理,主要介绍了如何将android linux烧到Raspberry Pi及其调试相关的知识,希望对你有一定的参考价值。
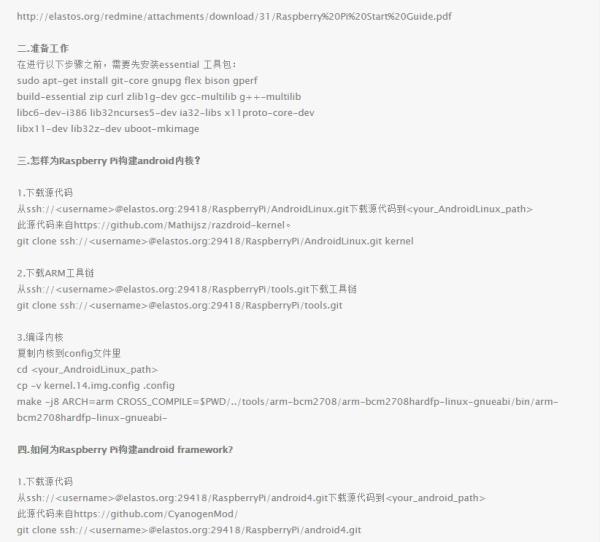
一.Raspberry Pi入门向导。
可以在以下地址下载Raspberry向导

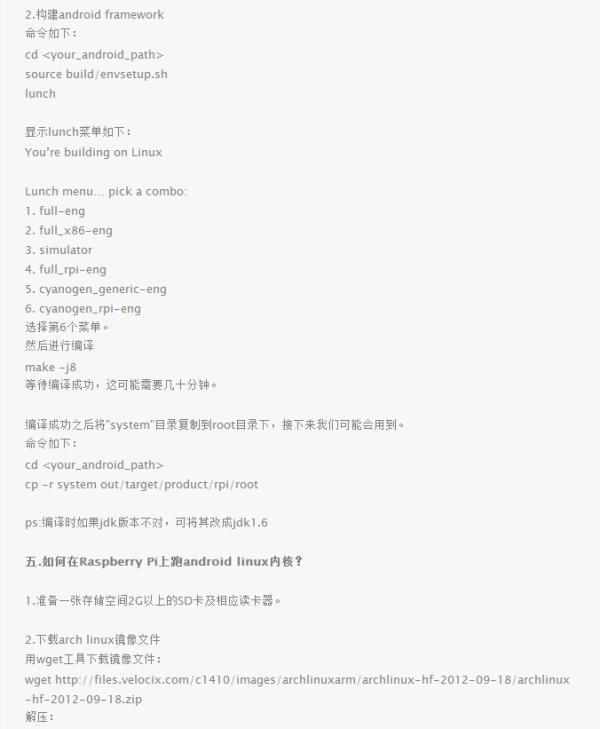
2.构建android framework
命令如下:
cd <your_android_path>
source build/envsetup.sh
lunch
显示lunch菜单如下:
You’re building on Linux
Lunch menu… pick a combo:
1. full-eng
2. full_x86-eng
3. simulator
4. full_rpi-eng
5. cyanogen_generic-eng
6. cyanogen_rpi-eng
选择第6个菜单。
然后进行编译
make -j8
等待编译成功,这可能需要几十分钟。
编译成功之后将”system”目录复制到root目录下,接下来我们可能会用到。
命令如下:
cd <your_android_path>
cp -r system out/target/product/rpi/root
ps:编译时如果jdk版本不对,可将其改成jdk1.6
五.如何在Raspberry Pi上跑android linux内核?
1.准备一张存储空间2G以上的SD卡及相应读卡器。
2.下载arch linux镜像文件
用wget工具下载镜像文件:
wget http://files.velocix.com/c1410/images/archlinuxarm/archlinux-hf-2012-09-18/archlinux-hf-2012-09-18.zip
解压:
unzip archlinux-hf-2012-09-18.zip
成功之后,你会在当前目录下发现一个镜像文件。
3.烧linux镜像文件。
sudo dd bs=4M if=archlinux-hf-2012-09-18.img of=/dev/sdb
sudo sync
ps:/dev/sdb是SD卡在主机上的设备文件。不同的电脑可能不同。
4.用android linux内核代替这个内核。
做完上述步骤之后,当你把SD卡插在电脑上,你会发现有两个分区:一个是引导区,另一个是文件系统区。
用android linux内核代替引导区的kernel.img。
cp -uv <your_android_linux_path>/arch/arm/boot/zImage <your_sdcard_boot_partition>/kernel.img
5.用android linux文件系统代替这个linux文件系统
rm -rf <your_sdcard_file_system_partition>
cp -r <your_android_source_code_path>/out/target/product/rpi/root/* <your_sdcard_file_system_partition>
6.配置内核命令行cmdline.txt
Edit the <your_sdcard_boot_partition>/cmdling.txt, and replace “init=/…” with “init=/init”
7.做完这些之后就可以在Raspberry Pi上跑这个android linux内核。
六.如何为Android linux做一张可引导的SD卡
1.删除已有分区,如果没有就不用删了。
Command(m for help):p
Disk /dev/sdb: 15.7 GB, 15707668480 bytes
64 heads, 32 sectors/track, 14980 cylinders, total 30668085 sectors
Units = sectors of 1 * 512 = 512 bytes
Sector size (logical/physical): 512 bytes / 512 bytes
I/O size (minimum/optimal): 512 bytes / 512 bytes
Disk identifier: 0×00000000
sudo fdisk/dev/sdb
Command(m for help):d
Partition number(1-4):1
Command(m for help):d
Selected partition 2
Command (m for help): p
Disk /dev/sdb: 15.7 GB, 15707668480 bytes
64 heads, 32 sectors/track, 14980 cylinders, total 30679040 sectors
Units = sectors of 1 * 512 = 512 bytes
Sector size (logical/physical): 512 bytes / 512 bytes
I/O size (minimum/optimal): 512 bytes / 512 bytes
Disk identifier: 0×00000000
Device Boot Start End Blocks Id System
Command(m for help):w
ps:确定删除之后,卸掉SD卡,然后再装上。
以bytes问单位记下SD卡的大小。后面的步骤会用到。
然后进入”Expert mode”。
Command(m for help):x
将这个SD卡设置为255个磁面,63个扇区和磁柱数量(不同的SD/mmc卡有着不同的此柱数量)
Expert command (m for help): h
Number of heads (1-256, default 64): 255
Expert command (m for help): s
Number of sectors (1-63, default 32): 63
ps:在下一步开始前,先要计算磁柱数量,计算过程如下:
B:SD卡以bytes为单位的大小(前面已经记住了即:15707668480)
C:磁柱的数量
C=B/255/63/512
例如:我的SD卡大小是16G(15707668480)
C=15707668480/255/63/512=1909.68191721,约等于1909.
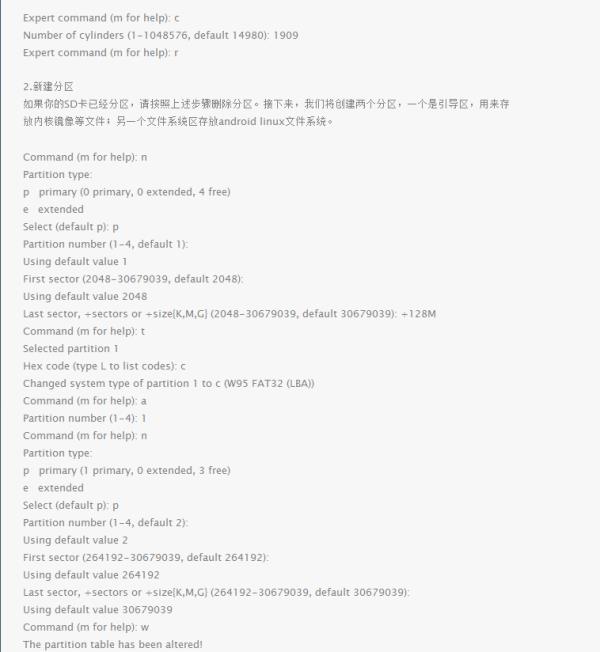
Expert command (m for help): c
Number of cylinders (1-1048576, default 14980): 1909
Expert command (m for help): r
2.新建分区
如果你的SD卡已经分区,请按照上述步骤删除分区。接下来,我们将创建两个分区,一个是引导区,用来存放内核镜像等文件;另一个文件系统区存放android linux文件系统。
Command (m for help): n
Partition type:
p primary (0 primary, 0 extended, 4 free)
e extended
Select (default p): p
Partition number (1-4, default 1):
Using default value 1
First sector (2048-30679039, default 2048):
Using default value 2048
Last sector, +sectors or +sizeK,M,G (2048-30679039, default 30679039): +128M
Command (m for help): t
Selected partition 1
Hex code (type L to list codes): c
Changed system type of partition 1 to c (W95 FAT32 (LBA))
Command (m for help): a
Partition number (1-4): 1
Command (m for help): n
Partition type:
p primary (1 primary, 0 extended, 3 free)
e extended
Select (default p): p
Partition number (1-4, default 2):
Using default value 2
First sector (264192-30679039, default 264192):
Using default value 264192
Last sector, +sectors or +sizeK,M,G (264192-30679039, default 30679039):
Using default value 30679039
Command (m for help): w
The partition table has been altered!
Calling ioctl() to re-read partition table.
WARNING: If you have created or modified any DOS 6.x
partitions, please see the fdisk manual page for additional
information.
Syncing disks.
ok,分区成功,现在我们有两个分区,接下我们对分区进行格式化。
3.格式化分区
对引导区进行格式化:
sudo mkfs.msdos -F 32 /dev/sdb1 -n BOOT
mkfs.msdos 3.0.12 (29 Oct 2011)
对文件系统区进行格式化:
sudo mkfs.ext3 /dev/sdb2 -L ROOTFS
mke2fs 1.42 (29-Nov-2011)
Filesystem label=ROOTFS
OS type: Linux
Block size=4096 (log=2)
Fragment size=4096 (log=2)
Stride=0 blocks, Stripe width=0 blocks
950976 inodes, 3801856 blocks
190092 blocks (5.00%) reserved for the super user
First data block=0
Maximum filesystem blocks=3896508416
117 block groups
32768 blocks per group, 32768 fragments per group
8128 inodes per group
Superblock backups stored on blocks:
32768, 98304, 163840, 229376, 294912, 819200, 884736, 1605632, 2654208
Allocating group tables: done
Writing inode tables: done
Creating journal (32768 blocks): done
Writing superblocks and filesystem accounting information: done
4.设置引导区
引导区必须包含以下文件,你可以从官方镜像里获取(bootable/fat32 partition)也可以从书面步骤中复制过来:
bootcode.bin:第二阶段的引导程序,
loader.bin:第三阶段的引导程序,
start.elf:GPU二进制固件映像,
kernel.img操作系统的内核镜像文件,
cmdline.txt:传递给内核的参数.
5.设置root文件系统分区
ROOTFS分区包含android文件系统,是从<your_android_framework_path>/out/target/product/rpi/root复制过来的。
cp -r <your_android_framework_path>/out/target/product/rpi/root/* /media/ROOTFS/
6.完成上述步骤之后,将其放在Raspberry Pi上跑。
七.如何在Raspberry Pi使用adb?
1.查看网络
当android linux在Raspberry Pi运行时,切换到控制台,执行以下命令:
ifconfig eth0
记下ip地址。
如果不能找到ip,可以输入以下命令:/system/xbin/dhcp-eth0,来启动网络连接程序。
ps:如果屏幕没有显示控制台,只要按CTRL+ALT+F2即可切换到控制台。如果你想要切换到Android界面,只要按CTRL+ALT+F7即可。
2.远程连接adb服务器
在主机上执行以下命令即可与同一局域网的Raspberry Pi相连
adb connect ip
连接成功后,你就可以用adb工具输出日志,执行shell命令等。
3.也可以用数据线连接主机,直接在主机上调试。
进入调试的命令为:
screen /dev/ttyUSB0 115200
名词解释:
交叉编译(cross compile):交叉编译呢,简单地说,就是在一个平台上生成另一个平台上的可执行代码。这里需要注意的是所谓 平台,实际上包含两个概念:体系结构(Architecture)、操作系统(Operating System)。同一个体系结构可以运行不同的操作系统;同样,同一个操作系统也可以在不同的体系结构上运行。举例来说,我们常说的x86 Linux平台实际上是Intel x86体系结构和Linux for x86操作系统的统称;而x86 WinNT平台实际上是Intel x86体系结构和Windows NT for x86操作系统的简称。
参考技术A 一.Raspberry Pi入门向导。
可以在以下地址下载Raspberry向导


4.设置引导区
引导区必须包含以下文件,你可以从官方镜像里获取(bootable/fat32 partition)也可以从书面步骤中复制过来:
bootcode.bin:第二阶段的引导程序,
loader.bin:第三阶段的引导程序,
start.elf:GPU二进制固件映像,
kernel.img操作系统的内核镜像文件,
cmdline.txt:传递给内核的参数.
5.设置root文件系统分区
ROOTFS分区包含android文件系统,是从<your_android_framework_path>/out/target/product/rpi/root复制过来的。
cp -r <your_android_framework_path>/out/target/product/rpi/root/* /media/ROOTFS/
6.完成上述步骤之后,将其放在Raspberry Pi上跑。
七.如何在Raspberry Pi使用adb?
1.查看网络
当android linux在Raspberry Pi运行时,切换到控制台,执行以下命令:
ifconfig eth0
记下ip地址。
如果不能找到ip,可以输入以下命令:/system/xbin/dhcp-eth0,来启动网络连接程序。
ps:如果屏幕没有显示控制台,只要按CTRL+ALT+F2即可切换到控制台。如果你想要切换到Android界面,只要按CTRL+ALT+F7即可。
2.远程连接adb服务器
在主机上执行以下命令即可与同一局域网的Raspberry Pi相连
adb connect ip
连接成功后,你就可以用adb工具输出日志,执行shell命令等。
3.也可以用数据线连接主机,直接在主机上调试。
进入调试的命令为:
screen /dev/ttyUSB0 115200
名词解释:
交叉编译(cross compile):交叉编译呢,简单地说,就是在一个平台上生成另一个平台上的可执行代码。这里需要注意的是所谓 平台,实际上包含两个概念:体系结构(Architecture)、操作系统(Operating System)。同一个体系结构可以运行不同的操作系统;同样,同一个操作系统也可以在不同的体系结构上运行。举例来说,我们常说的x86 Linux平台实际上是Intel x86体系结构和Linux for x86操作系统的统称;而x86 WinNT平台实际上是Intel x86体系结构和Windows NT for x86操作系统的简称。
本回答被提问者和网友采纳以上是关于如何将android linux烧到Raspberry Pi及其调试的主要内容,如果未能解决你的问题,请参考以下文章