扩散模型 (Diffusion Model) 简要介绍与源码分析
Posted
tags:
篇首语:本文由小常识网(cha138.com)小编为大家整理,主要介绍了扩散模型 (Diffusion Model) 简要介绍与源码分析相关的知识,希望对你有一定的参考价值。
扩散模型 (Diffusion Model) 简要介绍与源码分析
前言
近期同事分享了 Diffusion Model, 这才发现生成模型的发展已经到了如此惊人的地步, OpenAI 推出的 Dall-E 2 可以根据文本描述生成极为逼真的图像, 质量之高直让人惊呼哇塞. 今早公众号给我推送了一篇关于 Stability AI 公司的报道, 他们推出的 AI 文生图扩散模型 Stable Diffusion 已开源, 能够在消费级显卡上实现 Dall-E 2 级别的图像生成, 效率提升了 30 倍.
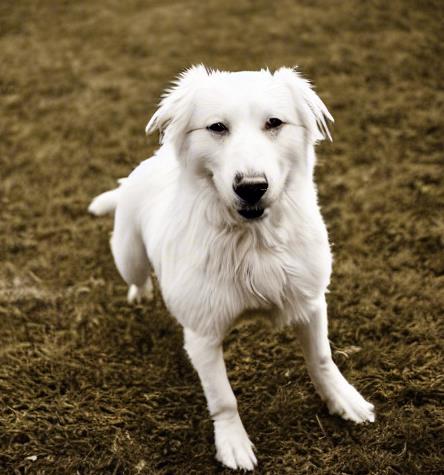
于是找到他们的开源产品体验了一把, 在线体验地址在 https://huggingface.co/spaces/stabilityai/stable-diffusion (开源代码在 Github 上: https://github.com/CompVis/stable-diffusion), 在搜索框中输入 "A dog flying in the sky" (一只狗在天空飞翔), 生成效果如下:

Amazing! 当然, 不是每一张图片都符合预期, 但好在可以生成无数张图片, 其中总有效果好的. 在震惊之余, 不免对 Diffusion Model (扩散模型) 背后的原理感兴趣, 就想看看是怎么实现的.
当时同事分享时, PPT 上那一堆堆公式扑面而来, 把我给整懵圈了, 但还是得撑起下巴, 表现出似有所悟、深以为然的样子, 在讲到关键处不由暗暗点头以表示理解和赞许. 后面花了个周末专门学习了一下, 公式推导+代码分析, 感觉终于了解了基本概念, 于是记录下来形成此文, 不敢说自己完全懂了, 毕竟我不做这个方向, 但回过头去看 PPT 上的公式就不再发怵了.
广而告之
可以在微信中搜索 “珍妮的算法之路” 或者 “world4458” 关注我的微信公众号, 可以及时获取最新原创技术文章更新.
另外可以看看知乎专栏 PoorMemory-机器学习, 以后文章也会发在知乎专栏中.
总览
本文对 Diffusion Model 扩散模型的原理进行简要介绍, 然后对源码进行分析. 扩散模型的实现有多种形式, 本文关注的是 DDPM (denoising diffusion probabilistic models). 在介绍完基本原理后, 对作者释放的 Tensorflow 源码进行分析, 加深对各种公式的理解.
参考文章
在理解扩散模型的路上, 受到下面这些文章的启发, 强烈推荐阅读:
- Lilian 的博客, 内容非常非常详实, 干货十足, 而且每篇文章都极其用心, 向大佬学习: What are Diffusion Models?
- ewrfcas 的知乎, 公式推导补充了更多的细节: 由浅入深了解Diffusion Model
- Lilian 的博客, 介绍变分自动编码器 VAE: From Autoencoder to Beta-VAE, Diffusion Model 需要从分布中随机采样样本, 该过程无法求导, 需要使用到 VAE 中介绍的重参数技巧.
- Denoising Diffusion Probabilistic Models 论文,
- 其 TF 源码位于: https://github.com/hojonathanho/diffusion, 源码介绍以该版本为主
- PyTorch 的开源实现: https://github.com/lucidrains/denoising-diffusion-pytorch, 核心逻辑和上面 Tensorflow 版本是一致的, Stable Diffusion 参考的是 pytorch 版本的代码.
扩散模型介绍
基本原理
Diffusion Model (扩散模型) 是一类生成模型, 和 VAE (Variational Autoencoder, 变分自动编码器), GAN (Generative Adversarial Network, 生成对抗网络) 等生成网络不同的是, 扩散模型在前向阶段对图像逐步施加噪声, 直至图像被破坏变成完全的高斯噪声, 然后在逆向阶段学习从高斯噪声还原为原始图像的过程.
具体来说, 前向阶段在原始图像 $\\mathbfx_0$ 上逐步增加噪声, 每一步得到的图像 $\\mathbfxt$ 只和上一步的结果 $\\mathbfxt - 1$ 相关, 直至第 $T$ 步的图像 $\\mathbfx_T$ 变为纯高斯噪声. 前向阶段图示如下:

而逆向阶段则是不断去除噪声的过程, 首先给定高斯噪声 $\\mathbfx_T$, 通过逐步去噪, 直至最终将原图像 $\\mathbfx_0$ 给恢复出来, 逆向阶段图示如下:

模型训练完成后, 只要给定高斯随机噪声, 就可以生成一张从未见过的图像. 下面分别介绍前向阶段和逆向阶段, 只列出重要公式,
前向阶段
由于前向过程中图像 $\\mathbfxt$ 只和上一时刻的 $\\mathbfxt - 1$ 有关, 该过程可以视为马尔科夫过程, 满足:
$$ \\beginalign q\\left(x_1: T \\mid x_0\\right) &=\\prod_t=1^T q\\left(x_t \\mid x_t-1\\right) \\ q\\left(x_t \\mid x_t-1\\right) &=\\mathcalN\\left(x_t ; \\sqrt1-\\beta_t x_t-1, \\beta_t \\mathbfI\\right), \\endalign $$
其中 $\\beta_t\\in(0, 1)$ 为高斯分布的方差超参, 并满足 $\\beta_1 < \\beta_2 < \\ldots < \\beta_T$. 另外公式 (2) 中为何均值 $x_t-1$ 前乘上系数 $\\sqrt1-\\beta_t x_t-1$ 的原因将在后面的推导介绍. 上述过程的一个美妙性质是我们可以在任意 time step 下通过 重参数技巧 采样得到 $x_t$.
重参数技巧 (reparameterization trick) 是为了解决随机采样样本这一过程无法求导的问题. 比如要从高斯分布 $z \\sim \\mathcalN(z; \\mu, \\sigma^2\\mathbfI)$ 中采样样本 $z$, 可以通过引入随机变量 $\\epsilon\\sim\\mathcalN(0, \\mathbfI)$, 使得 $z = \\mu + \\sigma\\odot\\epsilon$, 此时 $z$ 依旧具有随机性, 且服从高斯分布 $\\mathcalN(\\mu, \\sigma^2\\mathbfI)$, 同时 $\\mu$ 与 $\\sigma$ (通常由网络生成) 可导.
简要了解了重参数技巧后, 再回到上面通过公式 (2) 采样 $x_t$ 的方法, 即生成随机变量 $\\epsilon_t\\sim\\mathcalN(0, \\mathbfI)$, 然后令 $\\alpha_t = 1 - \\beta_t$, 以及 $\\overline\\alpha_t = \\prod_i=1^T\\alpha_t$, 从而可以得到:

其中公式 (3-1) 到公式 (3-2) 的推导是由于独立高斯分布的可见性, 有 $\\mathcalN\\left(0, \\sigma_1^2\\mathbfI\\right) +\\mathcalN\\left(0,\\sigma_2^2 \\mathbfI\\right)\\sim\\mathcalN\\left(0, \\left(\\sigma_1^2 + \\sigma_2^2\\right)\\mathbfI\\right)$, 因此:
$$ \\beginaligned &\\sqrta_t\\left(1-\\alpha_t-1\\right) \\epsilon_2 \\sim \\mathcalN\\left(0, a_t\\left(1-\\alpha_t-1\\right) \\mathbfI\\right) \\ &\\sqrt1-\\alpha_t \\epsilon_1 \\sim \\mathcalN\\left(0,\\left(1-\\alpha_t\\right) \\mathbfI\\right) \\ &\\sqrta_t\\left(1-\\alpha_t-1\\right) \\epsilon_2+\\sqrt1-\\alpha_t \\epsilon_1 \\sim \\mathcalN\\left(0,\\left[\\alpha_t\\left(1-\\alpha_t-1\\right)+\\left(1-\\alpha_t\\right)\\right] \\mathbfI\\right) \\ &=\\mathcalN\\left(0,\\left(1-\\alpha_t \\alpha_t-1\\right) \\mathbfI\\right) . \\endaligned $$
注意公式 (3-2) 中 $\\bar\\epsilon2 \\sim \\mathcalN(0, \\mathbfI)$, 因此还需乘上 $\\sqrt1-\\alpha_t \\alphat-1$. 从公式 (3) 可以看出
$$ \\beginaligned q\\left(x_t \\mid x_0\\right)=\\mathcalN\\left(x_t ; \\sqrt\\bara_t x_0,\\left(1-\\bara_t\\right) \\mathbfI\\right) \\endaligned $$
注意由于 $\\beta_t\\in(0, 1)$ 且 $\\beta_1 < \\ldots < \\beta_T$, 而 $\\alpha_t = 1 - \\beta_t$, 因此 $\\alpha_t\\in(0, 1)$ 并且有 $\\alpha_1 > \\ldots>\\alpha_T$, 另外由于 $\\bar\\alphat=\\prodi=1^T\\alpha_t$, 因此当 $T\\rightarrow\\infty$ 时, $\\bar\\alphat\\rightarrow0$ 以及 $(1-\\barat)\\rightarrow 1$, 此时 $x_T\\sim\\mathcalN(0, \\mathbfI)$. 从这里的推导来看, 在公式 (2) 中的均值 $xt-1$ 前乘上系数 $\\sqrt1-\\beta_t xt-1$ 会使得 $x_T$ 最后收敛到标准高斯分布.
逆向阶段
前向阶段是加噪声的过程, 而逆向阶段则是将噪声去除, 如果能得到逆向过程的分布 $q\\left(x_t-1 \\mid x_t\\right)$, 那么通过输入高斯噪声 $x_T\\sim\\mathcalN(0, \\mathbfI)$, 我们将生成一个真实的样本. 注意到当 $\\beta_t$ 足够小时, $q\\left(x_t-1 \\mid x_t\\right)$ 也是高斯分布, 具体的证明在 ewrfcas 的知乎文章: 由浅入深了解Diffusion Model 推荐的论文中: On the theory of stochastic processes, with particular reference to applications. 我大致看了一下, 哈哈, 没太看明白, 不过想到这个不是我关注的重点, 因此 pass. 由于我们无法直接推断 $q\\left(x_t-1 \\mid x_t\\right)$, 因此我们将使用深度学习模型 $p_\\theta$ 去拟合分布 $q\\left(x_t-1 \\mid x_t\\right)$, 模型参数为 $\\theta$:
$$ \\beginaligned p_\\theta\\left(x_0: T\\right) &=p\\left(x_T\\right) \\prod_t=1^T p_\\theta\\left(x_t-1 \\mid x_t\\right) \\ p_\\theta\\left(x_t-1 \\mid x_t\\right) &=\\mathcalN\\left(x_t-1 ; \\mu_\\theta\\left(x_t, t\\right), \\Sigma_\\theta\\left(x_t, t\\right)\\right) \\endaligned $$
注意到, 虽然我们无法直接求得 $q\\left(x_t-1 \\mid x_t\\right)$ (注意这里是 $q$ 而不是模型 $p_\\theta$), 但在知道 $x_0$ 的情况下, 可以通过贝叶斯公式得到 $q\\left(x_t-1 \\mid x_t, x_0\\right)$ 为:
$$ \\beginaligned q\\left(x_t-1 \\mid x_t, x_0\\right) &= \\mathcalN\\left(x_t-1 ; \\colorblue\\tilde\\mu(x_t, x_0), \\colorred\\tilde\\beta_t \\mathbfI\\right) \\endaligned $$
推导过程如下:
$$ \\beginaligned q(x_t-1 \\vert x_t, x_0) &= q(x_t \\vert x_t-1, x_0) \\frac q(x_t-1 \\vert x_0) q(x_t \\vert x_0) \\ &\\propto \\exp \\Big(-\\frac12 \\big(\\frac(x_t - \\sqrt\\alpha_t x_t-1)^2\\beta_t + \\frac(x_t-1 - \\sqrt\\bar\\alphat-1 x_0)^21-\\bar\\alphat-1 - \\frac(x_t - \\sqrt\\bar\\alphat x_0)^21-\\bar\\alphat \\big) \\Big) \\ &= \\exp \\Big(-\\frac12 \\big(\\fracx_t^2 - 2\\sqrt\\alpha_t x_t \\colorbluext-1 \\colorblack+ \\alpha_t \\colorredxt-1^2 \\beta_t + \\frac \\colorredx_t-1^2 \\colorblack- 2 \\sqrt\\bar\\alphat-1 x_0 \\colorbluext-1 \\colorblack+ \\bar\\alphat-1 x_0^2 1-\\bar\\alphat-1 - \\frac(x_t - \\sqrt\\bar\\alphat x_0)^21-\\bar\\alphat \\big) \\Big) \\ &= \\exp\\Big( -\\frac12 \\big( \\underbrace\\colorred(\\frac\\alpha_t\\beta_t + \\frac11 - \\bar\\alphat-1) xt-1^2xt-1 \\text 方差 - \\underbrace\\colorblue(\\frac2\\sqrt\\alpha_t\\beta_t x_t + \\frac2\\sqrt\\bar\\alphat-11 - \\bar\\alphat-1 x_0) x_t-1xt-1 \\text 均值 + \\underbrace\\colorblack C(x_t, x_0)\\text 与 xt-1 \\text 无关 \\big) \\Big) \\endaligned $$
上面推导过程中, 通过贝叶斯公式巧妙的将逆向过程转换为前向过程, 且最终得到的概率密度函数和高斯概率密度函数的指数部分 $\\exp\\left(-\\frac\\left(x - \\mu\\right)^22\\sigma^2\\right) = \\exp\\left(-\\frac12\\left(\\frac1\\sigma^2x^2 - \\frac2\\mu\\sigma^2x + \\frac\\mu^2\\sigma^2\\right)\\right)$ 能对应, 即有:

通过公式 (8) 和公式 (9), 我们能得到 $q\\left(x_t-1 \\mid x_t, x_0\\right)$ 的分布. 此外由于公式 (3) 揭示的 $x_t$ 和 $x_0$ 之间的关系: $x_t =\\sqrt\\bar\\alpha_t x_0+\\sqrt1-\\bar\\alpha_t \\bar\\epsilon_t$, 可以得到
$$ \\beginaligned x_0 = \\frac1\\sqrt\\bar\\alpha_t(x_t - \\sqrt1 - \\bar\\alpha_t\\epsilon_t) \\endaligned $$
代入公式 (9) 中得到:

补充一下公式 (11) 的详细推导过程:

前面说到, 我们将使用深度学习模型 $p_\\theta$ 去拟合逆向过程的分布 $q\\left(x_t-1 \\mid x_t\\right)$, 由上面公式知 $p_\\theta\\left(x_t-1 \\mid x_t\\right) =\\mathcalN\\left(x_t-1 ; \\mu_\\theta\\left(x_t, t\\right), \\Sigma_\\theta\\left(x_t, t\\right)\\right)$, 我们希望训练模型 $\\mu_\\theta\\left(x_t, t\\right)$ 以预估 $\\tilde\\mu_t = \\frac1\\sqrt\\alpha_t \\Big( x_t - \\frac1 - \\alpha_t\\sqrt1 - \\bar\\alpha_t \\epsilon_t \\Big)$. 由于 $x_t$ 在训练阶段会作为输入, 因此它是已知的, 我们可以转而让模型去预估噪声 $\\epsilon_t$, 即令:
$$ \\beginaligned \\mu_\\theta(x_t, t) &= \\colorcyan\\frac1\\sqrt\\alpha_t \\Big( x_t - \\frac1 - \\alpha_t\\sqrt1 - \\bar\\alphat \\epsilon\\theta(x_t, t) \\Big) \\ \\textThus x_t-1 &= \\mathcalN(x_t-1; \\frac1\\sqrt\\alpha_t \\Big( x_t - \\frac1 - \\alpha_t\\sqrt1 - \\bar\\alphat \\epsilon\\theta(x_t, t) \\Big), \\boldsymbol\\Sigma_\\theta(x_t, t)) \\endaligned $$
模型训练
前面谈到, 逆向阶段让模型去预估噪声 $\\epsilon_\\theta(x_t, t)$, 那么应该如何设计 Loss 函数 ? 我们的目标是在真实数据分布下, 最大化模型预测分布的对数似然, 即优化在 $x_0\\sim q(x_0)$ 下的 $p_\\theta(x_0)$ 交叉熵:
$$ \\beginaligned \\mathcalL = \\mathbbEq(x_0)\\left[-\\logp\\theta(x_0)\\right] \\endaligned $$
和 变分自动编码器 VAE 类似, 使用 Variational Lower Bound 来优化: $-\\logp_\\theta(x_0)$ :

对公式 (15) 左右两边取期望 $\\mathbbE_q(x_0)$, 利用到重积分中的 Fubini 定理 可得:
$$ \\mathcalLV L B=\\underbrace\\mathbbEq\\left(x_0\\right)\\left(\\mathbbEq\\left(x1: T \\mid x_0\\right)\\left[\\log \\fracq\\left(x_1: T \\mid x_0\\right)p_\\theta\\left(x_0: T\\right)\\right]\\right)=\\mathbbEq\\left(x0: T\\right)\\left[\\log \\fracq\\left(x_1: T \\mid x_0\\right)p_\\theta\\left(x_0: T\\right)\\right]\\text Fubini定理 \\geq \\mathbbEq\\left(x_0\\right)\\left[-\\log p_\\theta\\left(x_0\\right)\\right] $$
因此最小化 $\\mathcalLV L B$ 就可以优化目标函数 $\\mathcalL$. 之后对 $\\mathcalLV L B$ 做进一步的推导, 这部分的详细推导见上面的参考文章, 最终的结论是:
$$ \\beginaligned \\mathcalLV L B &= L_T + LT - 1 + \\ldots + L_0 \\ L_T &= D_KL\\left(q(x_T|x_0)||p_\\theta(x_T)\\right) \\ L_t &= D_KL\\left(q(x_t|x_t - 1, x_0)||p_\\theta(x_t|x_t+1)\\right); \\quad 1 \\leq t \\leq T - 1 \\ L_0 &= -\\logp_\\theta\\left(x_0|x_1\\right) \\endaligned $$
最终是优化两个高斯分布 $q(x_t|x_t - 1, x_0) = \\mathcalN\\left(x_t-1 ; \\colorblue\\tilde\\mu(x_t, x_0), \\colorred\\tilde\\betat \\mathbfI\\right)$ 与 $p\\theta(x_t|x_t+1) = \\mathcalN\\left(x_t-1 ; \\mu_\\theta\\left(x_t, t\\right), \\Sigma_\\theta\\right)$ (此为模型预估的分布)之间的 KL 散度. 由于多元高斯分布的 KL 散度存在闭式解, 详见: Multivariate_normal_distributions, 从而可以得到:
$$ \\beginaligned L_t &= \\mathbbEx_0, \\epsilon \\Big[\\frac12 | \\boldsymbol\\Sigma\\theta(x_t, t) |^2_2 | \\colorblue\\tilde\\mut(x_t, x_0) - \\colorgreen\\mu\\theta(x_t, t) |^2 \\Big] \\ &= \\mathbbEx_0, \\epsilon \\Big[\\frac12 |\\boldsymbol\\Sigma\\theta |^2_2 | \\colorblue\\frac1\\sqrt\\alpha_t \\Big( x_t - \\frac1 - \\alpha_t\\sqrt1 - \\bar\\alphat \\epsilon_t \\Big) - \\colorgreen\\frac1\\sqrt\\alpha_t \\Big( x_t - \\frac1 - \\alpha_t\\sqrt1 - \\bar\\alphat \\boldsymbol\\epsilon\\theta(x_t, t) \\Big) |^2 \\Big] \\ &= \\mathbbEx_0, \\epsilon \\Big[\\frac (1 - \\alpha_t)^2 2 \\alpha_t (1 - \\bar\\alphat) | \\boldsymbol\\Sigma\\theta |^2_2 |\\epsilon_t - \\epsilon_\\theta(x_t, t)|^2 \\Big]; \\quad \\text其中 \\epsilon_t \\text为高斯噪声, \\epsilon_\\theta \\text为模型学习的噪声 \\ &= \\mathbbEx_0, \\epsilon \\Big[\\frac (1 - \\alpha_t)^2 2 \\alpha_t (1 - \\bar\\alphat) | \\boldsymbol\\Sigma\\theta |^2_2 |\\epsilon_t - \\epsilon\\theta(\\sqrt\\bar\\alpha_tx_0 + \\sqrt1 - \\bar\\alpha_t\\epsilon_t, t)|^2 \\Big] \\endaligned $$
DDPM 将 Loss 简化为如下形式:
$$ \\beginaligned L_t^\\text simple =\\mathbbEx_0, \\epsilon_t\\left[\\left|\\epsilon_t-\\epsilon\\theta\\left(\\sqrt\\bar\\alpha_t x_0+\\sqrt1-\\bar\\alpha_t \\epsilon_t, t\\right)\\right|^2\\right] \\endaligned $$
因此 Diffusion 模型的目标函数即是学习高斯噪声 $\\epsilon_t$ 和 $\\epsilon_\\theta$ (来自模型输出) 之间的 MSE loss.
最终算法
最终 DDPM 的算法流程如下:

训练阶段重复如下步骤:
- 从数据集中采样 $x_0$
- 随机选取 time step $t$
- 生成高斯噪声 $\\epsilon_t\\in\\mathcalN(0, \\mathbfI)$
- 调用模型预估 $\\epsilon_\\theta\\left(\\sqrt\\bar\\alpha_t x_0+\\sqrt1-\\bar\\alpha_t \\epsilon_t, t\\right)$
- 计算噪声之间的 MSE Loss: $\\left|\\epsilon_t-\\epsilon_\\theta\\left(\\sqrt\\bar\\alpha_t x_0+\\sqrt1-\\bar\\alpha_t \\epsilon_t, t\\right)\\right|^2$, 并利用反向传播算法训练模型.
逆向阶段采用如下步骤进行采样:
- 从高斯分布采样 $x_T$
- 按照 $T, \\ldots, 1$ 的顺序进行迭代:
- 如果 $t = 1$, 令 $\\mathbfz = 0$; 如果 $t > 1$, 从高斯分布中采样 $\\mathbfz\\sim\\mathcalN(0, \\mathbfI)$
- 利用公式 (12) 学习出均值 $\\mu_\\theta(x_t, t) = \\colorcyan\\frac1\\sqrt\\alpha_t \\Big( x_t - \\frac1 - \\alpha_t\\sqrt1 - \\bar\\alphat \\epsilon\\theta(x_t, t) \\Big)$, 并利用公式 (8) 计算均方差 $\\sigma_t = \\sqrt\\tilde\\betat = \\sqrt\\frac1 - \\bar\\alphat-11 - \\bar\\alpha_t \\cdot \\beta_t$
- 通过重参数技巧采样 $x_t - 1 = \\mu_\\theta(x_t, t) + \\sigma_t\\mathbfz$
- 经过以上过程的迭代, 最终恢复 $x_0$.
源码分析
DDPM 文章以及代码的相关信息如下:
- Denoising Diffusion Probabilistic Models 论文,
- 其 TF 源码位于: https://github.com/hojonathanho/diffusion, 源码介绍以该版本为主
- PyTorch 的开源实现: https://github.com/lucidrains/denoising-diffusion-pytorch, 核心逻辑和上面 Tensorflow 版本是一致的, Stable Diffusion 参考的是 pytorch 版本的代码.
本文以分析 Tensorflow 源码为主, Pytorch 版本的代码和 Tensorflow 版本的实现逻辑大体不差的, 变量名字啥的都类似, 阅读起来不会有啥门槛. Tensorlow 源码对 Diffusion 模型的实现位于 diffusion_utils_2.py, 模型本身的分析以该文件为主.
训练阶段
以 CIFAR 数据集为例.
在 run_cifar.py 中进行前向传播计算 Loss:

- 第 6 行随机选出 $t\\sim\\textUniform(1, \\ldots, T)$
- 第 7 行
training_losses定义在 GaussianDiffusion2 中, 计算噪声间的 MSE Loss.
进入 GaussianDiffusion2 中, 看到初始化函数中定义了诸多变量, 我在注释中使用公式的方式进行了说明:

下面进入到 training_losses 函数中:

- 第 19 行:
self.model_mean_type默认是eps, 模型学习的是噪声, 因此target是第 6 行定义的noise, 即 $\\epsilon_t$ - 第 9 行: 调用
self.q_sample计算 $x_t$, 即公式 (3) $x_t =\\sqrt\\bar\\alpha_t x_0+\\sqrt1-\\bar\\alpha_t \\epsilon_t$ - 第 21 行:
denoise_fn是定义在 unet.py 中的UNet模型, 只需知道它的输入和输出大小相同; 结合第 9 行得到的 $x_t$, 得到模型预估的噪声: $\\epsilon_\\theta\\left(\\sqrt\\bar\\alpha_t x_0+\\sqrt1-\\bar\\alpha_t \\epsilon_t, t\\right)$ - 第 23 行: 计算两个噪声之间的 MSE: $\\left|\\epsilon_t-\\epsilon_\\theta\\left(\\sqrt\\bar\\alpha_t x_0+\\sqrt1-\\bar\\alpha_t \\epsilon_t, t\\right)\\right|^2$, 并利用反向传播算法训练模型
上面第 9 行定义的 self.q_sample 详情如下:

- 第 13 行的
q_sample已经介绍过, 不多说. - 第 2 行的
_extract在代码中经常被使用到, 看到它只需知道它是用来提取系数的即可. 引入输入是一个 Batch, 里面的每个样本都会随机采样一个 time step $t$, 因此需要使用tf.gather来将 $\\bar\\alpha_t$ 之类选出来, 然后将系数 reshape 为[B, 1, 1, ....]的形式, 目的是为了利用 broadcasting 机制和 $x_t$ 这个 Tensor 相乘.
前向的训练阶段代码实现非常简单, 下面看逆向阶段
逆向阶段
逆向阶段代码定义在 GaussianDiffusion2 中:

- 第 5 行生成高斯噪声 $x_T$, 然后对其不断去噪直至恢复原始图像
- 第 11 行的
self.p_sample就是公式 (6) $p_\\theta\\left(x_t-1 \\mid x_t\\right) =\\mathcalN\\left(x_t-1 ; \\mu_\\theta\\left(x_t, t\\right), \\Sigma_\\theta\\left(x_t, t\\right)\\right)$ 的过程, 使用模型来预估 $\\mu_\\theta\\left(x_t, t\\right)$ 以及 $\\Sigma_\\theta\\left(x_t, t\\right)$ - 第 12 行的
denoise_fn在前面说过, 是定义在 unet.py 中的UNet模型;img_表示 $x_t$. - 第 13 行的
noise_fn则默认是tf.random_normal, 用于生成高斯噪声.
进入 p_sample 函数:

- 第 7 行调用
self.p_mean_variance生成 $\\mu_\\theta\\left(x_t, t\\right)$ 以及 $\\log\\left(\\Sigma_\\theta\\left(x_t, t\\right)\\right)$, 其中 $\\Sigma_\\theta\\left(x_t, t\\right)$ 通过计算 $\\tilde\\beta_t$ 得到. - 第 11 行从高斯分布中采样 $\\mathbfz$
- 第 18 行通过重参数技巧采样 $x_t - 1 = \\mu_\\theta(x_t, t) + \\sigma_t\\mathbfz$, 其中 $\\sigma_t = \\sqrt\\tilde\\beta_t$
进入 self.p_mean_variance 函数:

- 第 6 行调用模型
denoise_fn, 通过输入 $x_t$, 输出得到噪声 $\\epsilon_t$ - 第 19 行
self.model_var_type默认为fixedlarge, 但我当时看fixedsmall比较爽, 因此model_variance和model_log_variance分别为 $\\tilde\\betat = \\frac1 - \\bar\\alphat-11 - \\bar\\alpha_t \\cdot \\beta_t$ (见公式 8), 以及 $\\log\\tilde\\beta_t$ - 第 29 行调用
self._predict_xstart_from_eps函数, 利用公式 (10) 得到 $x_0 = \\frac1\\sqrt\\bar\\alpha_t(x_t - \\sqrt1 - \\bar\\alpha_t\\epsilon_t)$ - 第 30 行调用
self.q_posterior_mean_variance通过公式 (9) 得到 $\\mu_\\theta(x_t, x_0) = \\frac\\sqrt\\alpha_t(1 - \\bar\\alpha_t-1)1 - \\bar\\alphat x_t + \\frac\\sqrt\\bar\\alphat-1\\beta_t1 - \\bar\\alpha_t x_0$
self._predict_xstart_from_eps 函数详情如下:

- 该函数计算 $x_0 = \\frac1\\sqrt\\bar\\alpha_t(x_t - \\sqrt1 - \\bar\\alpha_t\\epsilon_t)$
self.q_posterior_mean_variance 函数详情如下:

- 相关说明见注释, 另外发现对于 $\\mu_\\theta(x_t, x_0)$ 的计算使用的是公式 (9) $\\mu_\\theta(x_t, x_0) = \\frac\\sqrt\\alpha_t(1 - \\bar\\alpha_t-1)1 - \\bar\\alphat x_t + \\frac\\sqrt\\bar\\alphat-1\\beta_t1 - \\bar\\alphat x_0$ 而不是进一步推导后的公式 (11) $\\mu\\theta(x_t, x_0) = \\frac1\\sqrt\\alpha_t \\Big( x_t - \\frac1 - \\alpha_t\\sqrt1 - \\bar\\alpha_t \\epsilon_t \\Big)$.
总结
本文分析了扩散模型 DDPM 算法,对原理以及代码进行了剖析,公式比较多,手推一遍再结合代码分析会有更深的体会。
CVLatent diffusion model 扩散模型体验
note
文章目录
一、diffusion模型
1.1 Stable Diffusion简介
稳定扩散模型(Stable Diffusion Model)是一种用于描述信息传播和创新扩散的数学模型。它基于经典的扩散方程,但引入了长尾分布以捕捉现实中存在的大量异常事件。
在稳定扩散模型中,假设某个创新或信息被一个人采纳后,它会以一定的概率被其他人采纳,并通过社交网络进行传播。这个概率可以由多个因素决定,例如该创新的吸引力、采纳者的行为习惯等。而在每一次传播过程中,采纳者的数量服从一个长尾分布,即少数人采纳了很多次,而大多数人只采纳了很少次。这种长尾分布可以用稳定分布来建模。
通过稳定扩散模型,我们可以预测一个创新或信息在社交网络中的传播效果,以及确定哪些因素对其影响最大。此外,该模型还可以用于优化营销策略、研究用户行为等领域。
1.2 和GAN对比的优势
稳定扩散模型在计算机视觉领域的应用主要是对图像和视频中的特定物体、目标或行为的识别和跟踪。通过稳定扩散模型,可以预测物体或目标在不同时间点和场景下的出现概率,并优化跟踪算法以提高检测和识别的精度和效率。
与生成对抗网络(GAN)相比,稳定扩散模型的优势在于其具有更好的稳定性和可解释性:
- GAN通常是基于两个神经网络相互博弈,其中一个神经网络用于生成样本,而另一个神经网络则用于判别真实样本和生成样本。这种方法往往需要大量的训练数据和计算资源,同时也存在训练不稳定、模式崩塌等问题。
- 稳定扩散模型则基于传统的数学模型,具有较好的稳定性和可解释性。
- 不需要大量的训练数据和计算资源,可以从少量的数据中学习并进行预测。
- 稳定扩散模型还可以通过调整模型参数来控制模型的灵敏度和鲁棒性,以适应不同的数据分布和噪声情况。
- 稳定扩散模型在计算机视觉领域具有一定的优势,可以用于物体和目标识别、跟踪和预测等任务。但它也存在一些局限性,例如难以处理复杂的图像场景、对噪声和异常值较为敏感等问题。
二、Latent diffusion model原理
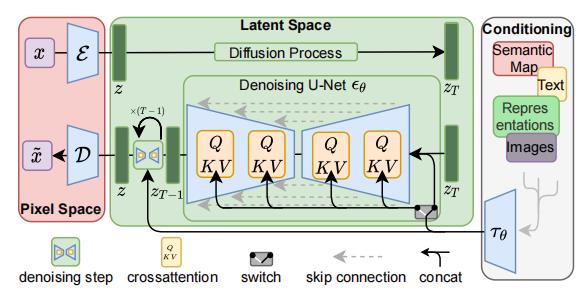
Latent Diffusion模型不直接在操作图像,而是在潜在空间中进行操作。通过将原始数据编码到更小的空间中,让U-Net可以在低维表示上添加和删除噪声。

上图中的符号表示:
- x x x 表示输入图像,
- x ~ \\tildex x~ 表示生成的圈像;
- ε \\varepsilon ε 是编码器,
- D \\mathcalD D 是解码器, 二者共同构成了感知压缩;
- z z z 是潜在向量;
- z T z_T zT 是增加噪声后的 潜在向量;
- τ θ \\tau_\\theta τθ 是文本/图像的编码器(比如Transformer或CLIP),实现了语义压缩。
stable diffusion的推理过程:
- 将潜在种子和文本提示作为输入。
- 然后使用潜在种子生成大小为 64×64 的随机潜在图像表示,而文本提示通过 CLIP 文本编码器转换为 77×768 的文本嵌入。
- U-Net 以文本嵌入为条件迭代地对随机潜在图像表示进行去噪。 U-Net 的输出是噪声残差,用于通过调度算法计算去噪的潜在图像表示。
2.1 潜在空间(Lantent Space)
2.2 自动编码器和U-Net
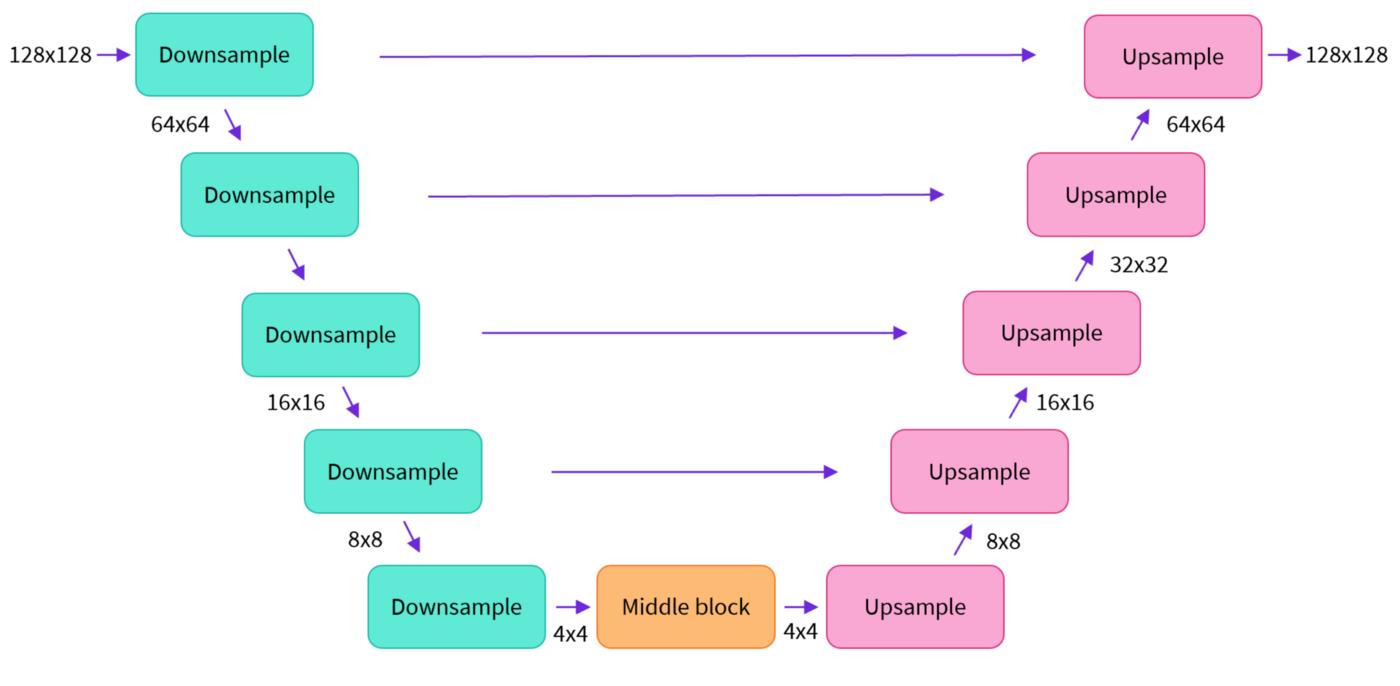
- U-net网络模型,由编码器和解码器组成:
- 编码器将图像表示压缩为较低分辨率的图像;
- 解码器将较低分辨率解码回较高分辨率的图像。
- Unet网络:利用
DoubleConv,Down,Up,OutConv四个模块组装U-net模型,其中Up即右侧模型块之间的上采样连接(Up sampling)部分,注意U-net的跳跃连接(Skip-connection)也在这部分(torch.cat([x2, x1], dim=1))。因为每个子块内部的两次卷积(Double Convolution),所以上采样后也有DoubleConv层。

2.3 文本编码器
文本编码器将输入提示prompt转换为U-net可以理解的嵌入空间。

三、代码实践
3.1 模型权重checkpoints
sd-v1-1.ckpt: 237k steps at resolution256x256on laion2B-en.
194k steps at resolution512x512on laion-high-resolution (170M examples from LAION-5B with resolution>= 1024x1024).sd-v1-2.ckpt: Resumed fromsd-v1-1.ckpt.
515k steps at resolution512x512on laion-aesthetics v2 5+ (a subset of laion2B-en with estimated aesthetics score> 5.0, and additionally
filtered to images with an original size>= 512x512, and an estimated watermark probability< 0.5. The watermark estimate is from the LAION-5B metadata, the aesthetics score is estimated using the LAION-Aesthetics Predictor V2).sd-v1-3.ckpt: Resumed fromsd-v1-2.ckpt. 195k steps at resolution512x512on “laion-aesthetics v2 5+” and 10% dropping of the text-conditioning to improve classifier-free guidance sampling.sd-v1-4.ckpt: Resumed fromsd-v1-2.ckpt. 225k steps at resolution512x512on “laion-aesthetics v2 5+” and 10% dropping of the text-conditioning to improve classifier-free guidance sampling.
3.2 Stable Diffusion v1模型推理
- 仓库地址:https://github.com/CompVis/stable-diffusion
- 这里我选用的模型是stable-diffusion-v1,使用PLMS sampler采样
- Stable Diffusion v1模型使用了a downsampling-factor 8 autoencoder with an 860M UNet 和 CLIP ViT-L/14 text encoder;在256x256图片上预训练,可以在512x512图片上进行模型微调
# 创建对应虚拟环境和下载包
conda env create -f environment.yaml
conda activate ldm
mkdir -p models/ldm/stable-diffusion-v1/

# 运行代码,可以改为自己的prompt
python scripts/txt2img.py --prompt "a photograph of an cute dog" --plms

# 对应的参数设置
usage: txt2img.py [-h] [--prompt [PROMPT]] [--outdir [OUTDIR]] [--skip_grid] [--skip_save] [--ddim_steps DDIM_STEPS] [--plms] [--laion400m] [--fixed_code] [--ddim_eta DDIM_ETA]
                  [--n_iter N_ITER] [--H H] [--W W] [--C C] [--f F] [--n_samples N_SAMPLES] [--n_rows N_ROWS] [--scale SCALE] [--from-file FROM_FILE] [--config CONFIG] [--ckpt CKPT]
                  [--seed SEED] [--precision full,autocast]

optional arguments:
  -h, --help            show this help message and exit
  --prompt [PROMPT]     the prompt to render
  --outdir [OUTDIR]     dir to write results to
  --skip_grid           do not save a grid, only individual samples. Helpful when evaluating lots of samples
  --skip_save           do not save individual samples. For speed measurements.
  --ddim_steps DDIM_STEPS
                        number of ddim sampling steps
  --plms                use plms sampling
  --laion400m           uses the LAION400M model
  --fixed_code          if enabled, uses the same starting code across samples
  --ddim_eta DDIM_ETA   ddim eta (eta=0.0 corresponds to deterministic sampling
  --n_iter N_ITER       sample this often
  --H H                 image height, in pixel space
  --W W                 image width, in pixel space
  --C C                 latent channels
  --f F                 downsampling factor
  --n_samples N_SAMPLES
                        how many samples to produce for each given prompt. A.k.a. batch size
  --n_rows N_ROWS       rows in the grid (default: n_samples)
  --scale SCALE         unconditional guidance scale: eps = eps(x, empty) + scale * (eps(x, cond) - eps(x, empty))
  --from-file FROM_FILE
                        if specified, load prompts from this file
  --config CONFIG       path to config which constructs model
  --ckpt CKPT           path to checkpoint of model
  --seed SEED           the seed (for reproducible sampling)
  --precision full,autocast
                        evaluate at this precision

3.3 安装Stable Diffusion Web Ui
提供的功能:
- txt2img — 根据文本提示生成图像;
- img2img — 根据提供的图像作为范本、结合文本提示生成图像;
- Extras — 优化(清晰、扩展)图像;
- PNG Info — 显示图像基本信息
- Checkpoint Merger — 模型合并
- Train — 根据提供的图片训练具有某种图像风格的模型
- Settings — 系统设置
Reference
[1] 由浅入深了解Diffusion Model
[2] Diffusion Model一发力,GAN就过时了?
[3] AI绘画——使用stable-diffusion生成图片时提示RuntimeError: CUDA out of memory处理方法
[4] 深度学习训练模型时,GPU显存不够怎么办
[5] 从效果看Stable Diffusion中的采样方法
[6] 1秒出图,全球最快的开源Stable Diffusion出炉.OneFlow
[7] https://github.com/CompVis/stable-diffusion
[8] High-Resolution Image Synthesis with Latent Diffusion Models.CVPR2022
[8] model list:https://huggingface.co/CompVis/stable-diffusion
[9] model card: https://huggingface.co/CompVis
[10] https://arxiv.org/abs/2103.00020
[11] AI数字绘画 stable-diffusion 保姆级教程
[12] High-Resolution Image Synthesis with Latent Diffusion Models:https://arxiv.org/abs/2112.10752
[13] https://github.com/CompVis/stable-diffusion
[14] 万字长文:Stable Diffusion 保姆级教程
[15] Stable Diffusion原理详解
[16] CompVis/stable-diffusion-v-1-1-original
以上是关于扩散模型 (Diffusion Model) 简要介绍与源码分析的主要内容,如果未能解决你的问题,请参考以下文章