教程SpringCloud+Nacos+Feign+Gateway搭建教程(推荐)
Posted
tags:
篇首语:本文由小常识网(cha138.com)小编为大家整理,主要介绍了教程SpringCloud+Nacos+Feign+Gateway搭建教程(推荐)相关的知识,希望对你有一定的参考价值。
【教程】SpringCloud+Nacos+Feign+Gateway搭建教程(推荐)
【教程】SpringCloud+Nacos+Feign+Gateway ( 一 ) Nacos Server 注册中心 服务端项目(推荐)
参考代码:https://gitee.com/guanweiCode/SpringCloudGw
1 安装Nacos 并启动 参考:
【安装】Linux 安装nacos过程整理记录
【安装】安装nacos过程整理记录Windows
http://127.0.0.1:8848/nacos

【教程】IDEA创建SpringCloud ( 二.二 ) Nacos Client 服务提供者 客户端项目(推荐)
代码参考:https://gitee.com/guanweiCode/SpringCloudGw
1. 启动Nacos服务
2 创建服务提供者参考 springcloud-eureka-servicesupport

3.服务提供者具体代码配置 POM.xml
4.0.0
com.gw gwcloud-nacos-provide-user 1.0-SNAPSHOT gwcloud-nacos-provide-user
com.gw gwcloud-nacos-provide 1.0-SNAPSHOT
com.alibaba.cloud spring-cloud-starter-alibaba-nacos-discovery
<!-- web服务 -->
<dependency>
  <groupId>org.springframework.boot</groupId>
  <artifactId>spring-boot-starter-web</artifactId>
</dependency>
重点
<!-- 引入SpringCloud的 nacos 依赖 -->
<!--服务发现pom-->
<dependency>
  <groupId>com.alibaba.cloud</groupId>
  <artifactId>spring-cloud-starter-alibaba-nacos-discovery</artifactId>
</dependency>
- yml配置
server:
port: 8811  #服务提供方
spring:
application:
name: user-provide  #指定应用名称
cloud:
nacos:
discovery:
server-addr: 127.0.0.1:8848
5 启动类 重点
@EnableDiscoveryClient
package com.gw.nacos.provide.user;

import org.springframework.boot.SpringApplication;
import org.springframework.boot.autoconfigure.SpringBootApplication;
import org.springframework.cloud.client.discovery.EnableDiscoveryClient;

/**
 * @Title: Nacos服务提供方
 * @Description: 描述
 * @Version: v1.0
 * @Author: Mr.Guan
 * @Mail GuanWeiMail@163.com
 * @DateTime: 2021-02-26
 * @Project SpringCloudDemo
 * @Package com.gw
 */
@EnableDiscoveryClient
@SpringBootApplication
public class NacosUserProvideApplication

    public static void main(String[] args)
        SpringApplication.run(NacosUserProvideApplication.class, args);
6 Controller 跟普通Controller一样
package com.gw.nacos.provide.user.controller;

import io.swagger.annotations.Api;
import io.swagger.annotations.ApiOperation;
import org.springframework.beans.factory.annotation.Value;
import org.springframework.web.bind.annotation.GetMapping;
import org.springframework.web.bind.annotation.PathVariable;
import org.springframework.web.bind.annotation.RequestMapping;
import org.springframework.web.bind.annotation.RestController;

/**
 * @Title: 用户服务
 * @Description: 描述
 * @Version: v1.0
 * @Author: Mr.Guan
 * @Mail GuanWeiMail@163.com
 * @DateTime: 2021-02-26 16:43:36
 * @Project springcloud-gw-parent
 * @Package com.gw.nacos.provide.user.controller
 */
@Api(tags = "用户模块")
@RestController
@RequestMapping("user")
public class UserProvideController


    @Value("$server.port")
    private String port;

    /**
     * 通过用户ID获取用户
     * @param userId
     * @return
     */
    @ApiOperation(value = "根据用户ID查询用户")
    @GetMapping("/getUser/userId")
    public String getUser(@PathVariable("userId") String userId)

        return String.format("【%s-服务提供者】:%s", port, userId);
【教程】IDEA创建SpringCloud ( 三.二 ) Nacos Feign 服务消费者 使用者(推荐)
可参考:【教程】IDEA创建SpringCloud ( 三.二 ) Eureka Feign (Eureka推荐) 服务消费者 使用者 https://blog.csdn.net/G971005287W/article/details/113871425
代码:https://gitee.com/guanweiCode/SpringCloudGw
1 创建项目

2 配置POM
    <!-- 引入SpringCloud的Nacos server依赖 -->
    <!--服务发现pom-->
    <dependency>
      <groupId>com.alibaba.cloud</groupId>
      <artifactId>spring-cloud-starter-alibaba-nacos-discovery</artifactId>
    </dependency>

    <!-- feign -->
    <dependency>
      <groupId>org.springframework.cloud</groupId>
      <artifactId>spring-cloud-starter-openfeign</artifactId>
    </dependency>
完整 feign在 父依赖中, 可去看完整代码
<?xml version="1.0" encoding="UTF-8"?>

<project xmlns="http://maven.apache.org/POM/4.0.0" xmlns:xsi="http://www.w3.org/2001/XMLSchema-instance"
  xsi:schemaLocation="http://maven.apache.org/POM/4.0.0 http://maven.apache.org/xsd/maven-4.0.0.xsd">
  <modelVersion>4.0.0</modelVersion>

  <groupId>com.gw</groupId>
  <artifactId>gwcloud-nacos-consumer-demo</artifactId>
  <version>1.0-SNAPSHOT</version>
  <name>gwcloud-nacos-consumer-demo</name>

  <!-- 引入父项目 -->
  <parent>
    <groupId>com.gw</groupId>
    <artifactId>gwcloud-nacos-consumer</artifactId>
    <version>1.0-SNAPSHOT</version>
  </parent>

  <dependencies>
    <!-- 引入SpringCloud的euekea server依赖 -->
    <!--服务发现pom-->
    <dependency>
      <groupId>com.alibaba.cloud</groupId>
      <artifactId>spring-cloud-starter-alibaba-nacos-discovery</artifactId>
    </dependency>

    <!-- web服务 -->
    <dependency>
      <groupId>org.springframework.boot</groupId>
      <artifactId>spring-boot-starter-web</artifactId>
    </dependency>

  </dependencies>

</project>
3 配置 application.yml
server:
  port: 8821  #服务消费者 使用者 调用者
spring:
  application:
    name: demo-consumer  #指定应用名称
  cloud:
    nacos:
      discovery:
        server-addr: 127.0.0.1:8848
4. 创建启动类
/**
 * 代表自己是一个服务消费者
 */
@EnableDiscoveryClient
/**
 * 当前使用Nacos的Server
 * basePackages 配置feign客户端目录
 */
@EnableFeignClients(basePackages = "com.gw.nacos.consumer.demo.client")
完整
package com.gw.nacos.consumer.demo;

/**
 * @Title: Nacos服务消费者 调用者
 * @Description: 描述
 * @Version: v1.0
 * @Author: Mr.Guan
 * @Mail GuanWeiMail@163.com
 * @DateTime: 2021-02-26
 * @Project SpringCloudDemo
 * @Package com.gw
 */

import org.springframework.boot.SpringApplication;
import org.springframework.boot.autoconfigure.SpringBootApplication;
import org.springframework.cloud.client.discovery.EnableDiscoveryClient;
import org.springframework.cloud.openfeign.EnableFeignClients;

/**
 * 代表自己是一个服务消费者
 */
@EnableDiscoveryClient
/**
 * 当前使用Nacos的Server
 * basePackages 配置feign客户端目录
 */
@EnableFeignClients(basePackages = "com.gw.nacos.consumer.demo.client")
@SpringBootApplication
public class NacosDemoConsumerApplication

    public static void main(String[] args)
        SpringApplication.run(NacosDemoConsumerApplication.class, args);
5 FeignClient
package com.gw.nacos.consumer.demo.client;

import org.springframework.cloud.openfeign.FeignClient;
import org.springframework.web.bind.annotation.GetMapping;
import org.springframework.web.bind.annotation.PathVariable;

/**
 * @Title: Feign客户端 消费者
 * @Description: 用户服务
 * @Version: v1.0
 * @Author: Mr.Guan
 * @Mail GuanWeiMail@163.com
 * @DateTime: 2021-02-23
 * @Project springcloud-gw-parent
 * @Package com.gw.eureka.serviceconsume.feign.client
 */
@FeignClient(name = "user-provide")   //name 对应的服务名spring.application.name
public interface UserClient

    /**
     * 通过用户id获取用户
     * @param userId
     * @return
     */
    @GetMapping("/user/getUser/userId")
    String getUser(@PathVariable("userId") String userId);
6. Controller
package com.gw.nacos.consumer.demo.controller;

import com.gw.nacos.consumer.demo.client.UserClient;
import io.swagger.annotations.Api;
import io.swagger.annotations.ApiOperation;
import org.springframework.beans.factory.annotation.Value;
import org.springframework.web.bind.annotation.GetMapping;
import org.springframework.web.bind.annotation.PathVariable;
import org.springframework.web.bind.annotation.RequestMapping;
import org.springframework.web.bind.annotation.RestController;

import javax.annotation.Resource;

/**
 * @Title: 标题
 * @Description: 描述
 * @Version: v1.0
 * @Author: Mr.Guan
 * @Mail GuanWeiMail@163.com
 * @DateTime: 2021-02-26 16:42:01
 * @Project springcloud-gw-parent
 * @Package com.gw.nacos.consumer.demo.controller
 */
@Api(tags = "用户模块")
@RestController
@RequestMapping("user")
public class DemoConsumerController

    @Value("$server.port")
    private String port;

    @Resource
    private UserClient userClient;

    /**
     * 通过用户ID获取用户
     * @param userId
     * @return
     */
    @ApiOperation(value = "根据用户ID查询用户")
    @GetMapping("/getUserInfo/userId")
    public String getUserInfo(@PathVariable("userId") String userId)

        String user = userClient.getUser(userId);
        return String.format("【%s-Demo消费者】:调用Feign接口返回值 %s", port, user);
【教程】IDEA创建SpringCloud ( 四.二 ) Nacos (推荐) 高可用配置
代码参考:https://gitee.com/guanweiCode/SpringCloudGw
集群搭建参考:https://blog.csdn.net/G971005287W/article/details/114162914
1.搭建好Nacos集群

2 项目配置文件配置多个服务即可
server:
  port: 8811  #服务提供方
spring:
  application:
    name: gwcloud-user-provide-service  #指定应用名称
    #统一配置 参考gwcloud-starter-init
  cloud:
    nacos:
      discovery:
        # 指定Nacos集群服务地址:端口
        server-addr: nacos-server-01:8848,nacos-server-02:8848,nacos-server-03:8848
3 启动多个服务


【教程】SpringCloud+Nacos+Feign+Gateway ( 五 ) Nacos-Gateway 网关搭建及配置(推荐)
转发功能,熔断功能,限流功能
统一入口、鉴权校验、动态路由、降低耦合度
SpringCloud 是微服务中的翘楚,最佳的落地方案。
Spring Cloud Gateway 是 Spring Cloud 新推出的网关框架,之前是 Netflix Zuul。网关通常在项目中为了简化
前端的调用逻辑,同时也简化内部服务之间互相调用的复杂度;具体作用就是转发服务,接收并转发所有内外
部的客户端调用;其他常见的功能还有权限认证,限流控制等等。
(1)Filter(过滤器):
和Zuul的过滤器在概念上类似,可以使用它拦截和修改请求,并且对上游的响应,进行二次处理。过滤器为org.springframework.cloud.gateway.filter.GatewayFilter类的实例。
(2)Route(路由):
网关配置的基本组成模块,和Zuul的路由配置模块类似。一个Route模块由一个 ID,一个目标 URI,一组断言和一组过滤器定义。如果断言为真,则路由匹配,目标URI会被访问。
(3)Predicate(断言):
这是一个 Java 8 的 Predicate,可以使用它来匹配来自 HTTP 请求的任何内容,例如 headers 或参数。断言的输入类型是一个 ServerWebExchange。
1 创建项目

2 启动类
package com.gw.module.gateway;

import org.springframework.boot.SpringApplication;
import org.springframework.boot.autoconfigure.SpringBootApplication;
import org.springframework.cloud.client.discovery.EnableDiscoveryClient;

/**
 * @Title: Gateway服务
 * @Description: 网关
 * @Version: v1.0
 * @Author: Mr.Guan
 * @Mail GuanWeiMail@163.com
 * @DateTime: 2021-03-02
 * @Project SpringCloudGw
 * @Package com.gw
 */
@EnableDiscoveryClient
@SpringBootApplication
public class ModuleGatewayApplication

    public static void main(String[] args)
        SpringApplication.run(ModuleGatewayApplication.class, args);
3 POM.xml
    <!-- spring-cloud网关-->
    <dependency>
      <groupId>org.springframework.cloud</groupId>
      <artifactId>spring-cloud-starter-gateway</artifactId>
    </dependency>
完整的
<?xml version="1.0" encoding="UTF-8"?>

<project xmlns="http://maven.apache.org/POM/4.0.0" xmlns:xsi="http://www.w3.org/2001/XMLSchema-instance"
  xsi:schemaLocation="http://maven.apache.org/POM/4.0.0 http://maven.apache.org/xsd/maven-4.0.0.xsd">

  <!-- 引入父项目 -->
  <parent>
    <groupId>com.gw</groupId>
    <artifactId>gwcloud-module</artifactId>
    <version>1.0-SNAPSHOT</version>
  </parent>

  <modelVersion>4.0.0</modelVersion>
  <groupId>com.gw</groupId>
  <artifactId>gwcloud-module-gateway</artifactId>
  <version>1.0-SNAPSHOT</version>
  <name>gwcloud-module-gateway</name>

  <dependencies>
    <!-- gwcloud 微服务基础依赖-->
    <dependency>
      <groupId>com.gw</groupId>
      <artifactId>gwcloud-starter-init</artifactId>
      <exclusions>
        <exclusion>
          <groupId>com.gw</groupId>
          <artifactId>gwcloud-base-api</artifactId>
        </exclusion>
      </exclusions>
    </dependency>

    <!-- spring-cloud网关-->
    <dependency>
      <groupId>org.springframework.cloud</groupId>
      <artifactId>spring-cloud-starter-gateway</artifactId>
    </dependency>

  </dependencies>


  <build>
    <plugins>
      <plugin>
        <groupId>org.springframework.boot</groupId>
        <artifactId>spring-boot-maven-plugin</artifactId>
      </plugin>
    </plugins>
    <resources>
      <resource>
        <directory>src/main/resources</directory>
        <filtering>true</filtering>
      </resource>
    </resources>
  </build>


</project>
4. 配置文件 application.yml
server:
  port: 9999
spring:
  application:
    name: gwcloud-module-gateway
  cloud:
    gateway:
      discovery:
        locator:
          # 是否和服务注册与发现组件结合,设置为 true 后可以直接使用应用名称调用服务
          enabled: true
#      globalcors:
#        cors-configurations:
#          [/**]:
#            allowCredentials: true
#            allowedOrigins: "*"
#            allowedMethods: "*"
#            allowedHeaders: "*"
      #如果启用nacos或者数据库配置请删除以下配置
      # 路由(routes:路由,它由唯一标识(ID)、目标服务地址(uri)、一组断言(predicates)和一组过滤器组成(filters)。filters 不是必需参数。)
      routes:
          #路由标识(id:标识,具有唯一性)   简单尝试
        - id: gwcloud-user-provide-service
          # 目标服务地址(uri:地址,请求转发后的地址)
          uri: http://localhost:8811
          # 路由条件(predicates:断言,匹配 HTTP 请求内容)
          predicates:
              ## 转发地址格式为 uri/archive
            - Path=/nacos-config/**
5.路由配置方式
5.1基于yml配置文件的方式
spring:
  cloud:
    gateway:
      # 路由(routes:路由,它由唯一标识(ID)、目标服务地址(uri)、一组断言(predicates)和一组过滤器组成(filters)。filters 不是必需参数。)
      routes:
          #路由标识(id:标识,具有唯一性)   简单尝试
        - id: gwcloud-user-provide-service
          # 目标服务地址(uri:地址,请求转发后的地址)
          uri: http://localhost:8811
          # 路由条件(predicates:断言,匹配 HTTP 请求内容)
          predicates:
              ## 转发地址格式为 uri/archive
            - Path=/nacos-config/**
原本的访问地址为:http://localhost:8811/nacos-config/getUserConfig
Gateway访问地址为:http://localhost:9999/nacos-config/getUserConfig
5.2 基于yml配置文件的方式 通过服务名访问 在uri的schema协议部分为自定义的lb:类型,表示从微服务注册中心(如Nacos)订阅服务,并且进行服务的路由。
注册中心相结合的路由配置方式,与单个URI的路由配置,区别其实很小,仅仅在于URI的schema协议不同。单个URI的地址的schema协议,一般为http或者https协议。
需要注意的是uri的协议为lb,表示启用Gateway的负载均衡功能。
uri: lb://gwcloud-user-provide-service
      # 路由(routes:路由,它由唯一标识(ID)、目标服务地址(uri)、一组断言(predicates)和一组过滤器组成(filters)。filters 不是必需参数。)
      routes:
          #路由标识(id:标识,具有唯一性)   简单尝试
        - id: gwcloud-user-provide-service
          # 目标服务地址(uri:地址,请求转发后的地址)   lb://服务名
          uri: lb://gwcloud-user-provide-service
          # 路由条件(predicates:断言,匹配 HTTP 请求内容)
          predicates:
              ## 转发地址格式为 uri/archive
            - Path=/nacos-config/**


5.3 通过代码配置的方式
package com.gw.module.gateway.config;

import org.springframework.cloud.gateway.route.RouteLocator;
import org.springframework.cloud.gateway.route.builder.RouteLocatorBuilder;
import org.springframework.context.annotation.Bean;
import org.springframework.context.annotation.Configuration;

/**
 * @Title: Gateway配置类
 * @Description: 描述
 * @Version: v1.0
 * @Author: Mr.Guan
 * @Mail GuanWeiMail@163.com
 * @DateTime: 2021-03-03
 * @Project springcloud-gw-parent
 * @Package com.gw.module.gateway.config
 */
@Configuration
public class GatewayRoutesConfig

    /**
     * 通过代码配置路由
     * @param builder
     * @return
     */
    @Bean
    public RouteLocator customRouteLocator(RouteLocatorBuilder builder)
        return builder.routes()
                .route("gwcloud-user-provide-service-code", r -> r.path("/user/**")
                        .uri("lb://gwcloud-user-provide-service"))
                .build();

predicates规则
通过请求参数过滤
      routes:
          #路由标识(id:标识,具有唯一性)   简单尝试
        - id: gwcloud-user-provide-service
          # 目标服务地址(uri:地址,请求转发后的地址)   lb://服务名
          uri: lb://gwcloud-user-provide-service
          # 路由条件(predicates:断言,匹配 HTTP 请求内容)
          predicates:
              ## 通过请求参数过滤
            - Query=token

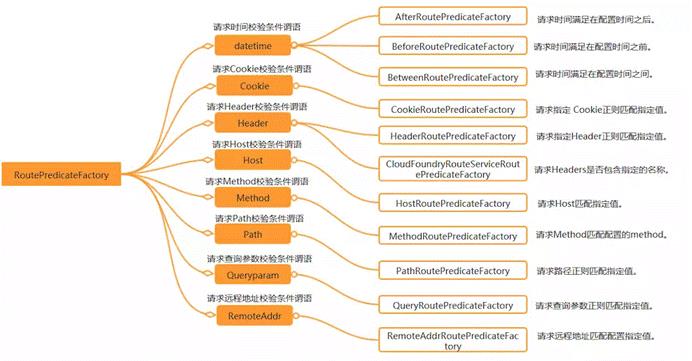
Predicate 断言条件(转发规则)介绍

filters

以上是关于教程SpringCloud+Nacos+Feign+Gateway搭建教程(推荐)的主要内容,如果未能解决你的问题,请参考以下文章