springboot2集成knife4j
Posted justry_deng
tags:
篇首语:本文由小常识网(cha138.com)小编为大家整理,主要介绍了springboot2集成knife4j相关的知识,希望对你有一定的参考价值。
springboot2集成knife4j
环境说明
- springboot:2.6.4
- knife4j-openapi2-spring-boot-starter:4.0.0
集成knife4j
第一步:引入依赖
<dependency>
    <groupId>com.github.xiaoymin</groupId>
    <artifactId>knife4j-openapi2-spring-boot-starter</artifactId>
    <version>4.0.0</version>
</dependency>
第二步:编写配置类
提示:可以借助配置文件,进一步改造
import lombok.extern.slf4j.Slf4j;
import org.springframework.beans.factory.annotation.Value;
import org.springframework.context.annotation.Bean;
import org.springframework.context.annotation.Configuration;
import org.springframework.stereotype.Controller;
import org.springframework.web.bind.annotation.RestController;
import springfox.documentation.builders.ApiInfoBuilder;
import springfox.documentation.builders.PathSelectors;
import springfox.documentation.builders.RequestHandlerSelectors;
import springfox.documentation.service.Contact;
import springfox.documentation.spi.DocumentationType;
import springfox.documentation.spring.web.plugins.Docket;
import springfox.documentation.swagger2.annotations.EnableSwagger2WebMvc;

/**
 * Knife4j配置
 *
 * @author <font size = "20" color = "#3CAA3C"><a href="https://gitee.com/JustryDeng">JustryDeng</a></font> <img
 * src="https://gitee.com/JustryDeng/shared-files/raw/master/JustryDeng/avatar.jpg" />
 * @since 1.0.0
 */
@Slf4j
@Configuration
@EnableSwagger2WebMvc
public class Knife4jConfig

    @Value("$spring.application.name:default")
    private String applicationName;

    @Bean
    public Docket docket()
        // 指定使用Swagger2规范
        return new Docket(DocumentationType.SWAGGER_2)
                .apiInfo(new ApiInfoBuilder()
                        // 简介(支持Markdown语法)
                        .description("# 我是API简介")
                        // 服务地址
                        .termsOfServiceUrl("http://local.idea-aedi.com/")
                        // 作者及联系信息
                        .contact(new Contact("JustryDeng", "https://gitee.com/JustryDeng", "13548417409@163.com"))
                        // api版本
                        .version("1.0.0")
                        .build())
                //分组名称(微服务项目可以用微服务名分组)
                .groupName(applicationName)
                .select()
                // 定位api
                .apis(
                        RequestHandlerSelectors.basePackage(getProjectBasePackage())
                                .and(RequestHandlerSelectors.withClassAnnotation(RestController.class)
                                                .or(RequestHandlerSelectors.withClassAnnotation(Controller.class))
                        )
                )
                .paths(PathSelectors.any())
                .build();


    /**
     * 获取项目包前缀
     */
    private String getProjectBasePackage()
        String projectBasePackage;
        String currPackageName = this.getClass().getPackage().getName();
        String[] packageItemArr = currPackageName.split("\\\\.");
        if (packageItemArr.length > 3)
            projectBasePackage = String.join(".", packageItemArr[0], packageItemArr[1], packageItemArr[2]);
         else
            projectBasePackage = currPackageName;

        log.info("Base package to scan api is -> ", projectBasePackage);
        return projectBasePackage;
第三步:测试一下
第一小步:编写controller
import com.ideaaedi.demo.controller.model.UserAddReqVO;
import com.ideaaedi.demo.controller.model.UserDetailRespVO;
import io.swagger.annotations.Api;
import io.swagger.annotations.ApiOperation;
import io.swagger.annotations.ApiParam;
import org.springframework.web.bind.annotation.DeleteMapping;
import org.springframework.web.bind.annotation.GetMapping;
import org.springframework.web.bind.annotation.PathVariable;
import org.springframework.web.bind.annotation.PostMapping;
import org.springframework.web.bind.annotation.RequestBody;
import org.springframework.web.bind.annotation.RequestParam;
import org.springframework.web.bind.annotation.RestController;

/**
 * 用于测试knife4j的controller
 *
 * @author <font size = "20" color = "#3CAA3C"><a href="https://gitee.com/JustryDeng">JustryDeng</a></font> <img
 * src="https://gitee.com/JustryDeng/shared-files/raw/master/JustryDeng/avatar.jpg" />
 * @since 1.0.0
 */
@RestController
@Api(tags = "我是DemoController")
public class TestController

    @GetMapping("/hello")
    @ApiOperation(value = "哈喽")
    public String hello(@ApiParam(name = "name", value = "姓名", required = true)@RequestParam String name)
        return "hello " + name;


    @PostMapping("/user/add")
    @ApiOperation(value = "新增用户")
    public UserDetailRespVO addUser(@RequestBody UserAddReqVO req)
        UserDetailRespVO resp = new UserDetailRespVO();
        resp.setId(9527L);
        resp.setName(req.getName());
        resp.setAge(req.getAge());
        return resp;


    @DeleteMapping("/user/delete/id")
    @ApiOperation(value = "删除用户")
    public Boolean addUser(@ApiParam(name = "id", value = "数据id", required = true) @PathVariable Long id)
        return true;


    /**
     * 测试 @RequestBody、@RequestParam、@PathVariable并存
     */
    @PostMapping("/multi-anno/id")
    @ApiOperation(value = "组合使用测试")
    @ApiParam
    public UserDetailRespVO testMultiAnno(@RequestBody UserAddReqVO req,
                                          @ApiParam(name = "name", value = "姓名", required = true)
                                          @RequestParam String name,
                                          @ApiParam(name = "id", value = "数据id", required = true)
                                          @PathVariable Long id)
        UserDetailRespVO resp = new UserDetailRespVO();
        resp.setId(9527L);
        resp.setName(req.getName());
        resp.setAge(req.getAge());
        return resp;
此controller中用到的相关模型
-
UserAddReqVO
import io.swagger.annotations.ApiModelProperty; import lombok.Data; import javax.validation.constraints.NotBlank; /** * 用户新增req模型 */ @Data public class UserAddReqVO @ApiModelProperty(value = "姓名",required = true) @NotBlank(message = "姓名不能为空") private String name; @ApiModelProperty("年龄") private Integer age; -
UserDetailRespVO
import io.swagger.annotations.ApiModelProperty;
import lombok.Data;

/**
 * 用户详情resp模型
 */
@Data
public class UserDetailRespVO

    @ApiModelProperty("id")
    private Long id;

    @ApiModelProperty("姓名")
    private String name;

    @ApiModelProperty("年龄")
    private Integer age;
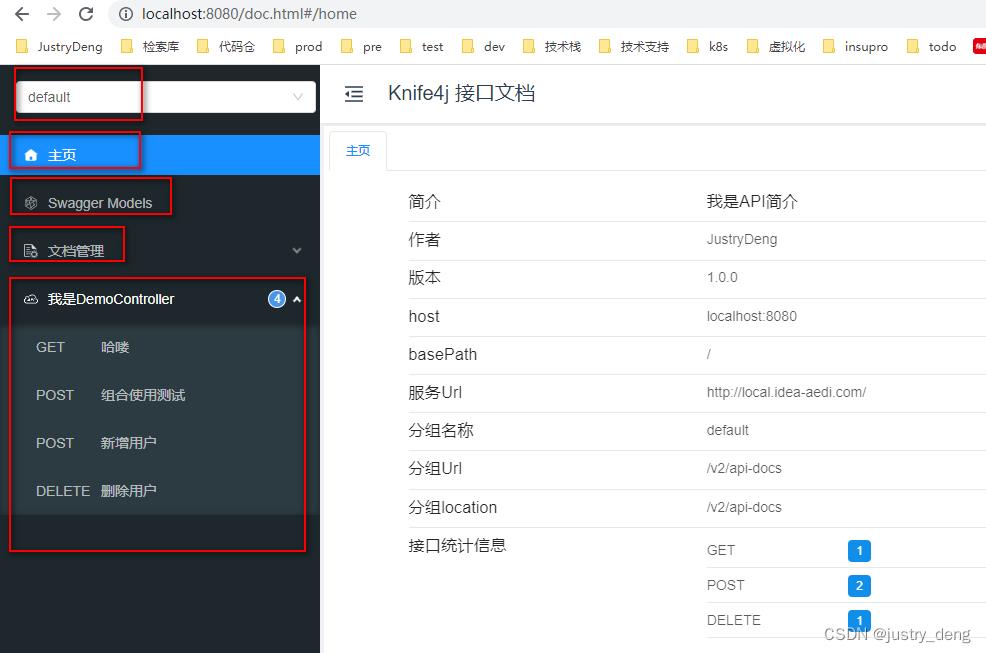
第二小步:启动项目,访问api文档
启动项目后,直接访问
http://ip:端口/doc.html即可


说明:
- 文档分组:可切换观察其余分组下的api
- 主页:概览
- Swagger Models:可以查看所有请求模型的信息
- 文档管理:可以导出文档、进行高级设置(如设置后处理脚本等)、进行全局参数设置、查看api信息
- 点击进入文档后,会展示api的详细信息,也可以进行调试,还可以打开api json数据等等
相关资料
以上是关于springboot2集成knife4j的主要内容,如果未能解决你的问题,请参考以下文章