Netty笔记1-Java NIO
Posted 吹灭读书灯 一身都是月
tags:
篇首语:本文由小常识网(cha138.com)小编为大家整理,主要介绍了Netty笔记1-Java NIO相关的知识,希望对你有一定的参考价值。
Java NIO
一、简介
Java NIO(New IO)是从Java 1.4版本开始引入的一个新的IO API,可以替代标准的Java IO API。NIO与原来的IO有同样的作用和目的,但是使用的方式完全不同,NIO支持面向缓冲区的、基于通道的IO操作。NIO将以更加高效的方式进行文件的读写操作。
二、IO与NIO的区别
| IO | NIO |
|---|---|
| 面向流(Stream Oriented) | 面向缓冲区(Buffer Oriented) |
| 阻塞IO(Blocking IO) | 非阻塞IO(NonBlocking IO) |
| 选择器(Selectors) |
1、面向流和缓冲区
IO
传统IO在传输数据时,根据输入输出的不同需要分别建立不同的链接,而且传输的数据是以流的形式在链接上进行传输的
就像自来水要通过水管将自来水厂和家连接起来一样
NIO
NIO在传输数据时,会在输入输出端之间建立通道,然后将数据放入到缓冲区中。缓冲区通过通道来传输数据
这里通道就像是铁路,能够连通两个地点。缓冲区就像是火车,能够真正地进行数据的传输
三、通道与缓冲区
Java NIO系统的核心在于:通道(Channel)和缓冲区(Buffer)。通道表示打开到 IO 设备(例如:文件、套接字)的连接。若需要使用 NIO 系统,需要获取用于连接 IO 设备的通道以及用于容纳数据的缓冲区。然后操作缓冲区,对数据进行处理
简而言之,通道负责传输,缓冲区负责存储
四、缓冲区(Buffer)
1、缓冲区类型
Buffer 就像一个数组,可以保存多个相同类型的数据。根据数据类型不同(boolean 除外) ,有以下Buffer 常用子类
- ByteBuffer
- CharBuffer
- ShortBuffer
- IntBuffer
- LongBuffer
- FloatBuffer
- DoubleBuffer
各种类型的缓冲区中,都有一个对应类型的数组,如
ByteBuffer
final byte[] hb; // Non-null only for heap buffers
IntBuffer
final int[] hb; // Non-null only for heap buffers
他们的继承关系如下
2、获取缓冲区
通过allocate方法可以获取一个对应缓冲区的对象,它是缓冲区类的一个静态方法
例
// 获取一个容量大小为1024字节的字节缓冲区
ByteBuffer byteBuffer = ByteBuffer.allocate(1024);
3、核心属性
缓冲区的父类Buffer中有几个核心属性,如下
// Invariants: mark <= position <= limit <= capacity
private int mark = -1;
private int position = 0;
private int limit;
private int capacity;
- capacity:缓冲区的容量。通过构造函数赋予,一旦设置,无法更改
- limit:缓冲区的界限。位于limit 后的数据不可读写。缓冲区的限制不能为负,并且不能大于其容量
- position:下一个读写位置的索引(类似
PC)。缓冲区的位置不能为负,并且不能大于limit - mark:记录当前position的值。position被改变后,可以通过调用reset() 方法恢复到mark的位置。
以上四个属性必须满足以下要求
mark <= position <= limit <= capacity
4、核心方法
put()方法
- put()方法可以将一个数据放入到缓冲区中。
- 进行该操作后,postition的值会+1,指向下一个可以放入的位置。capacity = limit ,为缓冲区容量的值。
flip()-(读/写->写/读)
- flip()方法会切换对缓冲区的操作模式,由写->读 / 读->写
- 进行该操作后
- 如果是写模式->读模式,position = 0 , limit 指向最后一个元素的下一个位置,capacity不变
- 如果是读->写,则恢复为put()方法中的值
get()方法
- get()方法会读取缓冲区中的一个值
- 进行该操作后,position会+1,如果超过了limit则会抛出异常
rewind()方法
- 该方法只能在读模式下使用
- rewind()方法后,会恢复position、limit和capacity的值,变为进行get()前的值
clean()方法
- clean()方法会将缓冲区中的各个属性恢复为最初的状态,position = 0, capacity = limit
- 此时缓冲区的数据依然存在,处于“被遗忘”状态,下次进行写操作时会覆盖这些数据
mark()和reset()方法
- mark()方法会将postion的值保存到mark属性中
- reset()方法会将position的值改为mark中保存的值
使用展示
public class Demo1
	public static void main(String[] args)
		ByteBuffer byteBuffer = ByteBuffer.allocate(1024);

		System.out.println("放入前参数");
		System.out.println("position " + byteBuffer.position());
		System.out.println("limit " + byteBuffer.limit());
		System.out.println("capacity " + byteBuffer.capacity());
		System.out.println();

		System.out.println("------put()------");
		System.out.println("放入3个数据");
		byte bt = 1;
		byteBuffer.put(bt);
		byteBuffer.put(bt);
		byteBuffer.put(bt);

		System.out.println("放入后参数");
		System.out.println("position " + byteBuffer.position());
		System.out.println("limit " + byteBuffer.limit());
		System.out.println("capacity " + byteBuffer.capacity());
		System.out.println();

		System.out.println("------flip()-get()------");
		System.out.println("读取一个数据");
		// 切换模式
		byteBuffer.flip();
		byteBuffer.get();

		System.out.println("读取后参数");
		System.out.println("position " + byteBuffer.position());
		System.out.println("limit " + byteBuffer.limit());
		System.out.println("capacity " + byteBuffer.capacity());
		System.out.println();

		System.out.println("------rewind()------");
		byteBuffer.rewind();
		System.out.println("恢复后参数");
		System.out.println("position " + byteBuffer.position());
		System.out.println("limit " + byteBuffer.limit());
		System.out.println("capacity " + byteBuffer.capacity());
		System.out.println();

		System.out.println("------clear()------");
		// 清空缓冲区,这里只是恢复了各个属性的值,但是缓冲区里的数据依然存在
		// 但是下次写入的时候会覆盖缓冲区中之前的数据
		byteBuffer.clear();
		System.out.println("清空后参数");
		System.out.println("position " + byteBuffer.position());
		System.out.println("limit " + byteBuffer.limit());
		System.out.println("capacity " + byteBuffer.capacity());
		System.out.println();
		System.out.println("清空后获得数据");
		System.out.println(byteBuffer.get());
打印结果
放入前参数
position 0
limit 1024
capacity 1024

------put()------
放入3个数据
放入后参数
position 3
limit 1024
capacity 1024

------flip()-get()------
读取一个数据
读取后参数
position 1
limit 3
capacity 1024

------rewind()------
恢复后参数
position 0
limit 3
capacity 1024

------clear()------
清空后参数
position 0
limit 1024
capacity 1024

清空后获得数据
1
5、非直接缓冲区和直接缓冲区
非直接缓冲区
通过allocate()方法获取的缓冲区都是非直接缓冲区。这些缓冲区是建立在JVM堆内存之中的。
public static ByteBuffer allocate(int capacity)
    if (capacity < 0)
    throw new IllegalArgumentException();

    // 在堆内存中开辟空间
    return new HeapByteBuffer(capacity, capacity);


HeapByteBuffer(int cap, int lim)         // package-private
    // new byte[cap] 创建数组,在堆内存中开辟空间
    super(-1, 0, lim, cap, new byte[cap], 0);
    /*
    hb = new byte[cap];
    offset = 0;
    */
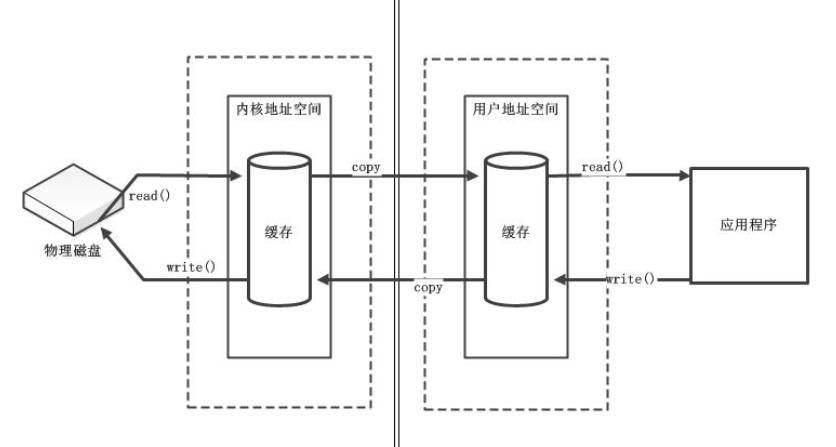
通过非直接缓冲区,想要将数据写入到物理磁盘中,或者是从物理磁盘读取数据。都需要经过JVM和操作系统,数据在两个地址空间中传输时,会一份保存在对方的空间中。所以非直接缓冲区的读取效率较低
直接缓冲区
只有ByteBuffer可以获得直接缓冲区,通过allocateDirect()获取的缓冲区为直接缓冲区,这些缓冲区是建立在物理内存之中的。
public static ByteBuffer allocateDirect(int capacity)
    return new DirectByteBuffer(capacity);


DirectByteBuffer(int cap)                    // package-private
	...
    // 申请物理内存
	boolean pa = VM.isDirectMemoryPageAligned();
	...
直接缓冲区通过在操作系统和JVM之间创建物理内存映射文件加快缓冲区数据读/写入物理磁盘的速度。放到物理内存映射文件中的数据就不归应用程序控制了,操作系统会自动将物理内存映射文件中的数据写入到物理内存中
五、通道(Channel)
1、简介
Channel由java.nio.channels 包定义的。Channel 表示IO 源与目标打开的连接。Channel 类似于传统的“流”。只不过Channel 本身不能直接访问数据,Channel 只能与Buffer 进行交互
2、图解
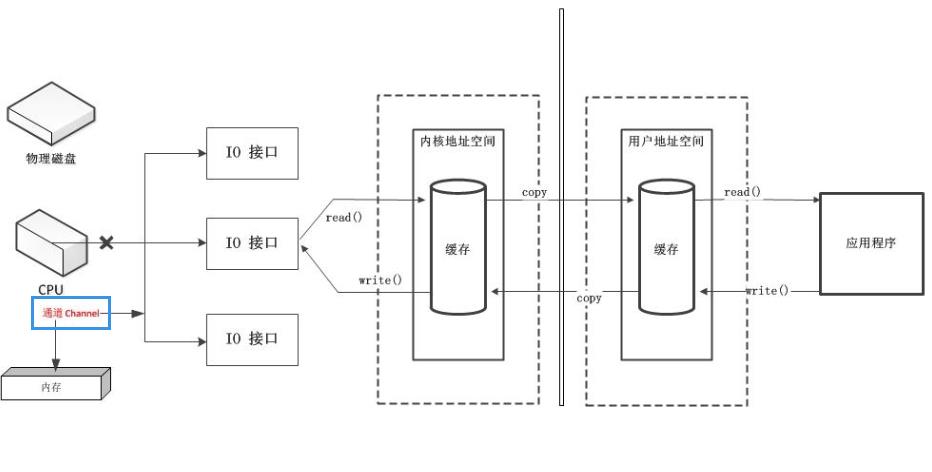
应用程序进行读写操作调用函数时,底层调用的操作系统提供给用户的读写API,调用这些API时会生成对应的指令,CPU则会执行这些指令。在计算机刚出现的那段时间,所有读写请求的指令都有CPU去执行,过多的读写请求会导致CPU无法去执行其他命令,从而CPU的利用率降低
后来,DMA(Direct Memory Access,直接存储器访问)出现了。当IO请求传到计算机底层时,DMA会向CPU请求,让DMA去处理这些IO操作,从而可以让CPU去执行其他指令。DMA处理IO操作时,会请求获取总线的使用权。当IO请求过多时,会导致大量总线用于处理IO请求,从而降低效率
于是便有了Channel(通道),Channel相当于一个专门用于IO操作的独立处理器,它具有独立处理IO请求的能力,当有IO请求时,它会自行处理这些IO请求
3、Java Channel
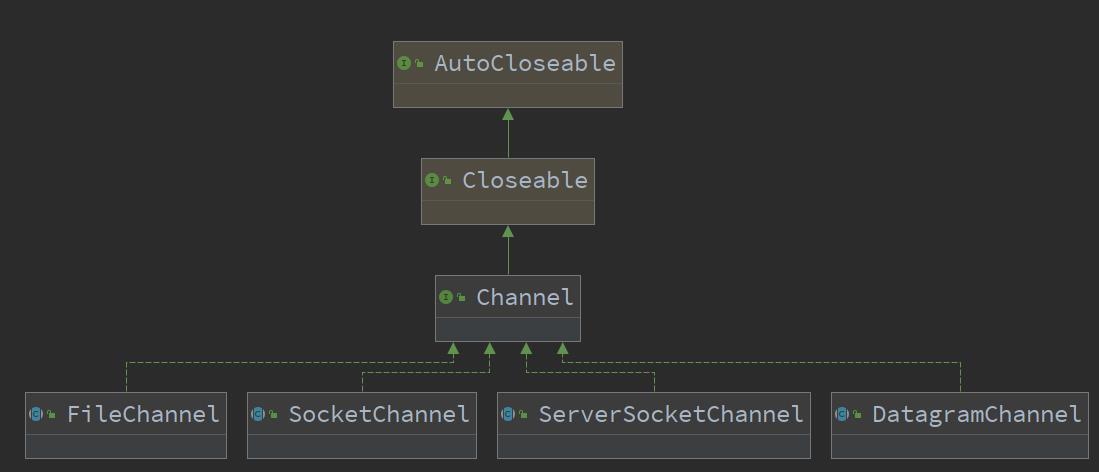
常用实现类
- 本地文件IO
- FileChannel
- 网络IO
- SocketChanel、ServerSocketChannel:用于TCP传输
- DatagramChannel:用于UDP传输
获得通道的方法
获取通道的一种方式是对支持通道的对象调用getChannel() 方法。支持通道的类如下:
- FileInputStream
- FileOutputStream
- RandomAccessFile
- DatagramSocket
- Socket
- ServerSocket
public class Demo2
   public static void main(String[] args) throws IOException
      // 本地通道
      FileInputStream fileInputStream = new FileInputStream("");
      FileChannel channel1 = fileInputStream.getChannel();

      FileOutputStream fileOutputStream = new FileOutputStream("");
      FileChannel channel2 = fileOutputStream.getChannel();

      // 网络通道
      Socket socket = new Socket();
      SocketChannel channel3 = socket.getChannel();

      ServerSocket serverSocket = new ServerSocket();
      ServerSocketChannel channel4 = serverSocket.getChannel();

      DatagramSocket datagramSocket = new DatagramSocket();
      DatagramChannel channel5 = datagramSocket.getChannel();

      // 最后要关闭通道
也可以通过通道的静态方法open()来获取
public static void main(String[] args) throws IOException
   FileChannel open = FileChannel.open(Paths.get(""));

   SocketChannel open1 = SocketChannel.open();

   ...
getChannel()+非直接缓冲区
- getChannel()获得通道
- allocate()获得非直接缓冲区
通过非直接缓冲区读写数据,需要通过通道来传输缓冲区里的数据
public class Demo4
   public static void main(String[] args)
      FileInputStream is = null;
      FileOutputStream os = null;
      // 获得通道
      FileChannel inChannel = null;
      FileChannel outChannel = null;

      // 利用 try-catch-finally 保证关闭
      try
         is = new FileInputStream("F:\\\\JDKLearning\\\\src\\\\main\\\\NIO\\\\day1\\\\1.jpg");
         os = new FileOutputStream("F:\\\\JDKLearning\\\\src\\\\main\\\\NIO\\\\day1\\\\2.jpg");

         // 获得通道
         inChannel = is.getChannel();
         outChannel = os.getChannel();

         // 获得缓冲区,用于在通道中传输数据
         ByteBuffer byteBuffer = ByteBuffer.allocate(1024);

         // 循环将字节数据放入到buffer中,然后写入磁盘中
         while (inChannel.read(byteBuffer) != -1)
            // 切换模式
            byteBuffer.flip();
            outChannel.write(byteBuffer);
            byteBuffer.clear();

       catch (IOException e)
         e.printStackTrace();
       finally
         if (inChannel != null)
            try
               inChannel.close();
             catch (IOException e)
               e.printStackTrace();


         if (outChannel != null)
            try
               outChannel.close();
             catch (IOException e)
               e.printStackTrace();


         if (is != null)
            try
               is.close();
             catch (IOException e)
               e.printStackTrace();


         if (os != null)
            try
               os.close();
             catch (IOException e)
               e.printStackTrace();
open()+直接缓冲区
- 通过open获得通道
- 通过FileChannel.map()获取直接缓冲区
使用直接缓冲区时,无需通过通道来传输数据,直接将数据放在缓冲区内即可
public class Demo5
   public static void main(String[] args) throws IOException
      // 通过open()方法来获得通道
      FileChannel inChannel = FileChannel.open(Paths.get("F:\\\\JDKLearning\\\\src\\\\main\\\\NIO\\\\day1\\\\1.jpg"), StandardOpenOption.READ);

      // outChannel需要为 READ WRITE CREATE模式
      // READ WRITE是因为后面获取直接缓冲区时模式为READ_WRITE模式
      // CREATE是因为要创建新的文件
      FileChannel outChannel = FileChannel.open(Paths.get("F:\\\\JDKLearning\\\\src\\\\main\\\\NIO\\\\day1\\\\3.jpg"), StandardOpenOption.READ, StandardOpenOption.WRITE, StandardOpenOption.CREATE);

      // 获得直接缓冲区
      MappedByteBuffer inMapBuf = inChannel.map(FileChannel.MapMode.READ_ONLY, 0, inChannel.size());
      MappedByteBuffer outMapBuf = outChannel.map(FileChannel.MapMode.READ_WRITE, 0, inChannel.size());

      // 字节数组
      byte[] bytes = new byte[inMapBuf.limit()];

      // 因为是直接缓冲区,可以直接将数据放入到内存映射文件,无需通过通道传输
      inMapBuf.get(bytes);
      outMapBuf.put(bytes);

      // 关闭缓冲区,这里没有用try-catch-finally
      inChannel.close();
      outChannel.close();
通道间直接传输
public static void channelToChannel() throws IOException
long start = System.currentTimeMillis();
// 通过open()方法来获得通道
FileChannel inChannel = FileChannel.open(Paths.get("F:\\\\JDKLearning\\\\src\\\\main\\\\NIO\\\\day1\\\\1.mp4"), StandardOpenOption.READ);
// outChannel需要为 READ WRITE CREATE模式
// READ WRITE是因为后面获取直接缓冲区时模式为READ_WRITE模式
// CREATE是因为要创建新的文件
FileChannel outChannel = FileChannel.open(Paths.get("F:\\\\JDKLearning\\\\src\\\\main\\\\NIO\\\\day1\\\\4.mp4"), StandardOpenOption.READ, StandardOpenOption.WRITE, StandardOpenOption.CREATE


