使用Android studio 离线打包uniapp
Posted JaydenLD@Clara
tags:
篇首语:本文由小常识网(cha138.com)小编为大家整理,主要介绍了使用Android studio 离线打包uniapp相关的知识,希望对你有一定的参考价值。
由于项目需求,使用了hbuilderx 他们家的uniapp框架,这个框架是基于微信小程序和vue衍生出来的,只要你会微信小程序和vue基本上都是很容易上手,关于他们的api,可以自行去官网查看,这里只是为了记录如何降低打包出来的apk的大小
本篇博客的前提是你的电脑android的环境配置都已经配置好了,可以运行的情况下进行的,如何证明安装成功了,你可以使用Android studio新建一个empty Activity之后直接运行看是否可以正常在模拟器上跑起来,接下来进入主题
你会发现,直接使用hbuilderx提供的sdk文件下的Hbuilder-Hello文件夹进行打包,如果你是直接用使用的hbuilderx uniapp的模板,打包出来的apk大约在50M左右,因为hbuilder-hello下几乎把所有的第三方的包给你放进去了,在libs里面,所以导致你实际开发的时候,包会越来越大,如何减低apk的大小呢
第一步,打开Android studio ,点击File - New - New Project 来到如下界面
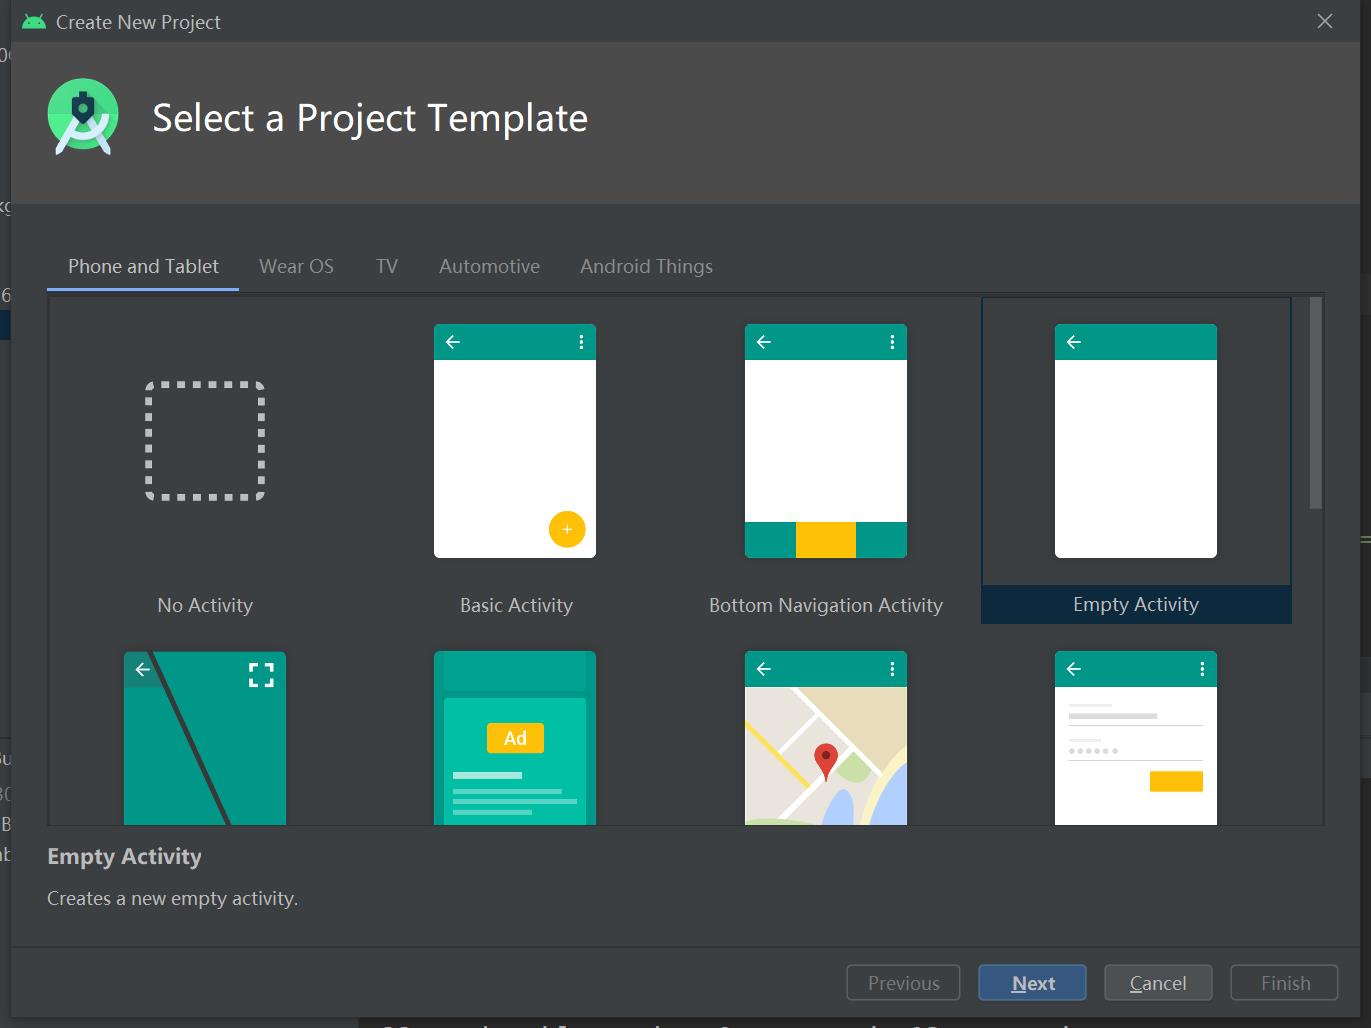
选择 No Activity

不选择 Empty Activity 的原因是打包之后你会有两个包一个是hello Android 一个是你真正的包,所以这里推荐选择 No Activity
第二步,点击next
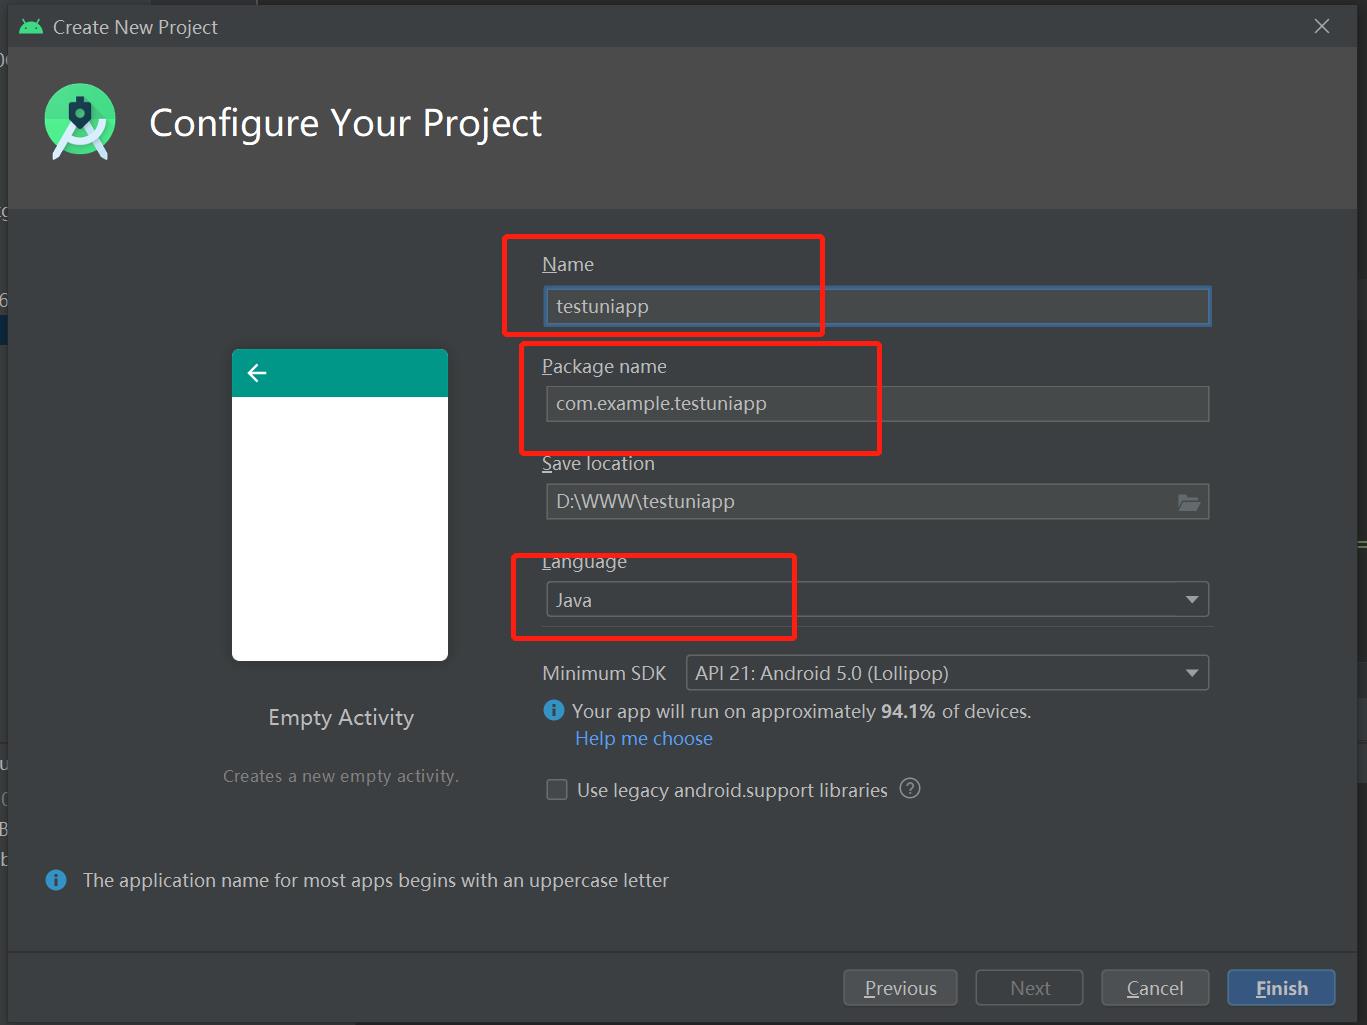
注意:离线打包不支持kotlin 所以要选择java,其余的应用名称,包名,可以自己定
然后点击finish,你会来到如下界面

为了统一官网配置,这里点击project,你会看到你的目录结构和Hbuilder-Hello的差不多
第三步开始配置
将你下载的离线打包的sdk中的HBuilder-Hello\\app\\libs下的
android-gif-drawable-release@1.2.17.aar
lib.5plus.base-release.aar
miit_mdid_1.0.10.aar
uniapp-release.aar
,这四个文件放到你新建的Android项目下的libs下面
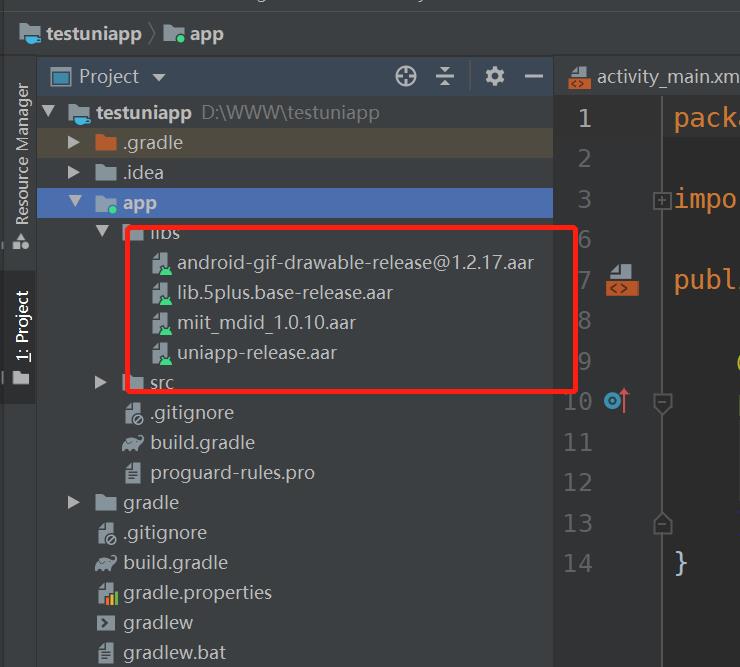
注意对比目录结构
接着,在app-src-main下新建assets文件夹,将HBuilder-Hello\\app\\src\\main\\assets文件夹下的data文件夹整个copy到新建的assets文件夹下
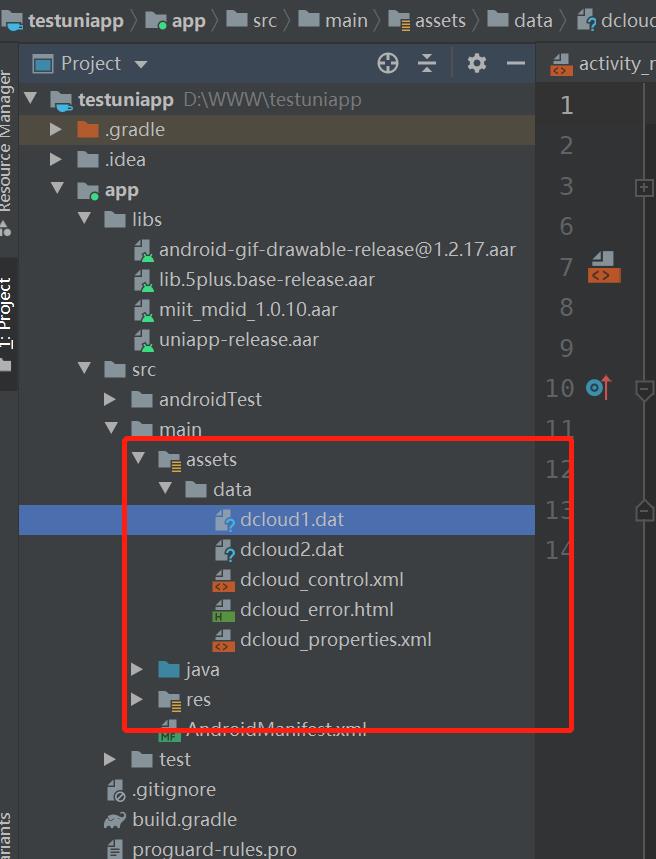
注意:不要管data文件夹下有什么不同,因为可能最新的sdk删除了上图中的两个dat文件,你不用管,只用直接复制就好了
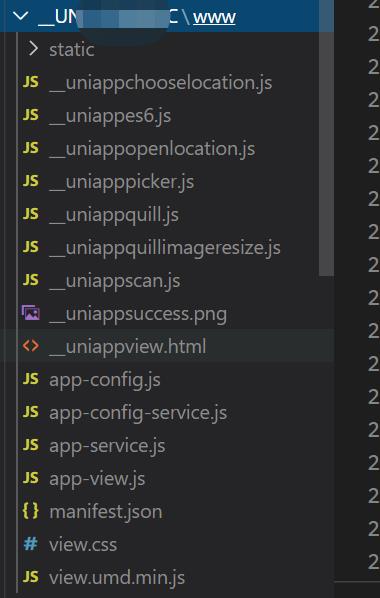
第四步,使用hbuilderx本地打包app资源,或者使用vscode直接yarn run build:app-plus进行打包资源,通过vscode打包的需要你自己改两个名字,一个是将dist下的build改成的应用id,将app-plus改成www,如果是hbuilderx工具生成的app资源是无需做修改的,等到的目录结构如下
然后在 上面新建的assets下新建apps文件夹,将上面的包放在assets/apps文件夹下
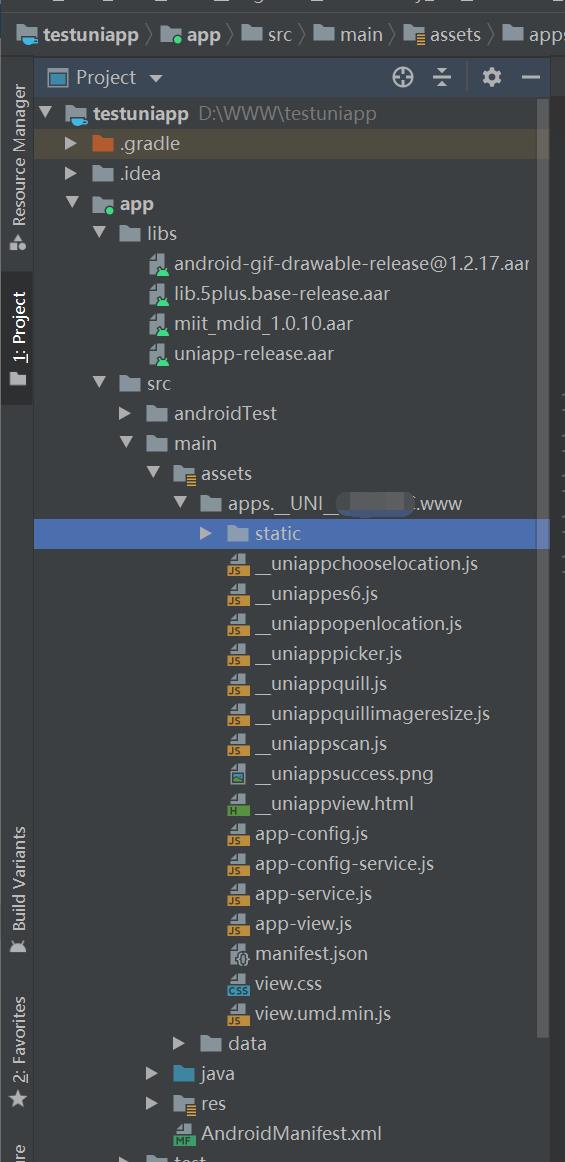
开始配置
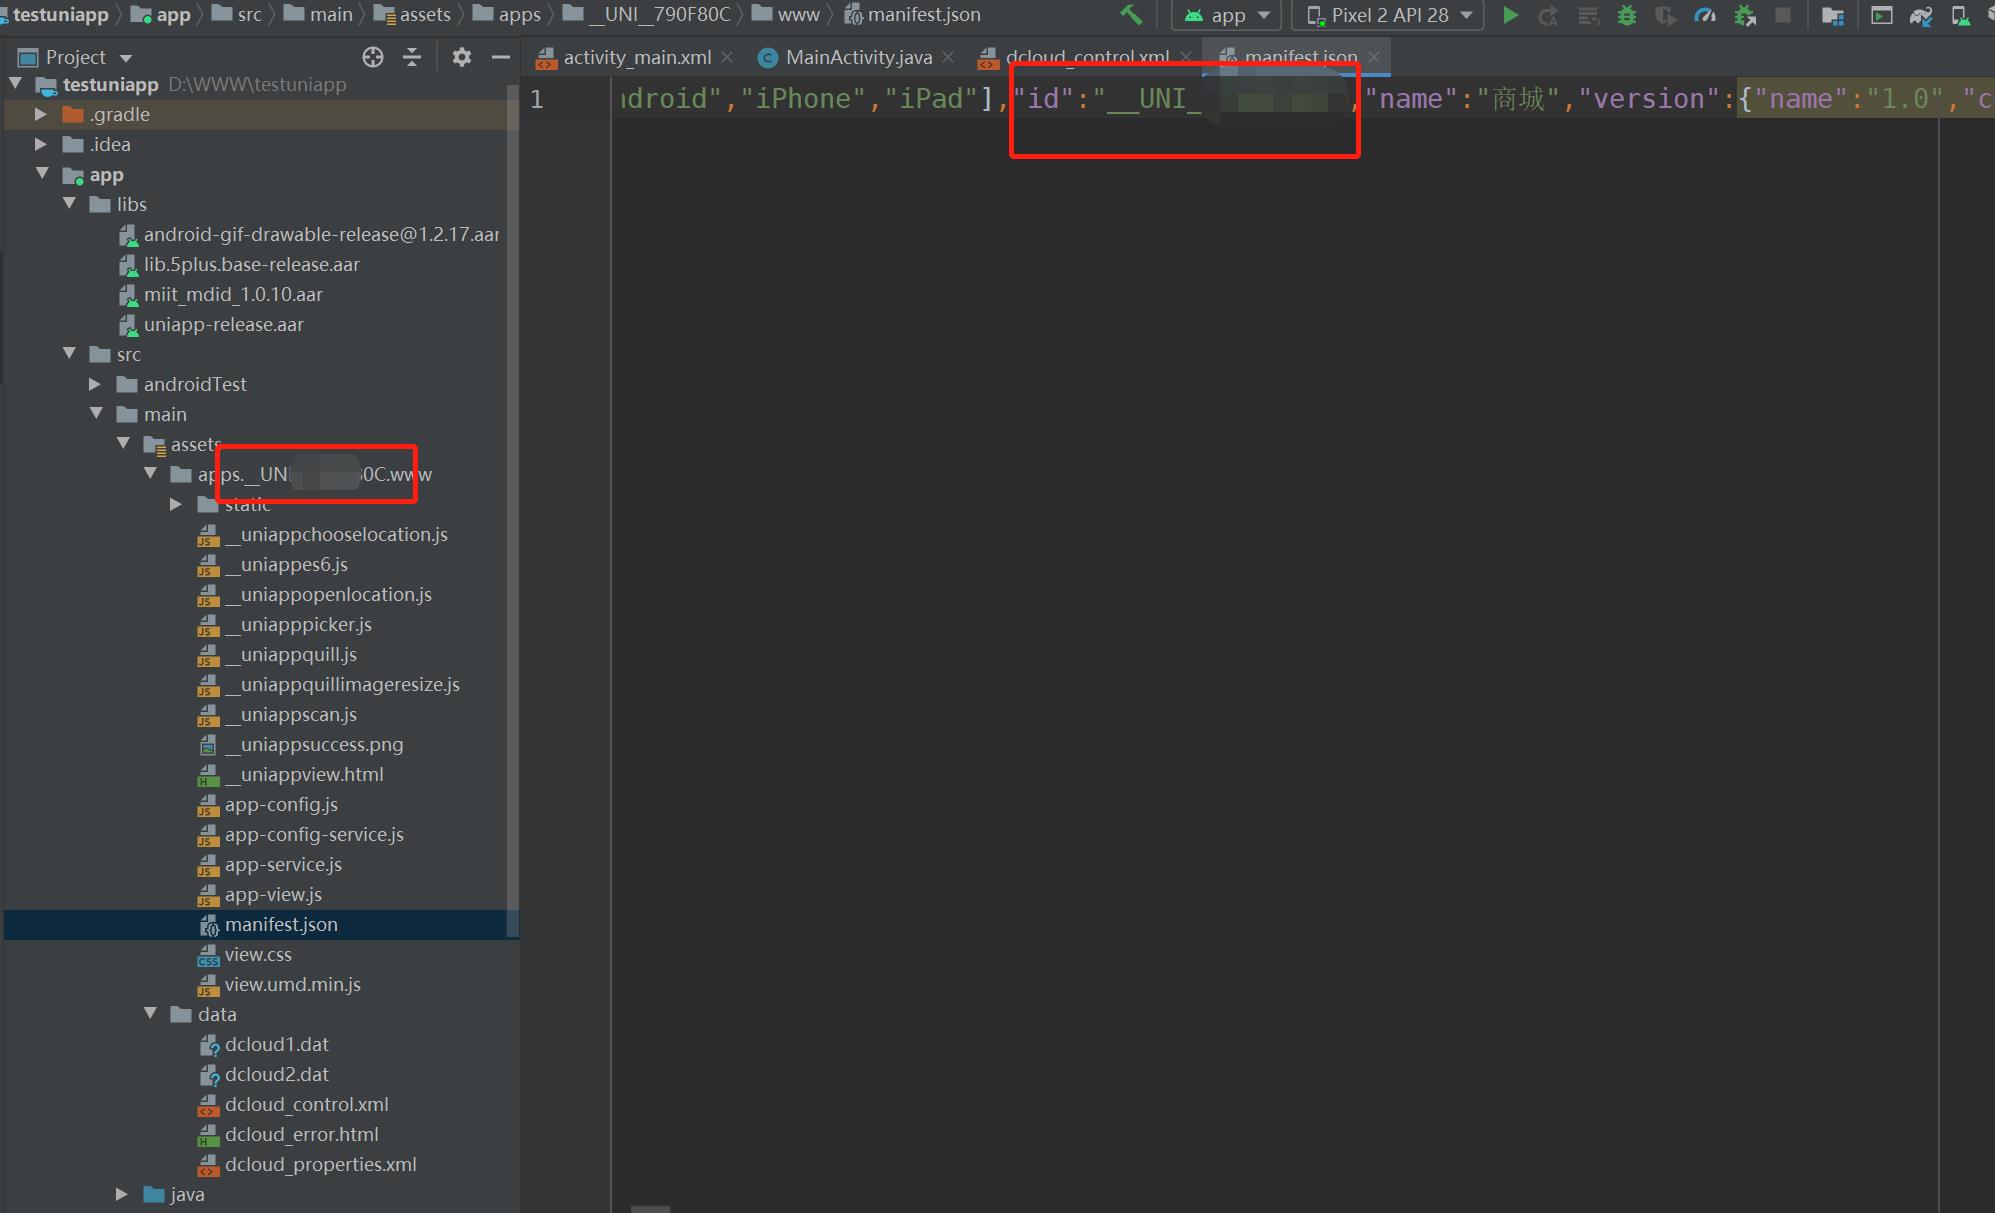
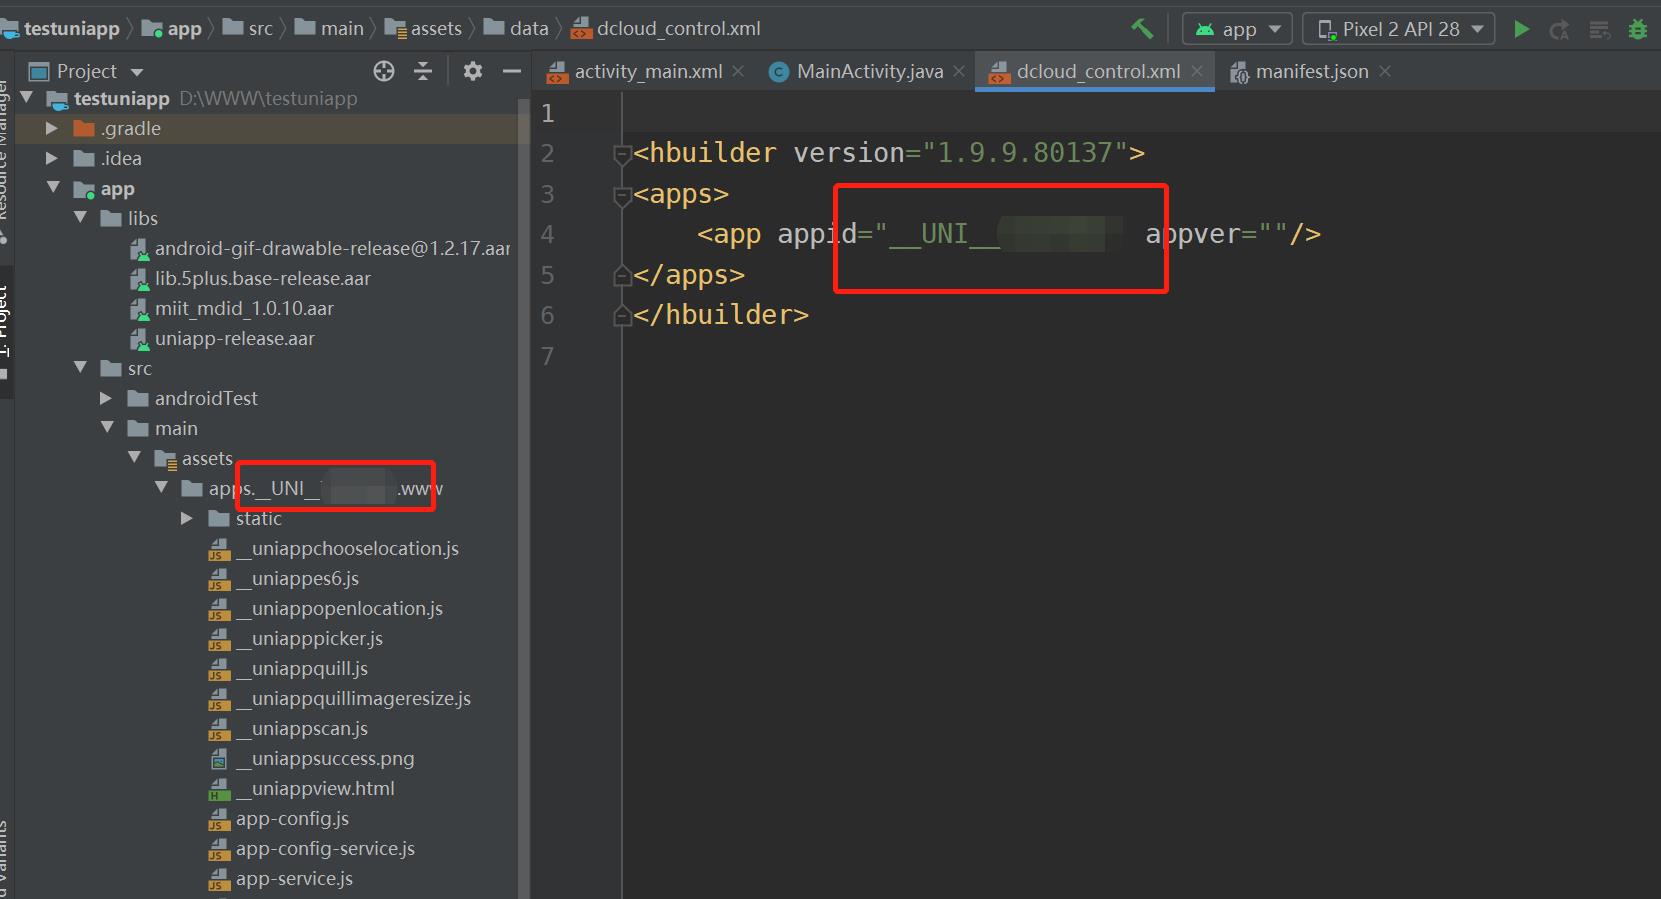
要确保这三处的id一致
然后打开app/build.gradle文件
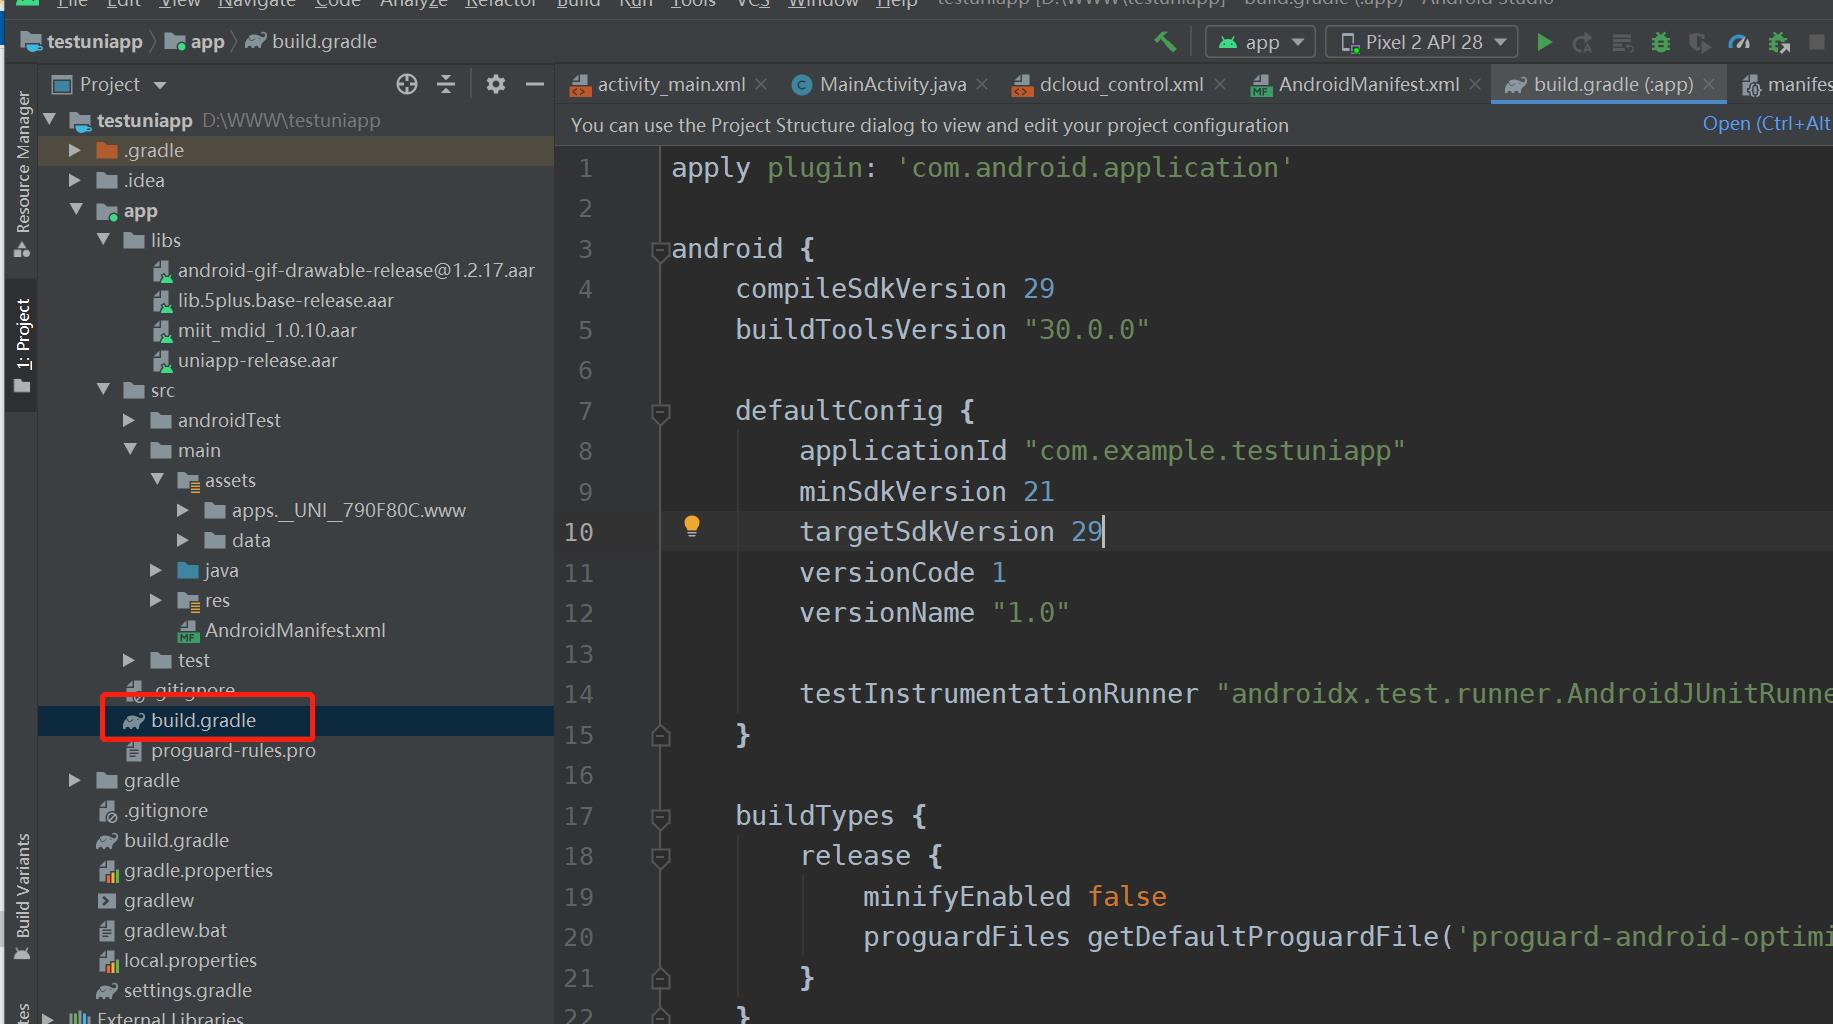
在dependencies下新增
implementation fileTree(dir: \'libs\', include: [\'*.aar\', \'*.jar\'], exclude: [])

implementation "com.android.support:support-v4:28.0.0"

implementation "com.android.support:appcompat-v7:28.0.0"

implementation \'com.android.support:recyclerview-v7:28.0.0\'

implementation \'com.facebook.fresco:fresco:1.13.0\'

implementation "com.facebook.fresco:animated-gif:1.13.0"

implementation \'com.github.bumptech.glide:glide:4.9.0\'
在 Android{}添加
aaptOptions {

    additionalParameters \'--auto-add-overlay\'

    ignoreAssetsPattern "!.svn:!.git:.*:!CVS:!thumbs.db:!picasa.ini:!*.scc:*~"

}
然后修改对应的版本
完整文件是
apply plugin: \'com.android.application\'

android {
    compileSdkVersion 29
    buildToolsVersion "30.0.0"

    defaultConfig {
        applicationId "com.example.testuniapp"
        minSdkVersion 21
        targetSdkVersion 29
        versionCode 1
        versionName "1.0"

        testInstrumentationRunner "androidx.test.runner.AndroidJUnitRunner"
    }

    buildTypes {
        release {
            minifyEnabled false
            proguardFiles getDefaultProguardFile(\'proguard-android-optimize.txt\'), \'proguard-rules.pro\'
        }
    }
}

dependencies {
    implementation fileTree(dir: "libs", include: ["*.jar"])
    implementation fileTree(dir: \'libs\', include: [\'*.aar\', \'*.jar\'], exclude: [])

    implementation "com.android.support:support-v4:28.0.0"

    implementation "com.android.support:appcompat-v7:28.0.0"

    implementation \'com.android.support:recyclerview-v7:28.0.0\'

    implementation \'com.facebook.fresco:fresco:1.13.0\'

    implementation "com.facebook.fresco:animated-gif:1.13.0"

    implementation \'com.github.bumptech.glide:glide:4.9.0\'

    implementation \'androidx.appcompat:appcompat:1.1.0\'
    implementation \'androidx.constraintlayout:constraintlayout:1.1.3\'
    testImplementation \'junit:junit:4.12\'
    androidTestImplementation \'androidx.test.ext:junit:1.1.1\'
    androidTestImplementation \'androidx.test.espresso:espresso-core:3.2.0\'

}
修改之后记得 Sync now

然后在app→src→main下配置AndroidManifest.xml文件
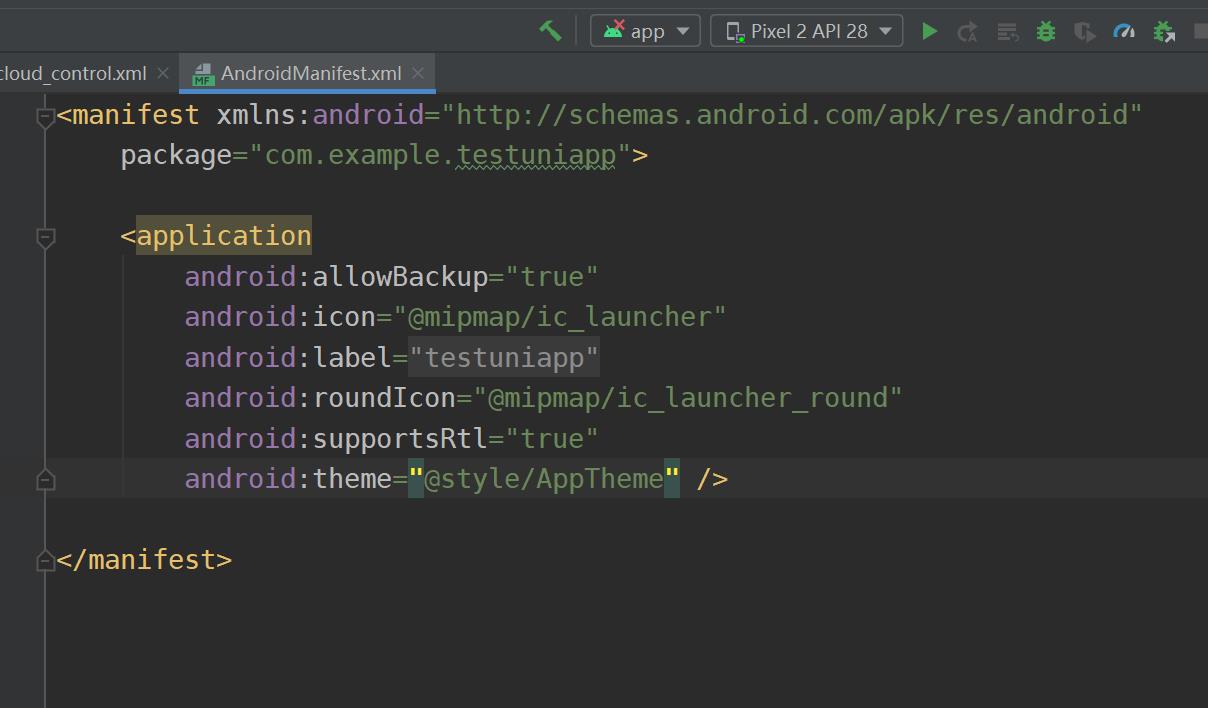
修改为
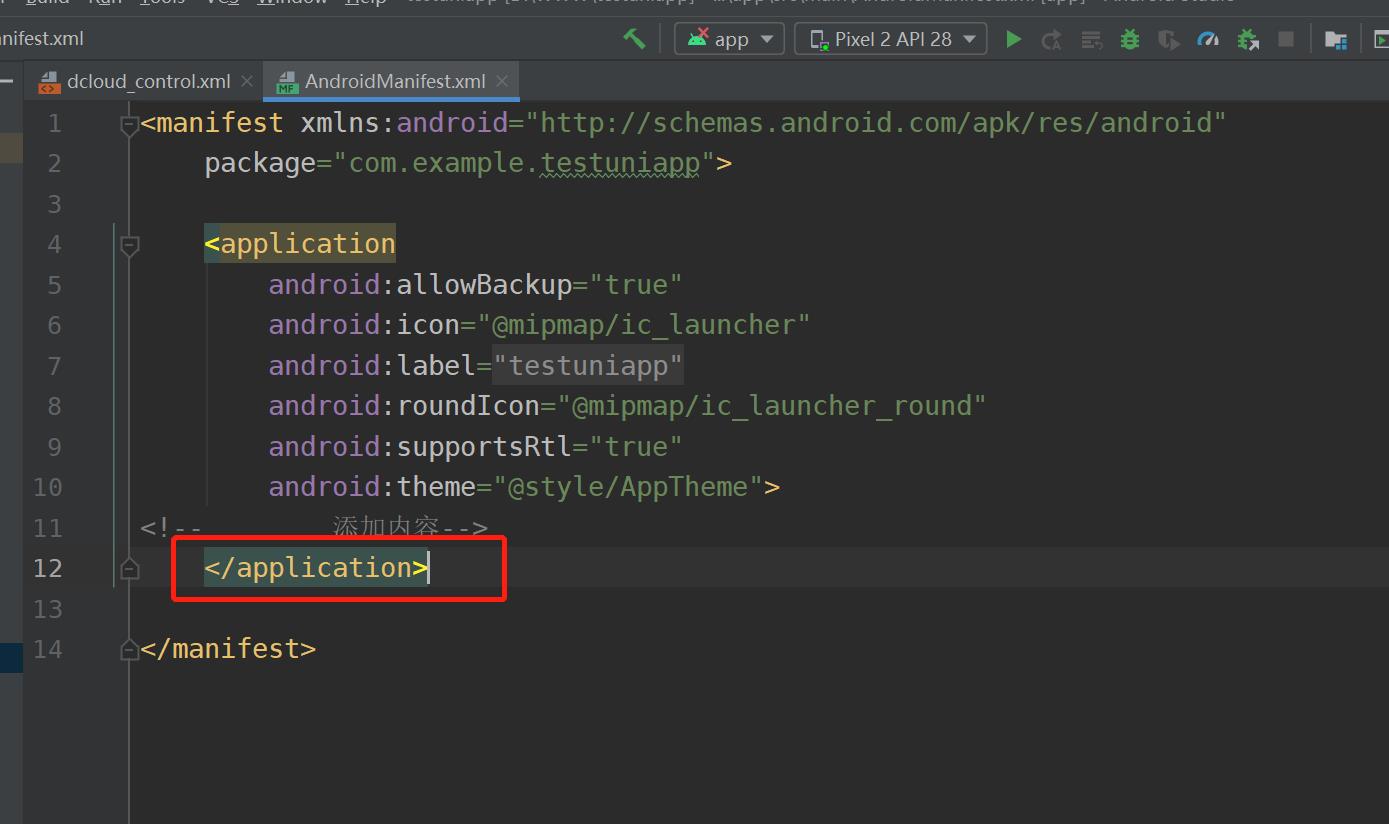
将application节点里的内容替换为
<activity

    android:name="io.dcloud.PandoraEntry"                    android:configChanges="orientation|keyboardHidden|keyboard|navigation"

    android:label="@string/app_name"      android:launchMode="singleTask"      android:hardwareAccelerated="true"      android:theme="@style/TranslucentTheme"      android:screenOrientation="user"     android:windowSoftInputMode="adjustResize" >

    <intent-filter>

        <action android:name="android.intent.action.MAIN" />

        <category android:name="android.intent.category.LAUNCHER" />     </intent-filter>

</activity>


<activity

    android:name="io.dcloud.PandoraEntryActivity"     android:launchMode="singleTask"      android:configChanges="orientation|keyboardHidden|screenSize|mcc|mnc|fontScale|keyboard"

    android:hardwareAccelerated="true"      android:permission="com.miui.securitycenter.permission.AppPermissionsEditor"

    android:screenOrientation="user"      android:theme="@style/DCloudTheme"      android:windowSoftInputMode="adjustResize">

    <intent-filter>

        <category android:name="android.intent.category.DEFAULT" />      <category android:name="android.intent.category.BROWSABLE" />

        <action android:name="android.intent.action.VIEW" />

        <data android:scheme="h56131bcf" />

    </intent-filter>

</activity>
可以去官网直接复制
完整代码是
<manifest xmlns:android="http://schemas.android.com/apk/res/android"
    package="com.example.testuniapp">

    <application
        android:allowBackup="true"
        android:icon="@mipmap/ic_launcher"
        android:label="@string/app_name"
        android:roundIcon="@mipmap/ic_launcher_round"
        android:supportsRtl="true"
        android:theme="@style/AppTheme">
<!--        添加内容-->
        <activity

            android:name="io.dcloud.PandoraEntry"                    android:configChanges="orientation|keyboardHidden|keyboard|navigation"

            android:label="@string/app_name"      android:launchMode="singleTask"      android:hardwareAccelerated="true"      android:theme="@style/TranslucentTheme"      android:screenOrientation="user"     android:windowSoftInputMode="adjustResize" >

            <intent-filter>

                <action android:name="android.intent.action.MAIN" />

                <category android:name="android.intent.category.LAUNCHER" />     </intent-filter>

        </activity>


        <activity

            android:name="io.dcloud.PandoraEntryActivity"     android:launchMode="singleTask"      android:configChanges="orientation|keyboardHidden|screenSize|mcc|mnc|fontScale|keyboard"

            android:hardwareAccelerated="true"      android:permission="com.miui.securitycenter.permission.AppPermissionsEditor"

            android:screenOrientation="user"      android:theme="@style/DCloudTheme"      android:windowSoftInputMode="adjustResize">

            <intent-filter>

                <category android:name="android.intent.category.DEFAULT" />      <category android:name="android.intent.category.BROWSABLE" />

                <action android:name="android.intent.action.VIEW" />

                <data android:scheme="h56131bcf" />

            </intent-filter>

        </activity>
    </application>

</manifest>
然后点击右上角的运行按钮运行,就可以快了的玩耍了

然后点击 build APK

打包成功之后,你会发现你的包小了很多
以上是关于使用Android studio 离线打包uniapp的主要内容,如果未能解决你的问题,请参考以下文章