JUC学习笔记
Posted Shinka_YXS
tags:
篇首语:本文由小常识网(cha138.com)小编为大家整理,主要介绍了JUC学习笔记相关的知识,希望对你有一定的参考价值。
尚硅谷JUC源码讲授实战教程完整版(java juc线程精讲)
1.volatile 关键字与内存可见性
当程序运行,JVM会为每一个执行任务的线程分配独立的缓存用于提高效率。
内存可见性问题是,当多个线程操作共享数据时,彼此不可见。
volatile 关键字:当多个线程进行操作共享数据时,可以保证内存中的数据可见。相较于synchronized是一种较为轻量级的同步策略。
volatile 不具备"互斥性",也不能保证变量的"原子性"
public class VolatileTest

    public static void main(String[] args)
        ThreadDemo threadDemo = new ThreadDemo();
        new Thread(threadDemo).start();

        while (true)
//            synchronized (threadDemo)
                if (threadDemo.isFlag())
                    System.out.println("---------");
                    break;

//


class ThreadDemo implements Runnable

//    private boolean flag = false;
    private volatile boolean flag = false;

    @Override
    public void run()
        try
            Thread.sleep(200);
         catch (Exception e)

        flag = true;
        System.out.println("flag=" + isFlag());


    public boolean isFlag()
        return flag;
2.原子变量与CAS算法
原子变量:jdk1.5后java.util.concurrent.atomic包下提供了常用的原子变量(其中有AtomicInteger)
1、volatile保证内存可见性
2、CAS (Compare-And-Swap)算法保证数据的原子性CAS算法是硬件对于并发操作共享数据的支持
CAS包含了三个操作数:内存值V、预估值A、更新值B。当且仅当V == A 时,V = B(将B赋值给A)。否则,将不做任何操作
public class AtomicTest

    public static void main(String[] args)
        AtomicDemo atomicDemo = new AtomicDemo();
        for (int i = 0; i < 10; i++)
            new Thread(atomicDemo).start();


class AtomicDemo implements Runnable

//    private int serialNum = 0;
    private AtomicInteger serialNum = new AtomicInteger();

    @Override
    public void run()

        try
            Thread.sleep(1000);
         catch (Exception e)


        System.out.println(Thread.currentThread().getName() + ":" + getSerialNum());


    public int getSerialNum()
//        return serialNum++;
        return serialNum.getAndIncrement();
3.模拟CAS算法
public class CompareAndSwapTest

    public static void main(String[] args)
        final CompareAndSwap cas = new CompareAndSwap();

        for (int i = 0; i < 10; i++)
            new Thread(new Runnable()
                @Override
                public void run()
                    int expectedValue = cas.get();
                    boolean flag = cas.compareAndSet(expectedValue, (int)(Math.random() * 100));
                    System.out.println(flag);

            ).start();


class CompareAndSwap
    private int value;

    // 获取内存值
    public synchronized int get()
        return value;


    // 比较
    public synchronized int compareAndSwap(int expectedValue, int newValue)
        int oldValue = value;

        if (oldValue == expectedValue)
            this.value = newValue;


        return oldValue;


    // 设置
    public synchronized boolean compareAndSet(int expectedValue, int newValue)
        return expectedValue == compareAndSwap(expectedValue, newValue);
4.同步容器类ConcurrentHashMap
- Java 5.0在java.util.concurrent包中提供了多种并发容器类来改进同步容器的性能。
- ConcurrentHashMap同步容器类是Java 5增加的一个线程安全的哈希表。
对于多线程的操作,介于HashMap 与 Hashtable之间。
java1.8之前内部采用“锁分段”机制替代 Hashtable的独占锁。进而提高性能,1.8之后是CAS - 此包还提供了设计用于多线程上下文中的collection实现:
ConcurrentHashMap、ConcurrentSkipListMap、ConcurrentSkipListSet、CopyOnWriteArrayList和CopyOnWriteArraySet。
当期望许多线程访问一个给定collection时,ConcurrentHashMap通常优于同步的HashMap,
ConcurrentSkipListMap通常优于同步的TreeMap。
当期望的读数和遍历远远大于列表的更新数时,CopyOnWriteArrayList优于同步的ArrayList。
/**
 * CopyOnWriteArrayList/CopyOnWriteArraySet : 写入并复制
 * 注意:不适合添加操作多的场景,因为每次添加都会进行复制,开销大,效率低
 *      适合并发迭代操作多的场景
 */
public class CopyOnWriteArrayListTest

    public static void main(String[] args)
        HelloThread ht = new HelloThread();

        for (int i = 0; i < 10; i++)
            new Thread(ht).start();


class HelloThread implements Runnable

//    private static List<String> list = Collections.synchronizedList(new ArrayList<>());
    private static CopyOnWriteArrayList<String> list = new CopyOnWriteArrayList<>();

    static
        list.add("AA");
        list.add("BB");
        list.add("CC");


    @Override
    public void run()
        Iterator<String> it = list.iterator();

        while (it.hasNext())
            System.out.println(it.next());
            // 使用的是List<String>时 此处会抛出java.util.ConcurrentModificationException异常
            list.add("AA");
5.CountDownLatch闭锁
-
Java 5.0在java.util.concurrent包中提供了多种并发容器类来改进同步容器的性能。
-
CountDownLatch一个同步辅助类,在完成一组正在其他线程中执行的操作之前,它允许一个或多个线程一直等待。
-
闭锁可以延迟线程的进度直到其到达终止状态,闭锁可以用来确保某些活动直到其他活动都完成才继续执行:
确保某个计算 在其需要的所有资源都被初始化之后 才继续执行;
确保某个服务 在其依赖的所有其他服务都已经启动之后 才启动;
等待直到某个操作所有参与者都准备就绪再继续执行。
/**
 * CountDownLatch闭锁:在完成某些运算时,只有其他线程的运算全部完成后,当前运算才继续执行
 */
public class CountDownLatchTest

    public static void main(String[] args)
        // 后面开了5个线程,此处就传入计数5
        CountDownLatch countDownLatch = new CountDownLatch(5);
        LatchDemo latchDemo = new LatchDemo(countDownLatch);

        long start = System.currentTimeMillis();

        for (int i = 0; i < 5; i++)
            new Thread(latchDemo).start();


        try
            countDownLatch.await();
         catch (InterruptedException e)
            e.printStackTrace();


        // 当计数减到0时才执行
        long end = System.currentTimeMillis();
        System.out.println("耗费时间为:" + (end - start));


class LatchDemo implements Runnable
    public CountDownLatch countDownLatch;

    public LatchDemo(CountDownLatch countDownLatch)
        this.countDownLatch = countDownLatch;


    @Override
    public void run()
        synchronized (this)
            try
                for (int i = 0; i < 50000; i++)
                    if (i % 2 == 0)
                        System.out.println(i);


            finally
                countDownLatch.countDown();
6.实现Callable接口
/**
 * 创建线程方式三:实现Callable接口
 * 相较于实现Runnable接口的方式,方法可以有返回值,并且可以抛出异常
 */
public class CallableTest
    public static void main(String[] args)
        CallableImpl callableImpl = new CallableImpl();

        // 执行Callable方式,需要FutureTask实现类的支持,用于接收运算结果。FutureTask是Future接口的实现类
        // 还有另外一个构造方法是FutureTask(Runnable runnable, V result)
        FutureTask<Integer> result = new FutureTask<>(callableImpl);

        new Thread(result).start();

        // 接收线程运算后的结果
        try
            Integer sum = result.get(); // futureTask也可用于闭锁
            System.out.println(sum);
            System.out.println("---------当分线程执行完 get()拿到结果了才执行此处---------");
         catch (InterruptedException | ExecutionException e)
            e.printStackTrace();


class CallableImpl implements Callable<Integer>
    @Override
    public Integer call() throws Exception
        int sum = 0;
        for (int i = 0; i < 100; i++)
            sum += i;

        return sum;
7.Lock同步锁
—、用于解决多线程安全问题的方式:
1.同步代码块(synchronized隐式锁)
2.同步方法(synchronized隐式锁)
3.同步锁Lock(jdk 1.5后出现,是个显式锁,需要通过lock()方法上锁,必须通过unlock()方法进行释放锁,所以有一定的风险,比如锁未成功释放)
public class LockTest
    public static void main(String[] args)
        Ticket ticket = new Ticket();

        new Thread(ticket, "1号窗口").start();
        new Thread(ticket, "2号窗口").start();
        new Thread(ticket, "3号窗口").start();


class Ticket implements Runnable

    private int ticketNum = 100;
    private Lock lock = new ReentrantLock();

    @Override
    public void run()
        while (true)
            lock.lock();    // 上锁
            try
                if (ticketNum > 0)
                    try
                        Thread.sleep(10);
                     catch (InterruptedException e)
                        e.printStackTrace();

                    System.out.println(Thread.currentThread().getName() + "完成售票,余票为:" + --ticketNum);

             finally
                lock.unlock();  // 释放锁
8.生产者消费者案例-虚假唤醒
如何用Lock同步锁实现等待唤醒机制,也就是像synchronized关键字的wait()和notify()的等待唤醒机制
8.1未使用等待唤醒机制出现的问题
public class ProductorAndConsumerTest

    public static void main(String[] args)
        Clerk clerk = new Clerk();
        Productor productor = new Productor(clerk);
        Consumer consumer = new Consumer(clerk);

        new Thread(productor, "生产者A").start();
        new Thread(consumer, "消费者B").start();


// 店员
class Clerk
    private int productNum = 0;

    // 进货
    public synchronized void get()
        if (productNum >= 5)
            System.out.println("商品仓位已满!");
//            try
//                this.wait();
//             catch (InterruptedException e)
//                e.printStackTrace();
//
         else
            System.out.println(Thread.currentThread().getName() + "进货:" + ++productNum);
//            this.notifyAll();


    // 卖货
    public synchronized void sale()
        if (productNum <= 0)
            System.out.println("商品已售罄!");
//            try
//                this.wait();
//             catch (InterruptedException e)
//                e.printStackTrace();
//
         else
            System.out.println(Thread.currentThread().getName() + "售出:" + --productNum);
//            this.notifyAll();


// 生产者
class Productor implements Runnable

    private Clerk clerk;

    public Productor(Clerk clerk)
        this.clerk = clerk;


    @Override
    public void run()
        for (int i = 0; i < 10; i++)
            clerk.get();


// 消费者
class Consumer implements Runnable

    private Clerk clerk;

    public Consumer(Clerk clerk)
        this.clerk = clerk;


    @Override
    public void run()
        for (int i = 0; i < 10; i++)
            clerk.sale();
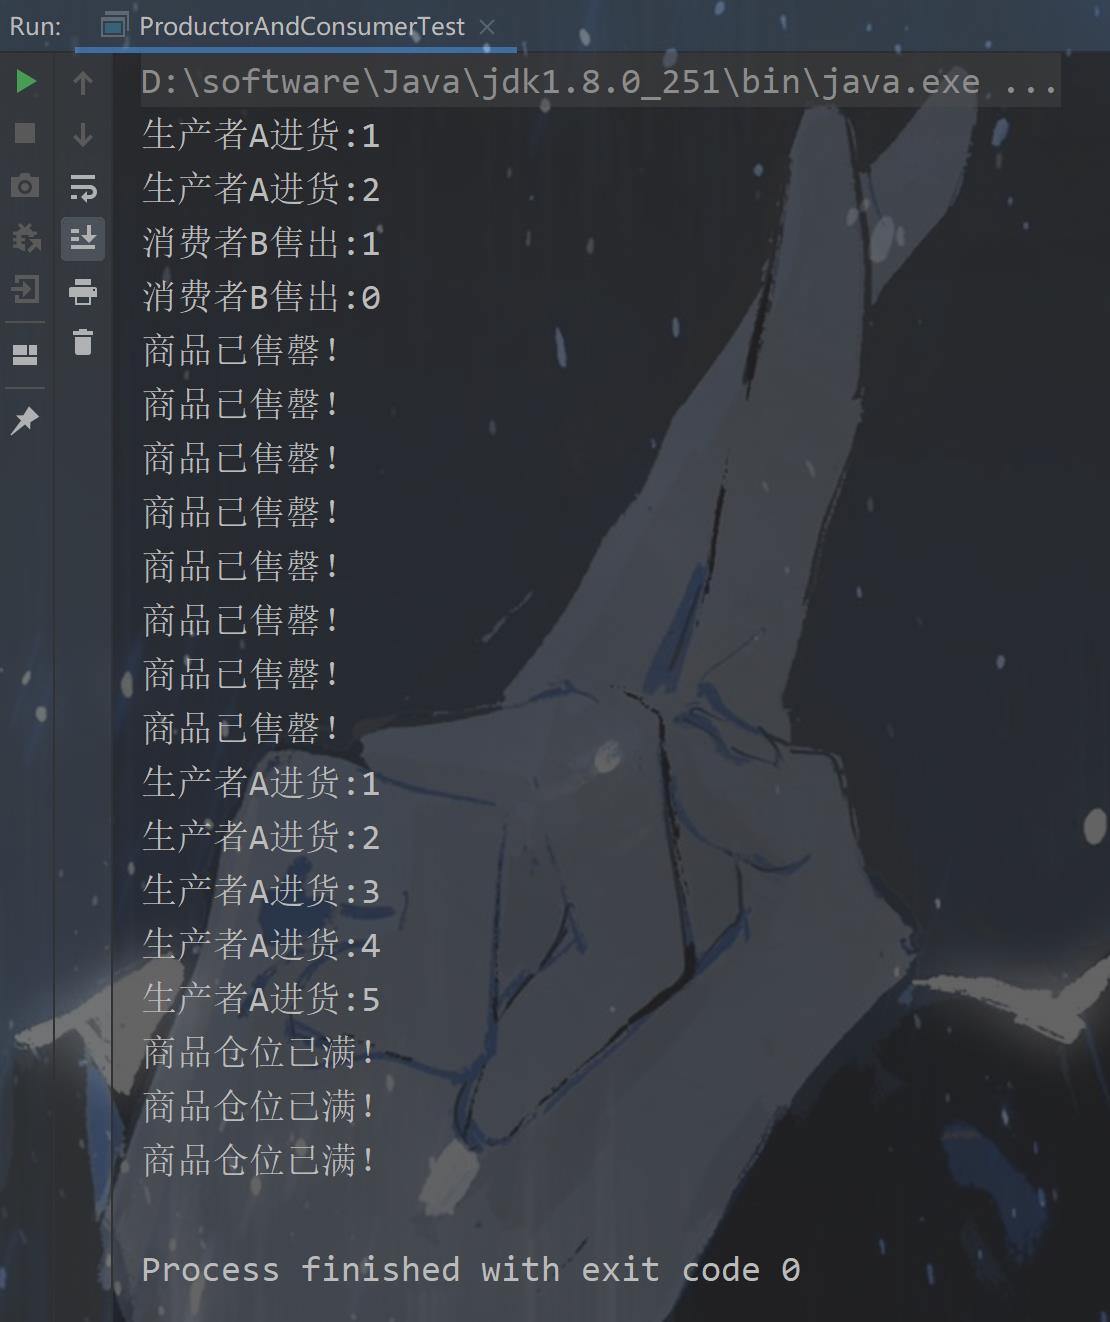
即使仓位满了,生产者还是不停地进货;即使商品售罄了,消费者还是不停地想要去消费、

8.2使用等待唤醒机制
将8.1中注释的代码放开、此时运行结果都是有效的数据、

8.3问题修正1
8.2的等待唤醒机制有些问题、
当把仓位改为1,并给生产者加0.2秒的延迟、
// 进货
public synchronized void get()
if (productNum >= 1) // 把仓位改为1
System.out.println("商品仓位已满!");
try
this.wait();
catch (InterruptedException e)
e.printStackTrace();
else
System.out.println(Thread.currentThread().getName() + "进货:" + ++productNum);
this.notifyAll();
@Override
public void run()
for (int i = 0; i < 10; i++)
try
Thread.sleep(200); // 给生产者加0.2秒的延迟
catch (InterruptedException e)
e.printStackTrace()