Android碎片:Fragment
Posted 西红柿里没有番茄
tags:
篇首语:本文由小常识网(cha138.com)小编为大家整理,主要介绍了Android碎片:Fragment相关的知识,希望对你有一定的参考价值。
Fragment的产生其实是谷歌为了解决手机端和平板端软件开发的问题,在Fragment出来之前开发安卓软件如果要同时运行在pad和手机上就得开发两个软件,有了碎片也就是Fragment之后只要开发一个软件就可以适应pad和手机,不受屏幕大小的影响。而且Fragment有自己生命周期使用起来超级方便,逻辑处理可以直接在Fragment里面处理好,然后在Activity中有需要的地方引用这个Fragment就行了
Fragment有android.support.v4.app.fragment包和android.app.fragment之分,它俩的区别在于:
android.app.fragment包是是3.0以后的系统才能使用的,也就是说3.0以前的系统是没法体验到这个包的功能。
而android.support.v4.app.fragment包是为了向下兼容,使低版本(到1.6版本)也能体验到fragment的功能。
推荐使用v4包下的,这样可以使APP适应更多机型。
它俩在使用上也是有区别的:
1.首先一点是在管理fragment的主activity上, app包下的照样继承Activity,但是v4包下的需要继承FragmentActivity,
2.对FragmentManager的获取,在app包下需要使用getFragmentManager()
FragmentMagnager fm=getFragmentManager();
在v4包下需要使用getSupportFragmentManager()来获取管理,代码如下:
FragmentMagnager fm=getSupportFragmentManager();
我们把用来显示特定的fragment的动作称之为事务,事务通过FragmentTransaction来执行,用以下方法对FragmentTransaction进行实例化:
FragmentTransaction transaction=fragmentManager.beginTransaction();
现在记录怎么使用Fragment:
- 静态使用
- 动态使用
首先当然是先试试最简单的一种使用方法:静态使用Fragment
其实静态使用的这种方式就相当于把Fragment当成一个控件,当我们定义好了这个控件之后就可以在Activity的布局文件中直接使用了。
步骤一:创建一个布局文件,这个布局文件是用来和Fragment绑定的,相当于Fragment的视图
<?xml version="1.0" encoding="utf-8"?>
<LinearLayout xmlns:android="http://schemas.android.com/apk/res/android"
    android:layout_width="match_parent"
    android:layout_height="match_parent"
    android:background="#000000"
    android:orientation="vertical">

    <TextView
        android:layout_width="match_parent"
        android:layout_height="match_parent"
        android:text="我是Fragment的布局文件,我是黑色"
        android:textColor="#ffffff" />


</LinearLayout>
步骤二:创建一个类继承Fragment
步骤三:在继承了Fragment的类中重写onCreateView方法
步骤四:在onCreateView方法中将布局文件和Fragment绑定
package com.contentprovide.liuliu.fragment_test;

import android.app.Fragment;
import android.os.Bundle;
import android.support.annotation.Nullable;
import android.view.LayoutInflater;
import android.view.View;
import android.view.ViewGroup;

/**
 * Created by liuliu on 2018/6/5.
 * <p>
 * 静态加载Fragment步骤:
 * 1、创建一个类继承Fragment(一般导包是app中的Fragment)
 * 2、重写onCreateView方法
 * 3、创建一个布局文件,充当Fragment的视图
 * 4、在onCreateView方法中将布局文件和Fragment绑定
 */

public class static_Frag extends Fragment {

    @Override
    public void onCreate(@Nullable Bundle savedInstanceState) {
        super.onCreate(savedInstanceState);
    }

    @Nullable
    @Override
    public View onCreateView(LayoutInflater inflater, @Nullable ViewGroup container, Bundle savedInstanceState) {

        View view = inflater.inflate(R.layout.static_layout, null);

        return view;
    }


}
这四步完成了那么一个具有视图效果的Fragment就完成了没接下来就可以直接在Activity中的布局文件中引用了
步骤五:在Activity中的布局文件中引用Fragment
<?xml version="1.0" encoding="utf-8"?>
<LinearLayout xmlns:android="http://schemas.android.com/apk/res/android"
    xmlns:app="http://schemas.android.com/apk/res-auto"
    xmlns:tools="http://schemas.android.com/tools"
    android:layout_width="match_parent"
    android:layout_height="match_parent"
    android:background="@color/colorAccent"
    android:orientation="vertical"
    tools:context="com.contentprovide.liuliu.fragment_test.MainActivity">


    <fragment
        android:id="@+id/one_frag"
        android:name="com.contentprovide.liuliu.fragment_test.static_Frag"
        android:layout_width="match_parent"
        android:layout_height="300px"
        android:layout_marginTop="200px" />

</LinearLayout>
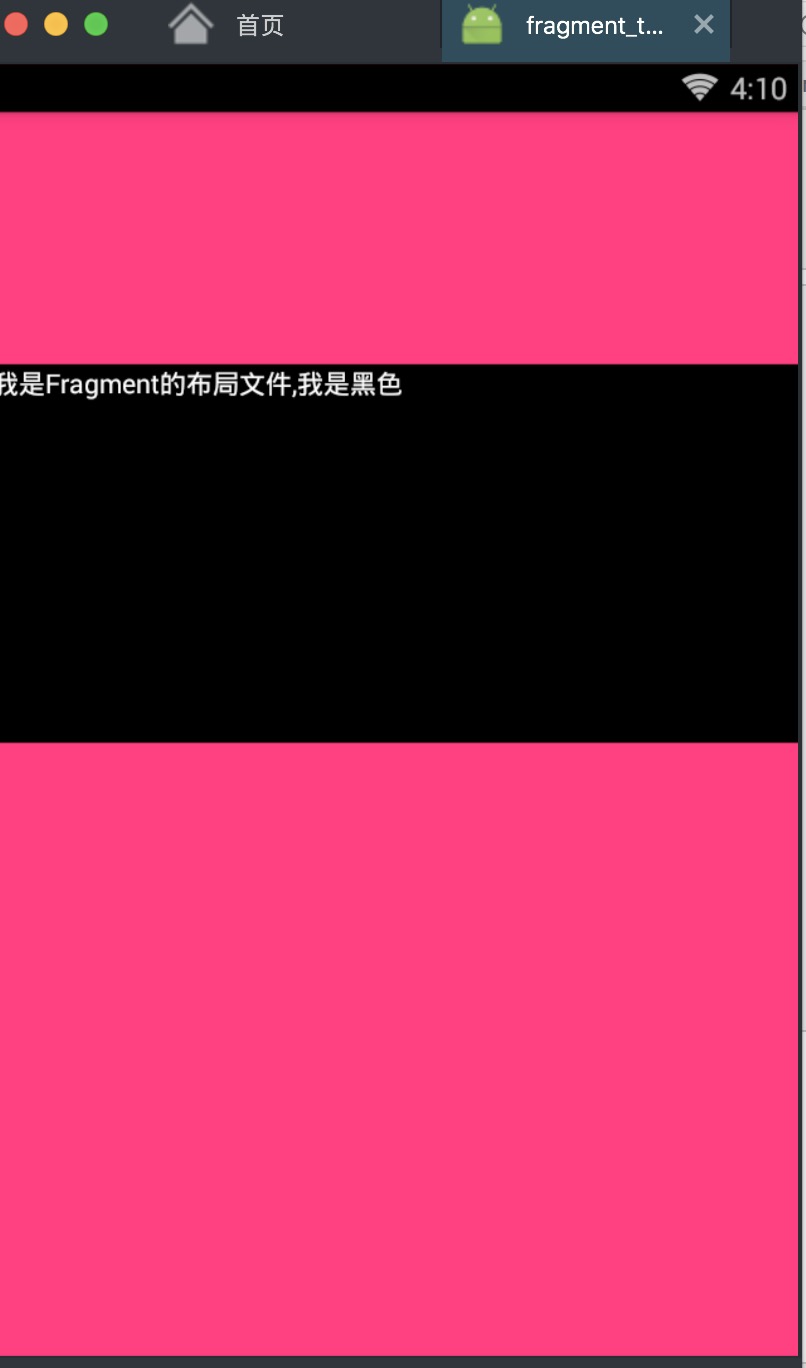
在步骤五中有个需要注意的地方,引用fragment时一定要给定一个id,否则会运行是会报错的
到这里Fragment的静态引用就结束了,可以运行看看效果:

优点:1、可以在Activity中直接绑定并且控制Fragment布局中的控件,这点对于初步使用是很方便的
2、把Fragment当成控件使用,也很方便上手
缺点:不能根据业务逻辑动态加载Fragment
静态使用Fragment虽然很简单但是很多时候没办法达到使用要求,动态使用就可以比较灵活,下面是动态使用Fragment的方法:
步骤一:我们先创建好几个Fragment,我这里创建了四个Fragment,每个Fragment都绑定了相对应的布局
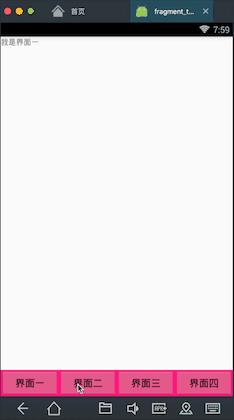
步骤二:在Activity的布局文件中定义一个FrameLayout布局,主要是用来灵活的存放不同的Fragment,我下面的布局除了FrameLayout还另外定义了四个按钮用来切换不同的FrameLayout,就像微信的界面一样,其实这个实现效果和TabHost是一样的,可以取代之前用的Tabhost
<?xml version="1.0" encoding="utf-8"?>
<LinearLayout xmlns:android="http://schemas.android.com/apk/res/android"
    xmlns:tools="http://schemas.android.com/tools"
    android:layout_width="match_parent"
    android:layout_height="match_parent"
    android:orientation="vertical"
    android:gravity="center"
    tools:context="com.contentprovide.liuliu.fragment_test2.MainActivity">


<FrameLayout
    android:id="@+id/frag"
    android:layout_width="match_parent"
    android:layout_height="match_parent"
    android:layout_weight="1"
    />


  <LinearLayout
      android:layout_width="match_parent"
      android:layout_height="wrap_content"
      android:orientation="horizontal"
      android:gravity="center"
      android:background="@color/colorAccent"
      >

      <Button
          android:id="@+id/btn_one"
          android:layout_width="wrap_content"
          android:layout_height="wrap_content"
          android:layout_weight="1"
          android:text="界面一"
          />
      <Button
          android:id="@+id/btn_two"
          android:layout_width="wrap_content"
          android:layout_height="wrap_content"
          android:layout_weight="1"
          android:text="界面二"
          />
      <Button
          android:id="@+id/btn_three"
          android:layout_width="wrap_content"
          android:layout_height="wrap_content"
          android:layout_weight="1"
          android:text="界面三"
          />
      <Button
          android:id="@+id/btn_four"
          android:layout_width="wrap_content"
          android:layout_height="wrap_content"
          android:layout_weight="1"
          android:text="界面四"
          />

  </LinearLayout>

</LinearLayout>
步骤三:接下来就可以在Activity中灵活的将Fragment放进FrameLayout中了
package com.contentprovide.liuliu.fragment_test2;

import android.app.Activity;
import android.app.FragmentManager;
import android.app.FragmentTransaction;
import android.os.Bundle;
import android.view.View;
import android.widget.Button;

public class MainActivity extends Activity implements View.OnClickListener {

    Button btn_one, btn_two, btn_three, btn_four;

    FragmentManager fragmentManager;
    FragmentTransaction fragmentTransaction;

    @Override
    protected void onCreate(Bundle savedInstanceState) {
        super.onCreate(savedInstanceState);
        setContentView(R.layout.activity_main);
        init();

//        获取碎片管理者
        fragmentManager = getFragmentManager();
//        获取碎片事物
        fragmentTransaction = fragmentManager.beginTransaction();
//        设置初始的Fragment
        fragmentTransaction.replace(R.id.frag, new one());
        fragmentTransaction.commit();

    }


    public void init() {
        btn_one = (Button) findViewById(R.id.btn_one);
        btn_two = (Button) findViewById(R.id.btn_two);
        btn_three = (Button) findViewById(R.id.btn_three);
        btn_four = (Button) findViewById(R.id.btn_four);

        btn_one.setOnClickListener(this);
        btn_two.setOnClickListener(this);
        btn_three.setOnClickListener(this);
        btn_four.setOnClickListener(this);
    }


    @Override
    public void onClick(View view) {
//        获取碎片管理者
        fragmentManager = getFragmentManager();
//        获取碎片事物
        fragmentTransaction = fragmentManager.beginTransaction();

        switch (view.getId()) {
            case R.id.btn_one:
                fragmentTransaction.replace(R.id.frag, new one());
                break;
            case R.id.btn_two:
                fragmentTransaction.replace(R.id.frag, new two());
                break;
            case R.id.btn_three:
                fragmentTransaction.replace(R.id.frag, new three());
                break;
            case R.id.btn_four:
                fragmentTransaction.replace(R.id.frag, new four());
                break;
        }
        fragmentTransaction.commit();
    }


}
实现效果:

怎么使用Fragment的两种方法讲完了,但是如果要在Activity中随心所欲的使用Fragment还得了解Fragment和Activity的通信
Activity获得Fragment中的信息,比如控件信息等
Fragment获得Activity中的信息
Fragment获得其他Fragment中的信息
首先我们先创建好一个类继承Fragment类,并且写好一个布局和这个Fragment进行绑定,布局中有三个按钮
Fragment代码
package com.contentprovide.liuliu.fragment_test;

import android.os.Bundle;
import android.support.v4.app.Fragment;
import android.view.LayoutInflater;
import android.view.View;
import android.view.ViewGroup;


public class connect_frag extends Fragment {


    public connect_frag() {
        // Required empty public constructor
    }


    @Override
    public View onCreateView(LayoutInflater inflater, ViewGroup container,
                             Bundle savedInstanceState) {

        View view = inflater.inflate(R.layout.fragment_connect_frag, container, false);


        return view;
    }


}
和Fragment绑定的布局文件的代码
<LinearLayout xmlns:android="http://schemas.android.com/apk/res/android"
    xmlns:tools="http://schemas.android.com/tools"
    android:layout_width="match_parent"
    android:layout_height="match_parent"
    android:background="@color/colorAccent"
    android:gravity="center"
    android:orientation="vertical"
    tools:context="com.contentprovide.liuliu.fragment_test.connect_frag">

    <Button
        android:id="@+id/frag_1"
        android:layout_width="match_parent"
        android:layout_height="wrap_content"
        android:text="第一页" />

    <Button
        android:id="@+id/frag_2"
        android:layout_width="match_parent"
        android:layout_height="wrap_content"
        android:text="第二页" />

    <Button
        android:id="@+id/frag_3"
        android:layout_width="match_parent"
        android:layout_height="wrap_content"
        android:text="第三页" />


</LinearLayout>
接下来我们就可以在Activity中的布局文件中引用这个Fragment了,也就是上面讲过的静态使用
<?xml version="1.0" encoding="utf-8"?>
<LinearLayout xmlns:android="http://schemas.android.com/apk/res/android"
    xmlns:app="http://schemas.android.com/apk/res-auto"
    xmlns:tools="http://schemas.android.com/tools"
    android:layout_width="match_parent"
    android:layout_height="match_parent"
    android:orientation="horizontal"
    tools:context="com.contentprovide.liuliu.fragment_test.MainActivity">


    <fragment
        android:id="@+id/frag"
        android:name="com.contentprovide.liuliu.fragment_test.connect_frag"
        android:layout_width="0dp"
        android:layout_height="match_parent"
        android:layout_weight="1" />

    <TextView
        android:id="@+id/te"
        android:layout_width="0dp"
        android:layout_height="match_parent"
        android:layout_weight="2"
        android:gravity="center"
        android:text="按钮一"
        android:textColor="@color/colorAccent" />


</LinearLayout>
现在我们就可以在Activity中获取到Fragment中的信息了,我们知道Fragment中有三个按钮,现在我们就在Activity中获取到这三个按钮信息,并且给这三个按钮添加监听事件
import android.os.Bundle;
import android.support.v7.app.AppCompatActivity;
import android.view.View;
import android.widget.Button;
import android.widget.TextView;

public class MainActivity extends AppCompatActivity implements View.OnClickListener {

    TextView te;

    Button frag_1, frag_2, frag_3;

    @Override
    protected void onCreate(Bundle savedInstanceState) {
        super.onCreate(savedInstanceState);
        setContentView(R.layout.activity_main);

        init();

    }

//    初始化控件
    public void init() {

        te = (TextView) findViewById(R.id.te);
        frag_1 = (Button) findViewById(R.id.frag_1);
        frag_2 = (Button) findViewById(R.id.frag_2);
        frag_3 = (Button) findViewById(R.id.frag_3);

        frag_1.setOnClickListener(this);
        frag_2.setOnClickListener(this);
        frag_3.setOnClickListener(this);


    }


//    添加事件
    @Override
    public void onClick(View view) {

        switch (view.getId()) {
            case R.id.frag_1:
                te.setText("按钮一");
                break;
            case R.id.frag_2:
                te.setText("按钮二");
                break;
            case R.id.frag_3:
                te.setText("按钮三");
                break;
        }
    }


}
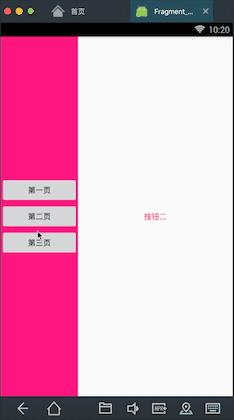
再理一理代码的实现效果:在界面的左边有一个Fragment,Fragment中有三个按钮,点击不同的按钮,在界面的右边通过一个TextView控件显示相对应的按钮信息,这个按钮信息就是我们在Activity中获取到的Fragment中的信息
下面是实现效果:

Fragment获得Activity中的信息
在Fragment中获得Activity中的信息其实是和上面的"在Activity中获得Fragment的信息"是差不多的,唯一的区别是一个一个是在Activity中处理信息,一个是在Fragment中处理信息
首先也是创建一个类继承Fragment类,然后创建一个布局文件和这个Fragment进行绑定
Fragment的代码:
package com.contentprovide.liuliu.fragment_test4;

import android.os.Bundle;
import android.support.v4.app.Fragment;
import android.view.LayoutInflater;
import android.view.View;
import android.view.ViewGroup;
import android.widget.Button;
import android.widget.TextView;


public class connect_frag extends Fragment implements View.OnClickListener {

    TextView te;

    Button frag_1, frag_2, frag_3;


    public connect_frag() {
        // Required empty public constructor
    }

    @Override
    public void onCreate(Bundle savedInstanceState) {
        super.onCreate(savedInstanceState);


    }

    @Override
    public View onCreateView(LayoutInflater inflater, ViewGroup container,
                             Bundle savedInstanceState) {
        View view = inflater.inflate(R.layout.fragment_connect_frag, null);

        init(view);

        return view;
    }

    public void init(View view) {

        frag_1 = view.findViewById(R.id.frag_1);
        frag_2 = view.findViewById(R.id.frag_2);
        frag_3 = view.findViewById(R.id.frag_3);

        frag_1.setOnClickListener(this);
        frag_2.setOnClickListener(this);
        frag_3.setOnClickListener(this);


    }


    @Override
    public void onClick(View view) {
        te = getActivity().findViewById(R.id.te);
        switch (view.getId()) {
            case R.id.frag_1:
                te.setText("按钮一");
                break;
            case R.id.frag_2:
                te.setText("按钮二");
                break;
            case R.id.frag_3:
                te.setText("按钮三");
                break;
        }
    }


}
Fragment布局文件的代码
<LinearLayout xmlns:android="http://schemas.android.com/apk/res/android"
    xmlns:tools="http://schemas.android.com/tools"
    android:layout_width="match_parent"
    android:layout_height="match_parent"
    android:background="@color/colorAccent"
    android:gravity="center"
    android:orientation="vertical"
    tools:context="com.contentprovide.liuliu.fragment_test.connect_frag">

    <Button
        android:id="@+id/frag_1"
        android:layout_width="match_parent"
        android:layout_height="wrap_content"
        android:text="第一页" />

    <Button
        android:id="@+id/frag_2"
        android:layout_width="match_parent"
        android:layout_height="wrap_content"
        android:text="第二页" />

    <Button
        android:id="@+id/frag_3"
        android:layout_width="match_parent"
        android:layout_height="wrap_content"
        android:text="第三页" />


</LinearLayout>
剩下就是在Activity中的布局文件中引用这个Fragment了
<?xml version="1.0" encoding="utf-8"?>
<LinearLayout xmlns:android="http://schemas.android.com/apk/res/android"
    xmlns:app="http://schemas.android.com/apk/res-auto"
    xmlns:tools="http://schemas.android.com/tools"
    android:layout_width="match_parent"
    android:layout_height="match_parent"
    android:orientation="horizontal"
    tools:context="com.contentprovide.liuliu.fragment_test4.MainActivity">


    <fragment
        android:id="@+id/frag"
        android:name="com.contentprovide.liuliu.fragment_test4.connect_frag"
        android:layout_width="0dp"
        android:layout_height="match_parent"
        android:layout_weight="1" />

    <TextView
        android:id="@+id/te"
        android:layout_width="0dp"
        android:layout_height="match_parent"
        android:layout_weight="2"
        android:gravity="center"
        android:textColor="@color/colorAccent"
        android:text="按钮一" />


</LinearLayout>
这种写法因为Activity中没有写代码,交互代码都写在了Fragment中了,所以就不放代码了。
可以发现第一种和第二种通信方式大部分内容都是相同的,唯一的区别可能就是交互代码写的位置不同了,一个是写在Activity中、一个是写在Fragment中,实现的效果也和第一种相同,这里就不上图了。
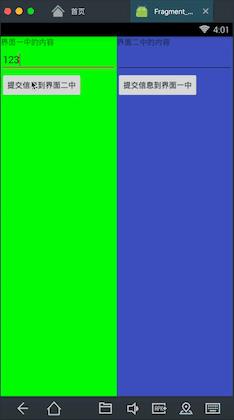
先看下我要实现的效果

在这个界面中有两个Fragment,分别是左边的绿色和右边的蓝色,现在我在左边的Fragment中的输入框中输入一个数,点击按钮提交,可以看到右边的Fragment中会出现刚才左边Fragment中输入的的数,同理右边输入的数也可以传到左边。这里就基本实现了Fragment之间的通信
现在来看下实现步骤:
步骤一:首先当然是最先创建好两个Fragment,并且绑定各自的布局文件
左边的Fragment代码:one_frag.java:
package com.contentprovide.liuliu.fragment_test5;


import android.os.Bundle;
import android.support.v4.app.Fragment;
import android.view.LayoutInflater;
import android.view.View;
import android.view.ViewGroup;
import android.widget.Button;
import android.widget.EditText;
import android.widget.TextView;


/**
 * A simple {@link Fragment} subclass.
 */
public class one_frag extends Fragment {

    TextView one_te;
    EditText one_edi;
    Button one_btn;


    public one_frag() {
        // Required empty public constructor
    }


    @Override
    public View onCreateView(LayoutInflater inflater, ViewGroup container,
                             Bundle savedInstanceState) {

        View view = inflater.inflate(R.layout.fragment_one_frag, container, false);

        one_te = view.findViewById(R.id.one_te);
        one_edi = view.findViewById(R.id.one_edi);
        one_btn = view.findViewById(R.id.one_btn);

        one_btn.setOnClickListener(new View.OnClickListener() {
            @Override
            public void onClick(View view) {
                String str = one_edi.getText().toString();
//获得管理者对象
                android.support.v4.app.FragmentManager fm = getActivity().getSupportFragmentManager();
//通过管理者对象获得需要的Fragment对象
                two_frag tf = (two_frag) fm.findFragmentById(R.id.frag2);
                tf.changes(str);
            }
        });

        return view;
    }

    public void change_te(String str){
        one_te.setText(str);
    }


}
右边的Fragment代码:two_frag.java:
package com.contentprovide.liuliu.fragment_test5; import android.os.Bundle; import android.support.v4.app.Fragment; import android.view.LayoutInflater; import android.view.View; import android.view.ViewGroup; import android.widget.Button; import android.widget.EditText; import android.widget.TextView; /** * A simple {@link Fragment} subclass. */ public class two_frag extends Fragment { TextView two_te; EditText two_edi; Button two_btn;