Vue3 composition-api&setup 生命周期
Posted 面条请不要欺负汉堡
tags:
篇首语:本文由小常识网(cha138.com)小编为大家整理,主要介绍了Vue3 composition-api&setup 生命周期相关的知识,希望对你有一定的参考价值。
一. setup简单介绍
setup是组合Composition API中的入口函数,也是第一个要使用的函数。setup只在初始化时执行一次,所有的Composition API函数都在此使用。Composition API代码组织很灵活,代码直接全部都写在setup里面即可(简单点来说,就是vue2⾥⾯的data,method,computed···全不要啦,所有数据⽅法全写在setup⾥)
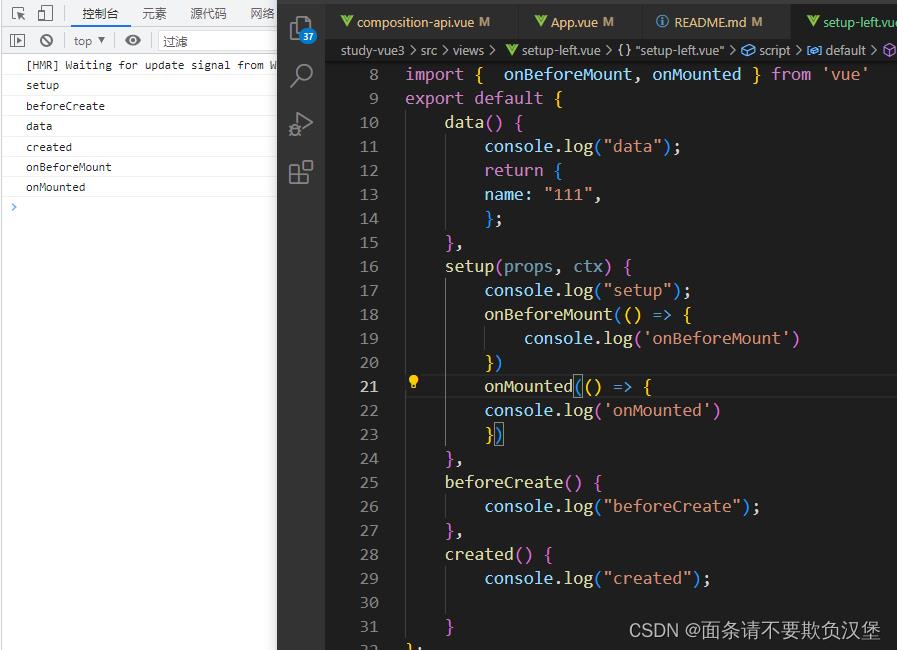
可以推断出setup执行的时候,组件对象还没有创建,组件实例对象this还不可用,此时this是undefined, 不能通过this来访问data/computed/methods/props
1. setup函数执行于beforeCreate和created之前,也就是说setup函数里面无法使用data和methods方法中的数据
2. setup 有2个参数
    props 的父组件传递过来的参数
    ctx 上下文对象
        ctx.attrs
        ctx.slots
        ctx.parent
        ctx.root
        ctx.emit
        ctx.refs
3.在 setup() 函数中无法访问到 this
4. 在setup函数中定义的变量和方法最后都是需要 return 出去的 不然无法再模板中使用
二.setup标签 单文件组件
是在单文件组件 (SFC) 中使用组合式 API 的编译时语法糖。相比于普通的
- 更少的样板内容,更简洁的代码。
- 能够使用纯 TypeScript 声明 props 和抛出事件。
- 更好的运行时性能 (其模板会被编译成与其同一作用域的渲染函数,没有任何的中间代理)。
- 更好的 IDE 类型推断性能 (减少语言服务器从代码中抽离类型的工作)
基本语法
<script setup name="Dict">
	1. name 表示组件的名称
	2. setup 放在script 上时,声明 变量,函数声明,以及 import 引入的内容,都能在模板中直接使用,不用rerun
	3. 访问props 使用defineProps
 	const props = defineProps(
	    //子组件接收父组件传递过来的值
	    info:
	        type: Object

	)
	4. ctx.emit 触发事件=》defineEmit(['selected']) // 传递值
	5. ctx.expose 暴露公共 函数 =》defineExpose(函数名称);
	6. useSlots 和 useAttrs:与 setupContext.slots 和 setupContext.attrs 等价的值
	import  useSlots, useAttrs  from 'vue'
	const slots = useSlots()
	const attrs = useAttrs()
	7. 状态驱动的动态 CSS【(<style> 中的 v-bind)】
	const theme =
  		color: 'red'

	<style scoped>
		p
		  color: v-bind('theme.color');

	</style>

</script>
动态组件
 动态组件:由于组件被引用为变量而不是作为字符串键来注册的,在 <script setup> 中要使用动态组件的时候,就应该使用动态的 :is 来绑定:
	<template>
 		 <component :is="Foo" />
  		<component :is="someCondition ? Foo : Bar" />
	</template>
	<script setup>
import Foo from './Foo.vue'
import Bar from './Bar.vue'
</script>
递归组件
一个单文件组件可以通过它的文件名被其自己所引用。例如:名为 FooBar.vue 的组件可以在其模板中用 引用它自己。
请注意这种方式相比于 import 导入的组件优先级更低。如果有命名的 import 导入和组件的推断名冲突了,可以使用 import 别名导入:
import FooBar as FooBarChild from ‘./components’
命名空间组件
可以使用带点的组件标记,例如 <Foo.Bar> 来引用嵌套在对象属性中的组件。这在需要从单个文件中导入多个组件的时候非常有用:
<script setup>
import * as Form from './form-components'
</script>

<template>
  <Form.Input>
    <Form.Label>label</Form.Label>
  </Form.Input>
</template>
使用自定义指令
全局注册的自定义指令将以符合预期的方式工作,且本地注册的指令可以直接在模板中使用,就像上文所提及的组件一样。
但这里有一个需要注意的限制:必须以 vNameOfDirective 的形式来命名本地自定义指令,以使得它们可以直接在模板中使用。
<script setup>
const vMyDirective =
  beforeMount: (el) =>
    // 在元素上做些操作


</script>
<template>
  <h1 v-my-directive>This is a Heading</h1>
</template>
或是
<script setup>
  // 导入的指令同样能够工作,并且能够通过重命名来使其符合命名规范
  import  myDirective as vMyDirective  from './MyDirective.js'
</script>
顶层 await
<script setup> 中可以使用顶层 await。结果代码会被编译成 async setup():
<script setup>
const post = await fetch(`/api/post/1`).then(r => r.json())
</script>
注意:
async setup() 必须与 Suspense 组合使用,Suspense 目前还是处于实验阶段的特性。我们打算在将来的某个发布版本中开发完成并提供文档 - 如果你现在感兴趣,可以参照 tests 看它是如何工作的
使用时要注意vue3版本,3.2开始支持,更简洁。定义的变量和方法都是不需要 return 出去的 就能模板中使用
三.Composition API
一组低侵入式的、函数式的 API,它使我们能够更灵活地「组合」组件的逻辑。
Composition API 的灵感来自于 React Hooks ,是比 mixin 更强大的存在。它可以提高代码逻辑的可复用性,从而实现与模板的无关性;同时函数式的编程使代码的可压缩性更强。
什么是组合式API?
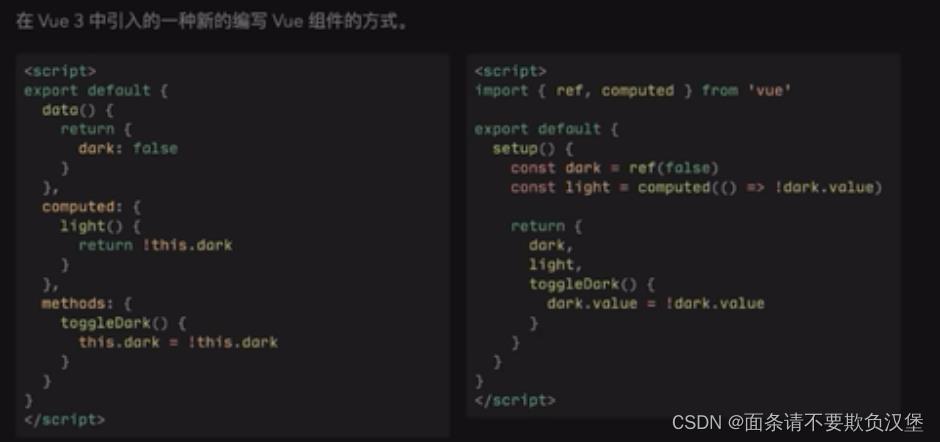
对象式API存在的问题(vue2)
- 不利于复用
- 潜在命名冲突
- 上下文丢失
- 有限的类型支持
- 按api类型组织
组合式api提供的能力 - 极易复用(原生js函数)
- 可灵活组合(生命周期钩子可多次使用)
- 提供更好的上下文支持
- 更好的typeScipt 类型支持
5.按功能/逻辑组织
响应式数据
在Vue2.x的版本中,我们只需要在 data() 中定义一个数据就能将它变为响应式数据,在 Vue3.0 中,需要用 reactive 函数或者 ref 来创建响应式数据。
1. 简单数据类型(String、Number, bool 等)推荐使⽤ref
引入 import ref from 'vue'
使用: let num = ref(1)
获取/修改值:num.value
2. 复杂数据类型(Array、Object)推荐使⽤reactive
 import reactive from 'vue'
 let arr = reactive(age:1) 传⼊⼀个对象,vue会封装成Proxy对象,使⽤⾥⾯的⽅法实现响应式数据
 直接修改数据: arr.age = 12
注意:如果不需要做响应式的数据,直接声明变量即可。⽐如从接⼝获取的数据,
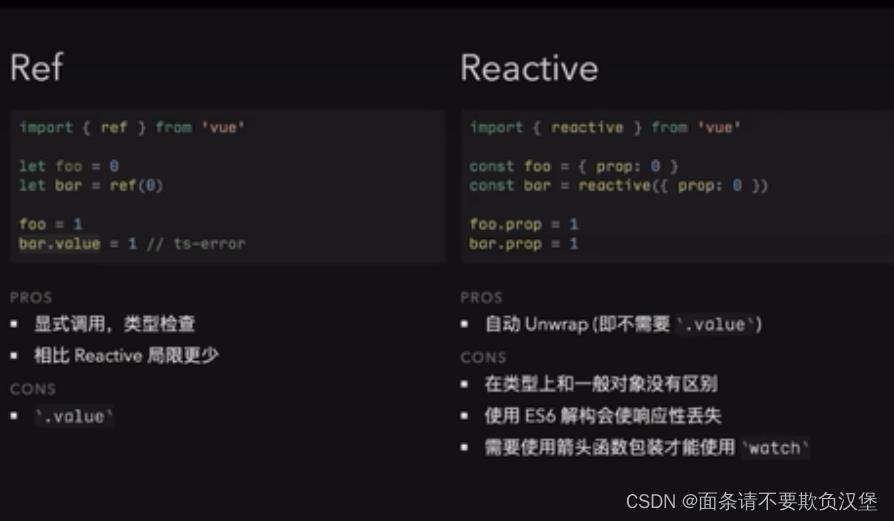
ref 介绍
ref 与 reactive 介绍,推荐使用ref
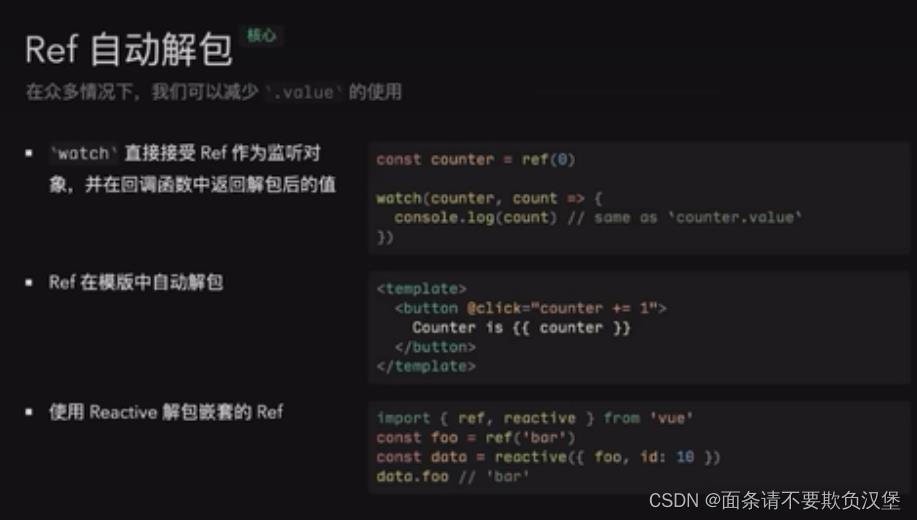
ref自动解包时 ,不需要用.value
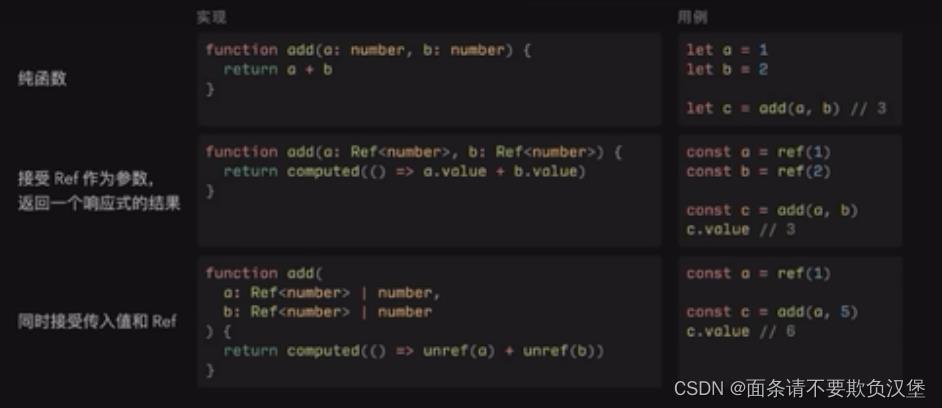
unref -Ref的反操作
如果传入一个ref,返回其值,否则原样返回

俩者可以很好结合使用
maybeRef可以很好的配合ref和unref
接受ref作为函数参数
响应式数据的判断
isRef:检查一个值是否为一个 ref 对象
isReactive:检查一个对象是否是由reactive创建的响应式代理
isReadonly:检查一个对象是否是由readonly创建的只读代理
isProxy:检查一个对象是否是由reactive或者readonly方法创建的代理
computed() 计算属性
computed() 用来创建计算属性,返回值是一个 ref() 实例
computed创建只读计算属性
给 computed() 传入一个函数,可以得到一个只读的计算属性:
const count = ref(1)

// 创建一个计算属性,使其值比 count 大 1
const bigCount = computed(() => count.value + 1)

console.log(bigCount.value) // 输出 2
bigCount.value++ // error 不可写
computed创建可读可写计算属性
onst count = ref(1)

// 创建一个 computed 计算属性,传入一个对象
const bigCount = computed(
    // 取值函数
    get: () => (count.value + 1),
    // 赋值函数
    set: val =>
      count.value = val - 1

)

// 给计算属性赋值的操作,会触发 set 函数
bigCount.value = 9
// 触发 set 函数后,count 的值会被更新
console.log(count.value) // 8
readonly()
传入一个响应式对象、普通对象或 ref ,返回一个只读的对象代理。这个代理是深层次的,对象内部的数据也是只读的。
const state = reactive( count: 0 )

const copy = readonly(state)

watchEffect(() =>
  // 依赖追踪
  console.log(copy.count)
)

// state 上的修改会触发 copy 上的侦听
state.count++

// 这里只读属性不能被修改
copy.count++ // warning!
watchEffect()
watchEffect() 会立即执行传入的函数,并响应式侦听其依赖,并在其依赖变更时重新运行该函数。
基本用法
const count = ref(0)

// 初次直接执行,打印出 0
watchEffect(() => console.log(count.value))

setTimeout(() =>
  // 被侦听的数据发生变化,触发函数打印出 1
  count.value++
, 1000)
停止侦听
watchEffect() 使用时返回一个函数,当执行这个返回的函数时,就停止侦听。
const stop = watchEffect(() =>
  /* ... */
)

// 停止侦听
stop()
watch()
composition-api 中的 watch 和 Vue2.x 中是一样的,watch 需要侦听数据,并执行它的侦听回调。默认情况下初次渲染不执行。
watch 与 watchEffect 的不同
- watch 初次渲染不执行
- watch 侦听的更具体
- watch 可以访问侦听数据变化前后的值
watch 侦听单个数据源
侦听的数据可以是个 reactive 创建出的响应式数据(拥有返回值的 getter 函数),也可以是个 ref
// 侦听一个 getter
const state = reactive( count: 0 )
watch(
  () => state.count,
  (count, prevCount) =>
    /* ... */

)

// 直接侦听一个 ref
const count = ref(0)
watch(count, (count, prevCount) =>
  /* ... */
)
watch 侦听多个数据源
在侦听多个数据源时,把参数以数组的形式给 watch
watch([ref1, ref2], ([newRef1, newRef2],   [prevRef1, prevRef2]) =>
  /* ... */
)
四.Composition-Api 依赖工具
 1. toRef():当我们在模板中渲染数据时,不希望由前缀的时候可以使用组合-toRef()
 toRef()是函数,转换响应式对象中某个属性为单独响应式数据,并且值是关联的
 	//  数据响应式:
    const obj = reactive(
      msg: 'hello',
      info: 'hi'
    )
    const msg = toRef(obj, 'msg')
    const info = toRef(obj, 'info')
    const hClick = () =>
      msg.value = 'nihao'
      info.value= 'hihi'

  可以直接访问: msg, info
2. toRefs():toRefs函数可以定义转换响应式中所有属性为 响应式数据,通常用于结构reactive定义的对象,转换响应式对象中所有属性(也可以是一部分)为单独响应式数据,对象成为普通对象,并且值是关联的
const  msg, info  = toRefs(obj);
五.生命周期
生命周期函数有:onBeforeMount、onMounted、onBeforeUpdate、onUpdated、onBeforeUnmount、onUnmounted、onErrorCaptured、onRenderTracked、 onRenderTriggered、onActivated、onDeactivated。
与vue2不同,vue3在vue2的生命周期的名字的基础上加了个on。
script>
import
  onBeforeMount,
  onMounted,
  onBeforeUpdate,
  onUpdated,
  onBeforeUnmount,
  onUnmounted,
  onRenderTracked,
  onRenderTriggered,
 from "vue";
export default
  components: ,
  data()
    return ;
  ,
  setup()
    // setup里面存着两个生命周期创建前创建
    // beforeCreate
    // created
    onBeforeMount(() =>
      console.log("onBefore   ====>  vue2.0 x beforemount");
    );
    onMounted(() =>
      console.log("onMounted  ====>  vue2.0 x mount");
    );
    onBeforeUpdate(() =>
      console.log("onBeforeUpdate  ====>  vue2.0 x beforeUpdate");
    );
    onUpdated(() =>
      console.log("onUpdated  ====>  vue2.0 x update");
    );
    onBeforeUnmount(() =>
      //在卸载组件实例之前调用。在这个阶段,实例仍然是完全正常的。
      console.log("onBeforeUnmount ====>  vue2.0 x beforeDestroy");
    );
    onUnmounted(() =>
      //卸载组件实例后调用,调用此钩子时,组件实例的所有指令都被解除绑定,所有事件侦听器都被移除,所有子组件实例被卸载。
      console.log("onUnmounted ====>  vue2.0 x destroyed");
    );
    // 新增两个生命周期函数
    //每次渲染后重新收集响应式依赖
    onRenderTracked(( key, target, type ) =>
      // 跟踪虚拟DOM重新渲染时调用,钩子接收debugger event作为参数,此事件告诉你哪个操作跟踪了组件以及该操作的目标对象和键。
      // type:set/get操作
      // key:追踪的键
      // target:重新渲染后的键
      console.log("onRenderTracked");
    );
    //每次触发页面重新渲染时自动执行
    onRenderTriggered(( key, target, type ) =>
      //当虚拟DOM重新渲染被触发时调用,和renderTracked类似,接收debugger event作为参数,
      // 此事件告诉你是什么操作触发了重新渲染,以及该操作的目标对象和键
      console.log("onRenderTriggered");
    );
    return ;
  ,
;
</script>
在setup中执行生命周期和外部的生命周期函数相比,会优先指向setUp内的生命周期函数,再去执行外部的生命周期函数
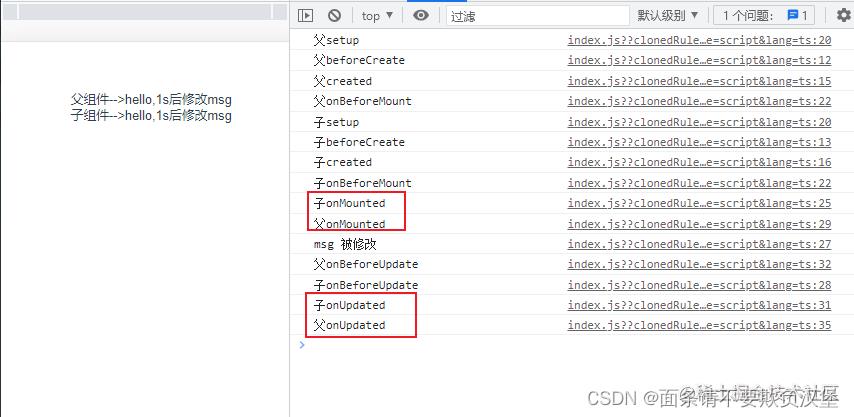
父子组件生命周期
父组件:
<template>
<div class="container">
 父组件-->msg
 //子组件
<ChildItem :msg="msg" :msg1="msg1"></ChildItem>
</div>
</template>


<script lang="ts">
import  defineComponent,ref, onBeforeMount, onMounted, onBeforeUpdate, onUpdated  from 'vue'
import ChildItem from './components/base/Child.vue'
export default defineComponent(
  name: 'App',
  components:
    ChildItem

  ,
  beforeCreate ()
    console.log('父beforeCreate')
  ,
  created ()
    console.log('父created')
  ,
  setup ()
    console.log('父setup')
    onBeforeMount(() =>
      console.log('父onBeforeMount')
    )
    onMounted(() =>
    //更新数据
    setTimeout(() =>
        msg.value = 'hello,1s后修改msg'
        console.log('msg 被修改')
      , 1000)
      console.log('父onMounted')
    )
    onBeforeUpdate(() =>
      console.log('父onBeforeUpdate')
    )
    onUpdated(() =>
      console.log('父onUpdated')
    )

)
</script>
Child.vue
<template>
  <div>子组件-->msg</div>

</template>

<script lang="ts">
import  defineComponent, onBeforeMount, onMounted, onBeforeUpdate, onUpdated  from 'vue'

export default defineComponent(
  name: 'ChildItem',
  props:
    msg:
      type: String,
      required: true

  ,
  beforeCreate ()
    console.log('子beforeCreate')
  ,
  created ()
    console.log('子created')
  ,
  setup (props,  attrs, slots, emit )
    console.log('子setup')
    onBeforeMount(() =>
      console.log('子onBeforeMount')
    )
    onMounted(() =>
      console.log('子onMounted')
    )
    onBeforeUpdate(() =>
      console.log('子onBeforeUpdate')
    )
    onUpdated(() =>
      console.log('子onUpdated')
    )


)
</script>
以上是关于Vue3 composition-api&setup 生命周期的主要内容,如果未能解决你的问题,请参考以下文章