使用Solr完成自动补全
Posted asin929
tags:
篇首语:本文由小常识网(cha138.com)小编为大家整理,主要介绍了使用Solr完成自动补全相关的知识,希望对你有一定的参考价值。
操作流程
1. 创建目录
mkdir -p /root/solr-test/solr-auto-test

cd  /root/solr-test/solr-auto-test
2. 产生collection所需的配置文件
solrctl instancedir --generate ./solr_configs3. 修改配置文件中的shema.xml和solrconfig.xml
3.1 修改solrconfig.xml
增加如下配置,定义一个searchComponent,
<searchComponent name="suggest" class="solr.SpellCheckComponent">
  <lst name="spellchecker">
    <str name="name">suggest</str>
    <str name="classname">org.apache.solr.spelling.suggest.Suggester</str>
    <str name="lookupImpl">org.apache.solr.spelling.suggest.tst.TSTLookup</str>
    <str name="field">suggestion</str>
  </lst>
</searchComponent>
增加如下配置,加合适的handler,告诉solr每次推荐的最大个数为10,
<requestHandler name="/suggest" class="org.apache.solr.handler.component.SearchHandler">
  <lst name="defaults">
    <str name="spellcheck">true</str>
    <str name="spellcheck.dictionary">suggest</str>
    <str name="spellcheck.count">10</str>
  </lst>
  <arr name="components">
    <str>suggest</str>
  </arr>
</requestHandler>
3.2 修改schema.xml
增加关于“单词补全”和“短语补全”的设置,
<!-- 单词补全建议-->
    <fieldType name="text_spell" class="solr.TextField">
      <analyzer type="index">
        <tokenizer class="solr.StandardTokenizerFactory"/>
        <filter class="solr.LowerCaseFilterFactory"/>
      </analyzer>
      <analyzer type="query">
        <tokenizer class="solr.StandardTokenizerFactory"/>
        <filter class="solr.LowerCaseFilterFactory"/>
      </analyzer>
    </fieldType>

<!-- 完整词组建议-->

<fieldType class="solr.TextField" name="text_auto_phrase">
  <analyzer>
    <tokenizer class="solr.KeywordTokenizerFactory"/>
    <filter class="solr.LowerCaseFilterFactory"/>
  </analyzer>
</fieldType> 增加如下设置,其中的type="text_spell"表示采用“单词补全”而不是“短语补全”,
<field name="suggestion" type="text_spell" indexed="true" stored="true" multiValued="true" /> 增加如下设置,source="name"表示需要补全的字段为“name”,
<copyField source="name" dest="suggestion" />4. 上传配置目录到ZooKeeper
solrctl instancedir --create collection-auto-test ./solr_configs/若存在的话,则更新,
solrctl instancedir --update collection-auto-test ./solr_configs/5. 创建新的collection
solrctl collection --create collection-auto-test -s 1 -c collection-auto-test6. 查看并导入数据
在界面–http://solr-server:8983/solr/#/collection-auto-test_shard1_replica1查看新创建的collection,不要使用Firefox。
此时,数据为空,通过下面命令导入。
cd /opt/cloudera/parcels/CDH/share/doc/solr-doc*/example/exampledocs

java -Durl=http://lyhadoop5.haohandata.com:8983/solr/collection-auto-test/update -jar post.jar *.xml
7. 自动补全
注意:
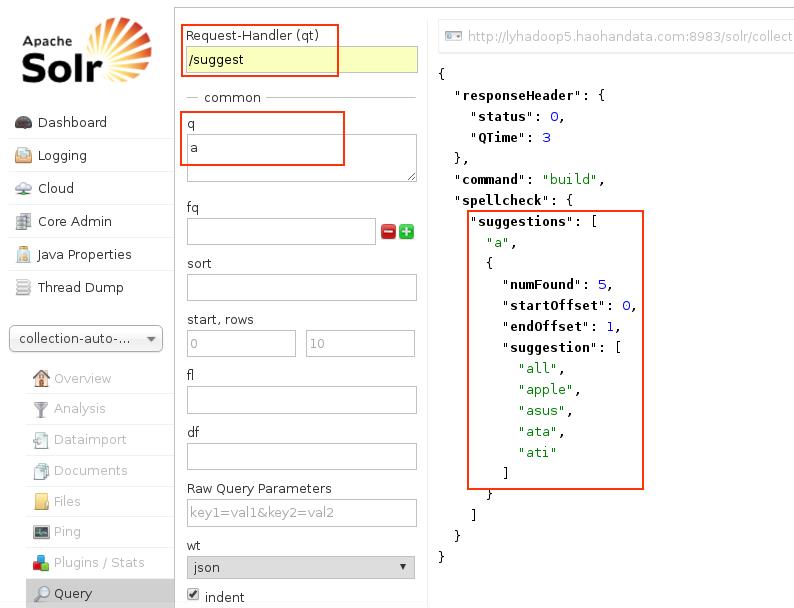
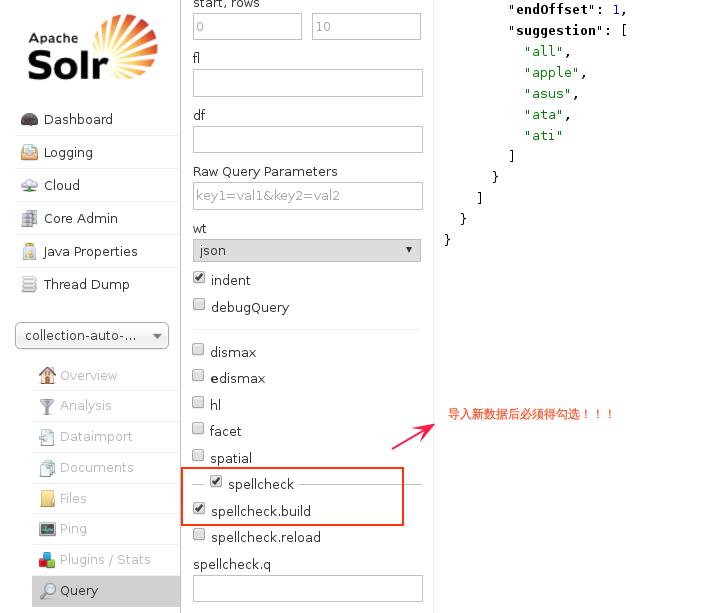
- 当修改了配置文件后,一定要重启Solr才能生效;自动补全时,插入新数据后,一定要重新build,即勾选“spellcheck”及下面的“spellcheck.build”并执行即可,此时会对所有数据更新index。
- 搜索大写字母开头返回结果为空,要写成小写字母。比如要匹配“Hello”,可以输入“he”
8. 自动补全截图


更多
已经获取到推荐的数据了,开发Web就比较容易了,参考链接1完成搜索框自动补全的实现。
参考
以上是关于使用Solr完成自动补全的主要内容,如果未能解决你的问题,请参考以下文章