Android自定义控件
Posted 刘永祥
tags:
篇首语:本文由小常识网(cha138.com)小编为大家整理,主要介绍了Android自定义控件相关的知识,希望对你有一定的参考价值。
我们在开发的过程中,有时会遇到一些android系统自带的控件解决不了我们的需求,比如说我们在开发项目时显示的图片轮播,当我们展示的时候不希望图片变形,还要保证图片能够完整的显示出来,我们如何做呢?如果只是一个简单的ImageView控件恐怕很难实现吧!有人会说ImageView的ScaleType属性就能够解决图片填充不满的问题,但是那样的话图片很容易失真,达不到产品原先的需求。首先我们来认识一下ImageView的ScaleType属性的一些值。当我们查看ImageView的ScaleType的源码时会发现ScaleType的一些枚举值,也就是我们所用的属性值
public static enum ScaleType {
        CENTER,
        CENTER_CROP,
        CENTER_INSIDE,
        FIT_CENTER,
        FIT_END,
        FIT_START,
        FIT_XY,
        MATRIX;
        private ScaleType() {
        }
    }
那么我们就按照枚举值的顺序来认识一下这些值如何使用。
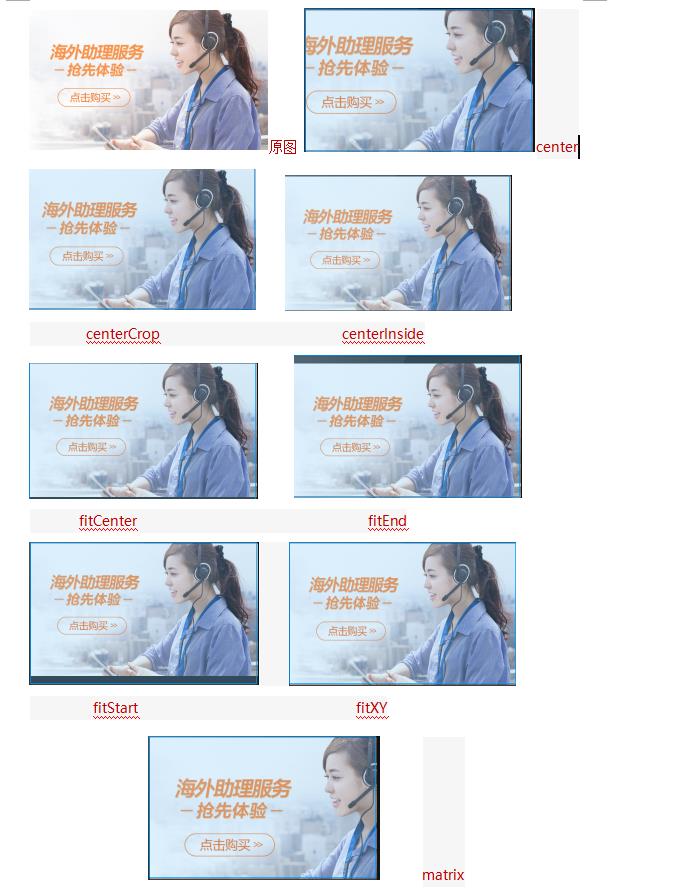
android:scaleType=”center”
center就是居中,按图片的原来大小居中显示,当图片长/宽超过View的长/宽,则截取图片的居中部分显示,目的是让图片居中。
android:scaleType=”centerCrop”
这个就是缩放图片的一种,它的作用就是让图片等比例缩放,但是唯一美中不足的就是这个图片的缩放会对图片造成一定的裁剪(当设置的View的宽高和图片的宽高比例不同的时候)。图片依旧是居中显示
android:scaleType=”centerInside”
将图片的内容完整居中显示,通过按比例缩小或原来的大小使得图片长/宽等于或小于View的长/宽
android:scaleType=”fitCenter”
把图片按比例扩大/缩小到View的宽度,居中显示
android:scaleType=”fitEnd”
把图片按比例扩大/缩小到View的宽度,显示在View的下部分位置
android:scaleType=”fitStart”
把图片按比例扩大/缩小到View的宽度,显示在View的上部分位置
android:scaleType=”fitXY”
把图片不按比例扩大/缩小到跟View的大小一致,这一种也是最容易产生图片失真的
android:scaleType=”matrix”
用矩阵来绘制,动态缩小放大图片来显示
以上效果图如下

介绍了上面的ScaleType以后下面就开始进入我们的正题,上面的属性值恐怕有时候是满足不了我们的需求吧,多多少少还是达不到图片既不失真又要等比例显示的效果吧。有人会说,我可以根据图片的宽高然后设置控件的宽高啊,这一种是可以解决图片的失真和等比例显示的效果,你直接用
`android:layout_width=”wrap_content”
android:layout_height=”wrap_content”
这样不是更好吗?但是你想想这样的话图片会达到轮播图的图片效果吗?轮播图的图片一般是宽度填充整个屏幕的,但是高度怎么办呢?有人说我可以根据自己手机的屏幕宽度/图片的宽度得到的比值去乘以图片的高度得到的值设置为控件的高度就可以解决了。但是这又有一个问题,你这样的话你的手机屏幕显示的是非常完美的,但是如果到其它手机你能确保也一样吗?恐怕不行吧!那么我们如何解决呢?我们如果想要完美的显示在所有的手机上面就需要自定义一个控件了。
Android自定义控件需要一些自定义的属性,我们需要在app\\src\\main\\res\\values下新建一个xml文件名字为attrs也就是属性文件,在文件里面我们要使用declare-styleable来声明一个我们自己的格式的一些属性
<?xml version="1.0" encoding="utf-8"?>
<resources>
    <declare-styleable name="CustomLayout">
        <attr name="test" format="string"></attr>
    </declare-styleable>
</resources>
其中declare-styleable name=”CustomLayout”里面的name值最好跟我们自定义控件名相同,name=”test” format=”string”,name是根据自己的习惯来定但是要做到见名知意,就像layout_width让人一看就知道就布局的宽一样。format就是数据的格式,它有string 、float、boolean、color、dimension、enum、flag、fraction、integer、reference这10种格式,本次只用到float这种格式。因为要实现图片等比例缩放需要用到一个比例内容如下
<?xml version="1.0" encoding="utf-8"?>
<resources>
    <declare-styleable name="CustomLayout">
        <attr name="ratio" format="float"></attr>
    </declare-styleable>
</resources>
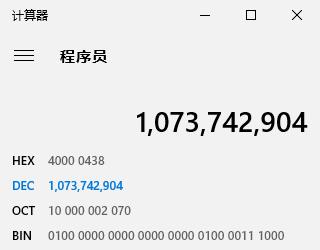
自定义控件的时候需要重写onMeasure方法,onMeasure是用来计算控件的宽高的,当我们知道控件的宽度或高度想要根据比例设置高度或宽度的时候,就需要在此方法中进行测量计算。在onMeasure方法中,我们会看到两个参数onMeasure(int widthMeasureSpec, int heightMeasureSpec),onMeasure传入的两个参数是由上一层控件传入的大小,有多种情况,重写该方法时需要对计算控件的实际大小,然后调用setMeasuredDimension(int, int)设置实际大小。widthMeasureSpec其实就是width的宽度值与宽度的模式,说到模式大家都应该很熟悉的,有三种模式分别是:MeasureSpec.AT_MOST、MeasureSpec.EXACTLY、MeasureSpec.UNSPECIFIED。当模式为MeasureSpec.AT_MOST时则意味着控件大小一般随着控件的子空间或内容进行变化,此时控件尺寸只要不超过父控件允许的最大尺寸即可,我们经常使用的wrap_content就是这种模式。当模式为MeasureSpec.EXACTLY时,说明控件的大小为精确值,是我们已知的大小的时候可以设置此模式,我们经常使用的match_parent就是这种模式。当模式为MeasureSpec.UNSPECIFIED时,说明控件的大小不确定,控件的大小是可以随便变化的,我们通常使用的父控件为Adapter的就是通过传入的大小来确定的就是这种模式。那么widthMeasureSpec里面的值又是什么情况呢,下面是我打印的一个当控件的宽度为match_parent也就是模式为MeasureSpec.EXACTLY时的widthMeasureSpec的值
10-28 12:55:50.785 5350-5350/custom.lyxrobert.com.customcontrols I/System.out: widthMeasureSpec------>1073742904那么1073742904是什么意思呢?

其中的10000111000转换成10进制就是1080也就是我的手机的屏宽,那么01000000000000000000010000111000前面的又是什么情况呢?
    public static final int AT_MOST = -2147483648;
    public static final int EXACTLY = 1073741824;
public static final int UNSPECIFIED = 0;1073741824的二进制则为01000000000000000000000000000000也就是01<<30其中01代表的是mode,看到这里相比大家也就知道怎么回事了吧。
那么我们就可以根据widthMeasureSpec来获取我们想要的宽度方法则是MeasureSpec.getSize(widthMeasureSpec),高度也是如此不过传入的参数就是heightMeasureSpec。
如果我们知道宽度和高度也是不行的,如果用户想要给图片设置一定的padding值怎么办?比如说padding为10,那么图片的内边距都会为10,图片以前的比例就很难保持。所以我们为防止这种情况的发生还是通过获取相应的padding值来进行处理。图片的宽度则为int img_width=width - getPaddingLeft() - getPaddingRight();通过宽度/计算出的图片的宽高比得到图片的高度int img_height = (int) (imageWidth / ratio + 0.5f);但是这样还是不行,因为图片宽度左右各减少10,而高度虽然也等比例缩小了,但是显示出来的效果恐怕只有图片的左右的间距与上下的会有不同的效果
图片没有设置padding时

图片设置padding为20dp时

我们发现图片的上下的边距并不是我们所设置的,那么如果达到这种效果呢,就是需要根据我们获取的img_height 的值再加上得到top和bottom的padding值height = img_height + getPaddingTop() + getPaddingBottom();设置之后的图片显示为

package custom.lyxrobert.com.customcontrols;

import android.content.Context;
import android.content.res.TypedArray;
import android.util.AttributeSet;
import android.widget.FrameLayout;

/**
 * Created by ytx on 2016/10/28.
 */
public class CustomLayout extends FrameLayout {
    private float ratio;
    public CustomLayout(Context context) {
        super(context);
    }

    public CustomLayout(Context context, AttributeSet attrs) {
        super(context, attrs);
        TypedArray ta = context.obtainStyledAttributes(attrs,R.styleable.CustomLayout);
        ratio = ta.getFloat(R.styleable.CustomLayout_rario, -1);
        ta.recycle();

    }

    public CustomLayout(Context context, AttributeSet attrs, int defStyleAttr) {
        super(context, attrs, defStyleAttr);
    }
    @Override
    protected void onMeasure(int widthMeasureSpec, int heightMeasureSpec) {
        int width = MeasureSpec.getSize(widthMeasureSpec);// 获取宽度值
        int widthMode = MeasureSpec.getMode(widthMeasureSpec);// 获取宽度模式
        int height;
        int heightMode = MeasureSpec.getMode(heightMeasureSpec);// 获取高度模式
        if (widthMode == MeasureSpec.EXACTLY
                && heightMode != MeasureSpec.EXACTLY && ratio > 0) {
            int img_width  = width - getPaddingLeft() - getPaddingRight();
            int img_height  = (int) (img_width / ratio + 0.5f);
            height = img_height  + getPaddingTop() + getPaddingBottom();
            heightMeasureSpec = MeasureSpec.makeMeasureSpec(height,
                    MeasureSpec.EXACTLY);
        }
        // 按照最新的高度测量控件
        super.onMeasure(widthMeasureSpec, heightMeasureSpec);
    }
}
布局文件为,如果想给给图片添加边距请在custom.lyxrobert.com.customcontrols.CustomLayout里面添加,不要在ImageView里面设置,否则将不会起作用,因为我们的计算是在CustomLayout里面的onMeasure方法里面实现的。lyxrobert:rario=”1.7”里面的1.7是图片的宽和高的像素比
<?xml version="1.0" encoding="utf-8"?>
<LinearLayout xmlns:android="http://schemas.android.com/apk/res/android"
    xmlns:lyxrobert="http://schemas.android.com/apk/res-auto"
    android:layout_width="match_parent"
    android:layout_height="match_parent"
    android:orientation="vertical"
    >
    <custom.lyxrobert.com.customcontrols.CustomLayout
    android:layout_width="match_parent"
    android:layout_height="wrap_content"
    lyxrobert:rario="1.7">
    <ImageView
        android:layout_width="match_parent"
        android:layout_height="match_parent"
        android:src="@drawable/test"
         />
</custom.lyxrobert.com.customcontrols.CustomLayout>

</LinearLayout>
点击查看无限循环广告轮播图
点击免费下载源码
如有疑问请留言
以上是关于Android自定义控件的主要内容,如果未能解决你的问题,请参考以下文章